You may be wondering how I started collaborating with Ninja Division – Soda Pop Miniatures and how I ended up building something as huge as Lug and Rachnera for them. Well, here’s the story.
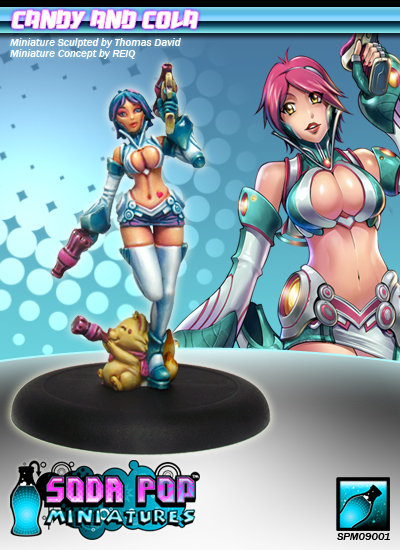
I started collaborating with Ninja Division – Soda Pop Miniatures in 2011. They contacted me because they were interested in having me cosplaying Candy, their mascotte, and they were wondering if I knew someone who could make the costume for me.
‘I’m a costumer.’ I said. And this is how I made my very first fiberglass costume that took 6 months to do with a friend of mine who had never, just like me, worked with fiberglass before. We needed more time to build Candy’s costume than we took to build Rachnera! Yes, I know my maker friend for many years. :) But I had never thought that Candy’s costume would lead us to build such incredible things for Soda Pop in the following years.

I was supposed to wear my Candy cosplay for Gen Con that year, but it turned out to be too heavy and very uncomfortable. This costume was impossible to wear in a convention. So I called the people from Soda Pop, explained them the situation and asked them if they would let me build another costume for Gen Con. Of course, they didn’t mind! lol They were even very happy. I picked up Rin Farrah from the game Relic Knights.

It was the very first leather costume I made. It wasn’t technically perfect, but I was very proud of it.

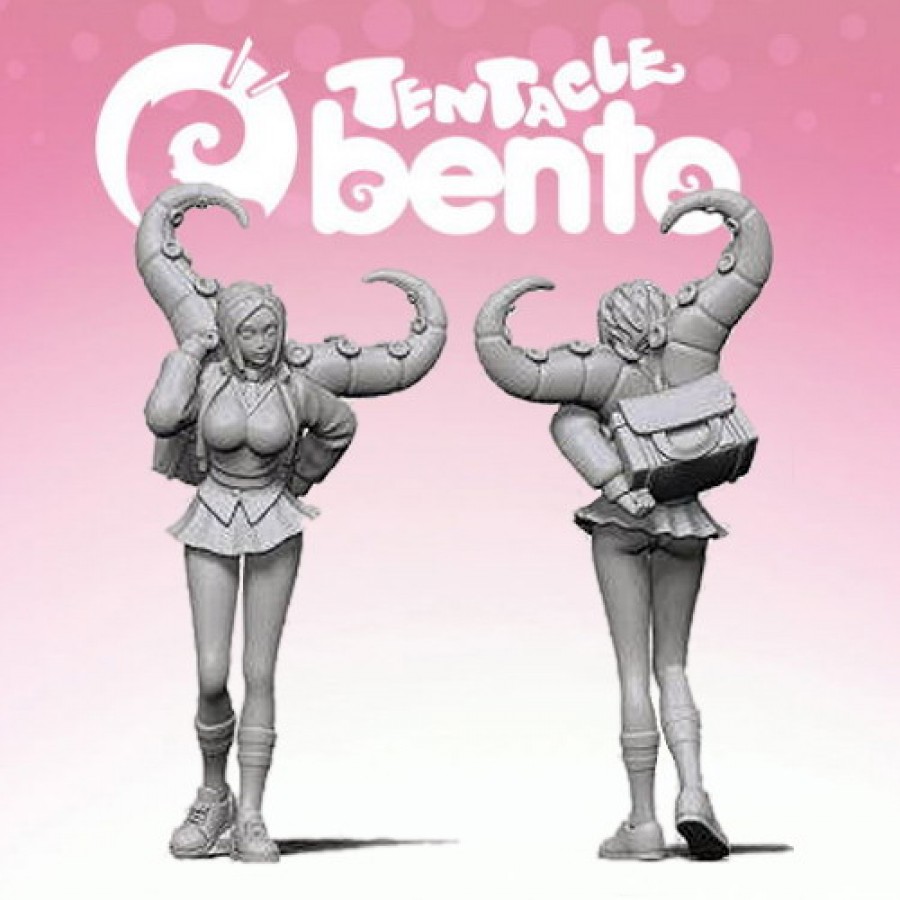
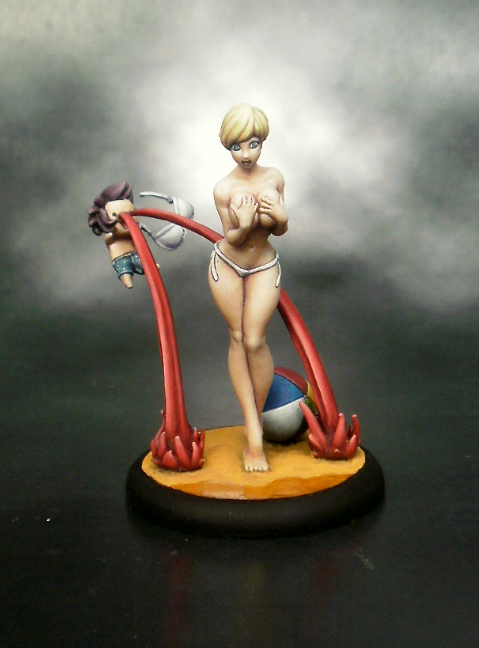
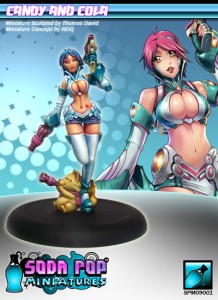
After a while, Soda Pop Miniatures offered to integrate me as a character in their games, starting with the Tentacle Bento card game. I had my own Marie-Claude character in the game, appearing on the drawings of some of the cards and having my own special edition Tentacle Bento miniature done. So cool! I still have some of these miniatures available on my store, for those who would be interested.

On the next picture, the character with short blond hair on the card is me. :) On the box, I’m the character wearing the green and white swimsuit.

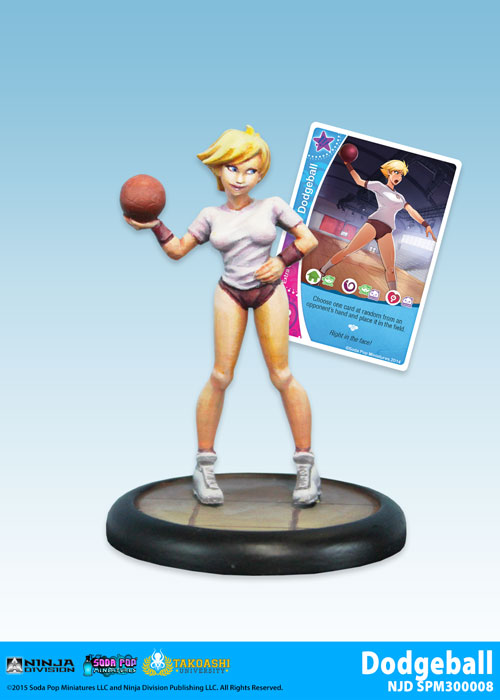
At that time, I made a very cute Japanese school gym outfit and this is one of the first photoshoots I made for Soda Pop Miniatures’ Takoashi University Universe. Many of you have certainly seen those pics.

It’s the same outfit they used for the Dodgeball MC minaiture.

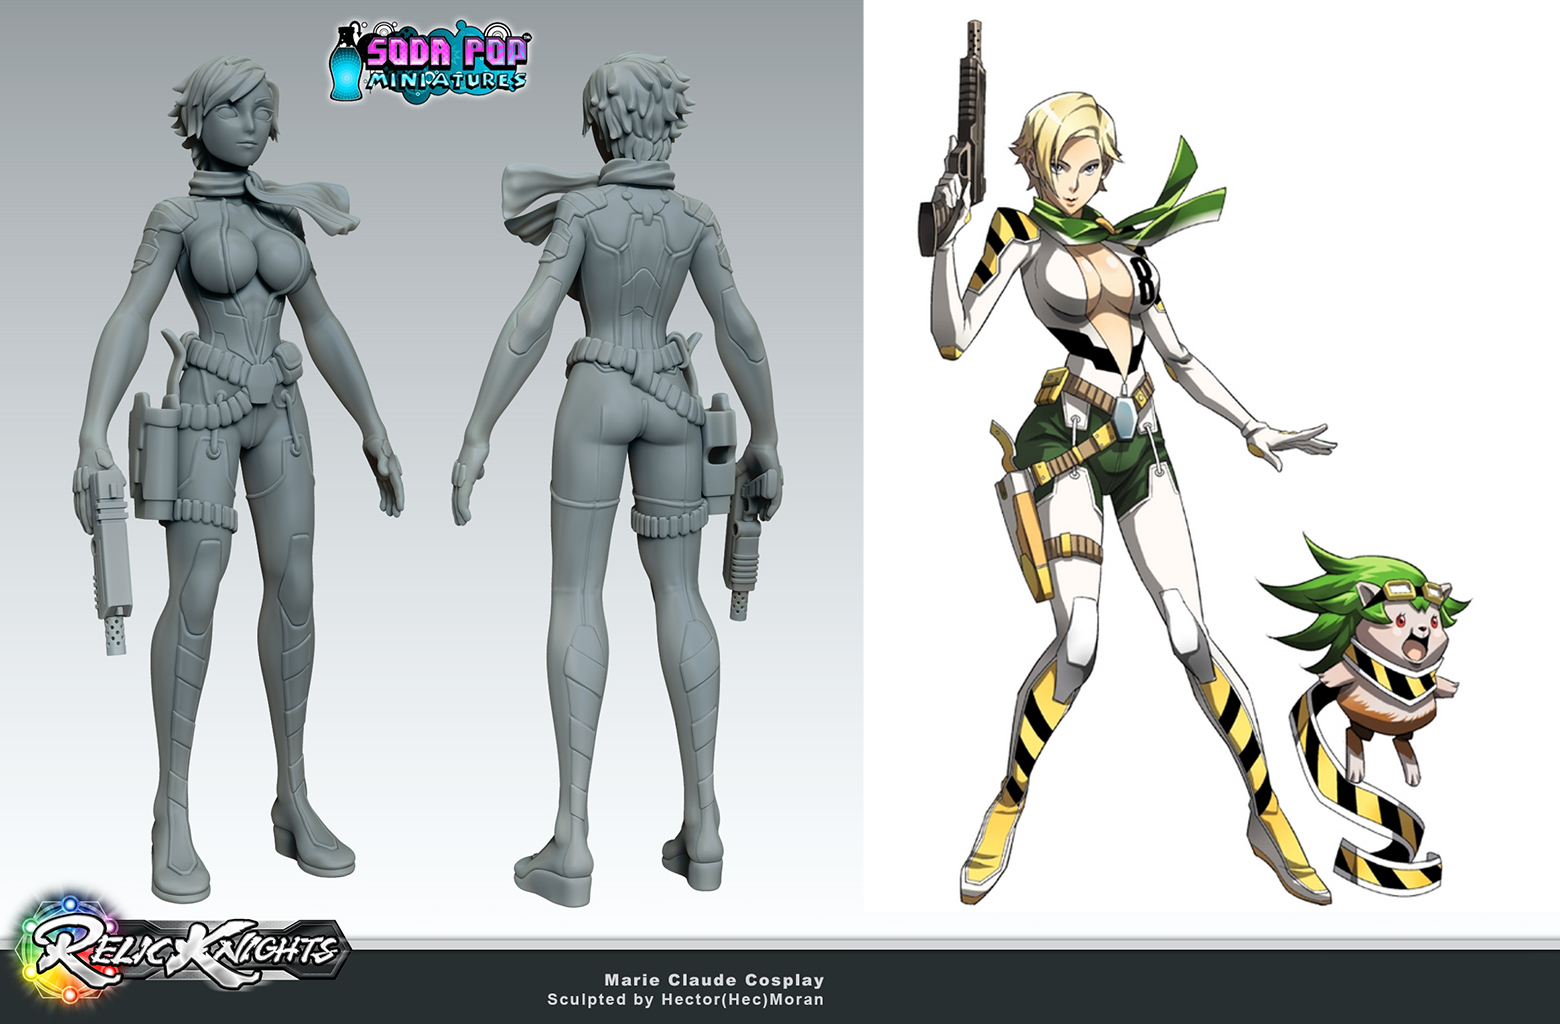
Then, they offered to integrate me in their game Relic Knights. My character would be part of the Cerci division. Consulting me during the process, asking for my preferences and opinion, they created a design for my character that would match the already existing costume designs of the game. My white Cerci suit was born!

Exploring the leather universe, I had decided to use that material for that costume too, making my very first leather boots by hand. It was before I met the shoemaker who helped me with the Power Girl boots. Once again, that costume wasn’t perfect, I was still experimenting a lot and didn’t know all the proper techniques to sew leather.

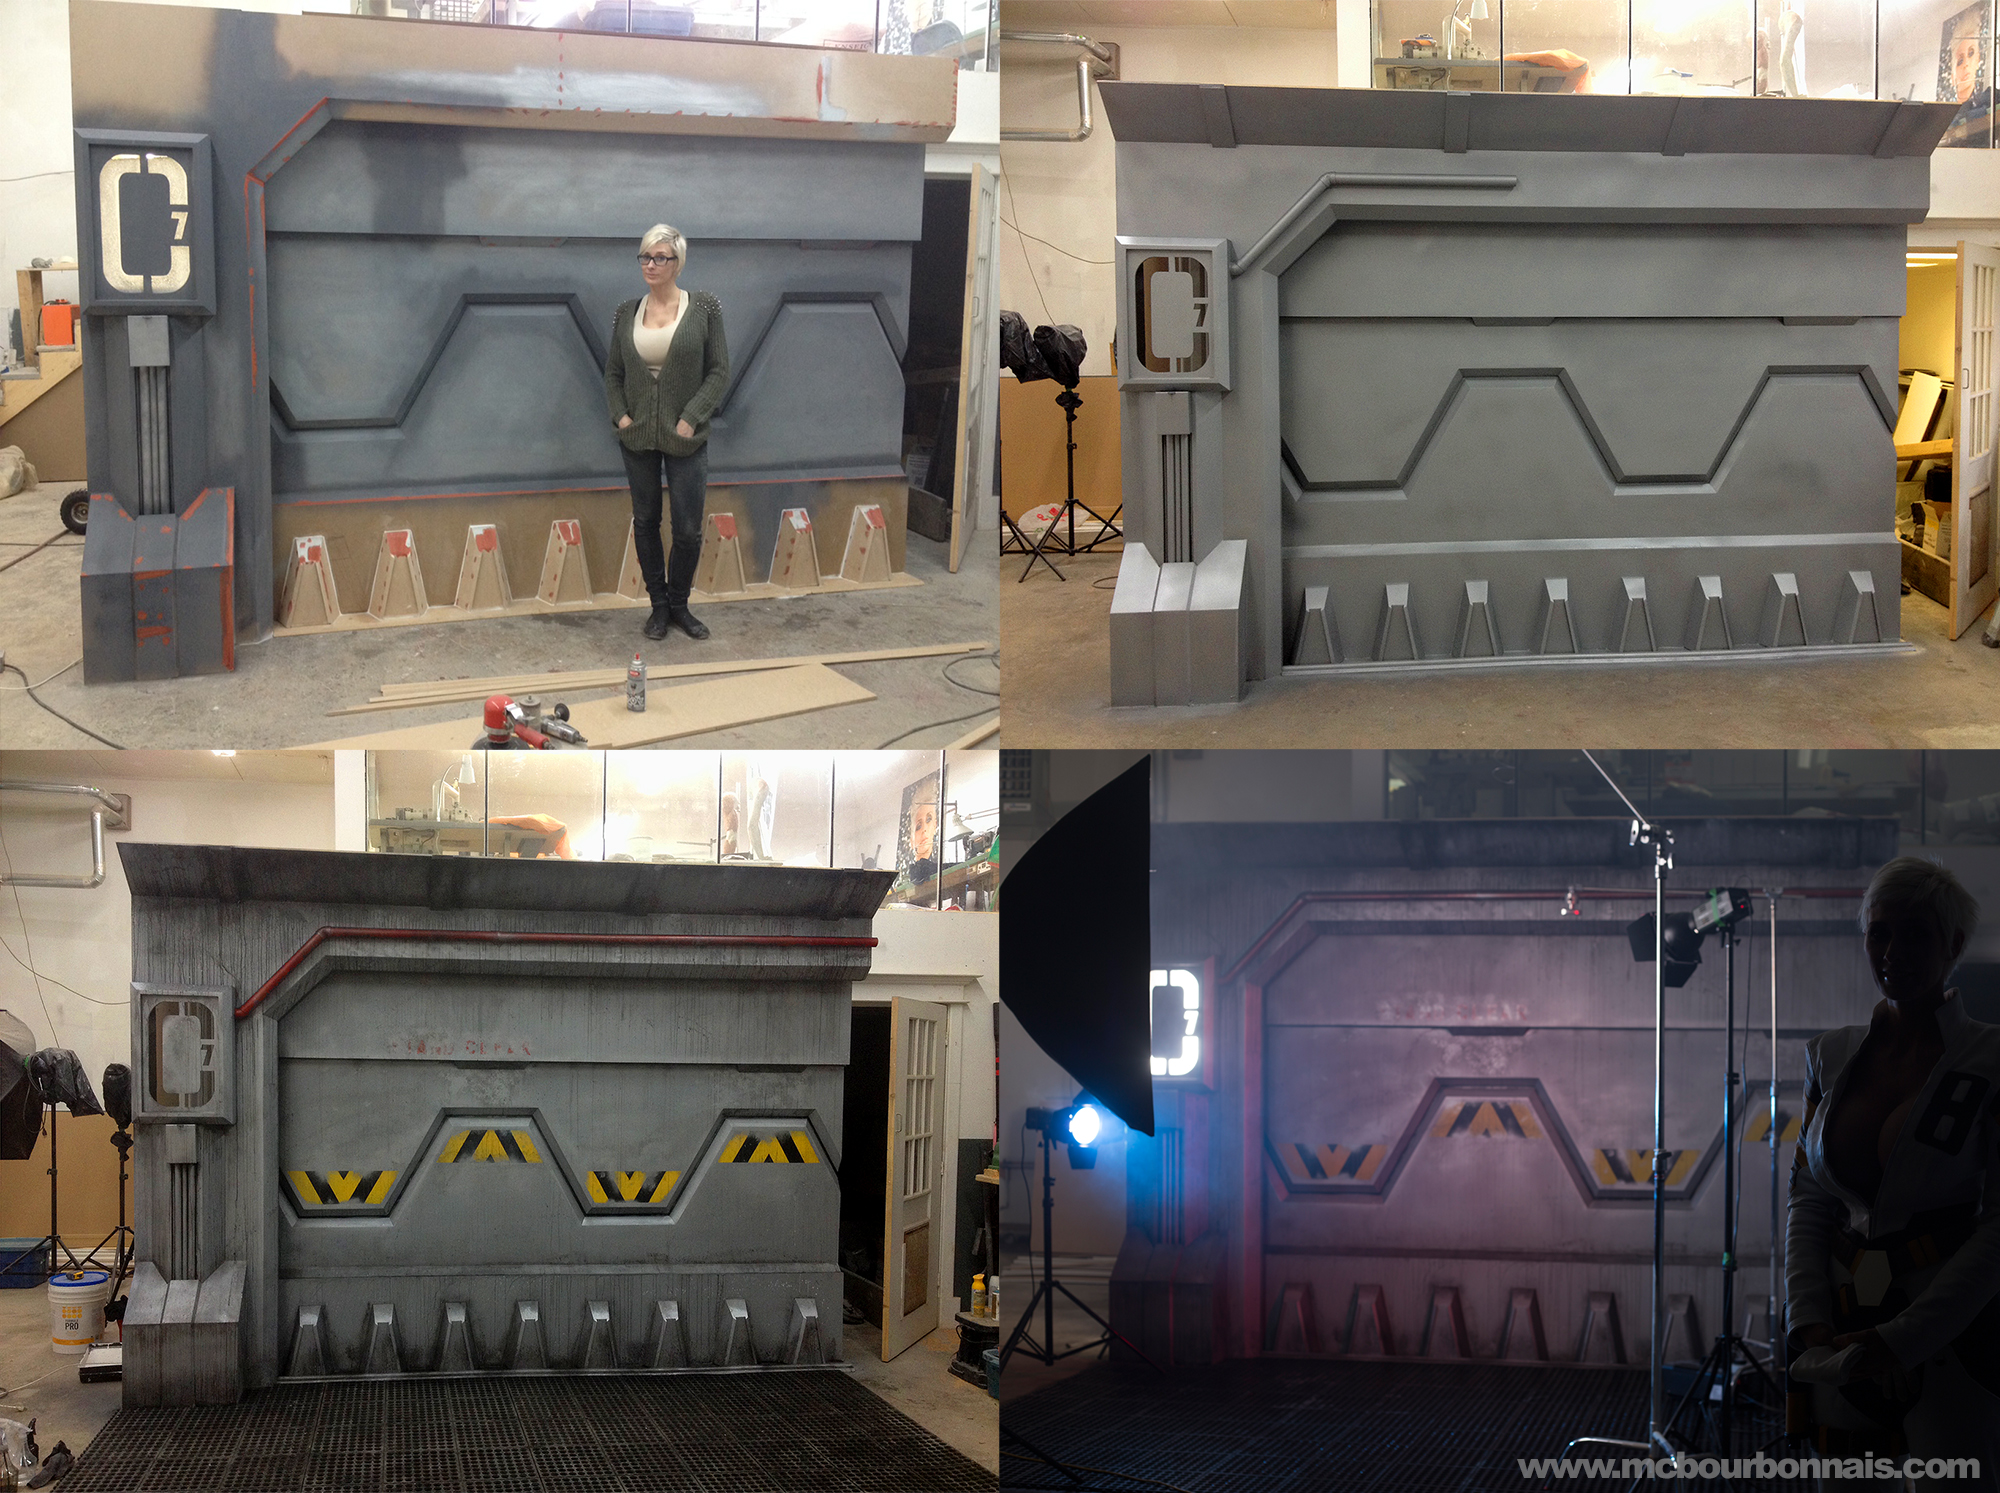
My friend and I had also built a set to take my Cerci suit in picture. This is the second big photoshoot that I made for Ninja Division – Soda Pop Miniatures.
I loved that wall that decorated my workshop for more than one year. I ended up using it for the photoshoot of my 1:6 scale Heroes of the North Hornet figure. Do you recognize the wall? ;)
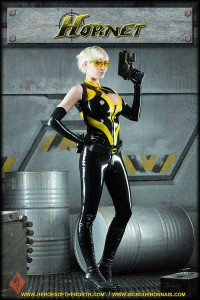
MC Bourbonnais as Hornet from Heroes of the North
I was so sad when we destroyed that set… But I needed to build something else.

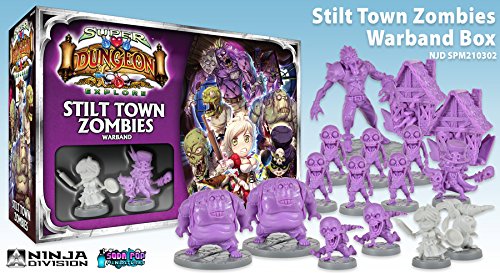
Then I was integrated in Soda Pop Miniatures’ Super Dungeon Explore game. My character was part of the Stilt Town Zombies Warband Box. That time, I was an innkeeper trying to resist to the zombies attack using her huge roller pin and iron pan.
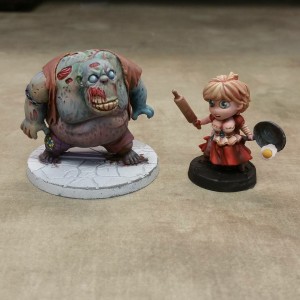
That costume was way simpler than the leather Cerci suit, but it turned out to be more popular. The cute dress and props grabbed everybody’s attention and the complicated Cerci leather suit was quickly forgotten. You never know what people will like. I’m sometimes surprised by what is popular and what is not.

And there was also the super sexy, funny nosebleed special edition miniature!

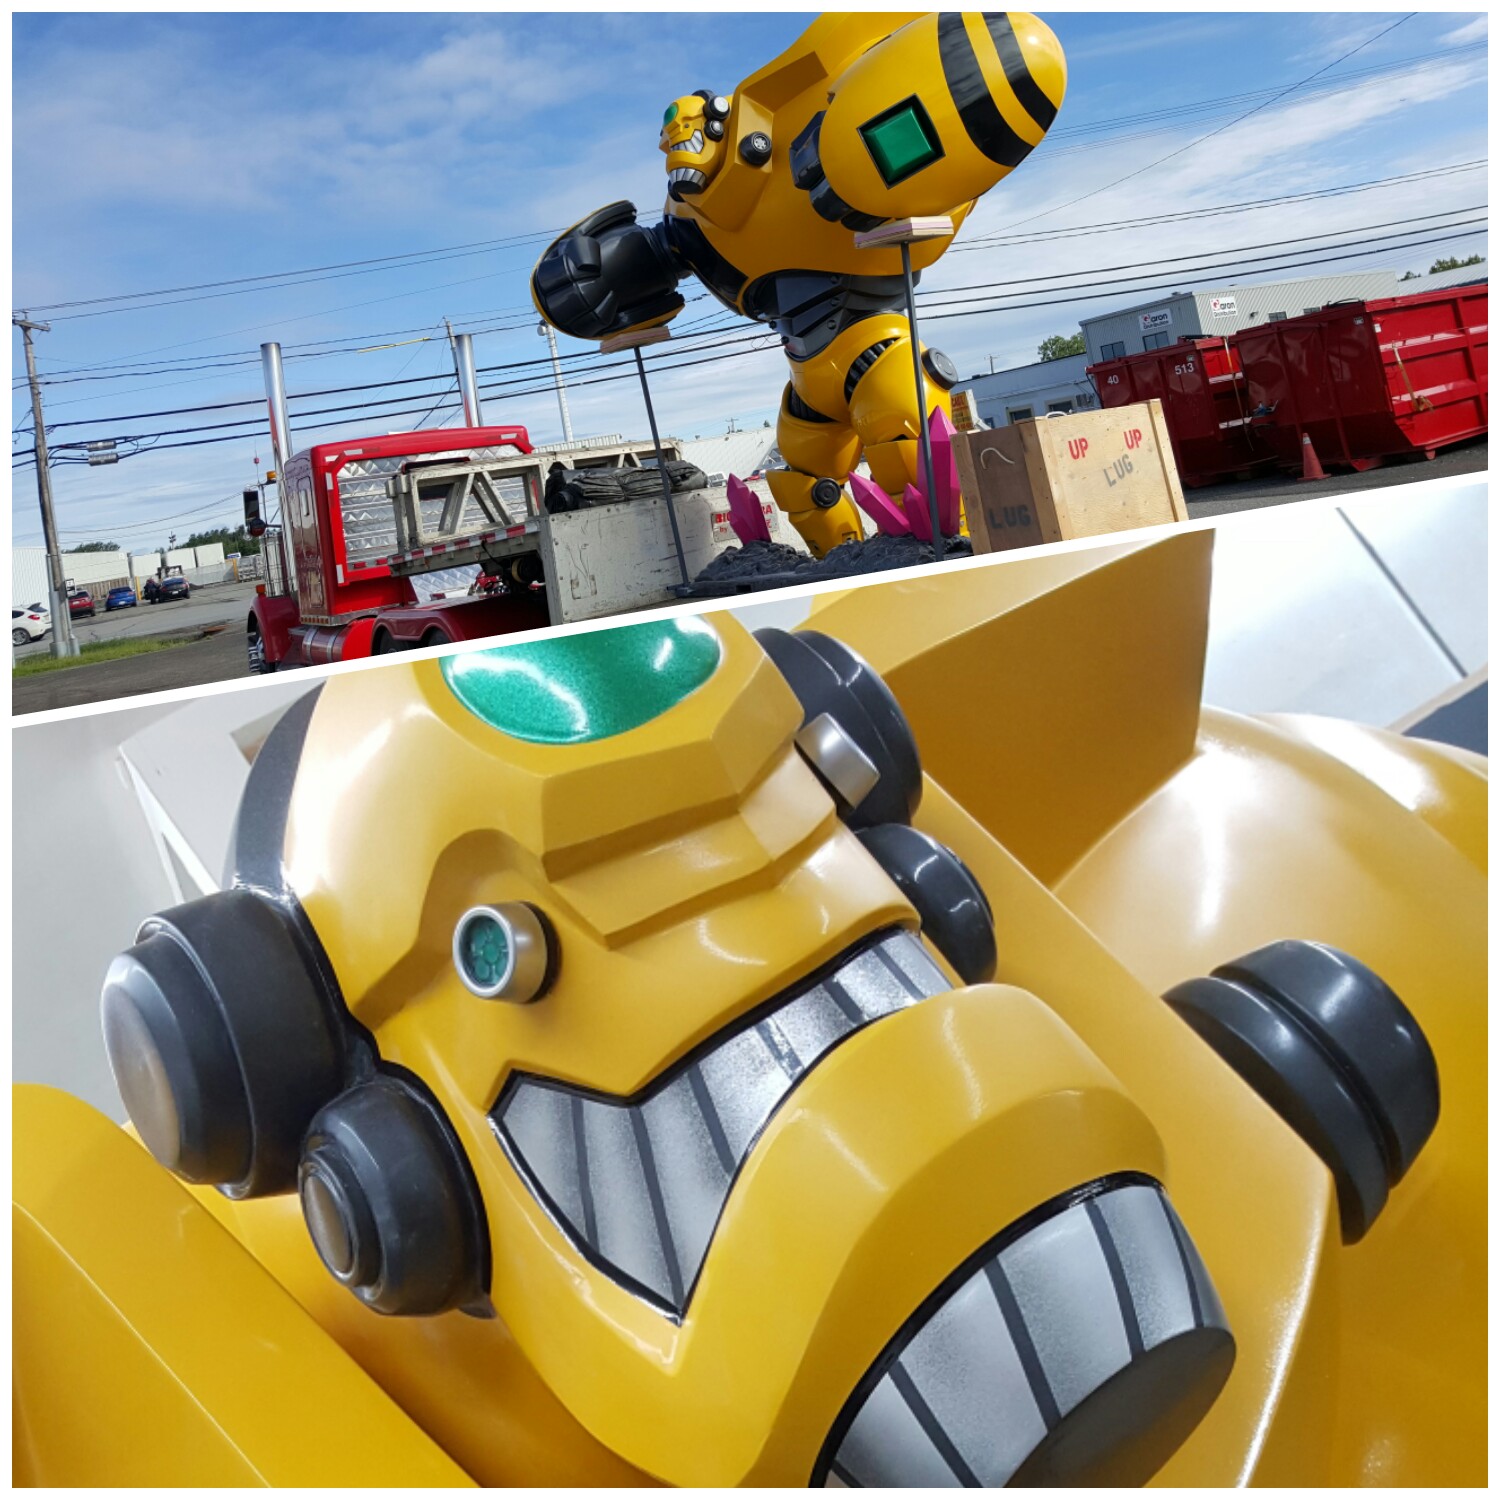
My friend, like many little boys, I guess, had always been fantasizing about building a robot. Many will have dreams and fantasies, little will make them come true. Yes, building a big robot was one of my friend’s ideas. (One of his many, not always good ideas…) And since some of Soda Pop Miniatures characters were robots, he asked them if they would like to have a big robot at their booth eventually.
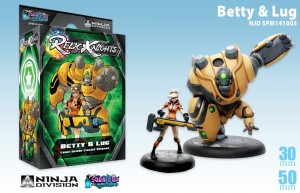
It would be such an incredible display piece! ‘Would you like to have one of your robots built for real? We could do that!’ said my friend to the Soda Pop people. ‘Who exactly is ‘we’’ I asked. ‘You and I’ he answered. ‘We have never done anything like that! What are you talking about?’ I said. And my friend replied: ‘We’ll figure it out.’ And it seems that Soda Pop was very enthusiastic about the idea of having a big robot at their booth, because they accepted to finance the project and the first thing I knew is that we were hired to build Lug, from their game Relic Knights, with the costume of Betty.
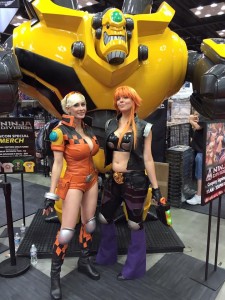
I will later write a whole blog about the making of Lug. But you already know that we finally presented Betty and Lug at Gen Con 2015. Betty was the best leather costume I had made at that time. I had met a teacher who had told me all the proper techniques to work with leather and Betty’s costume was almost perfect. It remains, in my opinion, one of my best costumes to this day.

Building Lug and rushing Betty’s costume was so much work that my friend and I almost died in the process, no joke. We were exhausted. But Lug litteraly stole the show at Gen Con 2015. Guess it was worthed.

While we were remodeling Lug and completing its final version, Ninja Division – Soda Pop Miniatures contacted us because they had another project for us. It was in April of this year. This is when we started working on Rachnera. I explain everything in my Rachnera making of blog, if you want to look at it. Rachnera wasn’t as big as Lug, but it was still very impressive and it truly was one of the main attractions at Anime Expo. Now I’m afraid of what my hands can build. I look at pictures of Lug and Rachnera and I can’t believe that we built that. I don’t know what my next project for Ninja Division – Soda Pop Miniatures will be… But one thing is for sure: if it comes from one of my friend’s suggestions again, it will be a big project.
NOTE: Before any of you ask, I’ll explain something one more time and I think I’m gonna copy/paste this at the beginning of each part of this blog. I’m not using a dust paper mask on the work in progress pics because wearing various masks irritates the skin of my face and gives me blemishes. The only fact of breathing in the humidity of my own breath in those masks makes my skin look bad. Then I can have a convention, a photoshoot or an interview and I have to wear more makeup to hide the blemishes, which isn’t good for my skin either. There are the masks for chemicals that I absolutely have to wear when I’m working with polyester resin or automotive paint. So when it comes to dust, I give my skin a break and I don’t wear a paper mask. I know it’s not the healthier choice, but most of models are usually not fiberglass technicians. I have to deal with two jobs that don’t go well together. So I make the choice, as sad as it is, not to wear paper masks to allow my skin to survive. But I do wear a mask for chemicals and vapors when I use polyester resin and automotive paint.
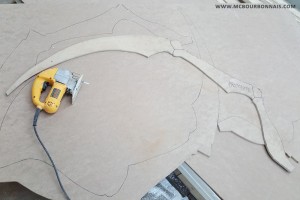
Sculpting styrene legs on a MDF frame guide
We had one big and one small MDF leg shape already cut. We needed 3 more of each, so we cut them. We glued styrene on each side of each MDF template and sculpted by hand each of the 8 legs. That step wasn’t too bad. It’s the finishing process, when we would later cover everything with fiberglass and try to make our 8 handmade legs look the same, that would be more complicated… Yes, we should have made molds.
We had decided at this point that we wanted some of Rachnera’s legs to hold in the air, instead of having her 8 legs touching the ground, to make her pose look more dynamic. We figured out that with the proper internal metallic structure, Rachnera could hold on her 4 bigger legs (front and back legs) and that the 4 smaller middle ones would be like a ‘decoration’ or not necessary for the structure to hold. I’ll come back later to the metallic structure, how it was integrated in the legs and how it was fixed to the spider. But first, let’s talk about fiberglass.
What’s fiberglass?
Before I say anything else, remember that you’re gonna have to wear a respirator mask and long clothes when you’ll work with fiberglass. You’ll understand why later.
When I started working with fiberglass, I didn’t know anything about it. I really learned everything from the beginning and I don’t consider myself an expert. I will share with you what I know, but my explanations will be basic. They will be the explanations of someone whose speciality job isn’t fiberglass and whose mother tongue isn’t English. Just keep that in mind and don’t hesitate to write comments, give tips and advices if you know more. Your comments are always welcome. :)
The final surface that we call ‘fiberglass’ is obtained by mixing fiberglass itself with a resin. If I understood correctly, the proper translation in English to talk about fiberglass would be fiberglass cloth (which would be the woven one) and fiberglass mat (which would be the agglomerated one. If I’m wrong, please write the correct translation in the comments.) In both cases, it looks like a shiny, white piece of fabric, it’s sold in rolls and it’s available in various thicknesses. Woven fiberglass works well when you want to cover a plain surface, like a floor or a roof. (Yes, apparently they make industrial floors and roofs in fiberglass. I didn’t know.) Agglomerated fiberglass mat is useful when you want to cover an intricate shape. You can tear small pieces of fiberglass mat and cover any type of shape by layering all these pieces of fiberglass mat all over the shape you’re covering. In any case, fiberglass has to be soaked with resin. I have always used polyester resin because it’s cheap and it catalyzes fast. However, polyester resin is a strong chemical product, it smells horrible and it’s toxic. You absolutely need to wear a respirator mask to work with polyester resin and you can’t use it in your house. You need a workshop or you have to use it outside if you can. To clean up polyester resin, if you want to use your brush more than once or if you have polyester resin on your hands, you’ll need acetone. Another product that you should never put on your skin. :S You’ll need gloves all the time. (I always use nitrile gloves instead of latex gloves because latex gloves, used to make silicone molds, can keep some silicone, like Smooth-On Rebound 25, to catalize properly. For that reason, latex gloves are prohibited in my workshop. I take no chance and use only nitrile gloves to do everything.) The polyester resin I use has a pinkish color that changes for an amber color when I mix it up with its catalysis. Without catalysis, the resin itself is a liquid. With the catalysis, it hardens. A piece made of polyester resin alone could break if you would drop it on the floor. Fiberglass mat or cloth is what gives the final piece its strenght.
There’s also shredded or chopped fiberglass. It’s applied and mixed up with resin using an air powered fiberglass spray gun or chopper gun system that throws both the chopped fiberglass and the resin at the same time. That professional equipment is used in industry to make fiberglass bathtubs, showers, boats, pools, etc. Let’s take for example a fiberglass bathtub. They will apply in the bathtub’s mold coats of gelcoat, then they will apply the chopped fiberglass and resin in the mold using the fiberglass spray gun. The part of the bathtub in which we sit will have a slick finish (the gelcoat) and the hidden part of the bathtub will have the rough texture of the chopped fiberglass. If you Google all this, you will easily find videos showing that process. My guess is that we might have used a fiberglass spraygun to cover the robot and spider. However, the price of that equipment alone would have taken part of our budget and since I don’t plan to become an official fiberglass shop, it’s not worthed investing in that. Big styrene statues or structures can also be covered with sprayable liquid plastics that can be painted. Various products exist. I didn’t know these products at that time, though. So my friend and I used what we knew and covered the robot and spider by hand, using pieces of fiberglass mat soaked in polyester resin.
Polyester resin applied on styrene makes it melt like snow in the sun. Don’t you ever sculpt styrene and apply polyester resin on your sculpture, you’ll destroy it. Styrene has to be protected from polyester resin and after many tests and searches, we found out that the best, easiest and cheapest way was to use aluminum foil. Just apply aluminum foil on your styrene structure using spray glue, make sure to put aluminum foil everywhere, cover all the styrene, and you’ll be good to go. We realized that aluminum tape works well too and is useful to cover small parts with a special shape.
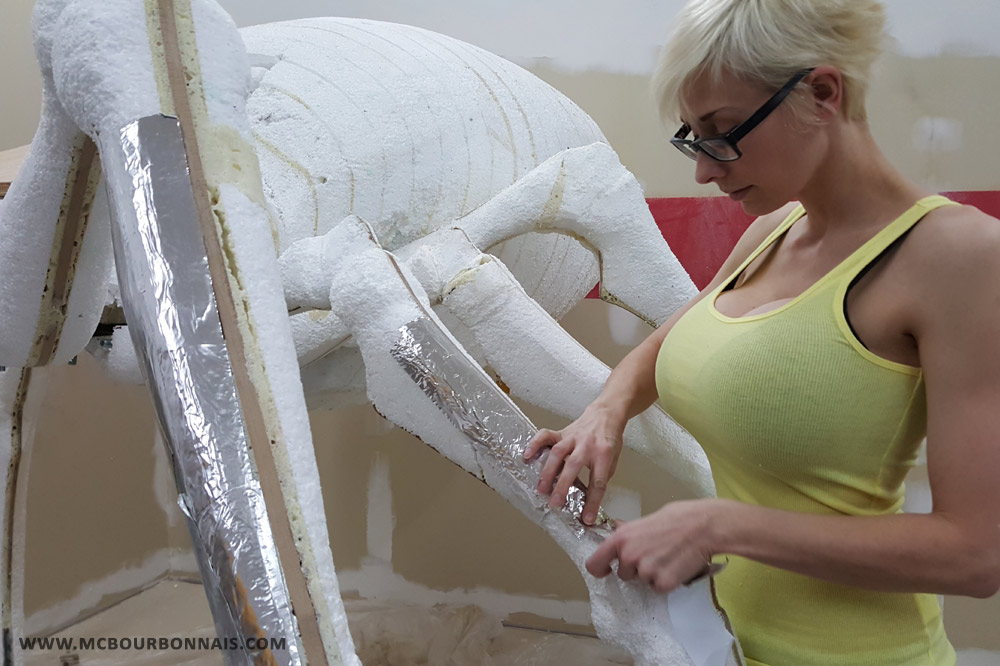
On the next picture, you’ll see the spider’s body and legs that we have separately sculpted in styrene by hand. You can see the MDF template in the middle of each leg. We were at the step of covering everything with aluminum foil before starting to apply fiberglass and polyester resin. (Notice in the background the red stripe on the beige wall. That was the set we had built to shoot my Gunbuster cosplay. :) We would later paint that fake wall in grey to make another photoshoot.)
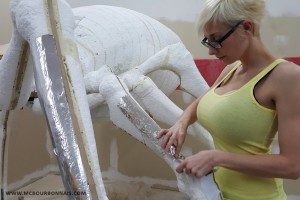
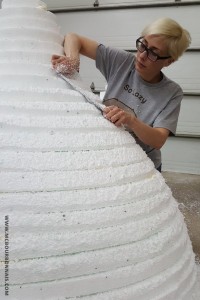
Once the whole styrene spider was covered with aluminum foil, we could start covering everything with polyester resin and fiberglass mat. That is one of the 2 worst steps. Polyester resin not only stinks, it’s also a strong chemical product that obligates anybody using it to wear a respirator mask. As I said, you also need to wear gloves. But it doesn’t take long before polyester resin makes the gloves ‘melt’ and you can feel, on the tip of your fingers, that the nitrile is reacting with the resin just before the glove rips. And then acetone is the only dangerous friend that will take off the polyester resin from your skin. No wonder why I never wear nailpolish when I’m in the middle of a big fiberglass project… You’ll need tons of gloves if you work with fiberglass. You’d better buy boxes of gloves. At the end of the project, I was always wearing 2 pairs of gloves on top of each other.
I also wear gloves when I tear pieces of agglomerated fiberglass mat. Because it itches. But it’s not the worst. Fiberglass dust is the worst. Before talking about this, let’s start with the first fiberglass step. We always prepare in advance piles of little pieces of fiberglass mat that we tear by hand. We make various sizes of pieces depending on what surface we have to cover. Then we put a piece of fiberglass mat on a flat surface and we use a brush to soak it with polyester resin. The same brush is used to apply the soaked fiberglass mat piece on the surface to be covered. You can reuse your brushes by keeping them in acetone in between the fiberglass coat applications. However, you’ll still need tons of brushes. I recommand to buy boxes of brushes too. And many gallons of acetone. On the next picture you can see the smaller spider’s legs covered with fiberglass.
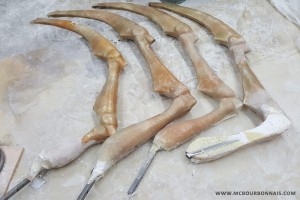
As you can guess, it takes a lot of time to do things that way. It’s a very long process. You have certainly noticed the metallic structure of the smaller legs. We used 1’’ X 1’’ steel square tubing that we fixed on the extremity of the 4 small MDF legs. These tubings were welded in a particular position that would make the smaller legs hold more or less in the air. As mentioned earlier, we wanted some of the middle legs to have a different position and to hold in the air instead of touching the ground. The square tubing parts would exceed the final fiberglass legs and be used to install the spider’s legs under its body with huge boalts.
More fiberglass fun in Part 3!

It’s not what you think…
Here’s another piece of my original character, Aimsee, for those who haven’t seen the character yet. I’ll also post an official presentation that I wrote for my OC in the next days.
This piece was done a couple weeks ago and I’m pretty ashamed I haven’t posted it yet. Bokuman was super responsive and worked very fast, he even suggested me cool alternative poses for the character. Overall, I like the art a lot! It’s really funny to get my character drawn by artits with different styles. You should see more pieces from him later… if he accepts to work for me again, of course.
In the meantime, here’s a couple links to Bokuman’s work. This guy is a machine! Go browse and hit the ‘like’ button to keep him going. :)
Bokuman
Deviant Art : http://bokuman.deviantart.com/
Patreon : https://www.patreon.com/bokuman
Gumroad : https://gumroad.com/bokuman#
Facebook : https://www.facebook.com/Bokuman-Studio-143445335776733/
Instagram : https://www.instagram.com/bokuman/
Tumblr : http://bokuman.tumblr.com/
Twitter : https://twitter.com/bokuman_studio

PART 1
Once Upon A Time
It all started with Lug, Ninja Division – Soda Pop Miniatures‘ giant yellow and black fiberglass robot. For those who don’t know Lug’s long story, my friend and I have built that monster during the first half of 2015. Ninja Division needed it at their booth for Gen Con 2015, but the robot was far from completion. It still needed more sanding and had an unfinished base. But we had to deliver it for Gen Con no matter what, so the robot had been painted as it was at that moment and we had brought that temporary version to Gen Con 2015. It litteraly stole the show, but my friend and I had the feeling that it could have looked better and Ninja Division had accepted to let us bring back the robot to my workshop in Québec to remodel it and finish it properly. Fall and winter 2015 passed, I had many trips and conventions and in April 2016, my friend and I were finally almost done with the final version of the robot and its new paint. I will later write a blog about Lug’s building process. But first, let’s talk about Rachnera.
When the people from Ninja Division – Soda Pop Miniatures contacted me about a Monster Musume project, my friend and I were painting Lug. Apparently, Ninja Division wanted to collaborate on something with Seven Seas Entertainment, a company that publishes licensed mangas translated in English in the USA. They are publishing, among others, Monster Musume. Ninja Division asked me if my friend and I would be willing to build a Monster Musume cosplay that would be displayed at the booth that they would be sharing with Seven Seas Entertainment at Anime Expo, in July. The piece would be used to promote both Ninja Division’s and Seven Seas Entertainment’s products and brands.
I have to say it: I was exhausted. I couldn’t make up my mind to start another fiberglass project right after Lug. I really needed some time to recover. Building that robot was by far the most complicated thing I had ever done. I didn’t want to go through this again. The chemicals, the sanding, the itching… Not at that moment. And just like my Power Girl costume that I never thought I would make, well, it happened. Sometimes life brings you to make strange decisions.
So I had to pick up a Monster Musume character. I knew the show because I had watched the anime on Crunchyroll and I had enjoyed it a lot. Well, as a girl who has a thing for big breasts, Monster Musume had everything to please me. ;) I considered choosing Centaurea, but thinking about it twice, I quickly came to the conclusion that Rachnera would be a more impressive piece. I had to choose an exhibition piece. It had to look good from many angles, no matter from where people would take it in picture. Rachnera was bigger, taller and I had the perfect body type to bring her to life. Yes, Rachnera it would be.
Building a big huge spider
First step was to choose a scale. How big exactly should the fiberglass spider be to be proportioned with my body? If you watch a lot of animes, you may have noticed that some props scale and even costume details often change from a plan to another. Sometimes a character is holding a sword that is twice as big as him and in another episode the same sword may look smaller. It depends on the drawings, those things tend to vary. You just don’t necessary notice it while watching the anime. But if you try to cosplay one of those characters, then, you notice it. Rachnera’s body was a little like that. Her body looks bigger on some drawings, smaller on others. Since I wanted to build an exhibition piece, a little bigger was better than a little too small. It’s well known, my American friends, you like big things with a lot of colors that lighten up, move, play music and glow in the dark! ;) Hesitating between many possible scales, I thought that one of the bigger options would probably be the way to go. You have that expression in English, what is it, again? Go big or go home. Right. I wasn’t about to go home.
Using as a reference a picture of me and some drawings of Rachnera, I tried in Photoshop to figure out THE perfect (big) scale for Rachnera’s body and legs. When I thought I had the correct scale, I sent my little Photoshop montage to Dutchprops. He’s the same 3D modeler I had hired to make my MKX Scorpion mask and I was very satisfied with his work. He already had the 3D scan of my body that he could use again to 3D model Rachnera’s body and legs, in proportion with my body, following the proportions on my reference Photoshop montage.
You can see more of Dutchprops’ work on his Instagram (@dutchprops) and Facebook:
www.facebook.com/dutchprops
If we had had a bigger budget, we could have sent the final 3D model to be cut in big styrene blocks by a 5 axis CNC. But both big styrene blocks and 5 axis CNC services would have been a pretty huge expense, so we went for a cheaper option, like we had done it for the robot. Cheaper, but way longer option. We did everyting by hand.
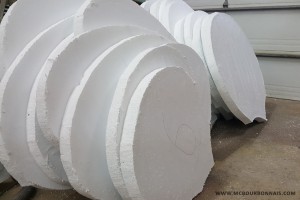
My friend used a software called 123D Make that allowed him to slice up the 3D model. We could then print the slices of the body and a reference shape for the legs. Each body slice was identified with a number. We glued the paper sheets on styrene boards and cut the slices with jigsaws. You can admire a big pile of styrene slices on the next pic.
Then we stacked and glued together all the styrene slices, following the numbers. To make sure that each slice would be centered on the previous one, my friend had placed on each slice to be printed not only a number, but also a mark identifying a center point. We pierced that point in each styrene slice and stacked the slices by sliding a wooden dowel in each slice’s hole. It may look like it would be obvious to stack the slices on top of each other like if there was only one way to do it. But when you put a smaller slice on top of a bigger one, the shape itself isn’t enough to show you where exactly to glue it. The position may not always be obvious and the holes were helpful. When we were building the robot, which had way more complicated shapes, this technique was essential to position each styrene slice. (Yes, we really built the robot with this technique of styrene slices. Yes, it took a lot of time. No, I wouldn’t do it again. Well, I did the spider. But I won’t do another robot.) You can see the wooden dowel on the next picture. It gives a better idea of the process.
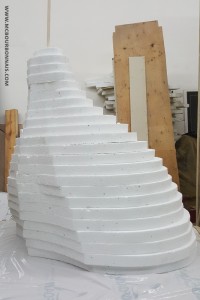
Stacking 2 inches thick slices makes that you have those ‘steps’ around the shape. To get rid of the ‘steps’ we had to sand them down, and the shape of the spider’s body appeared.
NOTE: Before any of you ask, I’ll explain something one more time and I think I’m gonna copy/paste this at the beginning of each part of this blog. I’m not using a dust paper mask on the work in progress pics because wearing various masks irritates the skin of my face and gives me blemishes. The only fact of breathing in the humidity of my own breath in those masks makes my skin look bad. Then I can have a convention, a photoshoot or an interview and I have to wear more makeup to hide the blemishes, which isn’t good for my skin either. There are the masks for chemicals that I absolutely have to wear when I’m working with polyester resin or automotive paint. So when it comes to dust, I give my skin a break and I don’t wear a paper mask. I know it’s not the healthier choice, but most of models are usually not fiberglass technicians. I have to deal with two jobs that don’t go well together. So I make the choice, as sad as it is, not to wear paper masks to allow my skin to survive. But I do wear a mask for chemicals and vapors when I use polyester resin and automotive paint.
Then we cut 2 first MDF shapes following the paper guide of the slice extracted from the 3D model. We made 2 different leg shapes. A bigger/longer one for the 2 front and 2 back legs and a smaller/shorter one for the 4 middle legs.
We glued styrofoam on each side of a first MDF guide and sculpted the leg’s shapes following the guide. As I said before, there are more efficient ways to do big fiberglass structures like this. A 5 axis CNC would have sculpted the leg in a fraction of the time we took to sculpt it by hand. But we had our budget limitations, so we sculpted by hand. That being said, it was surprisingly fast to sculpt that first leg, which made my friend think that it wouldn’t be too bad to sculpt the 8 legs instead of sculpting a big one, a small one and make 2 molds. ‘Not making molds will save money’ he thought. ‘But it will take longer to sand and finish 8 legs made by hand. We should make molds’ I said. ‘Making molds wouldn’t be that expensive. It will be way faster. It will be worthed’ I added. But my friend disagreed. ‘No, no, let’s sculpt the 7 other legs already. It will be faster and we’ll soon be done.’ We have a proverb in French that says ‘Ce que femme veut, Dieu le veut’ which means ‘What a woman wants, God wants.’ This is never true with my friend. No woman (or man) will ever convince him to do something he disagrees with, so it would be more appropriated in his case to say ‘What my friend wants, God wants.’ He wanted to sculpt and cover with fiberglass 8 different legs. Well, we did. But we would soon realize (sorry, my friend) that we should have made molds.
Enough for today! Part 2 of my Rachnera making of blog coming soon!
In less than one month, Scorpion will be traveling to Illinois! I’m received as a cosplay guest for Count-I-Con in Grayslake on August 27th and 28th. I’ll have new stuff for you, collectible posters and a brand new sexy/cute product that hasn’t been announced yet! ;) See you there!
Visit the convention’s official website for more info:
www.counticon.com
Building my Monster Musume Rachnera cosplay was a challenge, an adventure, a learning experience and everything in between. I was more than excited to present it at Anime Expo at the beginning of July and even more excited when I got to meet Okayado, the manga artist and creator of Monster Musume, who came at the booth with his translator for an official picture. And most of all, you, my loyal supporters, have been following and enjoying the making of process online through the pics that I shared with you all along the way. I will never thank Ninja Division – Soda Pop Miniatures and Seven Seas Entertainment enough for having made that project possible.
I know that many of you still have questions about the techniques that my friend and I have used to build Rachnera. I’m working on a detailed blog that will regroup the explanations that I shared on my social medias with more information. Be patient, it will be worthed. And then I’ll go back to my Power Girl making of blog. Until then, you can find prints of Rachnera by clicking here. Hope you’ll enjoy. :)

Great news! I’ll be visiting Toronto for my birthday weekend! I’m a cosplay guest for Unplugged Expo on October 15th and 16th, at the Westin Harbour Castle Convention Center. See you there!
www.unpluggedexpo.com
An introduction to shoemaking
It’s now time to talk about one of the most complicated parts of my Power Girl costume: the boots. Since I started making cosplay costumes, I always considered that the hardest costume parts to get or make were the gloves, boots/shoes and wigs. As skilled as I am as a seamstress, hairstyling is far from being my speciality and shoemaking remains a totally different domain. These parts are often, in my opinion, the weakest points of many cosplay costumes. Even though my hairstyle isn’t exactly the same than Power Girl’s, the short blond hair and big… eyes association between Power Girl and I seemed to be strong enough in people’s mind to convince me to simply use my real hair for that cosplay. No wig problem. Not this time. However, the boots were still a problem. I had choosen to make Amanda Conner’s Power Girl boots, with their very specific design details, and it was obvious that I couldn’t find such boots already made in any store on the planet. I had no idea of how I would reach my goal, but I would find a way to make custom leather boots.
As I said it in my previous blog, I was lucky enough to be introduced to a local shoemaker, Monsieur Yvon Lamontagne. He used to make more classic leather shoes, but he was very open-minded when I showed him the specific superheroe boots I wanted to make with him. There was no challenge he wasn’t ready to undertake. Great!
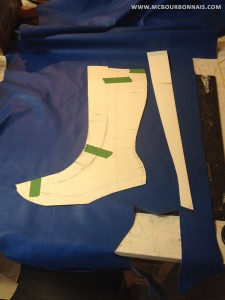
The whole process started by taking measurements of my feet and calves. It’s surprising how many different measurements you need to make the pattern of a custom boot. Just like I do for clothes, Monsieur Lamontagne works with basic patterns that he adjusts depending on the style of the boot or shoe he wants to make and depending on the person’s feet measurements. There is actually a way to make a shoe pattern from scratch using a shoe last. That step is a whole technique in itself and I won’t explain it in this blog since we didn’t have to do it, using Monsieur Lamontagne’s already existing basic shoe patterns. However, it’s good to know that each shoe or boot pattern is made based on one specific shoe last shape. Sharp tip shoes or rounded toe shoes are made using various shapes of shoe lasts.
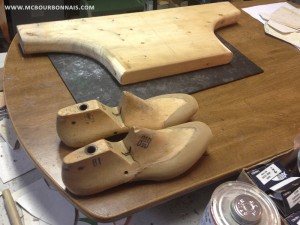
Those foot shaped wooden pieces are called shoe lasts. They are used to create the pattern of the shoe and to assemble the shoe and its sole.
Monsieur Lamontage also had a type of walking foot (sewing machine for leather) that I had never seen before. Specifically made for shoemaking, post bed sewing machines (compared to regular flat bed sewing machines) allows to sew stitches in some intricate parts of a shoe during the assembly process.
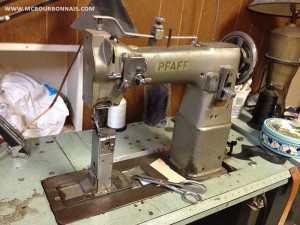
Arm bed sewing machines are also used for shoemaking. I later bought my own arm bed walking foot sewing machine. Monsieur Lamontagne’s one is different because it has that wheel instead of the foot.
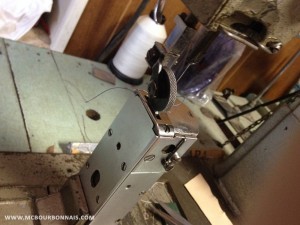
I have tried this machine a couple of time in the process of making Power Girl’s boots and I thought that the wheel tends to slide when making a topstitch. I personally prefer using a regular foot than a wheel for walking foot sewing machines.
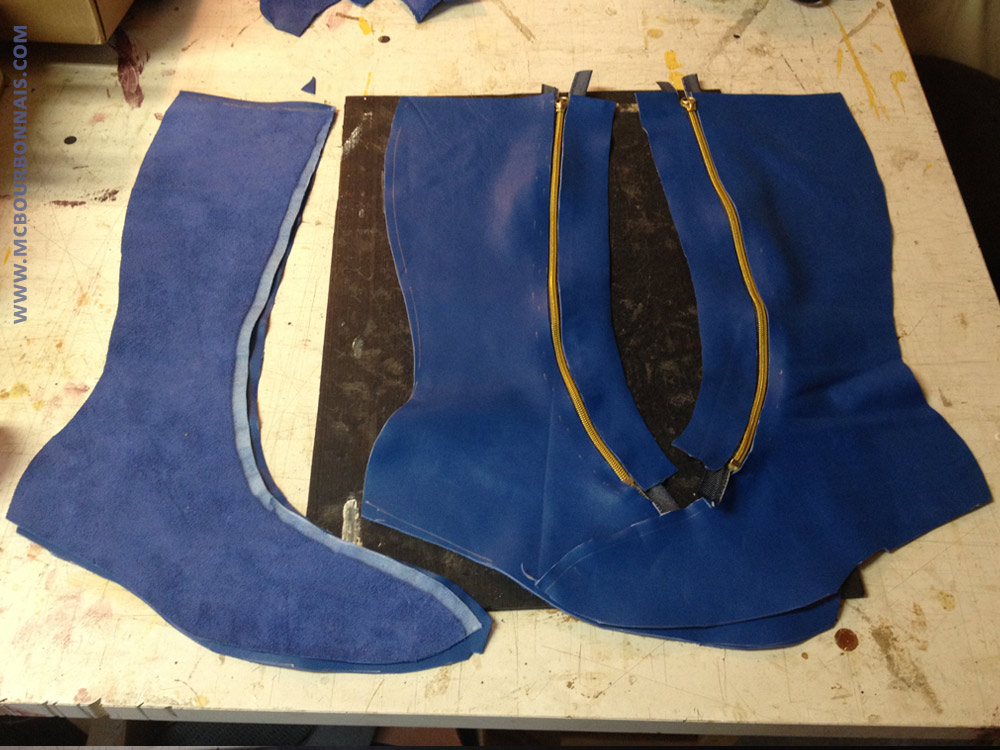
I mentioned that there were more than 100 steps required to make these boots from the very beginning to the end. So I will skip some steps and show only the main ones. Here’s the first step once the pattern was finished: cutting the boots’ pieces in the cowhide.
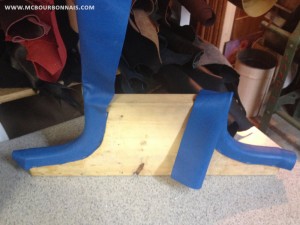
There is no visible zipper on Conner’s boots design, but there are 2 seamlines that goes from the tip to the top of the boot in the front. Analysing the design, Monsieur Lamontagne and I decided to hide the zipper under one of these seamlines in the pattern, because there has to be a zipper if I want to be able to put the boots on. Boots without a zipper are way larger, like musketeers’ boots, while Power Girl’s boots are very tight. Tight fitting always lets you 2 options: it has to be stretch or it needs a zipper (or snaps, or velcro, etc.) On the next pic, these 2 pieces of leather are the central piece from Conner’s design. One side of that piece will open and hide the zipper. Monsieur Lamontagne had the idea to pre-form the leather so the flap hiding the zipper would keep its curved shape. The leather pieces were temporary fixed to the wooden shape with stapples and stayed like this for a couple of days.
Leather boots are always lined. In this case, I used some beige leather for the lining. Here’s a piece of the lining stitched to its interfacing, which is made of the same blue leather than the exterior of the boots.

Same goes with garments. Interfacings are always made using the same fabric than the garment, or a contrasting color fabric if it’s part of the style. But in every case, the lining never goes up to the edge of a garment or shoe. There’s always a little ‘stripe’ of fabric or leather called ‘interfacing’ that ‘surrounds’ the lining on the edges of a garment.
Skipping many steps… Here are parts of the boots during the assembly process. Notice that some edges of the leather pieces were skived and others were not. I choose to use the same golden zippers than the ones I had used for the gloves.

It slowly started to look like boots. But there was still so much work to do… That part of the assembly process, I could have done by myself if I had had the proper pattern. It was like sewing any leather garment. But soon would arrive the steps of sewing the zipper flap and putting the boots and their linings on the shoe lasts to start working on the soles. These steps were still mysterious in my head and it’s where Monsieur Lamontagne’s teaching became very important. Be ready for my next blog if you want to see Power Girl’s boots appearing under your eyes!
Store-bought clothes look so good
First, there’s one thing I want to make clear. I sometimes hear people say things like: ‘Have you done this part of your costume by yourself?’ ‘No. I bought it.’ ‘Oh, I see. That’s why it looks so good. It’s store-bought. It’s not like if it was handmade.’ Please, stop that. Right now. Every piece of clothing or accessory, jeans, leather jacket, glove, shoe, cap, purse, wallet, etc. was hand made by a human being somewhere. ‘Store-bought’ dosen’t mean that it was made by a robot. Sewing machines still need to be operated by a human being. Store-bought clothes ARE made with someone’s hands. Yes, some precise steps of mass produced clothes like jeans are automated. I have visited sewing shops were they were making jeans and I saw a programmed sewing machine that was doing by itself the top stitch of the jeans’ back pockets. But this is an EXCEPTION. Everything is made by someone. And even if this someone is an asian woman, do I have to remember that it still counts as someone? Some people seem to think that store-bought clothes and accessories are made by putting a roll of fabric on a conveyor, then the fabric goes through a magic box and a garment comes out from the other side of the box on the conveyor. No, that’s not how store-bought clothes are made. Everything is made using sewing machines and the hands of a human being that has skills. It’s not ‘normal’ that store-bought clothes look better because they can be bought in a store. Store-bought clothes look good because they are made by very talented seamstresses (who work too often in awful conditions in various asian countries, but that’s another discussion.) My point is that it’s not ‘normal’ that a handmade costume looks a little crooked because it’s handmade. It just means that the hands who made it need more practice and we can all improve our skills if that’s what we want. :) That being said, if someone makes cosplay costumes for fun, I don’t mind the cute technical mistakes. Cosplay is a hobby first. It’s supposed to be about having fun. It’s not intended to be for professional costumers. (NOTE: Parental advisory: explicit content will follow. The next sentences may be offensive for some people. It contains coarse language and violence. Tried to include nudity, but didn’t succeed. You’ve been warned.) If a young lady or gentleman claims to be a ‘professional cosplayer’ because she/he is a social media superstar and because she/he sells autographed prints of herself/himself in costume, I’d be expecting their ‘handmade’ costumes to look as good as a handmade ‘store-bought’ garment. Kids in Asian countries can sew. (And it’s a shame that kids have to work like this in so many countries.) Young cosplayers who wish to call themselves ‘professional’ something should be able to sew as well as the young people who sew the store-bought clothes that we all wear everyday. By the way, I think that we should not use the expression ‘professional cosplayer’ at all because it makes no sense. There are cosplayers, there are popular cosplayers and there are professional costumers. I don’t consider myself as a professional cosplayer. I consider myself as a professional costumer. Am I part of the popular cosplayers? I have no control on that. The public decides. What I can control, though, are my skills as a professional costumer. End of the parental advisory. The rest of this blog is PG13. ;)
What’s a cosplay costume?
All this brings me to another important point. When I discovered cosplay, I looked at each costume as a piece of clothing. Because costumes are clothes. So why not using real clothes making techniques to make a cosplay costume? I realized that since most of cosplayers are comic book/ Japanese anime/ videogame fans first, and not costumers, some cosplayers think of a cosplay costume like if it was a special object in itself and not a piece of clothing. Let’s take for example that pattern making technique where people use tape to wrap someone’s torso over the person’s clothes in order to make the pattern of a shirt. Even though it can be a useful technique for some very specific costume needs, there are already real pattern making techniques that allow you to do any type of clothes you can think of. These pattern drawing techniques already exist. Why would you look for another way to do it? Pattern drawing is cheap. All you need is paper, a pencil, an eraser, a ruler and some curved rulers that are very handy. Then, you’ll need cheap fabric or old sheets or curtains to cut and sew a sample of your pattern and make any necessary adjustment if needed. And you’ll need the patience to do that step as many times as necessary to have a perfectly adjusted pattern before cutting in your real fabric. But it’s doable and these pattern drawing techniques are available online. Same goes for sewing techniques. They already exist. Sewing a zipper is a good example. It can be complicated, but there are ‘official’ ways to properly sew a zipper and these techniques are available online too. Why would we do it differently because it’s on a costume and not on a garment that we would wear everyday? Cosplay costumes should be considered as clothes because that’s what they basically are. It may sound like an obvious statement, but looking at many costumes over the past years made me realize that many cosplayers really consider a costume more like a crafted thing than like a garment. Which makes that when they are looking for a way to do something or for a solution to a problem, they don’t search in the good domain. They search for a way to reproduce the look of something. They don’t necessary try to understand how it would be made in real life. This is an advice that I would give to the more advanced costume makers who are interested in improving the level of their work. Always ask yourself how the costume you want to make would be made in real life. Here’s another example. If your costume includes Japanese hakama pants, these pants exist in real life. There’s a pattern to do this, there’s a way to sew real hakama pants. Why would you try to recreate the look when you can make real hakama pants? They exist for real already. Same goes for a kimono, a samurai armor, a petticoat for a dress, a tie, etc. These are all things that exist for real. Why wouldn’t you search online for the technique to make a real tie? It’s not because it’s for a costume that you have to ‘imitate’ a tie. If you take the time to make searches about how already existing things are made, you may be surprised to see that in some cases, it may be faster or easier to do the real thing than to create a new technique to imitate the real thing. If you want to reproduce a prop that would ideally be made out of wood, why would you go, let say, for papier mâché first? Why don’t you make some searches about woodworking techniques? Of course, some materials are expensive or require specialized equipment and it may be easier or cheaper, in the end, to imitate a material than to use it. But sometimes, it’s easier to go for the real material. You just need to stop considering costumes as crafted things. They are real objects. If your intention is to increase the level of your costume, try to think of your costume for what it really is and make searches in the appropriate domain of expertise. A garment is a garment. A jewel is a jewel. A leather belt is a belt. And boots are boots.
You thought that gloves were complicated… Let’s talk about shoemaking
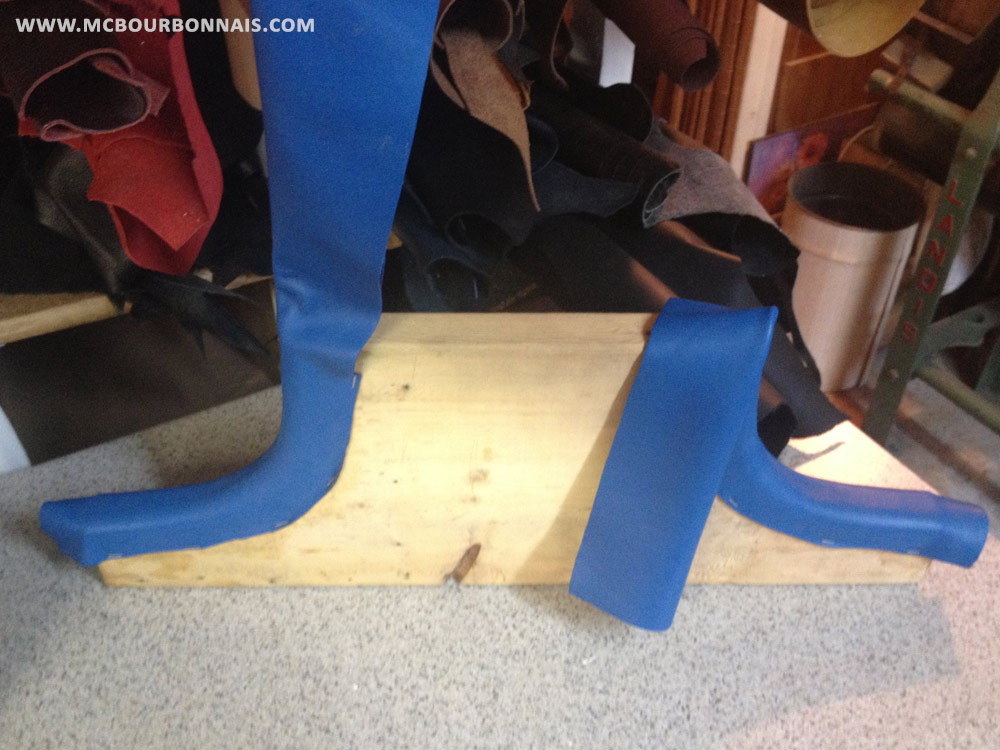
Yes, making custom leather gloves is one of the greatest sewing challenges I have undertaken as a costumer. But I still suceeded in doing it by myself. However, there was also that other part of Power Girl’s costume that I couldn’t ignore: the boots. And this, I coulnd’t do by myself. As I mentioned it before, I had already made a pair of wedge leather boots for the costume of my character in Soda Pop Miniatures’ game Relic Knights.
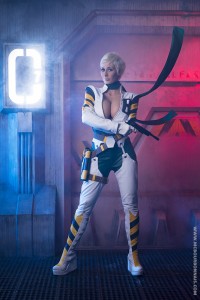
My character in Soda Pop Miniatures’ game Relic Knights
A friend of mine and I had worked on various prototypes before we made those thigh high boots that looked like boots, but that were not very comfortable. There was a lot of things going wrong in that costume. If you know how to make patterns and how to sew, you can figure out how to sew the upper part of the boots or shoes. The complicated part is the sole. The sole… It’s a solid piece, but it’s not like building an armor piece. It has to have a precise shape if you want to be able to walk. It has to be comfortable. Let’s put it that way: it was a mystery in my mind. I could sew the ‘soft’ part of a shoe of boot. But how is it fixed to the sole and heel? I could have dyed white boots in blue, I could have made shoe covers, I could have glued pieces of leather on already existing boots. I could have ‘imitated’ boots. But boots are an existing accessory and there is a way to make real boots from scratch. Power Girl’s boots are not ‘costume’ boots. They are real boots. Blue, with a zipper and golden buckles. Real leather boots.
In order to make the Soda Pop costume, my friend and I started making searches online about shoemaking techniques. It was very hard to find anything. And then, I thought of something. We always search in Google in English. What if we would search in French? And for the very first time, we found more information by searching in French than in English. In Europe, there are still shoemakers who don’t only fix shoes, but who make shoes from scratch. There are people who make hats, fancy gloves, fur accessories and garments, all kind of specialized professions that are slowly disappearing in Canada and in the USA. We have almost no seamstresses and tailors anymore. No shoemaker who make shoes from scratch. Nobody wears hats anymore. Caps are everywhere. In a couple of years, all these expertises will disappear if young people don’t get interested in this. As a 36 years old seamstress, you can’t image how happy I am when I meet a 15 years old cosplayer who made a dress by herself. That knowledge may survive. And maybe that it will be through cosplay if people like me succeed in showing to younger people that using the real techniques is doable. So my friend and I searched online for real shoemaking techniques and found French videos on Youtube. However, most of videos online were talking about classic shoes for men with a stitched sole while I wanted to make ‘fantasy’ or designer boots with a glueded wedge sole. My friend and I had only part of the info we needed and we realized, once we made the first boots for my Soda Pop’s costume, that shoemaking was a speciality that required many, many hours of work.
Meeting a shoemaker: the discovery of a dying profession
I talked to that teacher who had came to my workwhop to teach me leather sewing techniques and she actually knew a shoemaker. He must be one of the latest shoemakers in the province of Québec to make custom shoes from scratch. Shoemakers are definitely an endangered specie here. And he agreed in giving me private lessons. It’s with the help of Monsieur Lamontagne that I could have the Power Girl boots done as I wanted them to be. Now if you thought that making leather gloves was complicated, take a deep breath and be ready for everything. Because making Power Girl boots required 25 hours of work and more than 100 steps. Have a little rest and make sure to be in great shape for my next blog! Because reading how to make boots from scratch, even with pics, will make your brain work! lol
To be continued…
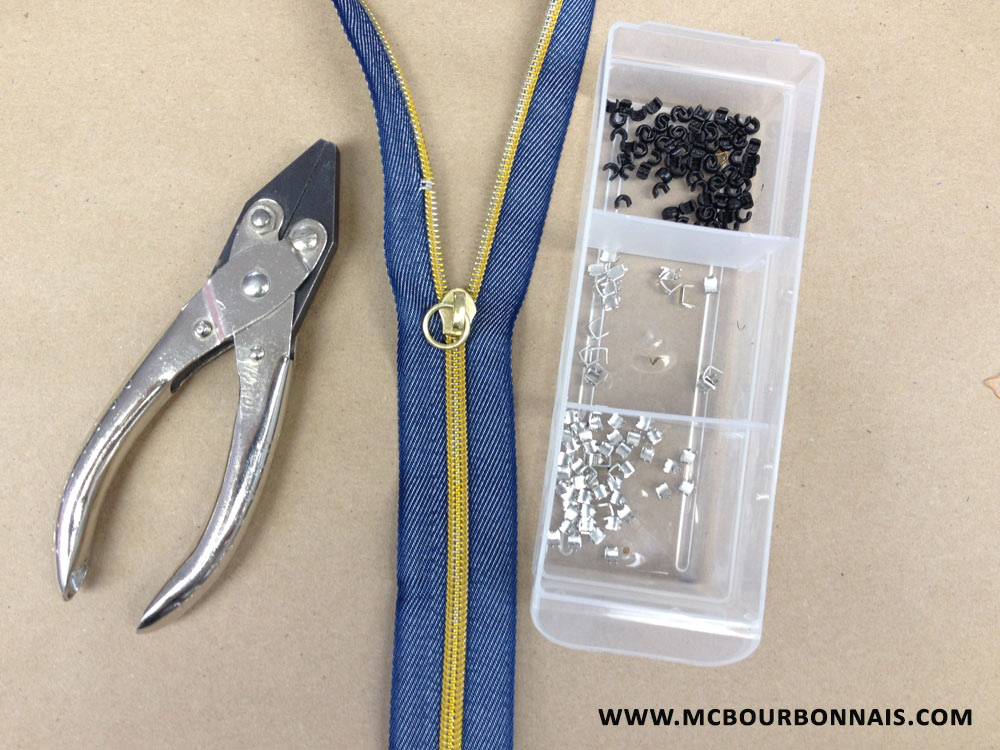
A word about zippers
It was now time to prepare the zippers. There are many types of zippers that I would put in 3 categories: nylon coil, plastic molded and metal zippers. The nylon coil looks like a ‘spiral’ that is sewn on to the zipper tape. It’s a very resistant zipper. Invisible zippers are like ‘reverse coil’ zippers. The zipper itself is hidden under the tape, so when you sew an invisible zipper, the zipper from outside looks like a seamline. It’s mainly used for women clothing like dresses and skirts. Invisible zippers are, however, very fragile. Many years ago, when I was working as a seamstress in a sewing workshop where we were doing alterations, I changed a lot of invisible zippers in skirts that were probably too small for the clients who had purchased them. ;) Then you have plastic molded zippers. They are made of symetrical little molded plasic ‘teeth.’ That type of zipper tends to form ‘waves’ when you sew it, for example, in front of a jacket or hoodie. For a colored leather jacket for which you’d like to use a colored zipper, it would be better to go for a coil zipper. Plus, molded zippers are easy to break over the time. When one teeth breaks, your zipper is done. There’s no way to fix it. Finally, there are metal zippers. They come in various finishes like brass, antique brass, nickel, antique nickel, gun metal. Metal zippers are commonly used for jeans. Look at a pair of jeans you have. The zipper is a metal one.
A golden touch
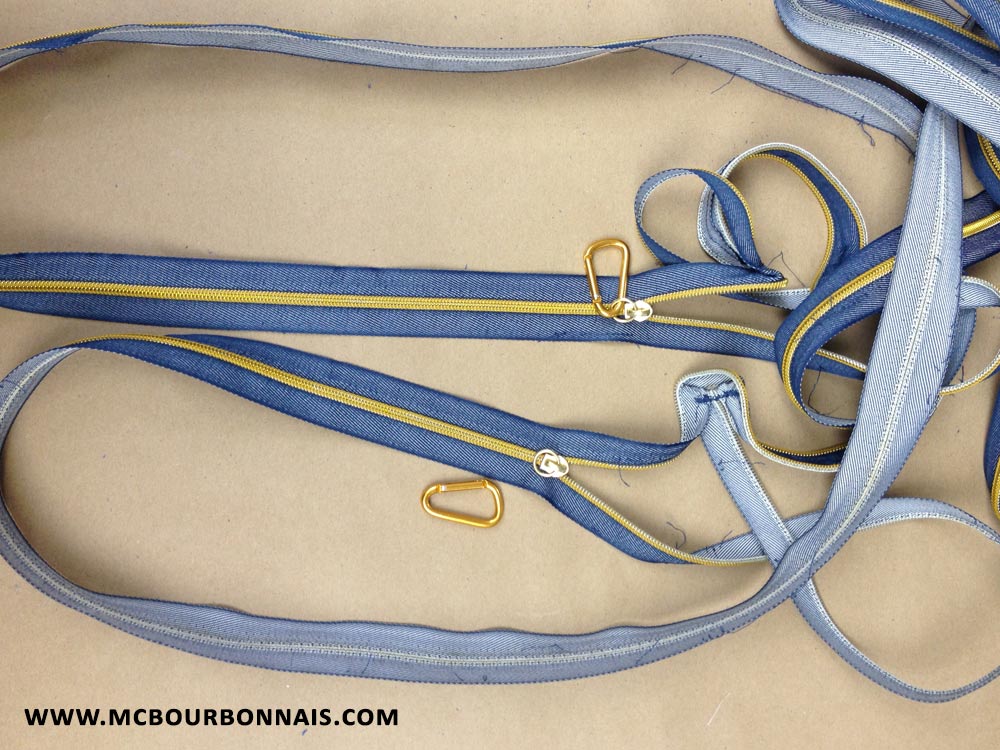
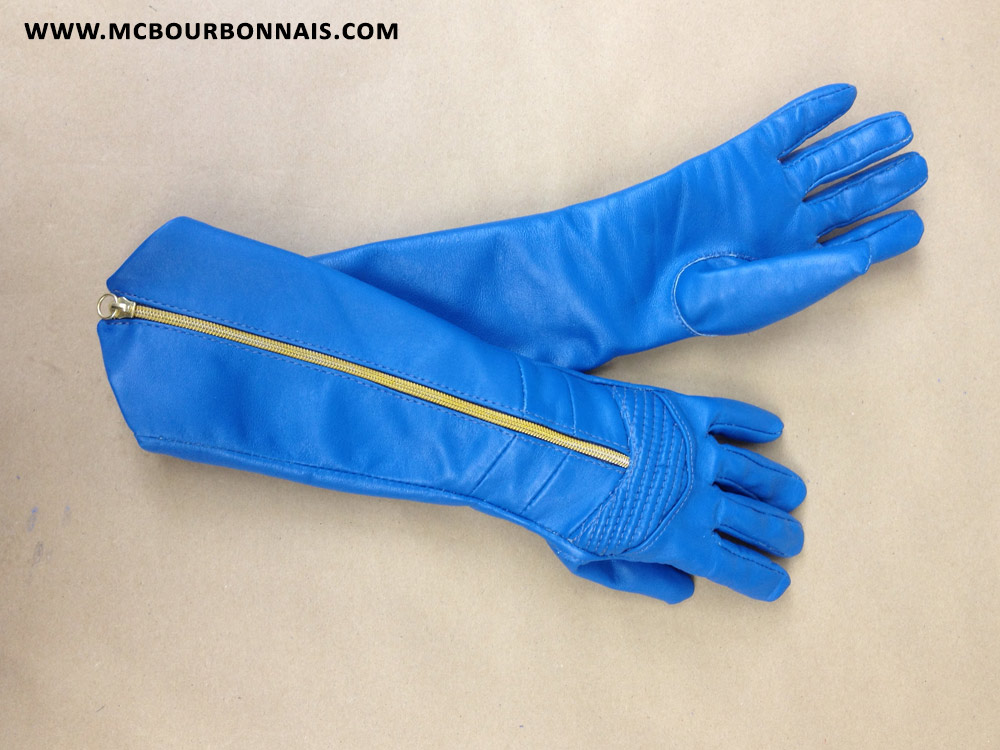
Since the golden zippers are visible in Conner’s gloves design, I had to find a golden zipper with a blue tape, because the zipper’s fabric tape shows off on the side of the coil or theet when you sew it. Metal golden zippers exist, but they are commonly sold in very basic tape colors like black, white, beige, navy blue. No Power Girl blue tape zipper with golden teeth. And then, I found a little treasure, certainly a sign from the God of Cosplay who put on my way these pencil cases made of a very long, custom golden coil zipper on a blue tape.
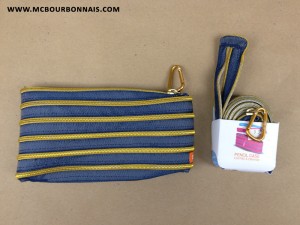
If that isn’t a sign, I’m asking you, what is it? These pencil cases were yelling at me: ‘Buy me! I’m meant to be part of your Power Girl costume!’ At $10 each pencil case, yes, they turned out to become $10 zippers… But when you need it, you need it.
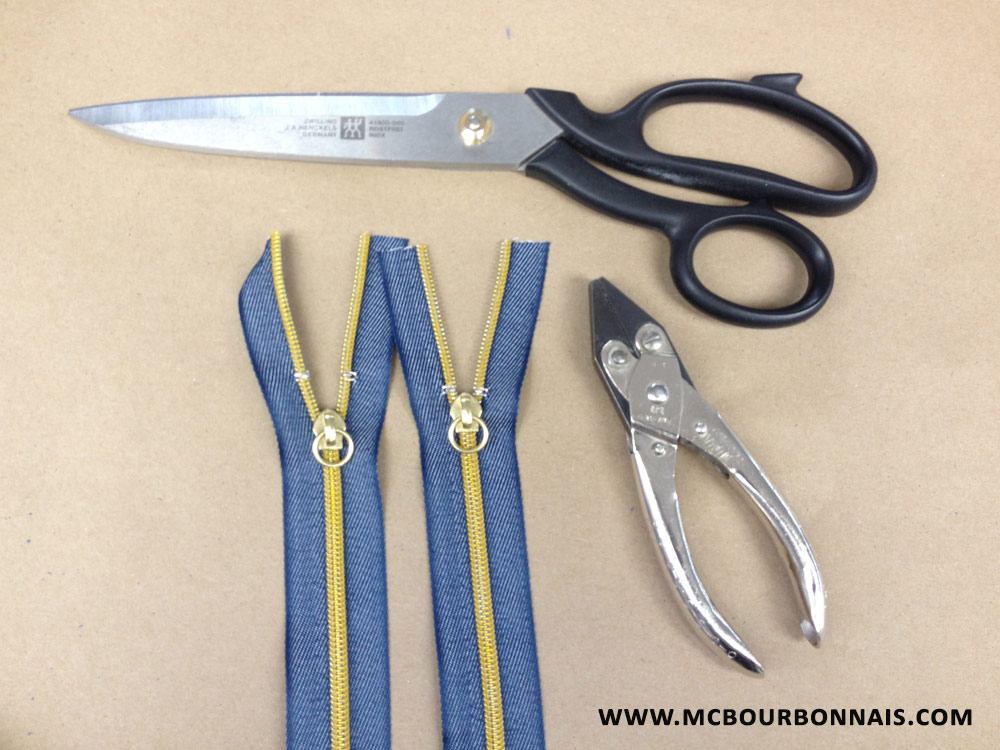
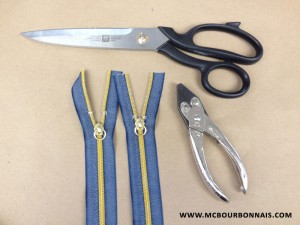
Next step was to unsew the pencil cases to have one single zipper ready to be sewed.

But since the zippers were so long, I had to cut them before sewing them to the gloves, which means that I had to add new little stoppers. It’s easy to cut a zipper from the top or from the bottom when it’s not a separated zipper. In any case, you’ll have to add the appropriated stoppers. Coil, plastic molded and metal zippers need various stoppers. Since these golden zippers were coil zippers, I used these stoppers that you have to insert between 2 ‘teeth’ of the ‘spiral.’ Then you flatten down the stopper with pliers.

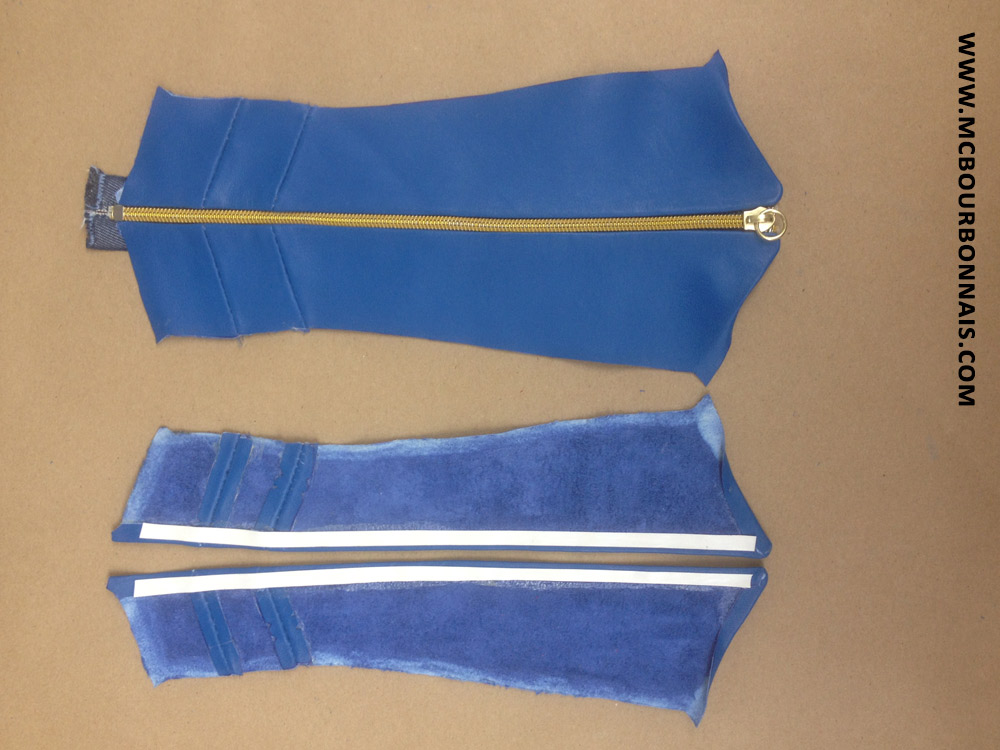
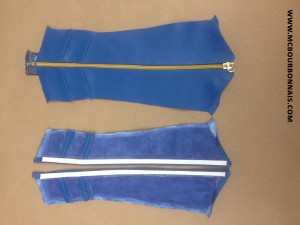
Preparing both zippers and cutting them to the correct length for the gloves.
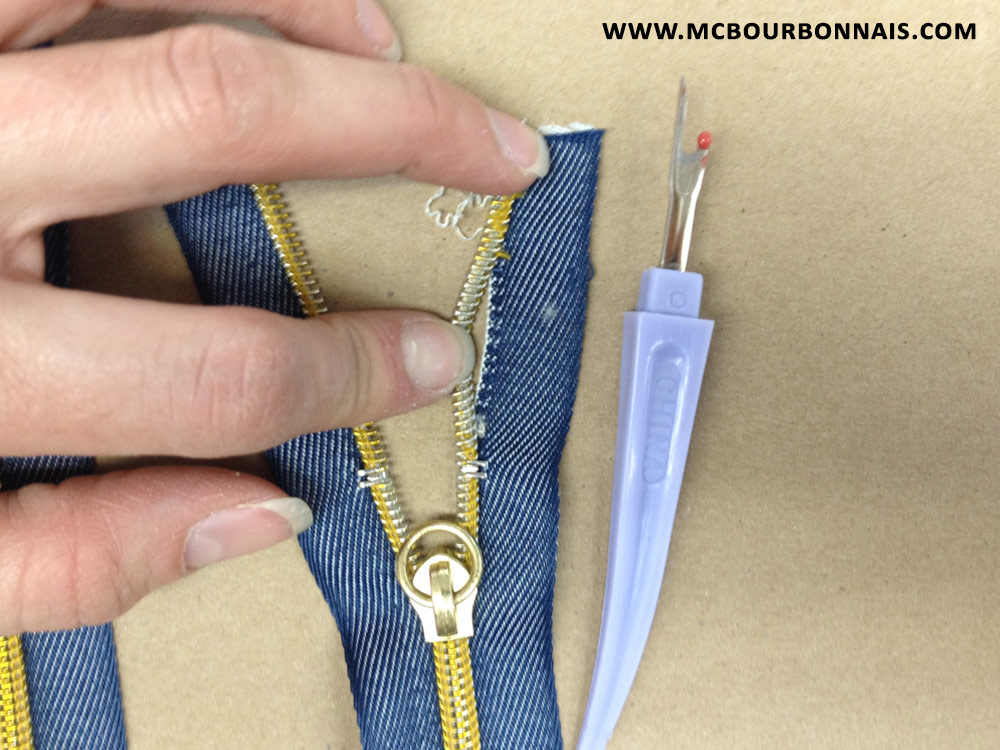
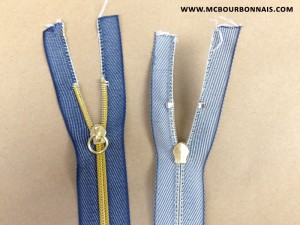
In order to make a nice finish when you sew your zipper, you have to get rid of the extra teeth or coil. In this case, the coil is stitched to the tape, so you simply have to unsew it.

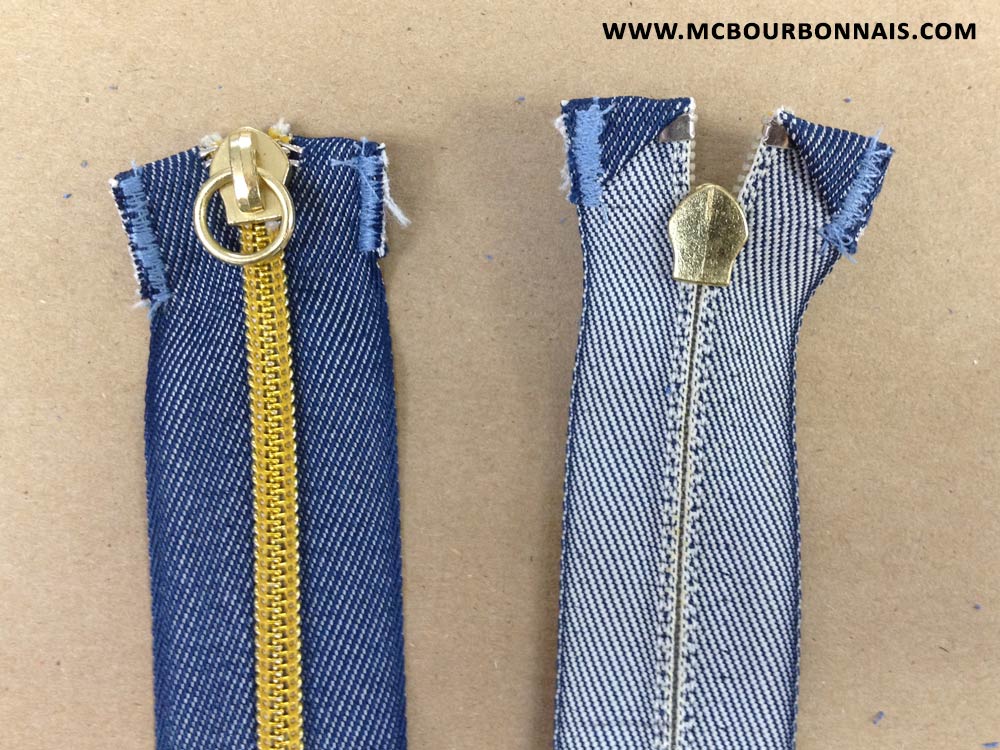
The zippers with the extra part of the coil unsewed. Notice how the fabric tape remains intact.
There are various way to sew the top part of the zipper tape before sewing the zipper. It can also be done directly when you sew the zipper to the garment. The seamstress or tailor will have enough skills to hold the tape with her or his fingers while sewing it. Since I can take my time and I want to do a very clean job, I choose to tack the zippers’ tape first.

Leather sewing tip: the miraculous double sided tape
Since you can’t use pins in leather (because they leave holes), the most amazing trick I can give you to hold leather pieces in place is to use double sided tape. You can use it before sewing hems, zippers and so much more. Using double sided tape was one of the tips that the teacher gave me when she went to my workshop and it allowed me to sew things that I couldn’t have made otherway. If you plan to sew leather, always have double sided tape next to you. It’s so handy. On the picture, you can see that I used stripes of double sided tape to apply the leather pieces on the zipper before sewing it with a top stitch.
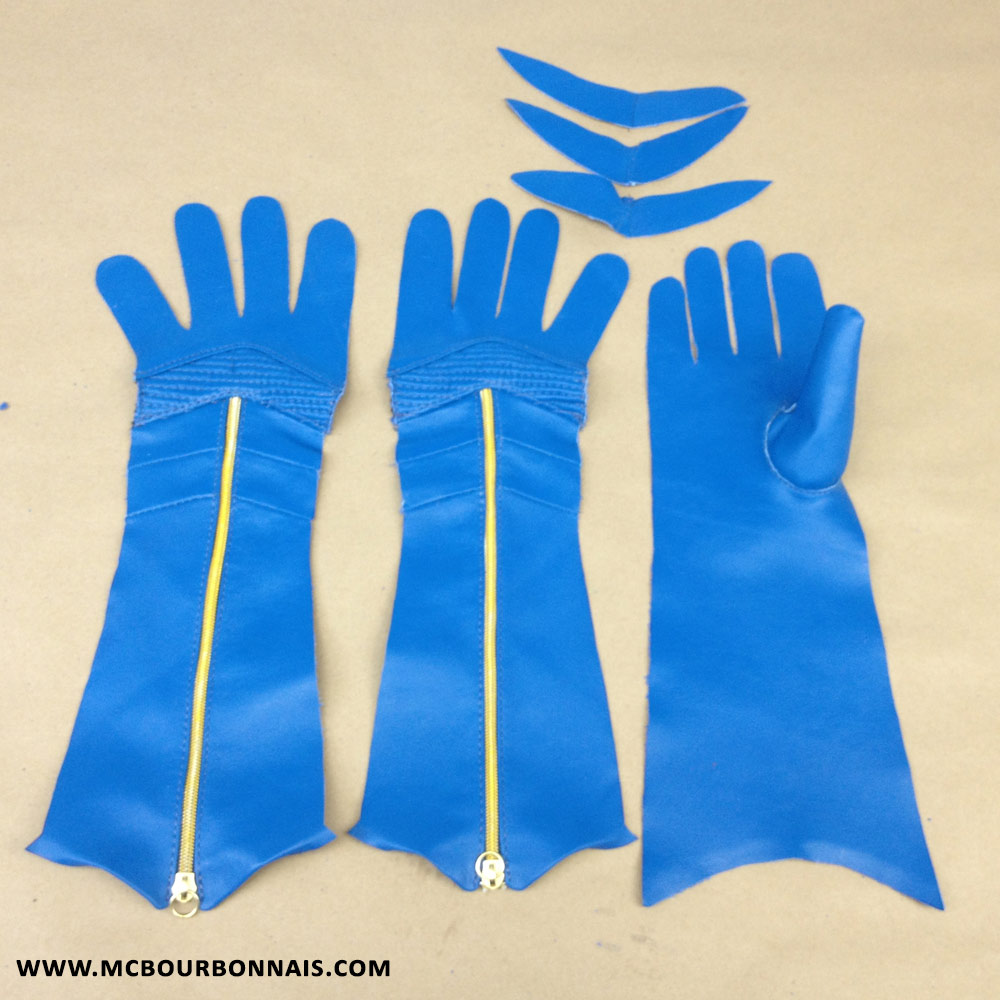
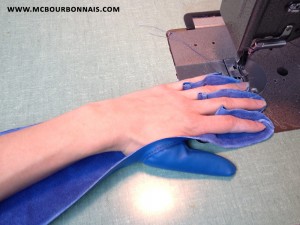
Work in progress picture of the gloves with the zippers, assembling more and more pieces together.

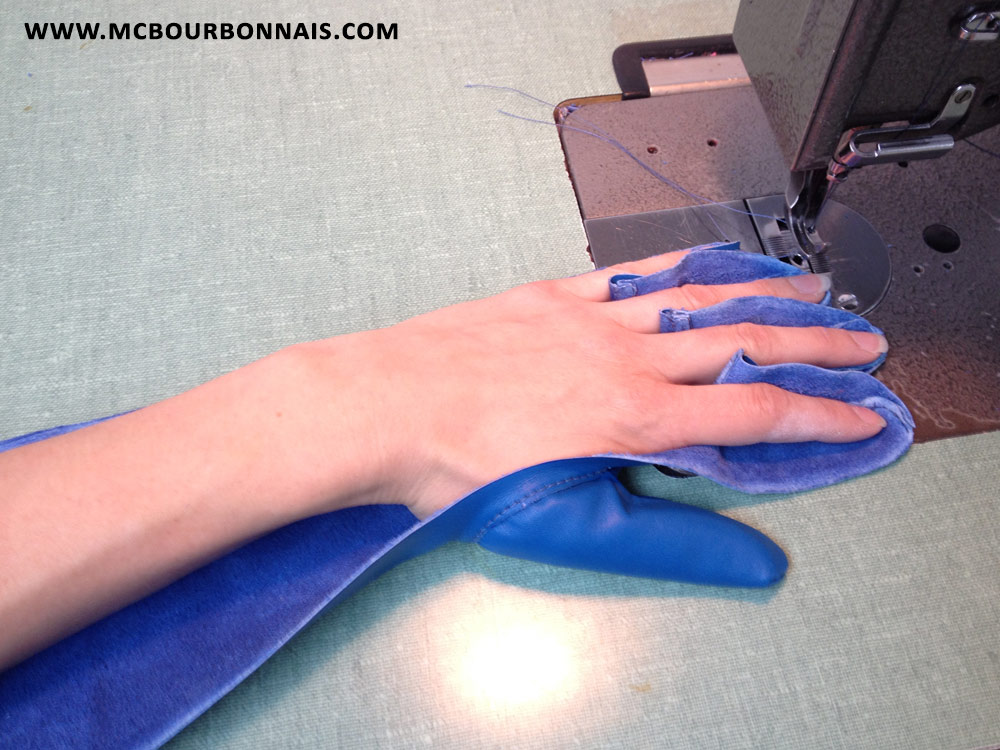
One of the many prototypes I had to make before I suceeded in sewing that strange piece of pattern in the hole to form a thumb. Very tricky stitches that have to be done in a particular order.
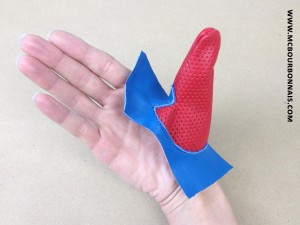
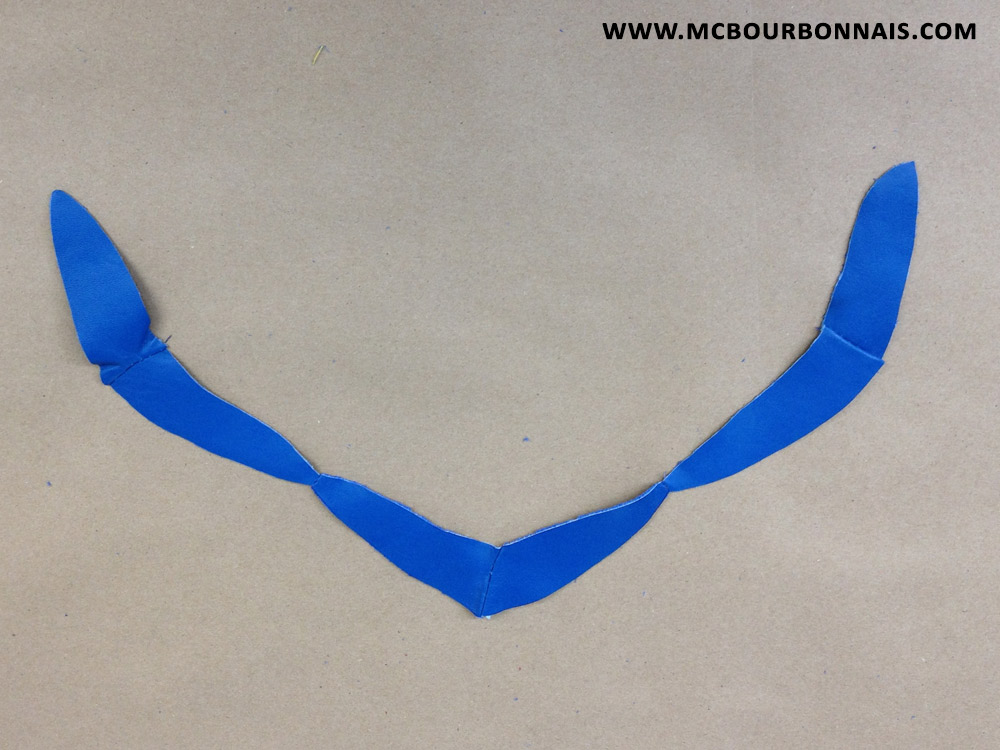
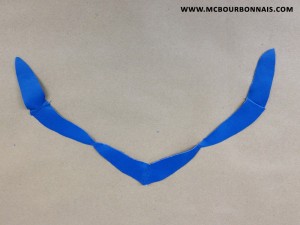
Strange step that looks like nothing: sewing together the tips of the small pieces that go between each finger. That stripe will be sewed all over the fingers, which is, in my opinion, the most complicated step in the whole process of sewing that precise glove pattern.
The gloves are looking more and more like gloves now. The fingers have their ‘thickness.’
On the next picture, I put my hand in the glove to show better which parts were sewn together.
That’s the part inside the hand and arm. Now I had to sew the top part of the glove. Same challenge, going around those little pieces that go between each finger. That step requires a lot of precision. Otherway, the fingers will be unheaven or may ‘turn’ or ‘twist.’ There’s a lot that can go wrong in that step. That’s what I found the most difficult to do.
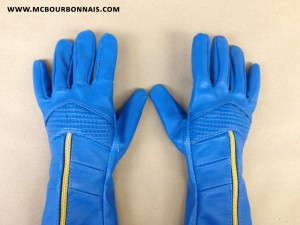
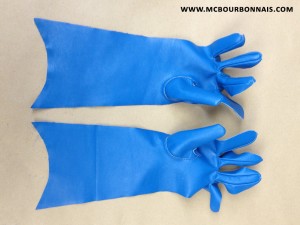
All the pieces of the gloves are now assembled. At the beginning, I mentioned that this blue cow hide had the perfect thickness to make boots, but that it was too thick to make delicate women’s gloves. Notice how the fingers have a bulky look. Lambskin would have given a more delicate result.

The finished gloves. They are not lined, but high quality leather gloves are generally lined. I wasn’t equipped to sew a delicate lining and honestly, I had enough challenges sewing the gloves themselves. I think that I didn’t have enough patience to sew a lining. The gloves looked good enough as the were. They are not perfect, but for the very first pair of leather gloves that I had ever made, I was very, very proud of myself. :)
Part 4 coming soon!