
Power Girl Cosplay Making Of – Part 5
An introduction to shoemaking
It’s now time to talk about one of the most complicated parts of my Power Girl costume: the boots. Since I started making cosplay costumes, I always considered that the hardest costume parts to get or make were the gloves, boots/shoes and wigs. As skilled as I am as a seamstress, hairstyling is far from being my speciality and shoemaking remains a totally different domain. These parts are often, in my opinion, the weakest points of many cosplay costumes. Even though my hairstyle isn’t exactly the same than Power Girl’s, the short blond hair and big… eyes association between Power Girl and I seemed to be strong enough in people’s mind to convince me to simply use my real hair for that cosplay. No wig problem. Not this time. However, the boots were still a problem. I had choosen to make Amanda Conner’s Power Girl boots, with their very specific design details, and it was obvious that I couldn’t find such boots already made in any store on the planet. I had no idea of how I would reach my goal, but I would find a way to make custom leather boots.
As I said it in my previous blog, I was lucky enough to be introduced to a local shoemaker, Monsieur Yvon Lamontagne. He used to make more classic leather shoes, but he was very open-minded when I showed him the specific superheroe boots I wanted to make with him. There was no challenge he wasn’t ready to undertake. Great!
The whole process started by taking measurements of my feet and calves. It’s surprising how many different measurements you need to make the pattern of a custom boot. Just like I do for clothes, Monsieur Lamontagne works with basic patterns that he adjusts depending on the style of the boot or shoe he wants to make and depending on the person’s feet measurements. There is actually a way to make a shoe pattern from scratch using a shoe last. That step is a whole technique in itself and I won’t explain it in this blog since we didn’t have to do it, using Monsieur Lamontagne’s already existing basic shoe patterns. However, it’s good to know that each shoe or boot pattern is made based on one specific shoe last shape. Sharp tip shoes or rounded toe shoes are made using various shapes of shoe lasts.
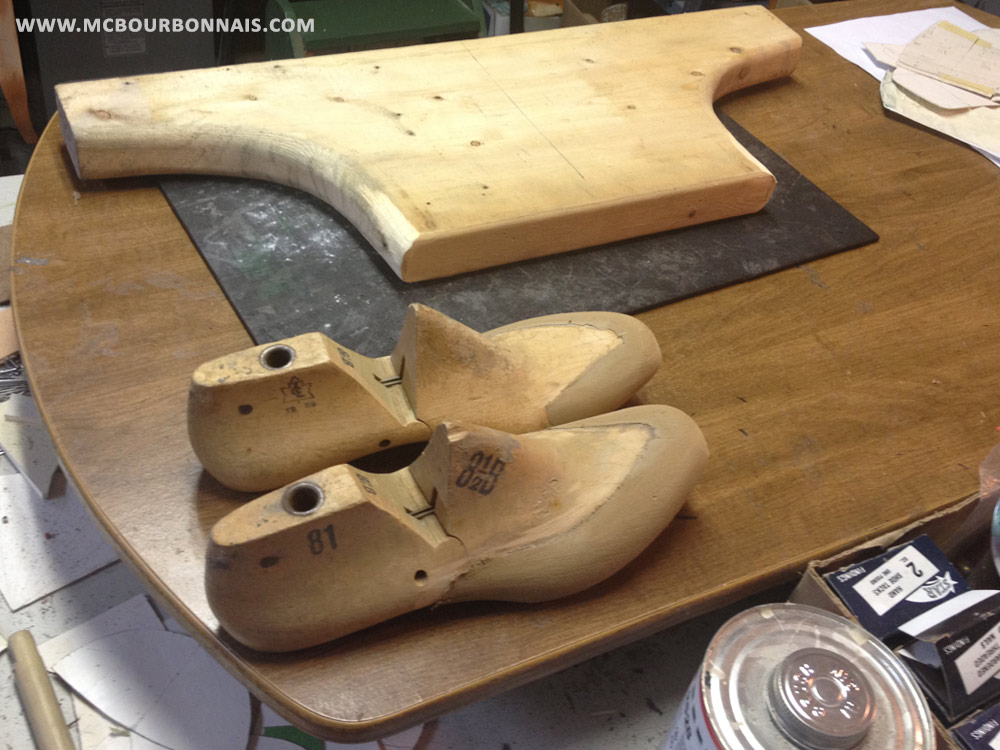
Those foot shaped wooden pieces are called shoe lasts. They are used to create the pattern of the shoe and to assemble the shoe and its sole.
Monsieur Lamontage also had a type of walking foot (sewing machine for leather) that I had never seen before. Specifically made for shoemaking, post bed sewing machines (compared to regular flat bed sewing machines) allows to sew stitches in some intricate parts of a shoe during the assembly process.

Arm bed sewing machines are also used for shoemaking. I later bought my own arm bed walking foot sewing machine. Monsieur Lamontagne’s one is different because it has that wheel instead of the foot.
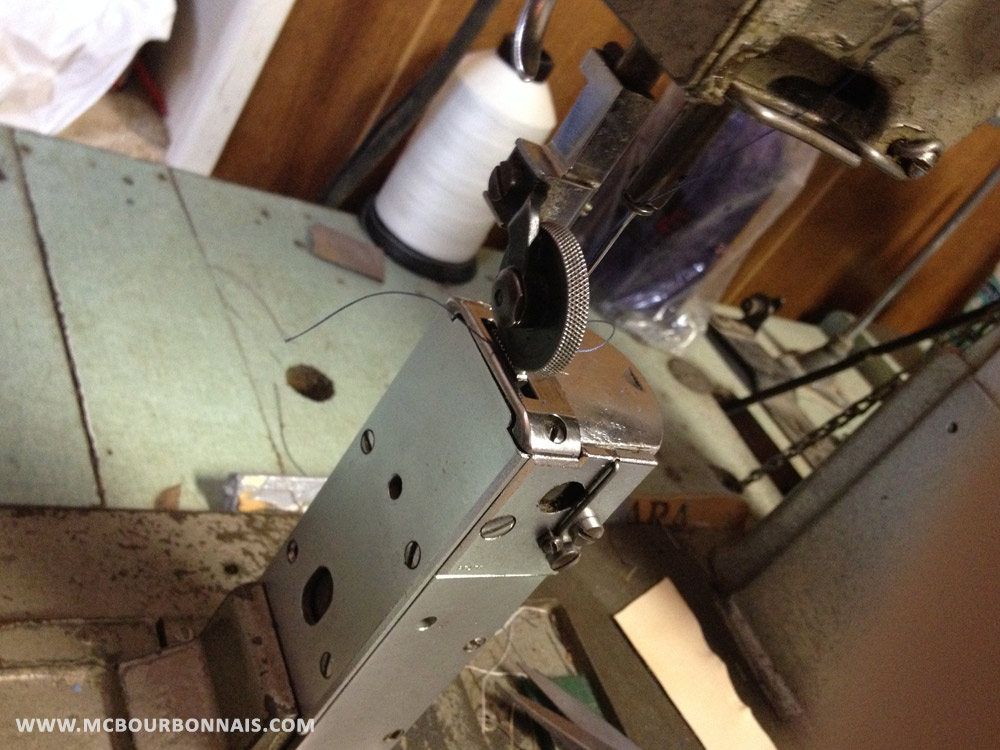
I have tried this machine a couple of time in the process of making Power Girl’s boots and I thought that the wheel tends to slide when making a topstitch. I personally prefer using a regular foot than a wheel for walking foot sewing machines.
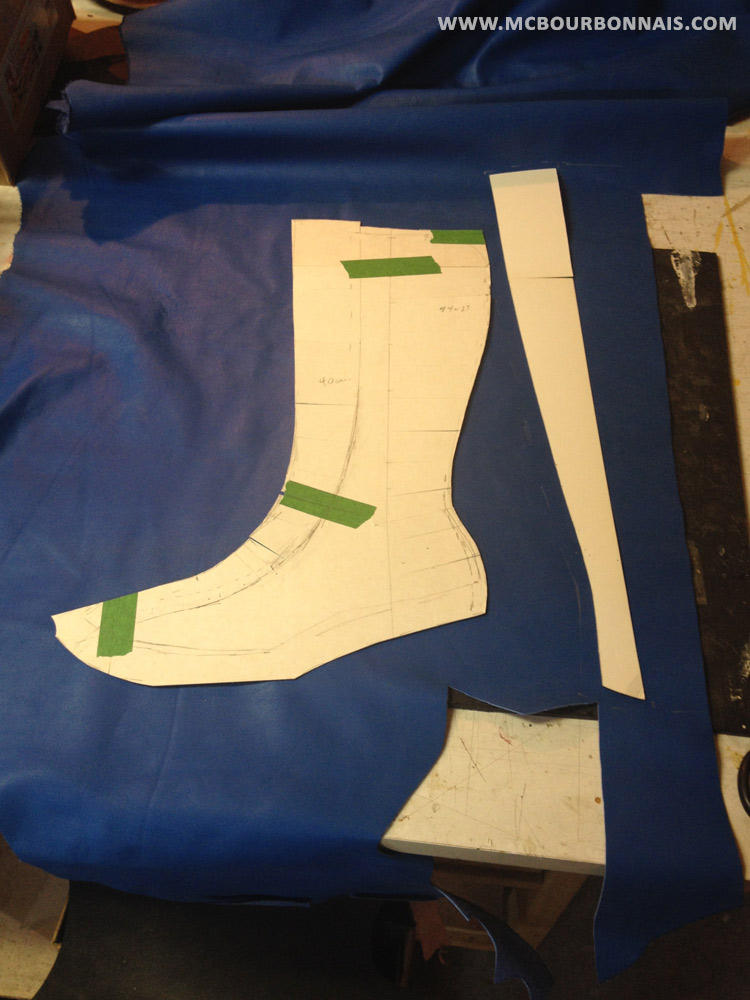
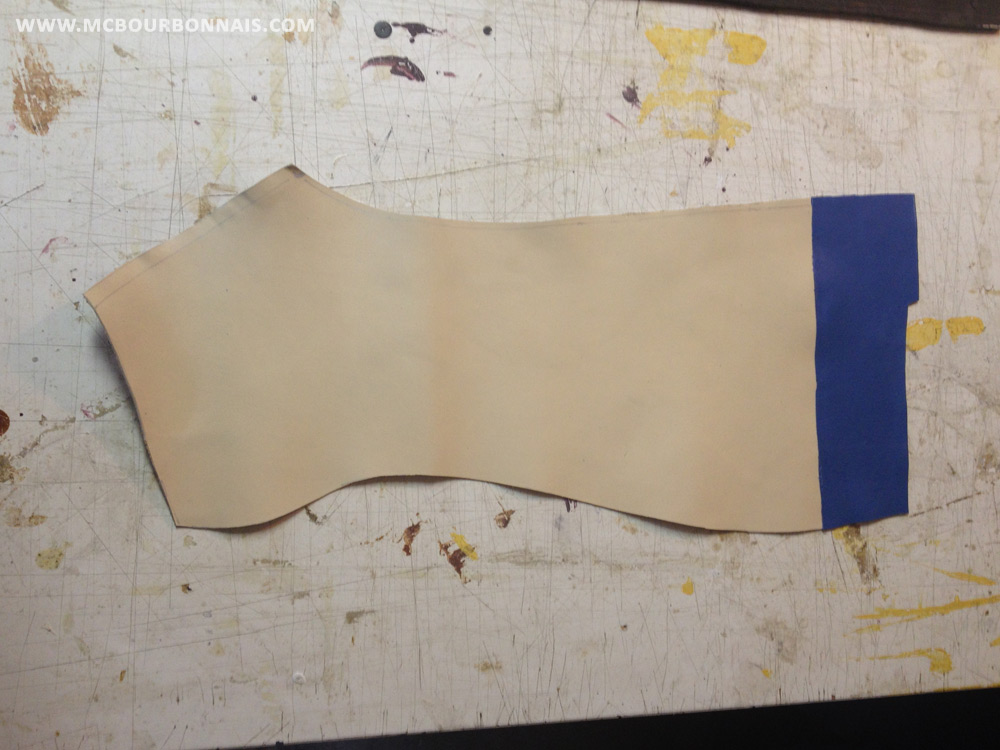
I mentioned that there were more than 100 steps required to make these boots from the very beginning to the end. So I will skip some steps and show only the main ones. Here’s the first step once the pattern was finished: cutting the boots’ pieces in the cowhide.
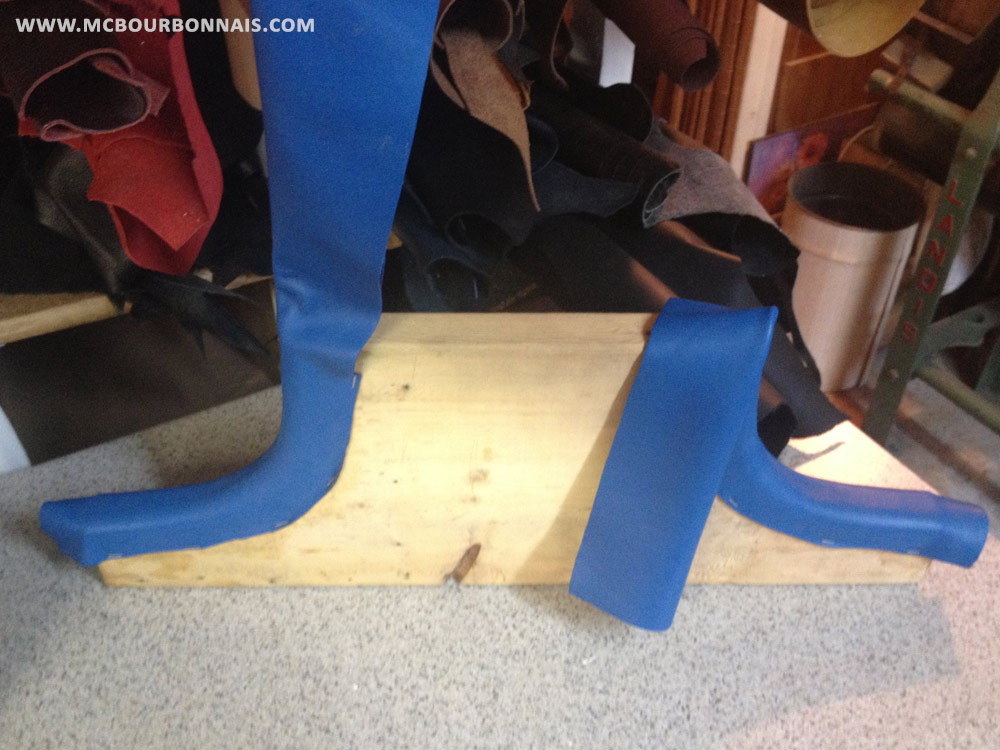
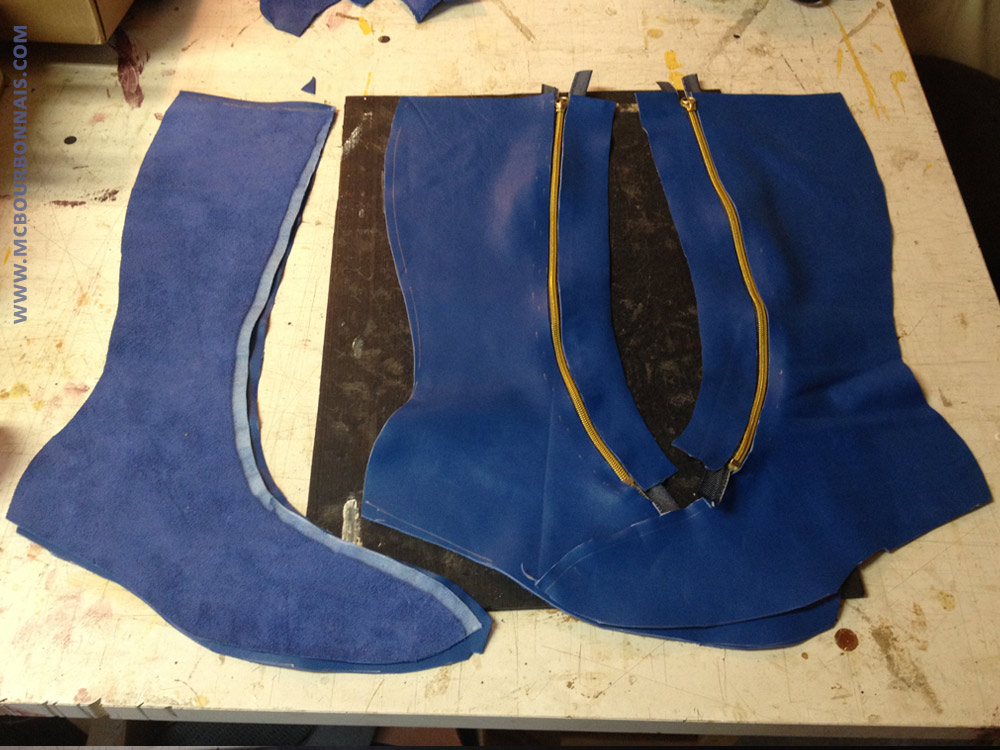
There is no visible zipper on Conner’s boots design, but there are 2 seamlines that goes from the tip to the top of the boot in the front. Analysing the design, Monsieur Lamontagne and I decided to hide the zipper under one of these seamlines in the pattern, because there has to be a zipper if I want to be able to put the boots on. Boots without a zipper are way larger, like musketeers’ boots, while Power Girl’s boots are very tight. Tight fitting always lets you 2 options: it has to be stretch or it needs a zipper (or snaps, or velcro, etc.) On the next pic, these 2 pieces of leather are the central piece from Conner’s design. One side of that piece will open and hide the zipper. Monsieur Lamontagne had the idea to pre-form the leather so the flap hiding the zipper would keep its curved shape. The leather pieces were temporary fixed to the wooden shape with stapples and stayed like this for a couple of days.
Leather boots are always lined. In this case, I used some beige leather for the lining. Here’s a piece of the lining stitched to its interfacing, which is made of the same blue leather than the exterior of the boots.
Same goes with garments. Interfacings are always made using the same fabric than the garment, or a contrasting color fabric if it’s part of the style. But in every case, the lining never goes up to the edge of a garment or shoe. There’s always a little ‘stripe’ of fabric or leather called ‘interfacing’ that ‘surrounds’ the lining on the edges of a garment.
Skipping many steps… Here are parts of the boots during the assembly process. Notice that some edges of the leather pieces were skived and others were not. I choose to use the same golden zippers than the ones I had used for the gloves.
It slowly started to look like boots. But there was still so much work to do… That part of the assembly process, I could have done by myself if I had had the proper pattern. It was like sewing any leather garment. But soon would arrive the steps of sewing the zipper flap and putting the boots and their linings on the shoe lasts to start working on the soles. These steps were still mysterious in my head and it’s where Monsieur Lamontagne’s teaching became very important. Be ready for my next blog if you want to see Power Girl’s boots appearing under your eyes!
Its great learning about all the hard work you put into your costumes!
It’s amazing seeing all of this come together! Keep up the excellent work. Thanks for sharing this!
Fascinating stuff, Marie-Claude! It must have been a great learning experience, and hopefully you picked up a new skill!
You know how much I enjoy reading and seeing how you create he incredible costumes, but these new posts about the nature of cosplay are really good! I wish I was still teaching the classes I had a few years ago. Lots of students who knew about cosplay but probably weren’t as certain about the details about what cosplay is. Your input really brings light to what cosplay truly is, your personal thoughts are very insightful, MC. Antidotes would be nice, too. “My Adventures in Cosplay”? You’ve really opened my mind. Just seeing cosplay isn’t enough. There’s clearly much more. ?????? Thank you.
Well Miss MC I have to say that the projects you undertake are always ambitious and you rarely take the easy way out. It takes quite of bit of skill to do this and I got to say you have the skills. Now days most people don’t have the patience to sew or make their own garments like the did in the past, It might just be to old fashion, that’s to bad. Also the next time you go on a tie raid I hope you can fit in substantial nudity. Your Fan Jeff E