
Monster Musume Rachnera Cosplay Making Of – Part 2
NOTE: Before any of you ask, I’ll explain something one more time and I think I’m gonna copy/paste this at the beginning of each part of this blog. I’m not using a dust paper mask on the work in progress pics because wearing various masks irritates the skin of my face and gives me blemishes. The only fact of breathing in the humidity of my own breath in those masks makes my skin look bad. Then I can have a convention, a photoshoot or an interview and I have to wear more makeup to hide the blemishes, which isn’t good for my skin either. There are the masks for chemicals that I absolutely have to wear when I’m working with polyester resin or automotive paint. So when it comes to dust, I give my skin a break and I don’t wear a paper mask. I know it’s not the healthier choice, but most of models are usually not fiberglass technicians. I have to deal with two jobs that don’t go well together. So I make the choice, as sad as it is, not to wear paper masks to allow my skin to survive. But I do wear a mask for chemicals and vapors when I use polyester resin and automotive paint.
Sculpting styrene legs on a MDF frame guide
We had one big and one small MDF leg shape already cut. We needed 3 more of each, so we cut them. We glued styrene on each side of each MDF template and sculpted by hand each of the 8 legs. That step wasn’t too bad. It’s the finishing process, when we would later cover everything with fiberglass and try to make our 8 handmade legs look the same, that would be more complicated… Yes, we should have made molds.
We had decided at this point that we wanted some of Rachnera’s legs to hold in the air, instead of having her 8 legs touching the ground, to make her pose look more dynamic. We figured out that with the proper internal metallic structure, Rachnera could hold on her 4 bigger legs (front and back legs) and that the 4 smaller middle ones would be like a ‘decoration’ or not necessary for the structure to hold. I’ll come back later to the metallic structure, how it was integrated in the legs and how it was fixed to the spider. But first, let’s talk about fiberglass.
What’s fiberglass?
Before I say anything else, remember that you’re gonna have to wear a respirator mask and long clothes when you’ll work with fiberglass. You’ll understand why later.
When I started working with fiberglass, I didn’t know anything about it. I really learned everything from the beginning and I don’t consider myself an expert. I will share with you what I know, but my explanations will be basic. They will be the explanations of someone whose speciality job isn’t fiberglass and whose mother tongue isn’t English. Just keep that in mind and don’t hesitate to write comments, give tips and advices if you know more. Your comments are always welcome. :)
The final surface that we call ‘fiberglass’ is obtained by mixing fiberglass itself with a resin. If I understood correctly, the proper translation in English to talk about fiberglass would be fiberglass cloth (which would be the woven one) and fiberglass mat (which would be the agglomerated one. If I’m wrong, please write the correct translation in the comments.) In both cases, it looks like a shiny, white piece of fabric, it’s sold in rolls and it’s available in various thicknesses. Woven fiberglass works well when you want to cover a plain surface, like a floor or a roof. (Yes, apparently they make industrial floors and roofs in fiberglass. I didn’t know.) Agglomerated fiberglass mat is useful when you want to cover an intricate shape. You can tear small pieces of fiberglass mat and cover any type of shape by layering all these pieces of fiberglass mat all over the shape you’re covering. In any case, fiberglass has to be soaked with resin. I have always used polyester resin because it’s cheap and it catalyzes fast. However, polyester resin is a strong chemical product, it smells horrible and it’s toxic. You absolutely need to wear a respirator mask to work with polyester resin and you can’t use it in your house. You need a workshop or you have to use it outside if you can. To clean up polyester resin, if you want to use your brush more than once or if you have polyester resin on your hands, you’ll need acetone. Another product that you should never put on your skin. :S You’ll need gloves all the time. (I always use nitrile gloves instead of latex gloves because latex gloves, used to make silicone molds, can keep some silicone, like Smooth-On Rebound 25, to catalize properly. For that reason, latex gloves are prohibited in my workshop. I take no chance and use only nitrile gloves to do everything.) The polyester resin I use has a pinkish color that changes for an amber color when I mix it up with its catalysis. Without catalysis, the resin itself is a liquid. With the catalysis, it hardens. A piece made of polyester resin alone could break if you would drop it on the floor. Fiberglass mat or cloth is what gives the final piece its strenght.
There’s also shredded or chopped fiberglass. It’s applied and mixed up with resin using an air powered fiberglass spray gun or chopper gun system that throws both the chopped fiberglass and the resin at the same time. That professional equipment is used in industry to make fiberglass bathtubs, showers, boats, pools, etc. Let’s take for example a fiberglass bathtub. They will apply in the bathtub’s mold coats of gelcoat, then they will apply the chopped fiberglass and resin in the mold using the fiberglass spray gun. The part of the bathtub in which we sit will have a slick finish (the gelcoat) and the hidden part of the bathtub will have the rough texture of the chopped fiberglass. If you Google all this, you will easily find videos showing that process. My guess is that we might have used a fiberglass spraygun to cover the robot and spider. However, the price of that equipment alone would have taken part of our budget and since I don’t plan to become an official fiberglass shop, it’s not worthed investing in that. Big styrene statues or structures can also be covered with sprayable liquid plastics that can be painted. Various products exist. I didn’t know these products at that time, though. So my friend and I used what we knew and covered the robot and spider by hand, using pieces of fiberglass mat soaked in polyester resin.
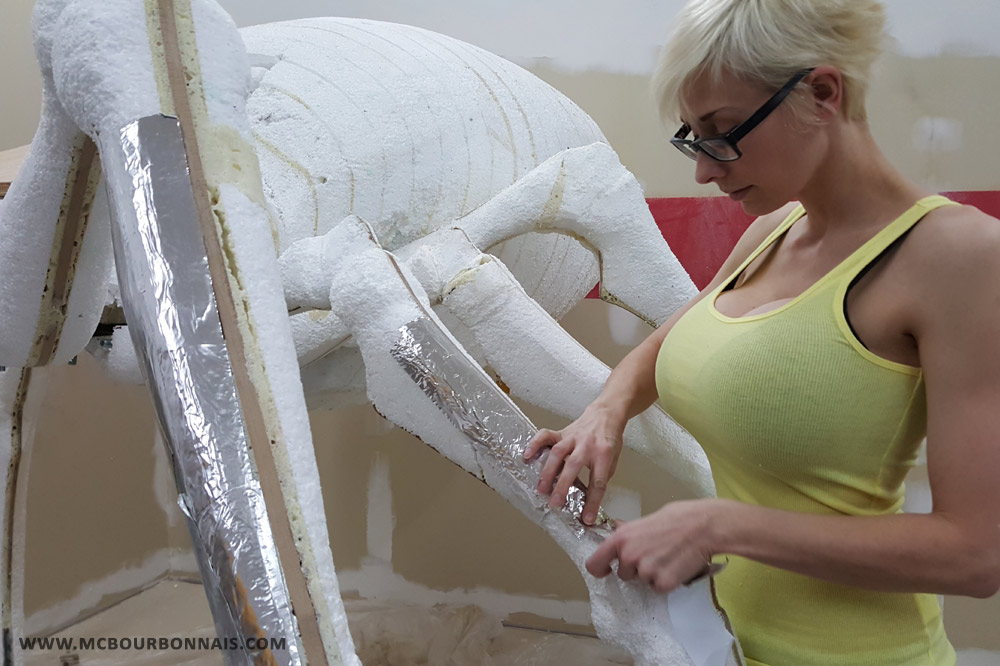
Polyester resin applied on styrene makes it melt like snow in the sun. Don’t you ever sculpt styrene and apply polyester resin on your sculpture, you’ll destroy it. Styrene has to be protected from polyester resin and after many tests and searches, we found out that the best, easiest and cheapest way was to use aluminum foil. Just apply aluminum foil on your styrene structure using spray glue, make sure to put aluminum foil everywhere, cover all the styrene, and you’ll be good to go. We realized that aluminum tape works well too and is useful to cover small parts with a special shape.
On the next picture, you’ll see the spider’s body and legs that we have separately sculpted in styrene by hand. You can see the MDF template in the middle of each leg. We were at the step of covering everything with aluminum foil before starting to apply fiberglass and polyester resin. (Notice in the background the red stripe on the beige wall. That was the set we had built to shoot my Gunbuster cosplay. :) We would later paint that fake wall in grey to make another photoshoot.)
Once the whole styrene spider was covered with aluminum foil, we could start covering everything with polyester resin and fiberglass mat. That is one of the 2 worst steps. Polyester resin not only stinks, it’s also a strong chemical product that obligates anybody using it to wear a respirator mask. As I said, you also need to wear gloves. But it doesn’t take long before polyester resin makes the gloves ‘melt’ and you can feel, on the tip of your fingers, that the nitrile is reacting with the resin just before the glove rips. And then acetone is the only dangerous friend that will take off the polyester resin from your skin. No wonder why I never wear nailpolish when I’m in the middle of a big fiberglass project… You’ll need tons of gloves if you work with fiberglass. You’d better buy boxes of gloves. At the end of the project, I was always wearing 2 pairs of gloves on top of each other.
I also wear gloves when I tear pieces of agglomerated fiberglass mat. Because it itches. But it’s not the worst. Fiberglass dust is the worst. Before talking about this, let’s start with the first fiberglass step. We always prepare in advance piles of little pieces of fiberglass mat that we tear by hand. We make various sizes of pieces depending on what surface we have to cover. Then we put a piece of fiberglass mat on a flat surface and we use a brush to soak it with polyester resin. The same brush is used to apply the soaked fiberglass mat piece on the surface to be covered. You can reuse your brushes by keeping them in acetone in between the fiberglass coat applications. However, you’ll still need tons of brushes. I recommand to buy boxes of brushes too. And many gallons of acetone. On the next picture you can see the smaller spider’s legs covered with fiberglass.
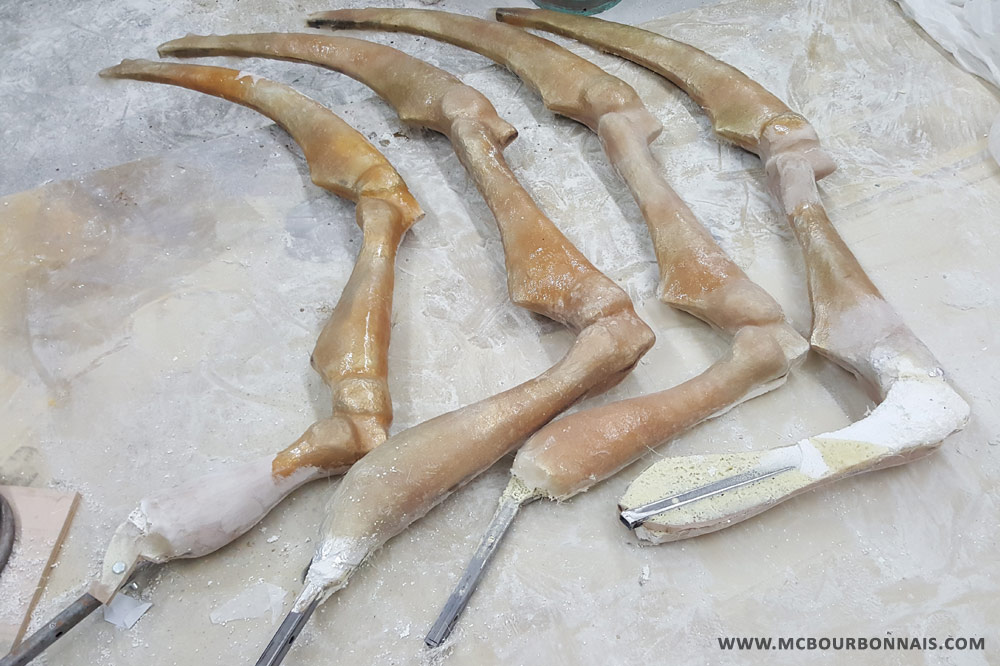
As you can guess, it takes a lot of time to do things that way. It’s a very long process. You have certainly noticed the metallic structure of the smaller legs. We used 1’’ X 1’’ steel square tubing that we fixed on the extremity of the 4 small MDF legs. These tubings were welded in a particular position that would make the smaller legs hold more or less in the air. As mentioned earlier, we wanted some of the middle legs to have a different position and to hold in the air instead of touching the ground. The square tubing parts would exceed the final fiberglass legs and be used to install the spider’s legs under its body with huge boalts.
More fiberglass fun in Part 3!
Covering the styrofoam with foil to keep it from melting was unexpected! Interesting way to solve that problem.
Thanks for sharing these stories!
I’ve built a boat or two using the “stitch and glue” method of construction. The boats are covered with fiberglass but instead of using polyester resin, epoxy is used. It has a much lower chemical odor and is terrifically strong when cured. There are a variety different viscosity ranges available and also drying times. Do a Google for MAS epoxy products and perhaps do a little test. I also believe it is safe to use on styrene without the need to pre-seal before fiberglassing.
I enjoy reading about the wide variety of projects you are involved in, don’t know where you get the time to do them all. Keep up the good work!
That’s some great info about fiberglass! I knew it involved a lot of hard work, but what you described was even more than I imagined. I am super impressed by you and your friend for just having the two of you work on this on your own.
Also, those legs look super real insect-like. Great amount of detail there!