
Monster Musume Rachnera Cosplay Making Of – Part 1

PART 1
Once Upon A Time
It all started with Lug, Ninja Division – Soda Pop Miniatures‘ giant yellow and black fiberglass robot. For those who don’t know Lug’s long story, my friend and I have built that monster during the first half of 2015. Ninja Division needed it at their booth for Gen Con 2015, but the robot was far from completion. It still needed more sanding and had an unfinished base. But we had to deliver it for Gen Con no matter what, so the robot had been painted as it was at that moment and we had brought that temporary version to Gen Con 2015. It litteraly stole the show, but my friend and I had the feeling that it could have looked better and Ninja Division had accepted to let us bring back the robot to my workshop in Québec to remodel it and finish it properly. Fall and winter 2015 passed, I had many trips and conventions and in April 2016, my friend and I were finally almost done with the final version of the robot and its new paint. I will later write a blog about Lug’s building process. But first, let’s talk about Rachnera.
When the people from Ninja Division – Soda Pop Miniatures contacted me about a Monster Musume project, my friend and I were painting Lug. Apparently, Ninja Division wanted to collaborate on something with Seven Seas Entertainment, a company that publishes licensed mangas translated in English in the USA. They are publishing, among others, Monster Musume. Ninja Division asked me if my friend and I would be willing to build a Monster Musume cosplay that would be displayed at the booth that they would be sharing with Seven Seas Entertainment at Anime Expo, in July. The piece would be used to promote both Ninja Division’s and Seven Seas Entertainment’s products and brands.
I have to say it: I was exhausted. I couldn’t make up my mind to start another fiberglass project right after Lug. I really needed some time to recover. Building that robot was by far the most complicated thing I had ever done. I didn’t want to go through this again. The chemicals, the sanding, the itching… Not at that moment. And just like my Power Girl costume that I never thought I would make, well, it happened. Sometimes life brings you to make strange decisions.
So I had to pick up a Monster Musume character. I knew the show because I had watched the anime on Crunchyroll and I had enjoyed it a lot. Well, as a girl who has a thing for big breasts, Monster Musume had everything to please me. ;) I considered choosing Centaurea, but thinking about it twice, I quickly came to the conclusion that Rachnera would be a more impressive piece. I had to choose an exhibition piece. It had to look good from many angles, no matter from where people would take it in picture. Rachnera was bigger, taller and I had the perfect body type to bring her to life. Yes, Rachnera it would be.
Building a big huge spider
First step was to choose a scale. How big exactly should the fiberglass spider be to be proportioned with my body? If you watch a lot of animes, you may have noticed that some props scale and even costume details often change from a plan to another. Sometimes a character is holding a sword that is twice as big as him and in another episode the same sword may look smaller. It depends on the drawings, those things tend to vary. You just don’t necessary notice it while watching the anime. But if you try to cosplay one of those characters, then, you notice it. Rachnera’s body was a little like that. Her body looks bigger on some drawings, smaller on others. Since I wanted to build an exhibition piece, a little bigger was better than a little too small. It’s well known, my American friends, you like big things with a lot of colors that lighten up, move, play music and glow in the dark! ;) Hesitating between many possible scales, I thought that one of the bigger options would probably be the way to go. You have that expression in English, what is it, again? Go big or go home. Right. I wasn’t about to go home.
Using as a reference a picture of me and some drawings of Rachnera, I tried in Photoshop to figure out THE perfect (big) scale for Rachnera’s body and legs. When I thought I had the correct scale, I sent my little Photoshop montage to Dutchprops. He’s the same 3D modeler I had hired to make my MKX Scorpion mask and I was very satisfied with his work. He already had the 3D scan of my body that he could use again to 3D model Rachnera’s body and legs, in proportion with my body, following the proportions on my reference Photoshop montage.
You can see more of Dutchprops’ work on his Instagram (@dutchprops) and Facebook:
If we had had a bigger budget, we could have sent the final 3D model to be cut in big styrene blocks by a 5 axis CNC. But both big styrene blocks and 5 axis CNC services would have been a pretty huge expense, so we went for a cheaper option, like we had done it for the robot. Cheaper, but way longer option. We did everyting by hand.
My friend used a software called 123D Make that allowed him to slice up the 3D model. We could then print the slices of the body and a reference shape for the legs. Each body slice was identified with a number. We glued the paper sheets on styrene boards and cut the slices with jigsaws. You can admire a big pile of styrene slices on the next pic.

Then we stacked and glued together all the styrene slices, following the numbers. To make sure that each slice would be centered on the previous one, my friend had placed on each slice to be printed not only a number, but also a mark identifying a center point. We pierced that point in each styrene slice and stacked the slices by sliding a wooden dowel in each slice’s hole. It may look like it would be obvious to stack the slices on top of each other like if there was only one way to do it. But when you put a smaller slice on top of a bigger one, the shape itself isn’t enough to show you where exactly to glue it. The position may not always be obvious and the holes were helpful. When we were building the robot, which had way more complicated shapes, this technique was essential to position each styrene slice. (Yes, we really built the robot with this technique of styrene slices. Yes, it took a lot of time. No, I wouldn’t do it again. Well, I did the spider. But I won’t do another robot.) You can see the wooden dowel on the next picture. It gives a better idea of the process.
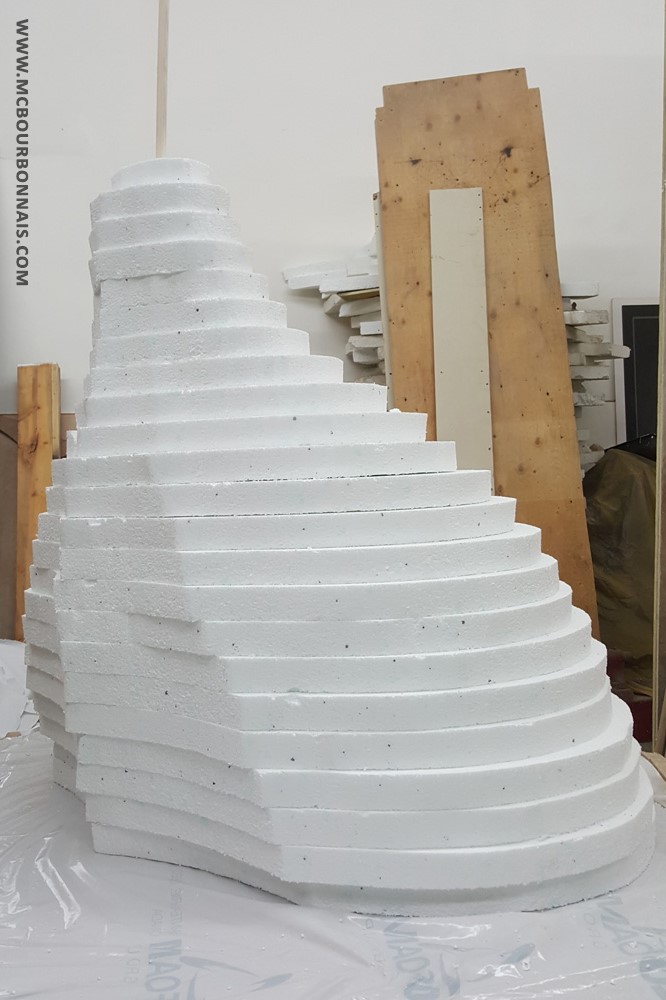
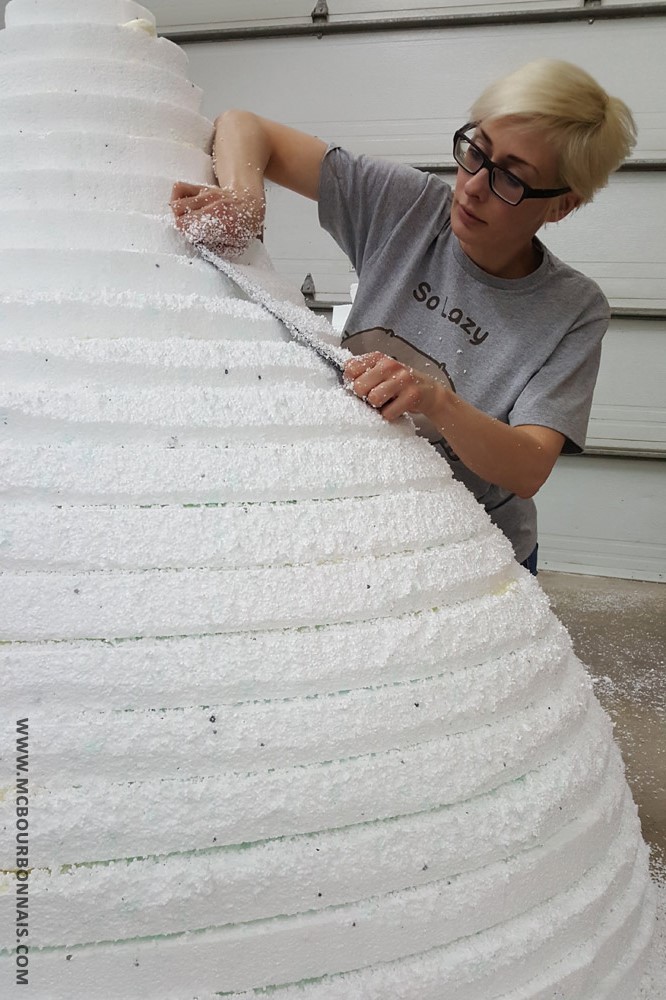
Stacking 2 inches thick slices makes that you have those ‘steps’ around the shape. To get rid of the ‘steps’ we had to sand them down, and the shape of the spider’s body appeared.
NOTE: Before any of you ask, I’ll explain something one more time and I think I’m gonna copy/paste this at the beginning of each part of this blog. I’m not using a dust paper mask on the work in progress pics because wearing various masks irritates the skin of my face and gives me blemishes. The only fact of breathing in the humidity of my own breath in those masks makes my skin look bad. Then I can have a convention, a photoshoot or an interview and I have to wear more makeup to hide the blemishes, which isn’t good for my skin either. There are the masks for chemicals that I absolutely have to wear when I’m working with polyester resin or automotive paint. So when it comes to dust, I give my skin a break and I don’t wear a paper mask. I know it’s not the healthier choice, but most of models are usually not fiberglass technicians. I have to deal with two jobs that don’t go well together. So I make the choice, as sad as it is, not to wear paper masks to allow my skin to survive. But I do wear a mask for chemicals and vapors when I use polyester resin and automotive paint.
Then we cut 2 first MDF shapes following the paper guide of the slice extracted from the 3D model. We made 2 different leg shapes. A bigger/longer one for the 2 front and 2 back legs and a smaller/shorter one for the 4 middle legs.

We glued styrofoam on each side of a first MDF guide and sculpted the leg’s shapes following the guide. As I said before, there are more efficient ways to do big fiberglass structures like this. A 5 axis CNC would have sculpted the leg in a fraction of the time we took to sculpt it by hand. But we had our budget limitations, so we sculpted by hand. That being said, it was surprisingly fast to sculpt that first leg, which made my friend think that it wouldn’t be too bad to sculpt the 8 legs instead of sculpting a big one, a small one and make 2 molds. ‘Not making molds will save money’ he thought. ‘But it will take longer to sand and finish 8 legs made by hand. We should make molds’ I said. ‘Making molds wouldn’t be that expensive. It will be way faster. It will be worthed’ I added. But my friend disagreed. ‘No, no, let’s sculpt the 7 other legs already. It will be faster and we’ll soon be done.’ We have a proverb in French that says ‘Ce que femme veut, Dieu le veut’ which means ‘What a woman wants, God wants.’ This is never true with my friend. No woman (or man) will ever convince him to do something he disagrees with, so it would be more appropriated in his case to say ‘What my friend wants, God wants.’ He wanted to sculpt and cover with fiberglass 8 different legs. Well, we did. But we would soon realize (sorry, my friend) that we should have made molds.
Enough for today! Part 2 of my Rachnera making of blog coming soon!
Great to see this up, Marie-Claude! I had wondered how early on you were asked to create Rachnera. I can only imaging how hard it was to say yes while just barely finishing Lug! But kudos to you for powering on through and accepting! You really have a lot of strength and endurance for taking on 2 huge projects in a row.
Looking forward to the next blog post!
As an experienced modeller I can say – sculp one is easy. Make two identical pieces shake your ego. Try done four or more identical stuffs is shortcut to inhabitate madhouse. No matter how much it cost to make moulds and cast resin copies – woman is right! :)