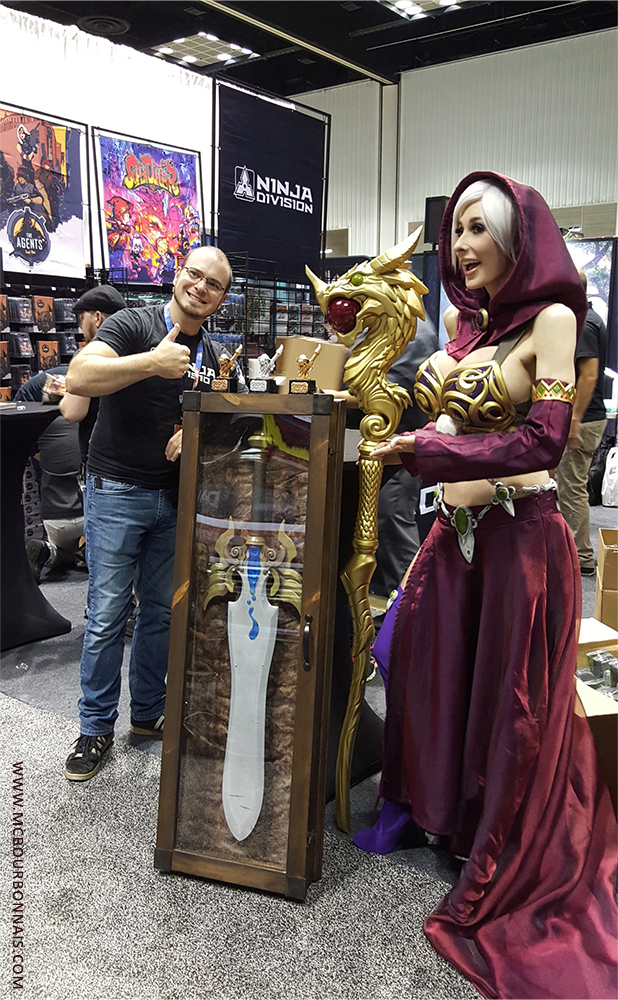
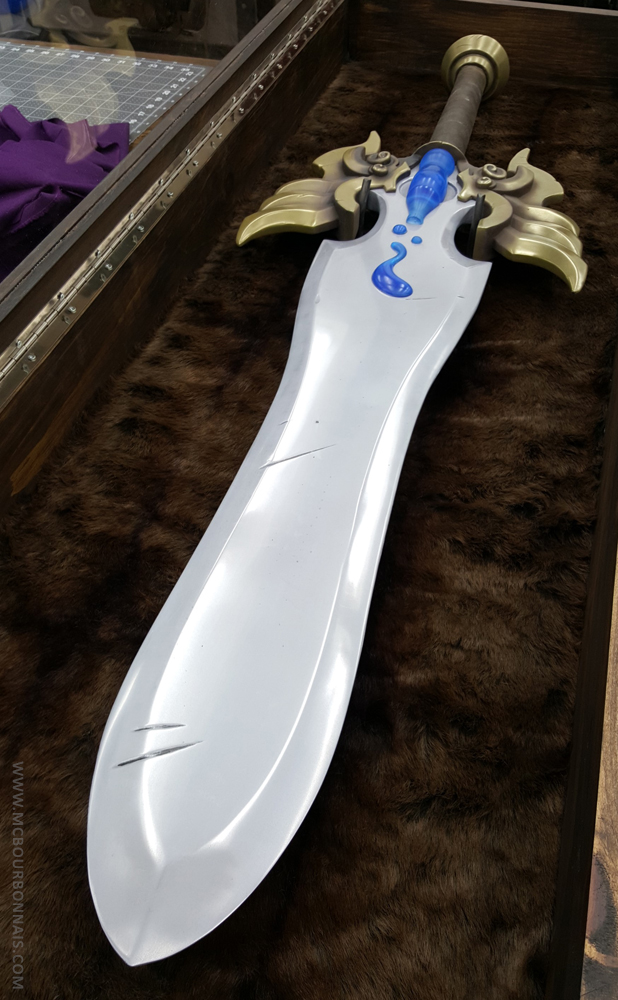
Maybe you’ve seen that trophy sword that was given by Ninja Division – Soda Pop Miniatures to the winner of their miniature painting contest at GenCon last year? Well it was made in my workshop, but I never had the time to talk about its making of. This year, they ordered another one and I’m working on it right now. Follow my Twitter account for daily making of updates!
Pour tous mes amis du Québec, je serai au Festival Geekulture Lanaudière dimanche, le 17 juin prochain! :D Venez me voir à ma table et ne manquez pas mon panel sur la fabrication de costumes à midi. Je parlerai du costume de votre choix! Vous voulez savoir comment j’ai fabriqué le robot de fibre de verre, l’araignée géante, mon costume de Scorpion, ce que je fais actuellement sur mes Vault suits… Je répondrai à toutes vos questions! :)
When I work on a cosplay costume, I always use many reference pics. Instead of looking at the pics on my computer or phone, I like to print the pics on cardboards that I can manipulate and put next to each other to have a global view of the costume. For video game costumes, it’s easy. I put a Vault suit on one of those mannequins in the game and I took pictures of my TV screen. Turning around the mannequin in the game, I could see the costume from every angle and from head to toe, so I had plenty of reference pics that I printed and put on my wall in my sewing room.
I mentioned many times how making a mockup is an essential step in the development of a pattern. When I work on a costume that has many yokes and seams, instead of guessing where the seams go on my flat paper pattern pieces, I simply make the mockup of a plain garment. I sewed a suit with long sleeves without any detail and standing in front of my mirror, looking at my reference pics, I started drawing the yokes and seams of the Vault suit directly on the suit I was wearing. It allows me to immediately see the proportions of each yoke compared to the reference pics. As you can guess, my breast implants are always the challenging part in the adaptation of a costume’s proportions. It’s not the design that is changing. It’s truly its proportions. Some yokes will be smaller or bigger than the original drawings in order to match my breasts measurements. Then I cut my mockup following the lines I traced and I make the paper pattern pieces with all the yokes. Once I have all my paper pattern pieces, I cut and sew a new mockup to test my pattern. There are always adjustments to make. I use pins, I take notes by drawing again on that new mockup and one more time, I transfer these adjustments to my paper pattern pieces. And I will make as many mockups as required until my pattern will be perfect. Don’t get me wrong. This isn’t a question of being perfectionist. This is simply how every piece of clothing is developed in the garment industry, from the simple jeans that will be mass produced to the Haute Couture dress custom made for a specific client. Mockups can NOT be avoided. For mass produced clothes, companies will even produce a mockup for each size that will be offered in their store. Each pattern, in each size, will be tested before it will be sent to mass production, most of the time in another country.
After many mockups, I evaluated that all the design details were there and that I could finally cut the pieces in the real fabrics. We often underestimate the time needed to cut. Also, many little pieces needed fusible interfacing. It took me many hours to cut all the pieces of my 5 Vault suits and to add interfacing to all the pieces that needed it. I used fusible interfacing because I’m using stretch fabrics, 4 knits and 1 woven fabric with a stretch fiber, and fusible interfacing would keep some pieces from stretching and would add some strength to the different fabrics. Usually, the pieces that will need interfacing are the collar, the wrists, any opening where there will be buttons and buttonholes, some hems (for fancy skirts, jackets, etc. but obviously not for jeans and tshirts), some pockets and their openings, etc. Putting fusing interfacing takes some time too. Some subcontractors in the garment industry specialize in cutting pattern pieces in the fabric and adding fusible interfacing to the pieces that need it.
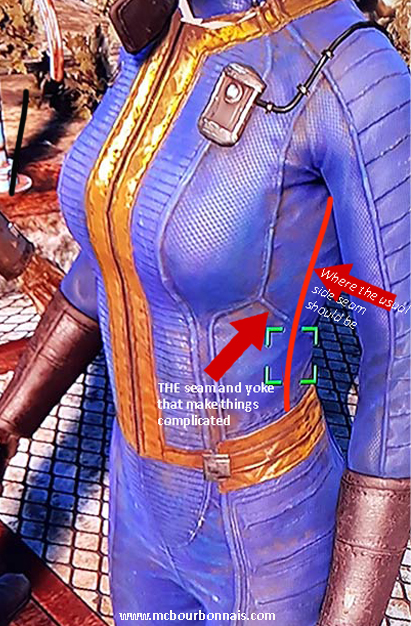
So all the pieces were cut and I was ready to start sewing. From where would I start? There are so many yokes and steps in this Vault suit! Sewing mockups allowed me to determine the order in which some pieces would need to be sewed. Because of some specific design details, that devilish yoke that goes under the arm instead of the usual side seam, I already knew that the Vault suit would have an unusual assembling order. This detail probably deserves an explanation.
If you don’t sew, you have to know that all the ‘ordinary’ tshirts/shirts/jackets in the world are usually assembled in one specific, efficient and profitable order. We’ll start by sewing the shoulders together, so the front and back of a shirt, for example, will hold together by the shoulders. After, we’ll sew the sleeves. Then, we’ll sew that seam that closes the sleeve and we’ll continue to close the side of the garment. One long seam that goes from the wrist to the hem of the garment. Then we can move on to the collar, wrists and/or hems. For a one piece jumpsuit with sleeves, that seam will go from the wrist to the hem of the leg. One long seam that closes all the suit. If the garment design allows it, that’s always how it will be sewed because it’s the most efficient way and companies usually want to keep the production costs low. If you draw on purpose a design that doesn’t allow you to close the side of the garment in one long seam, like for a racing suit with a lot of pieces and yokes, for example, you know in advance that the garment will be more expensive to produce because it will require more sewing steps.
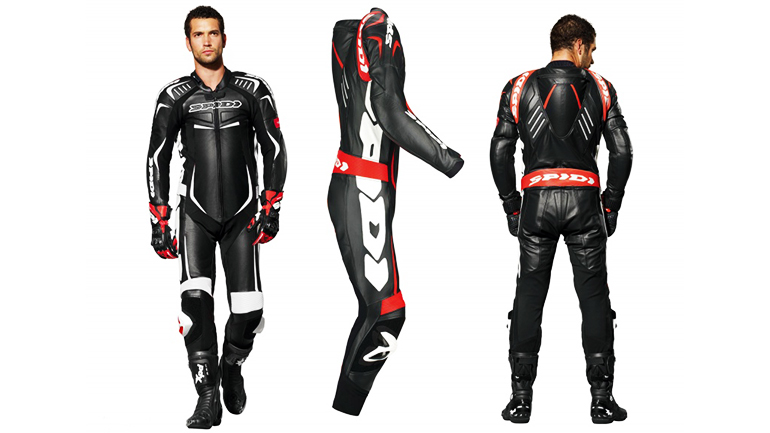
The following is a good example of a motorcycle racing suit with a lot of yokes, including some yokes on the side of the body, so there’s no side seam. It would be totally normal that such a suit would be more expensive, because it has many pieces to cut and many sewing steps.
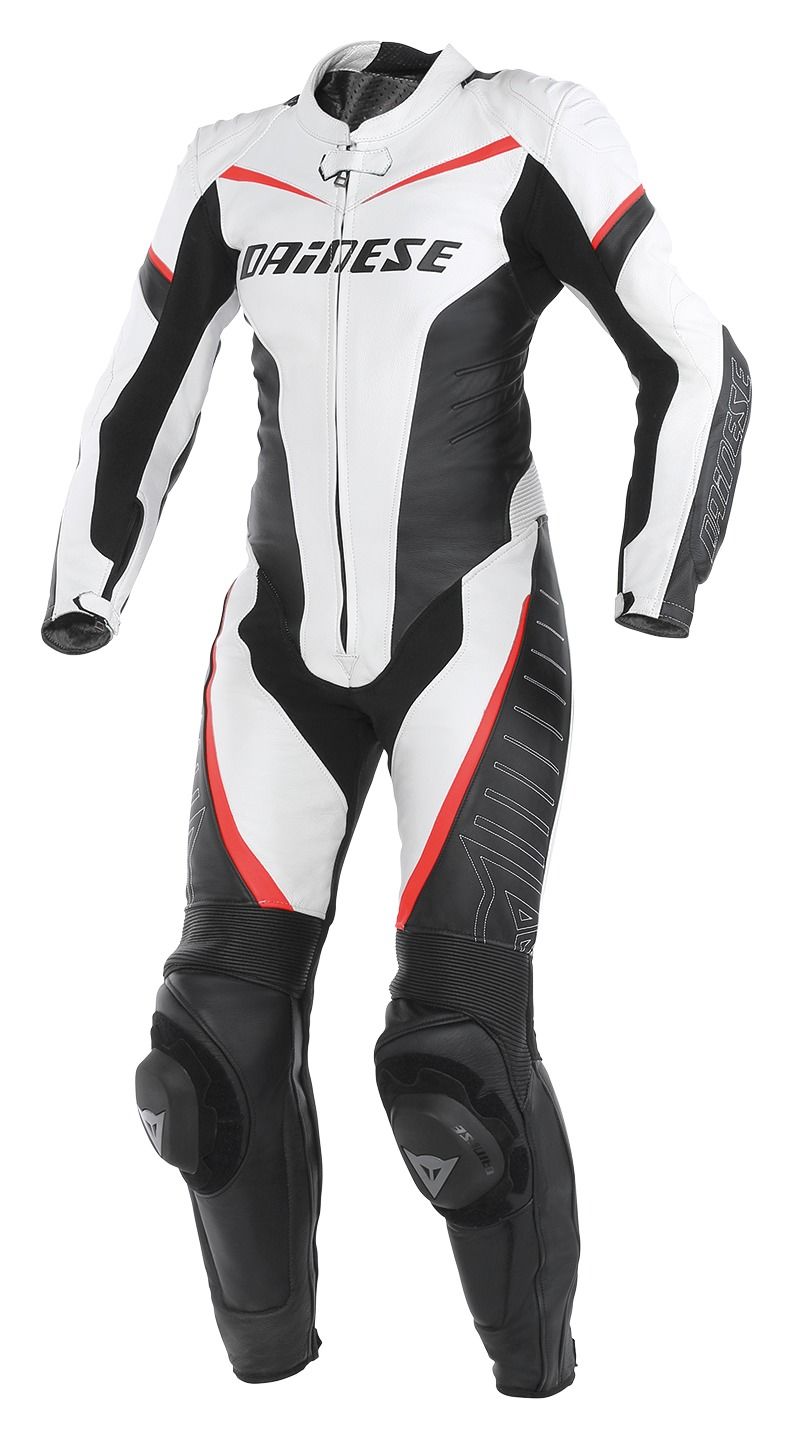
Here’s another good example of a pretty complicated one piece suit that has a lot of sewing steps.
Note that tshirts made using circular knits are one notable exception. If you look at your tshirt and it doesn’t have a seam on the side, it means that the knit was knitted on a circular machine, like a sock or a beanie. Each ‘tube’ corresponds to a size. They will cut the tshirt pattern pieces in that tube using the side of the tube as it is. No seam on the sides. The sewing steps will be to sew the shoulders together, forming a circle, the armholes. Each sleeve will be ‘closed’ with one seam separately, then sewed in the armhole in a circular seam. Last steps are the collar, sometimes a biais that covers the shoulder seams inside and finally, the hems.
Men’s tailor suits are also an exception. These fancy jackets will often be sewed by ‘closing’ the sleeves, ‘closing’ the body of the jacket and sewing the sleeves in a circular seam in the armholes. It makes a more beautiful looking, ‘rounder’ sleeve with a better visual structure. But it takes a little longer to sew.
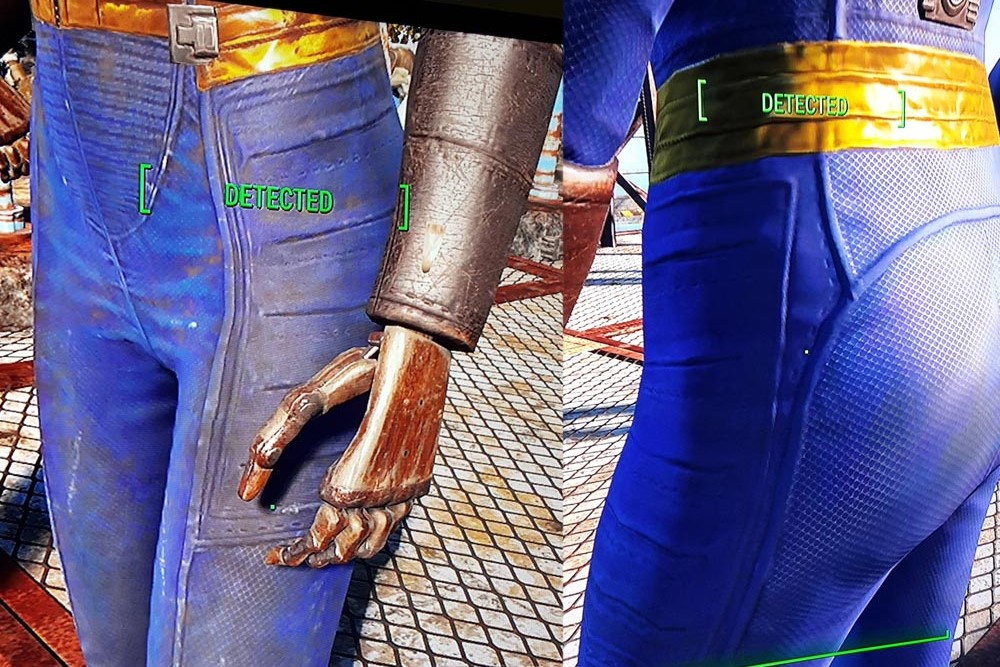
So the Vault suit is one of these one piece suits that couldn’t be ‘closed’ with one long side seam because of that yoke under the arm and the rectangular yoke on the side of the thighs. I decided to start by that rectangle. There are horizontal lines in the rectangle with suddle dotted lines around that remind me of top stitches.
I think that concept artists always draw costumes and garments trying to imitate things that they’ve seen around them. They are not fashion designers. They probably don’t know how to do pattern drafting or how to sew. They don’t necessary draw things that are logically functional or doable. They draw things that ‘look’ like a garment and most importantly, that look cool. My question was: ‘What the hell did this guy see to draw these lines surrounded by a top stitch? Which part of a real garment inspired this artist?’ Of course I’ll never know. I’ll never get to meet this artist to ask him what inspired this particular detail. I can only analyse and try to guess. After all, that’s my job as a costumer.
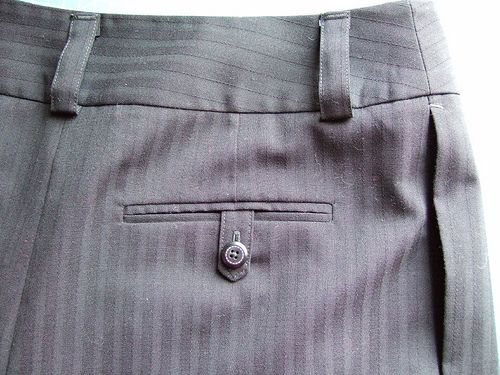
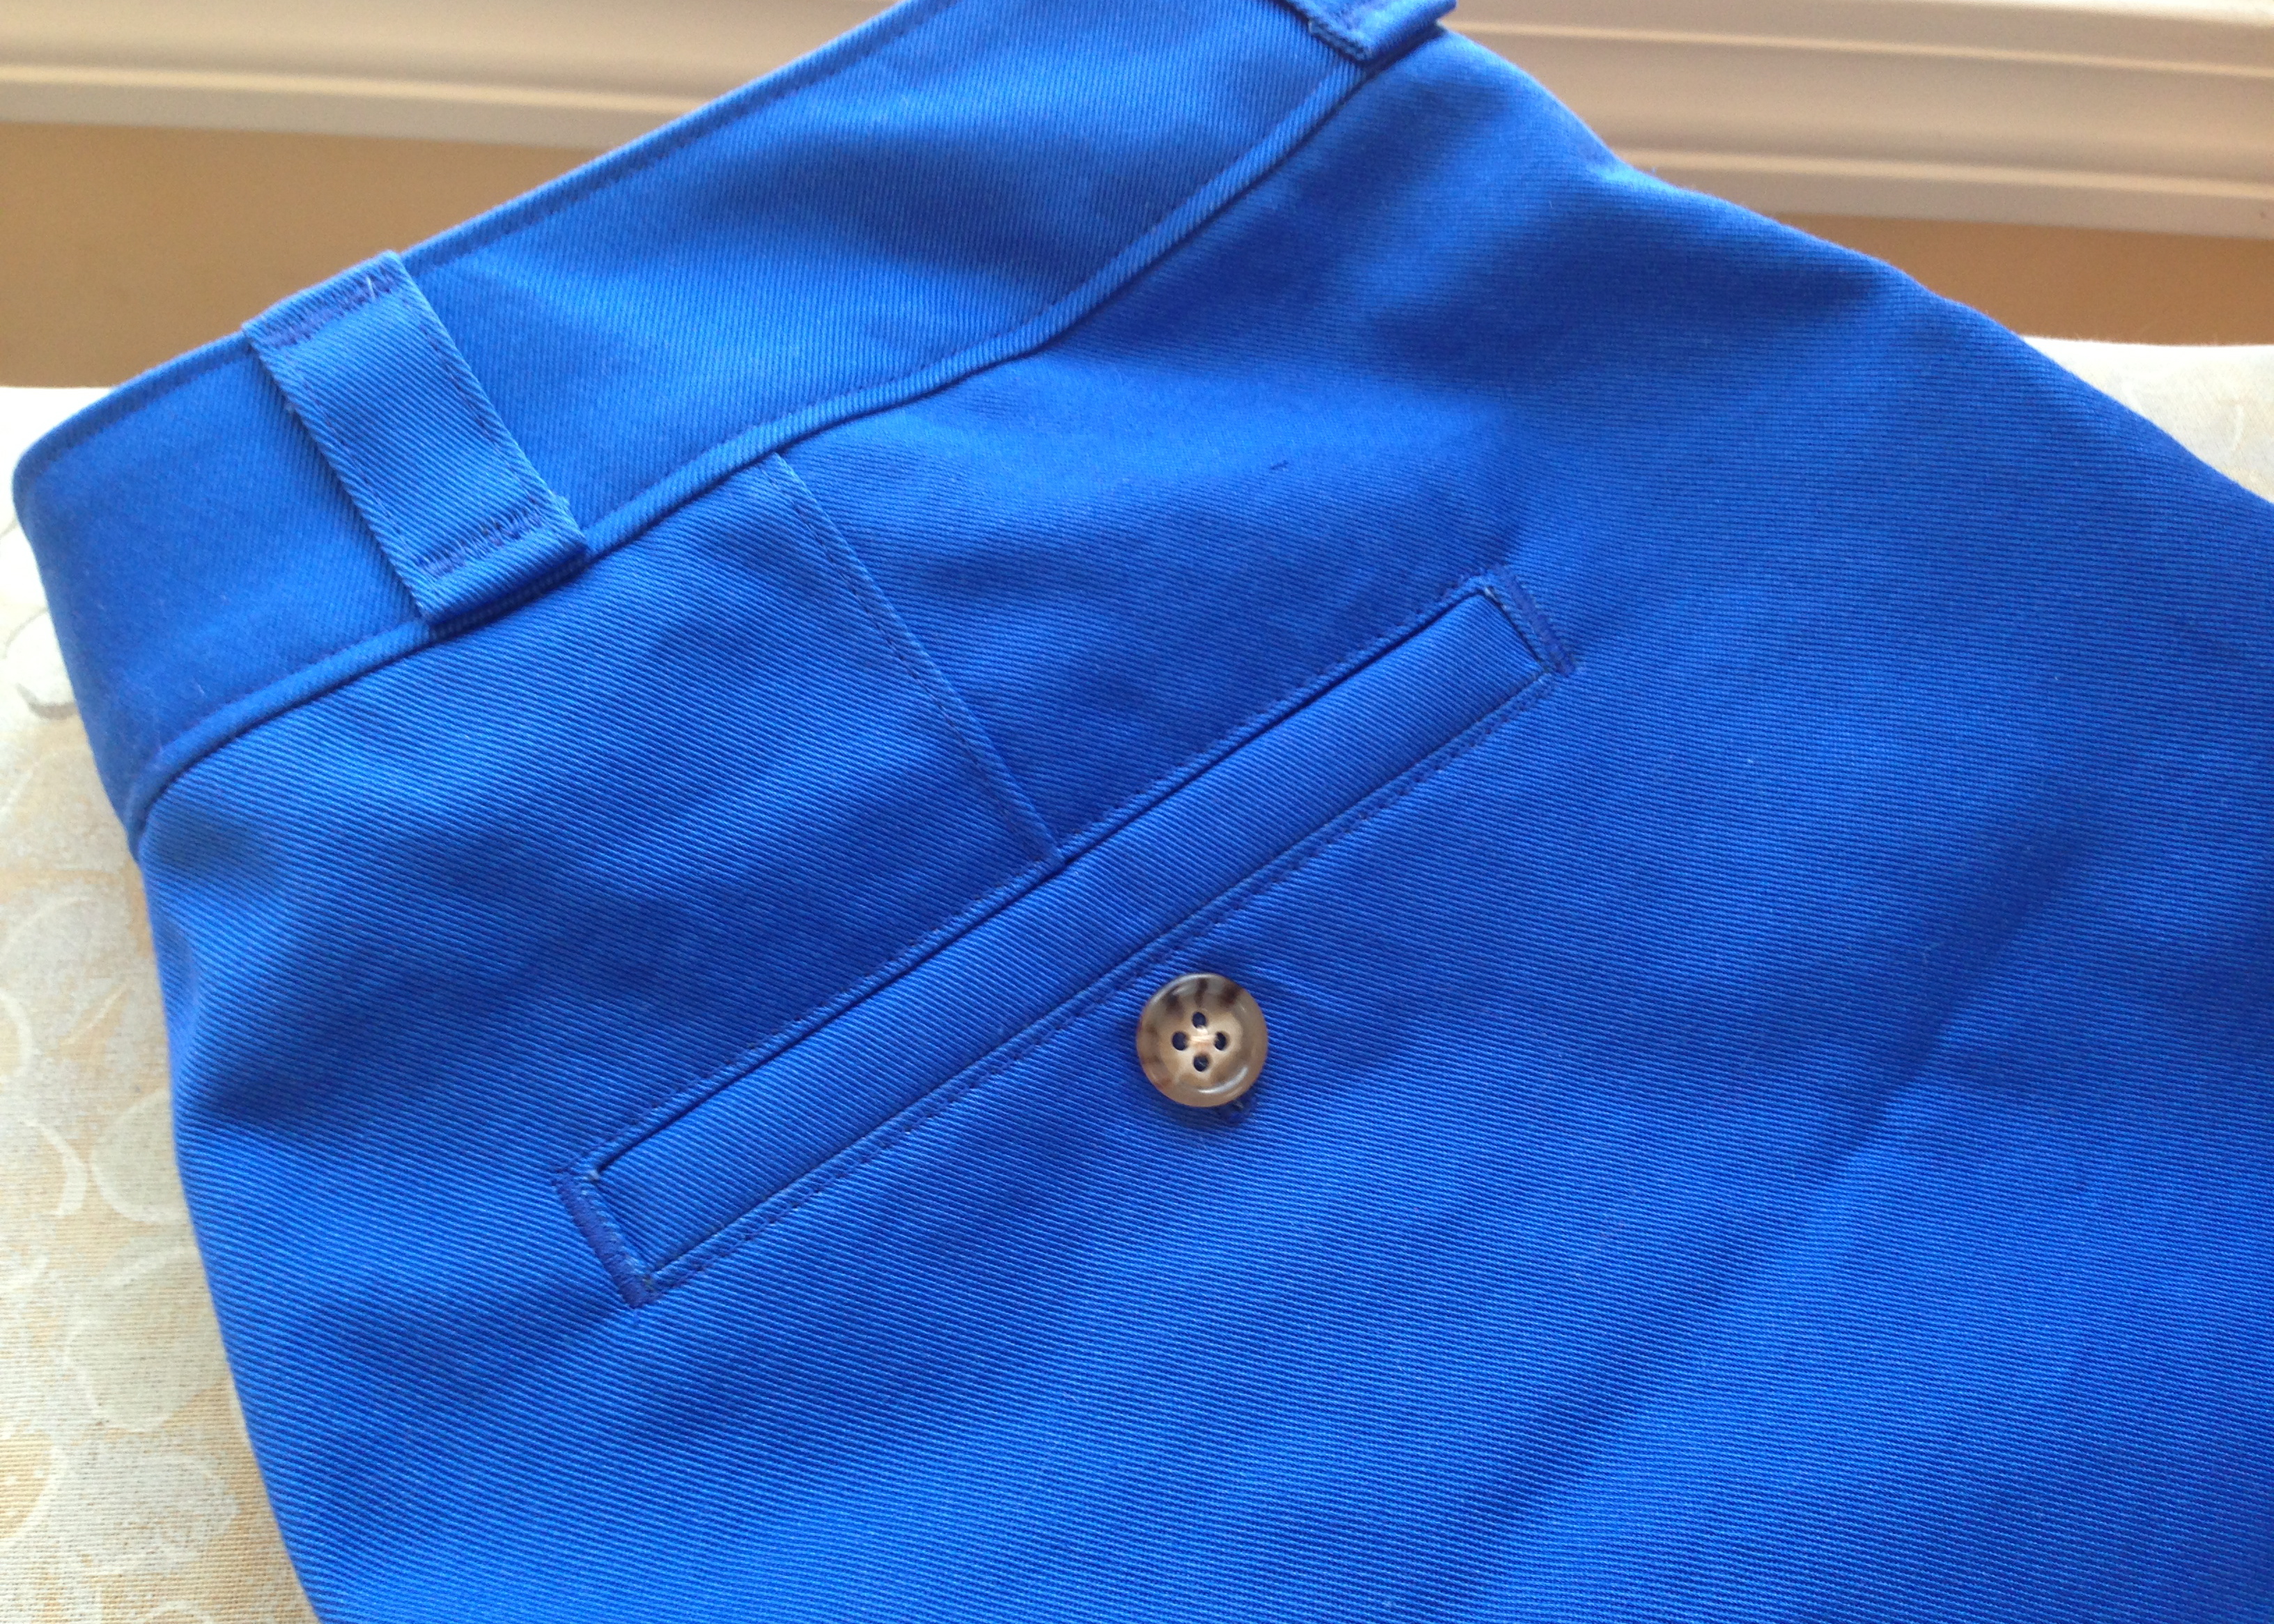
And after a little while, I came to the conclusion that these approximative, mysterious lines could be an artist’s interpretation of a welt pocket. There are different types of welt pockets.
I think that the concept artist could have seen welt pocket with a topstitch around and that it could have been the inspiration for these 5 horizontal lines. I decided to make 5 decorative double welt pockets in each rectangular yoke on the sides of the Vault suits. Every cosplayer knows that cosplay costumes rarely have pockets. I rarely get to sew pockets in my cosplay projects. As a matter of fact, I hadn’t sewed a welt pocket in years. I didn’t even remember how to do it. I had to look at my school books again.
You’ll usually see welt pockets on tailor suits and toxedos, on light or heavy jackets like leather jackets, etc. There are many techniques to sew a welt pocket. Different techniques will give slightly different results, some techniques are more complicated than others. But generally speaking, sewing a welt pocket isn’t a project for a beginner. I’ll try to explain the technique I used.
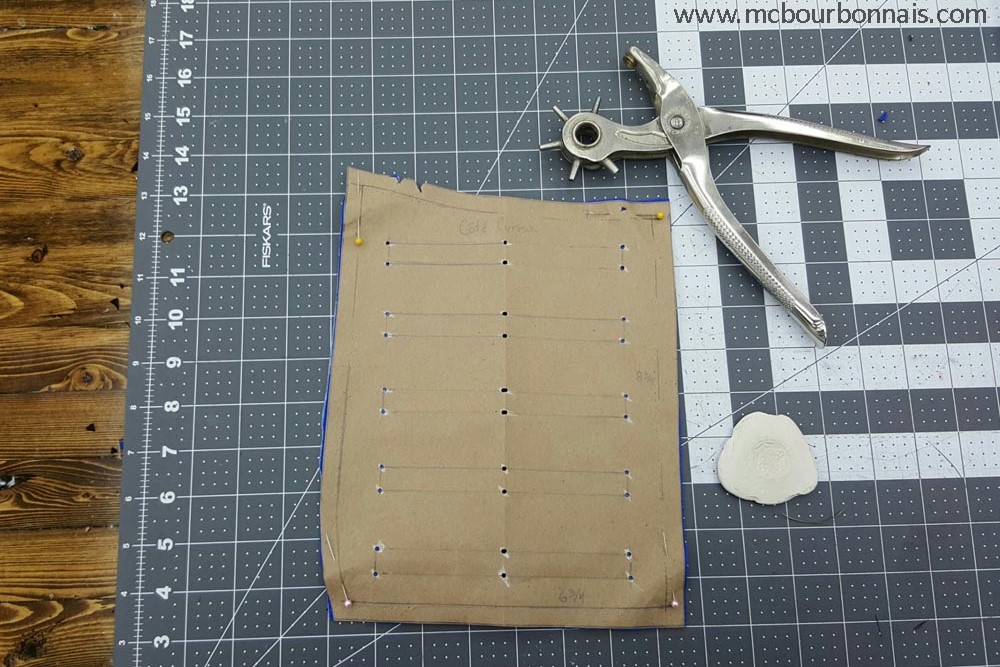
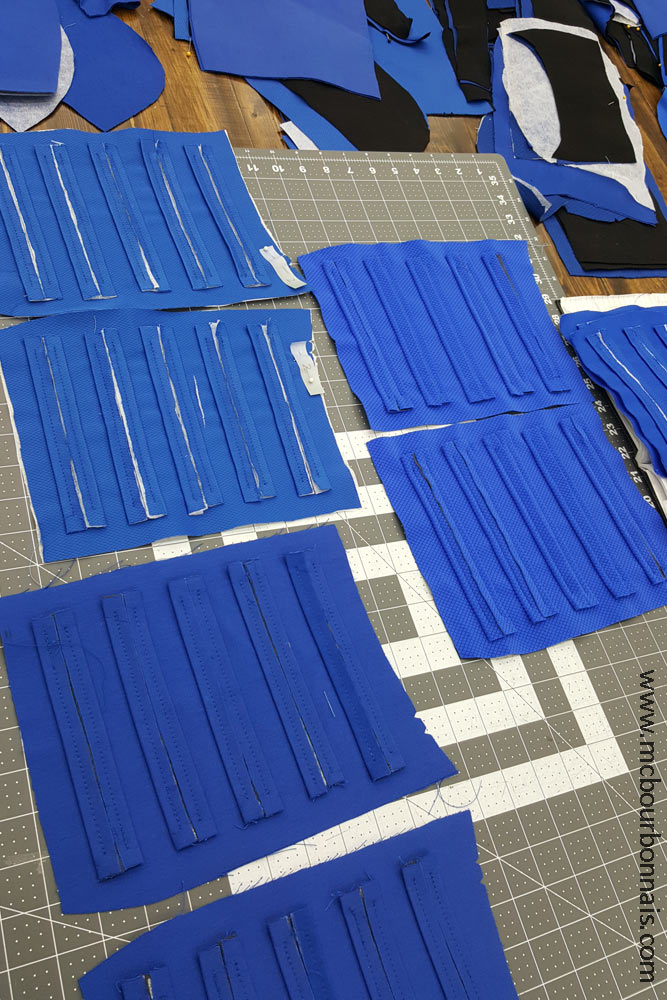
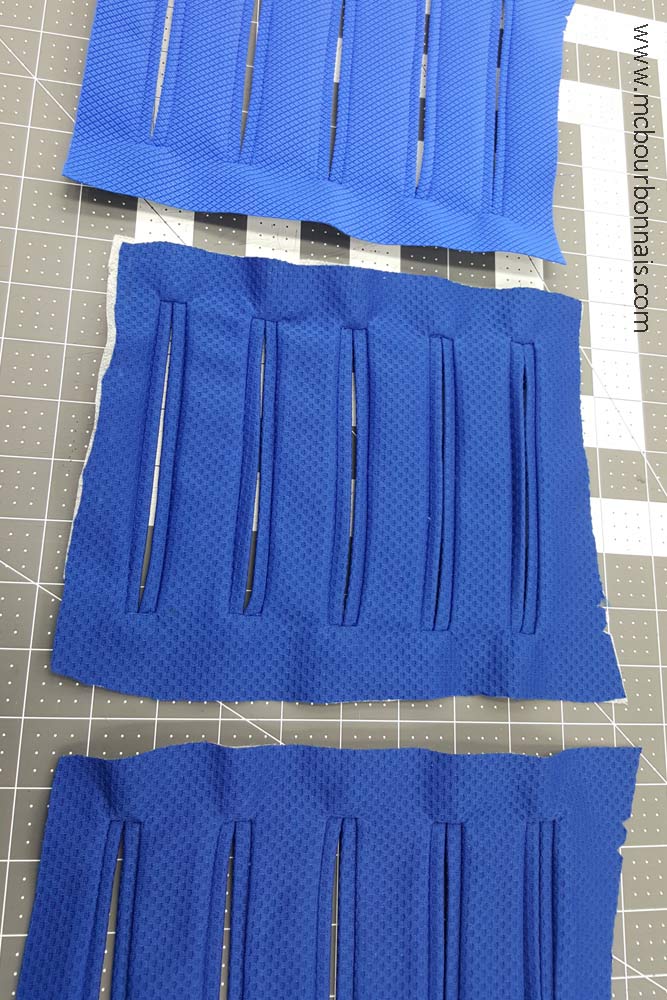
I started by tracing on my pattern piece the shape and place of each pocket. I used my revolving punching pliers to make holes in my paper pattern to mark the pockets’ corners and I traced dots on the fabric with a chalk.
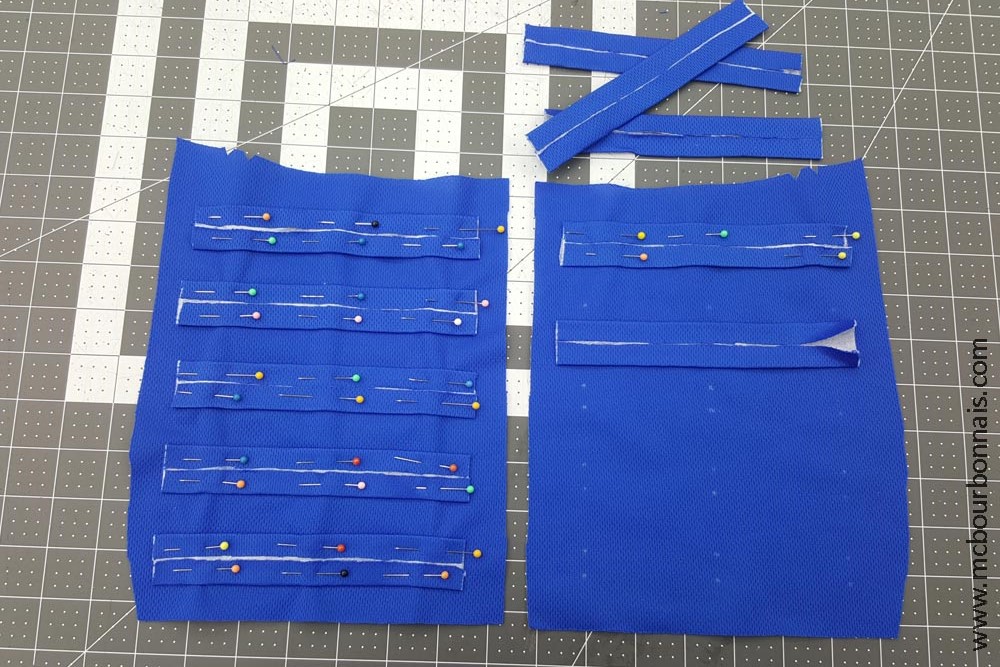
Welt pockets require a lot of calculation and precision. I chose a technique that I thought would be easier, since I hadn’t sewed a welt pocket for so long. I used fusable interfacing on all the fabric pieces. I folded in 3 many fabric stripes of a precise width and placed each of them on the rectangular yoke, following the chalk marks, with the opening facing me. Yes, I’m working on the good side of the fabric. There’s a point, in the making of a welt pocket, where you make an opening in the fabric and flip the pockets inside, on the wrong side of the fabric. But for now, I’m working on the good side of the fabric.
Next step is to make 2 stitches and this is where you have to be precise. The distance between the 2 stitches corresponds to the opening of the pocket. The distance between the stitch and the edge of the folded fabric stripe corresponds to half of the pocket’s opening width. When we’ll flip these fabric stipes inside, they will fill up the opening to form the welt pocket. If they’re too large, they will overlap. If they’re too narrow, there will be an opening in the middle. If they’re uneven, it will show and it won’t be beautiful.
And remember that I had to repeat the steps for the 5 Vault suits…
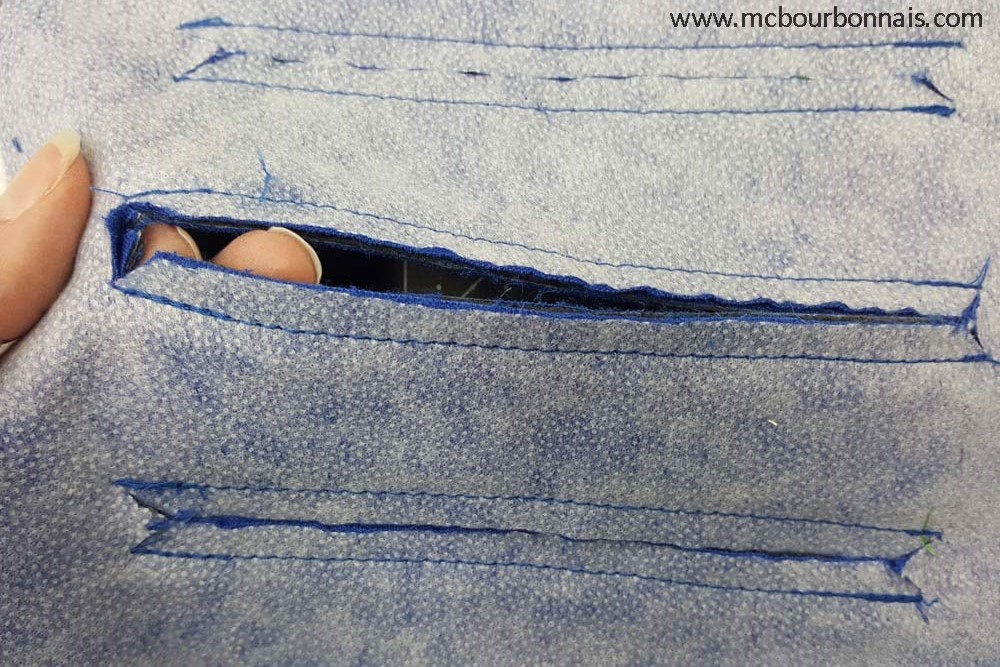
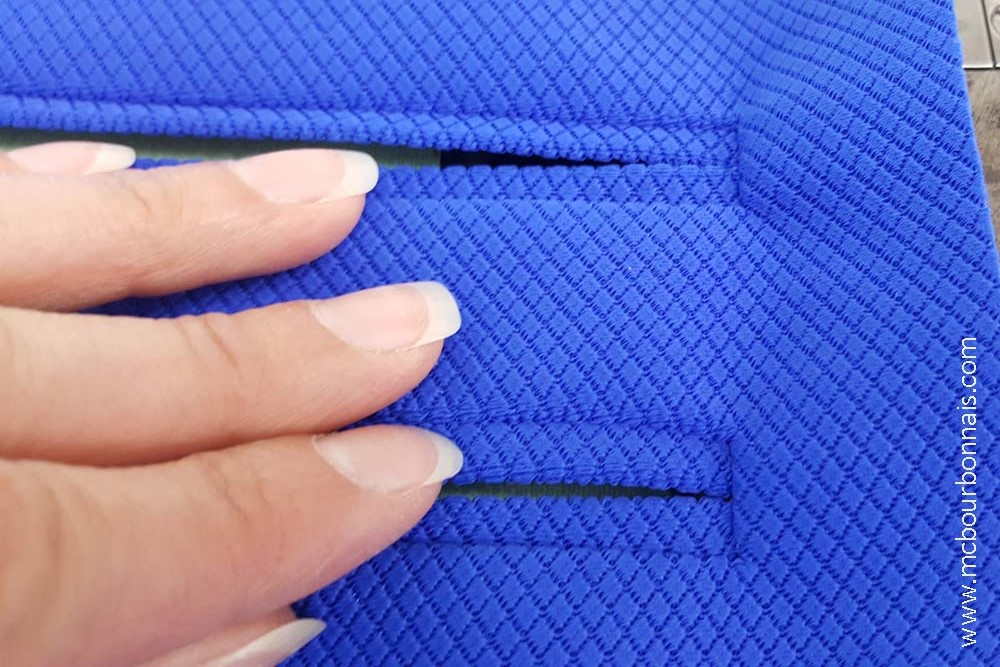
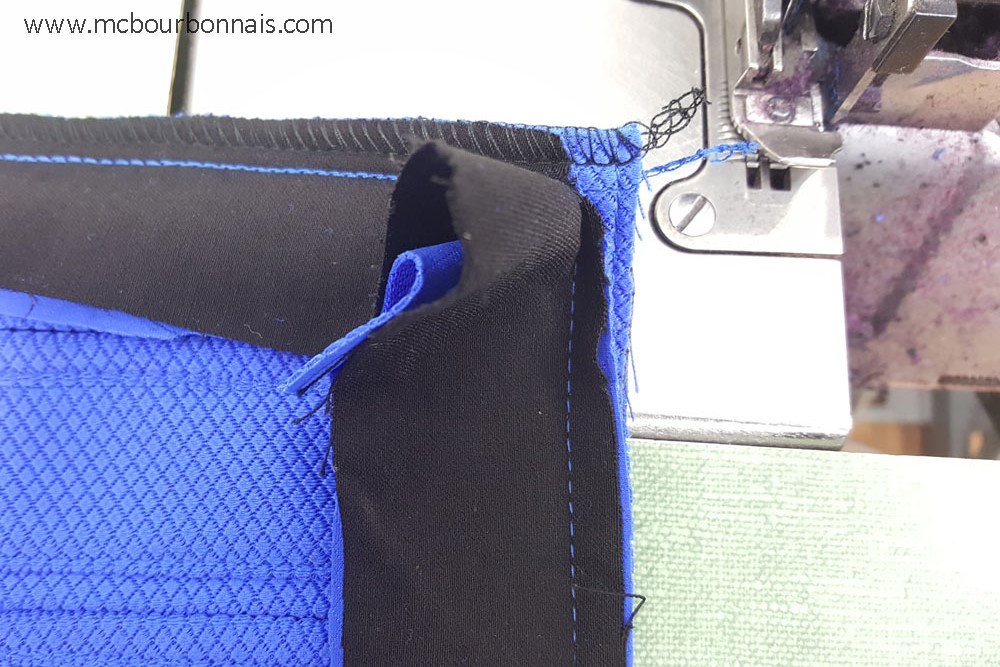
Next step is to cut an opening with an X-acto blade (my favorite tool…) right in the middle of the 2 stitches. Notice the shape of the opening cut in the corners. This shape is called ‘queue d’hirondelle’ in French, which means ‘swallow tail’. This cut shape will become the rectangular opening of the welt pocket. By the way, the white thing that you see on the wrong side of the fabric is the fusible interfacing.
This is where the magic happens. Now that there’s an opening in the middle of the rectangle, you can flip the fabric stripes inside, on the wrong side of the fabric. And all of a sudden, it looks like a welt pocket. :D
Notice the ‘queue d’hirondelle’ shape that is now a little triangle of fabric coming out from the corner.
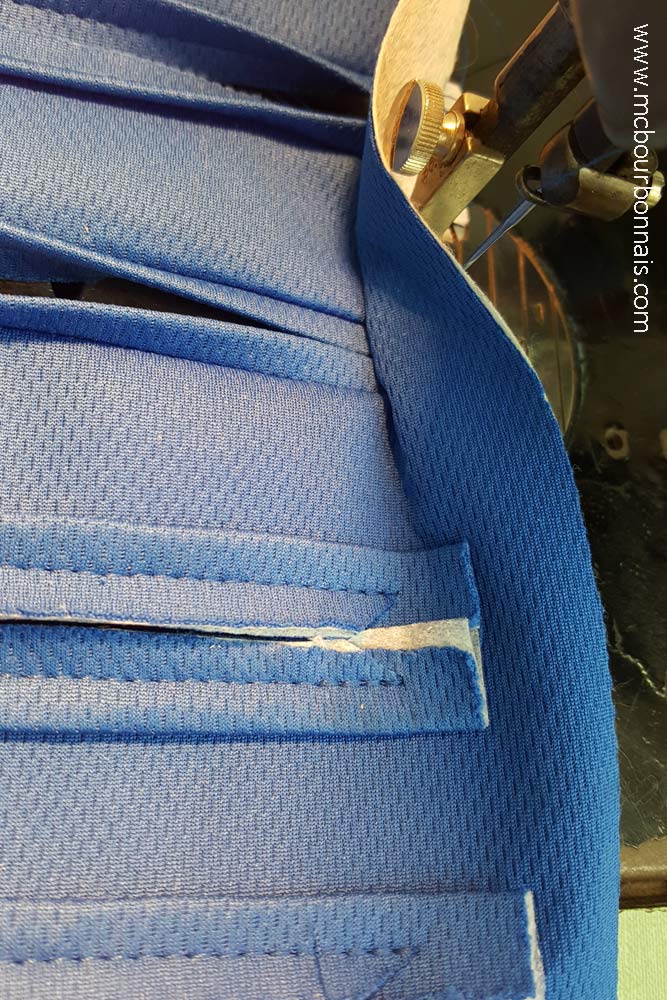
This little triangle has to be stitched. It will hold in place the sides of the rectangular opening.
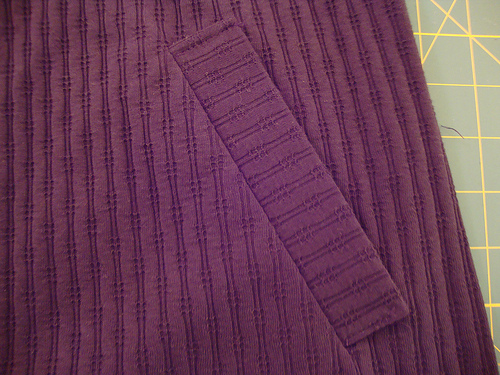
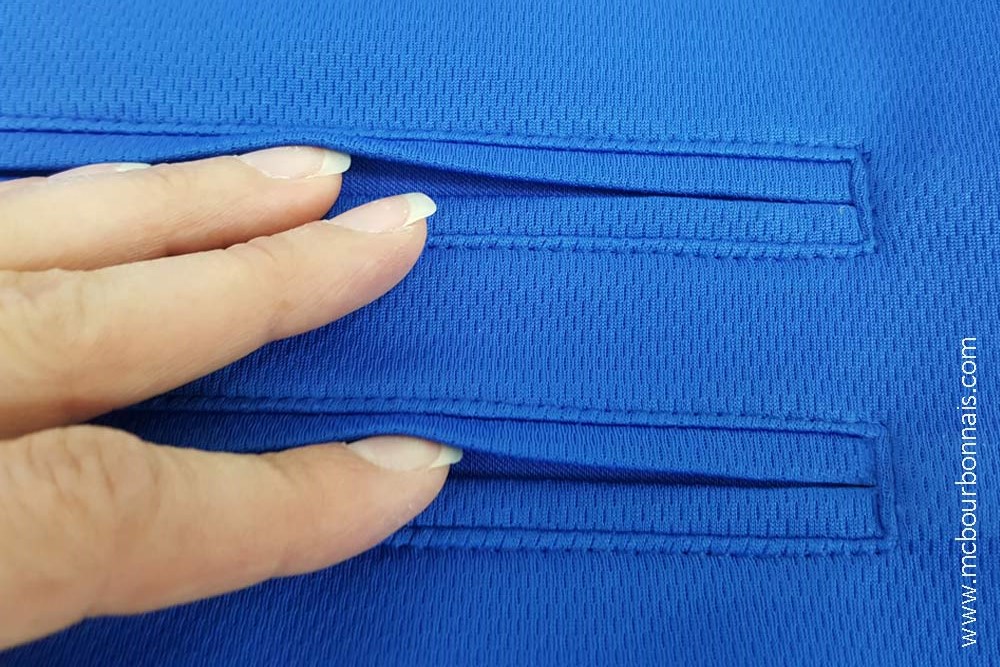
And here they are, the welt pockets!
Many welt pockets that need a little love and ironing.
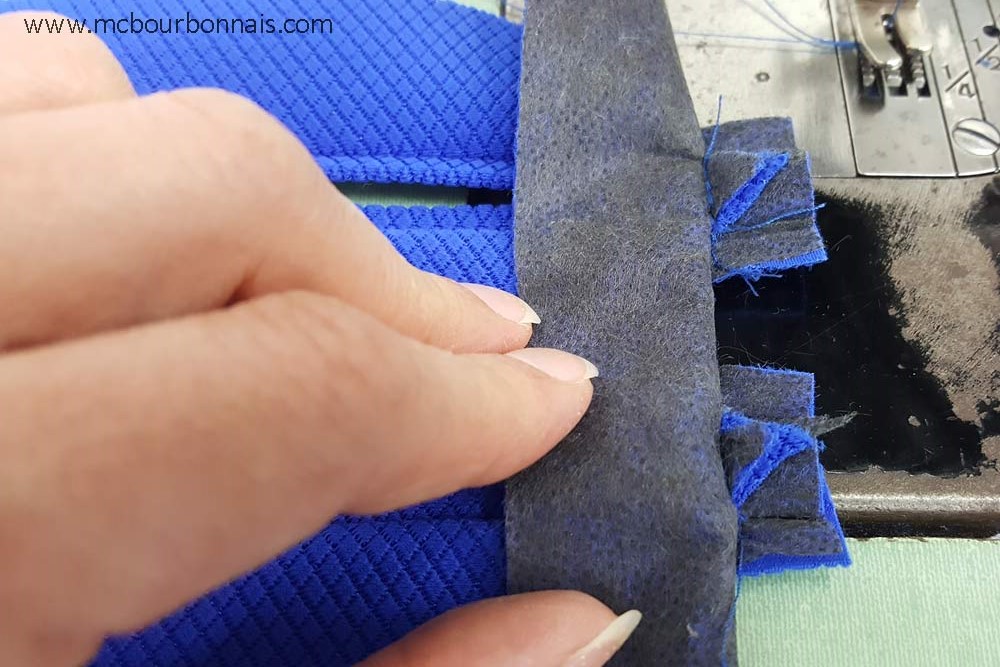
Of course I skipped some steps because they are only decorative pockets. There’s no pocket bags. I only lined each rectangular yoke with a piece of blue fabric. The topstitch around each welt pocket will hold the blue fabric under it. They are fake, ‘closed’ welt pockets.
5 welt pockets on each side of the Vault suit = 10 welt pockets per Vault suit X 5 Vault suits = 50 welt pockets. Done. I hadn’t made any welt pocket for years and I won’t make 1 more welt pocket anytime soon. To be honest, when I look at them closely, I know they’re not all perfect. But it was a good practice of a sewing technique I had forgotten.
Now let’s look at the original design again.
Each rectangular yoke with the welt pockets is ‘framed’ in another rectangular yoke. Sewing a rectangle in a rectangular opening is another type of challenge. Here we go.
Rectangle = 4 sides, so 4 seams. The first one is easy.
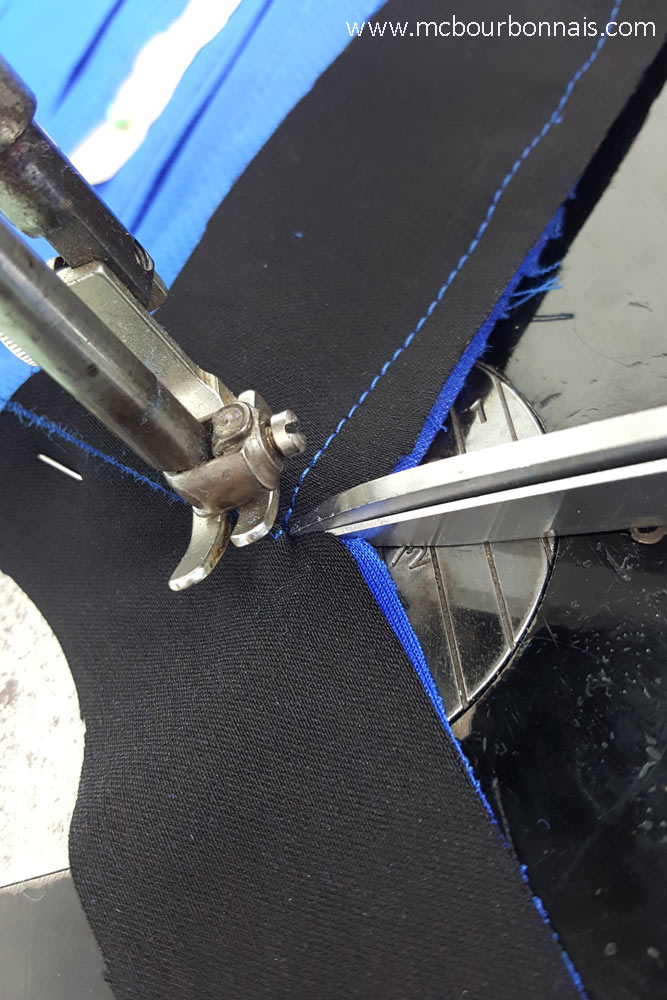
Then, how do we turn the corner? :S There’s a technique. :) You have to lift the foot of the sewing machine, but keep the needle in the fabric to make sure nothing will move. Then, you cut a diagonal notch in the corner. It has to be a precise cut. You want to stop just before the stitches.
Once the corner is cut, you can ‘open’ the notch, turn the fabric and continue sewing the other side of the rectangle. You repeat these steps for each corner until the whole rectangular yoke is sewn in the rectangular hole.
Assembling a garment is usually made using a 5 thread serger (for non stretch or very lightly stretch fabrics, look inside your jeans, for example) or a 4 thread serger (for stretch fabrics, look inside your tshirt.) But some complicated steps like the previous one I just explained have to be done with a plain sewing machine. It means that to prevent the fabric from fraying, I have to use the serger anyway, in a 2nd step, sewing over my 1st plain stitch. It’s just longer and for a mass produced garment, it would mean that it would be a little more expensive to produce. Each extra step adds to the production costs.
A topstitch, some ironing and that first little part of the Vault suit was done!
You can look at the original design again. A lot of work for only one yoke, right? That was a blog with a lot of information about sewing techniques and how garments are made in general. If you’re part of the readers who don’t know how to sew, I hope you’ve learned something! lol More information coming up in Part 3! :)
Yes, they’re ready, these pics of me as a brunette that I’ve been teasing you with on my social medias in the past weeks! :D And this photoshoot is pretty different, it’s inspired from the 60s!
A little while ago, a friend of mine bought a house that had never been remodeled in 50 years. He was demolishing everything to remodel the whole thing and I kept these prefinished panels and installed them in my workshop. Over the next months, I found vintage furnitures and accessories, like that old jukebox, and I completed my background. Perfect for a tribute photoshoot to the 60s… and it matches my light brown hair. ;) First official photoshoot with my natural hair color!
I’ve been working on my Aimsee & Keira projects with a few very realiable and wonderful artists for a long time now. Timur Shevtsov is one of them and he’s of great help! He’s a really talented concept artist who patiently does his best to meet each of my smallest requests and encourage me. I also have the pleasure to be his practice model from time to time. What a nice perk! :D A blonde or a brunette Marie-Claude today? Added funny notes to Timur’s sketches. ;) I’m very lucky to collaborate with such a talented artist.
Check out my website’s gallery for more artwork by Timur and check out his online profiles.
Le 2 juin prochain, je serai au Festival BD La Croisée des Mondes à la Librairie Morency de Place Fleur de Lys. Dès 11h00 jusqu’à 17h00, avec d’autres invités des mondes du cosplay et de la BD, nous ferons découvrir la pop culture au grand public!
I often hear in the cosplay community that video games costumes are considered like being more difficult to build because they can be so highly detailed. It’s the difference between a costume from a comic book or a manga, that will be quickly drawn and reproduced from a frame to another, slightly different depending on the artist who draw it, and between a video game costume, which is a texture map applied to the surface of a 3D model. No matter how complicated the costume is, all the details will always be there, from every angle, all through the game. Yes, some video games costumes are highly detailed and that’s exactly what I like about them. As I always say, cosplay was useful for me not only to give some international exposure to my skills as a costumer, but also to help me acquire some very advanced skills. I used cosplay as an excuse to make challenging buiding projects, choosing on purpose very complicated costumes that would necessary make me learn something new.
One of my friends is an excellent gamer and a huge Fallout 4 fan. He introduced me to the game that I found, to be honest, pretty boring at the beginning. Walking around in a destroyed world collecting garbages of all kind and killing people didn’t seem like the most exciting thing to me. And even though I built a robot, I’m not attracted to robots at first glance (sorry guys, I might be a cool girl, but I’m still a girl and I’m more into fashion than robots) and I wasn’t seduced by the game’s technology and power armors. At least not at first.
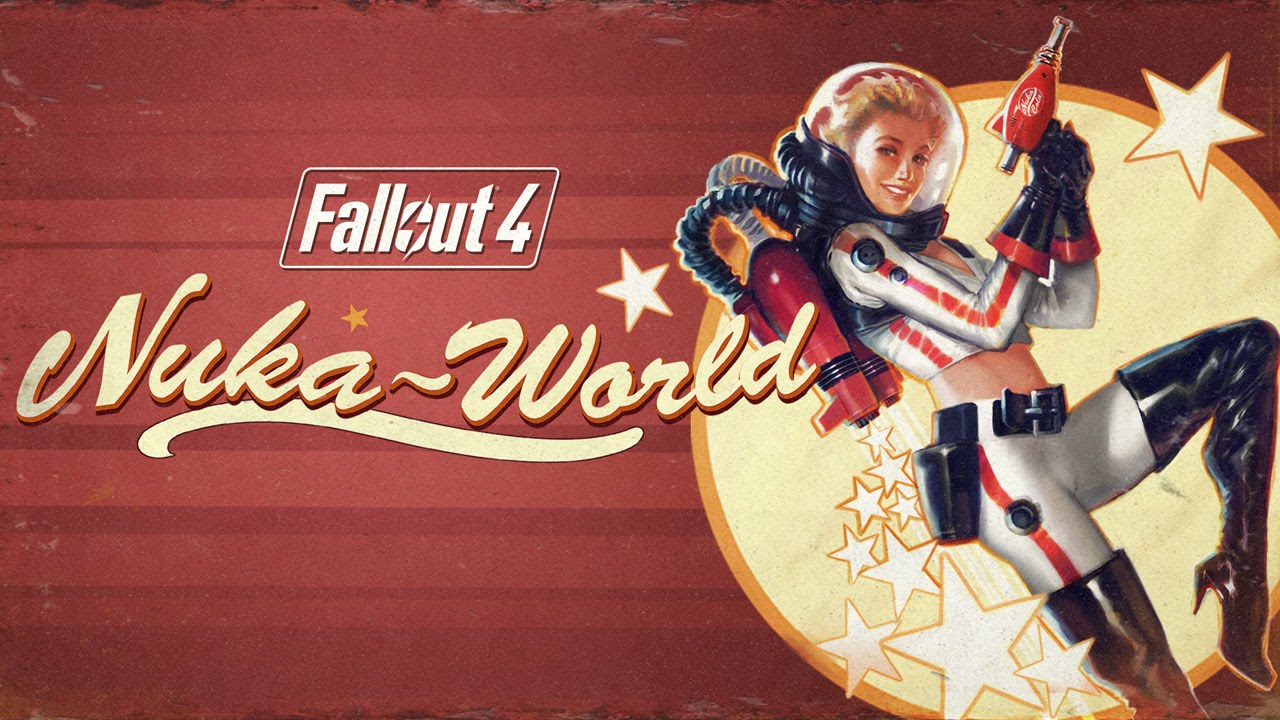
With my very limited gaming skills, I gave the game a try so I got to see the story from the beginning, noticing the characters’ clothes and the objects’ designs inspired from the 50s and 60s and I started to find the game more interesting. The more I discovered the game, the more I saw all the design searches that the Bethesda team made to give this apocalyptic world a ‘retro’ feel that would show through clothing and costumes, but also through objects and architecture. The created brand Nuka Cola, an obvious allusion to Coca Cola, which is intimately related to the 50s diners and rockabilly fashion, is the first reference to the 50s that is present all through the game and in Nuka-World, of course. It makes me want to have a milk shake.
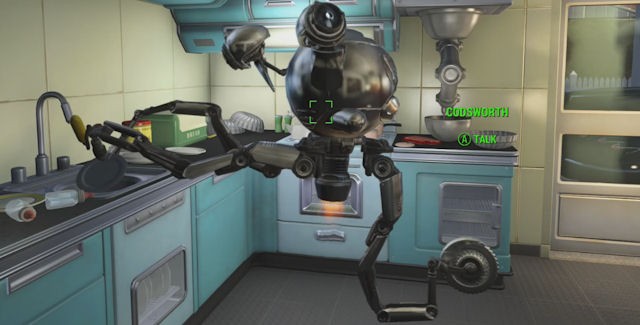
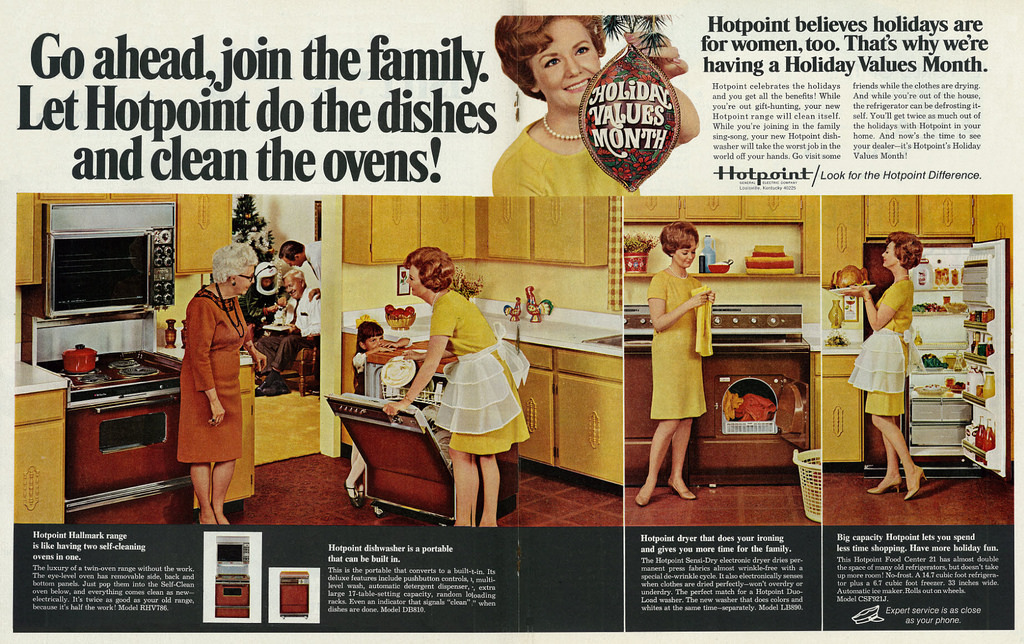
Then, there’s Codsworth, a helping, kind of housekeeping robot that immediately brings you in the future with its advanced technology. But at the same time, it remembers me of an expensive electrical appliance like one of these fancy things that were introduced to the housewives in the 60s ‘to make their lives easier’ and help them in their daily cooking and housekeeping tasks.
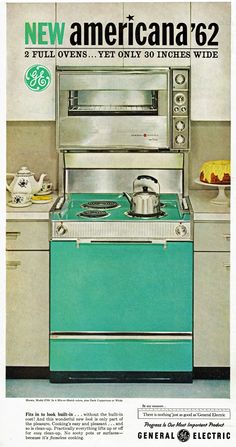
The turquoise color of the kitchen in Fallout 4’s opening scene was chosen on purpose. It was such a trendy color in the 60s…
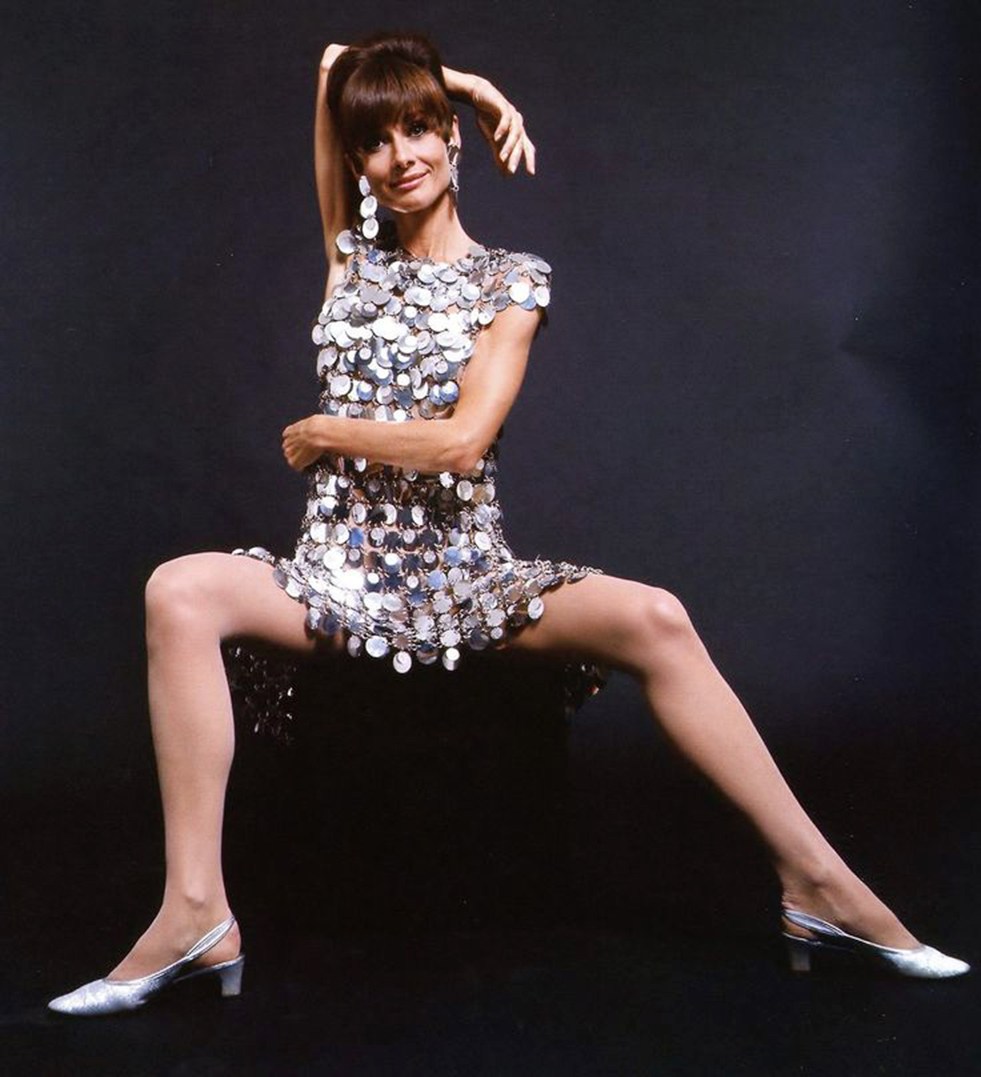
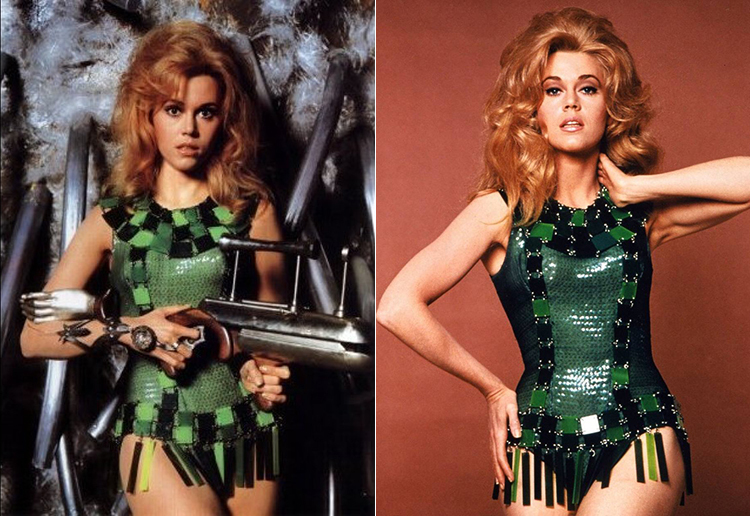
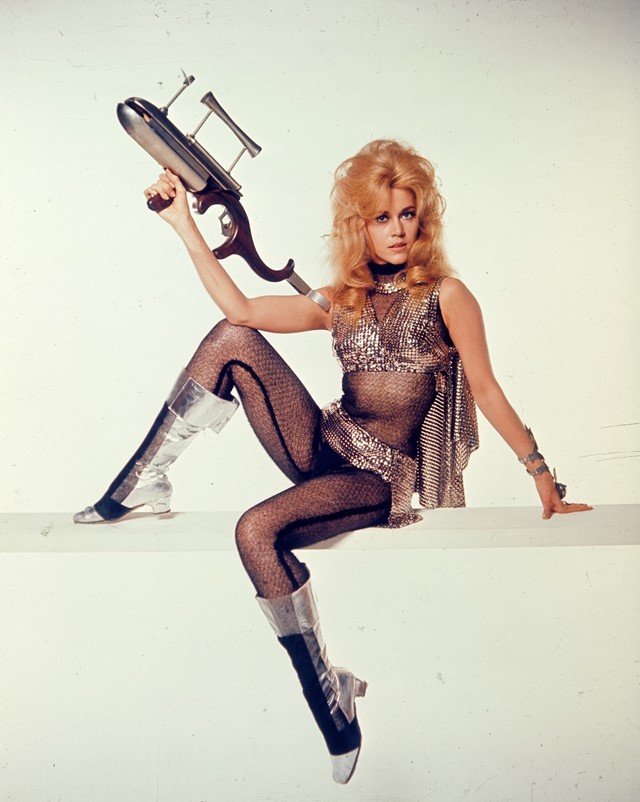
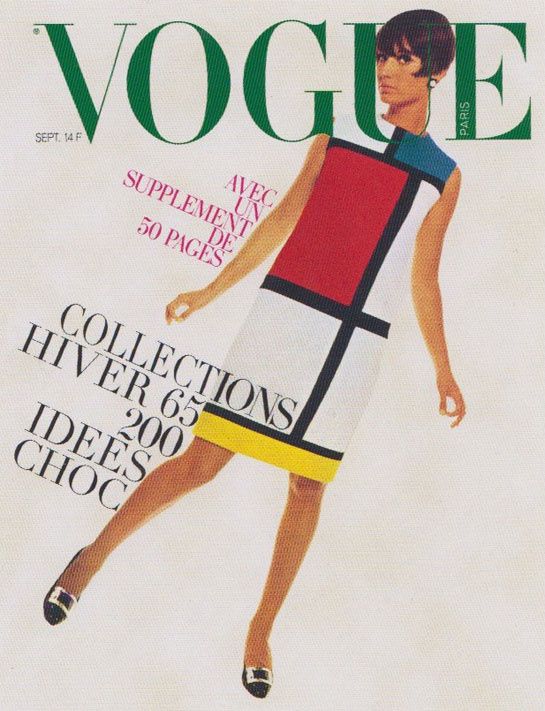
The 60s was the decade of the space conquest, the decade where a man first went in space, where a man first walked on the moon, the decade that saw the birth of cult shows and movies like Star Trek and 2001: A Space Odyssey. That fascination for space, the years 2000 and future in general tinted the 60s. It had influences on its fashion (think of the one of a kind metal dresses by Spanish Fashion Designer Paco Rabanne and legendary Mondrian dress by French Couturier Yves Saint Laurent in 1965) but also its furniture and architecture designs, with its spaceship inspired, curved objects (like the iconic Ball Chair designed by Finnish furniture Designer Eero Aarnio in 1963.) Watch the 1968 movie Barbarella and you’ll get the picture (lovely, lovely Jane Fonda.) By the way, Barbarella’s green outfit was by Paco Rabanne.
Audrey Hepburn in a Paco Rabanne dress in 1967
Jane Fonda as Barbarella in a Paco Rabanne outfit, 1968
Do you see the inspiration for the Nuka-Girl, now? She’s a perfect mix of the 50s and 60s fashion trends, with her Pin-up pose and retro astronaut inspired costume.
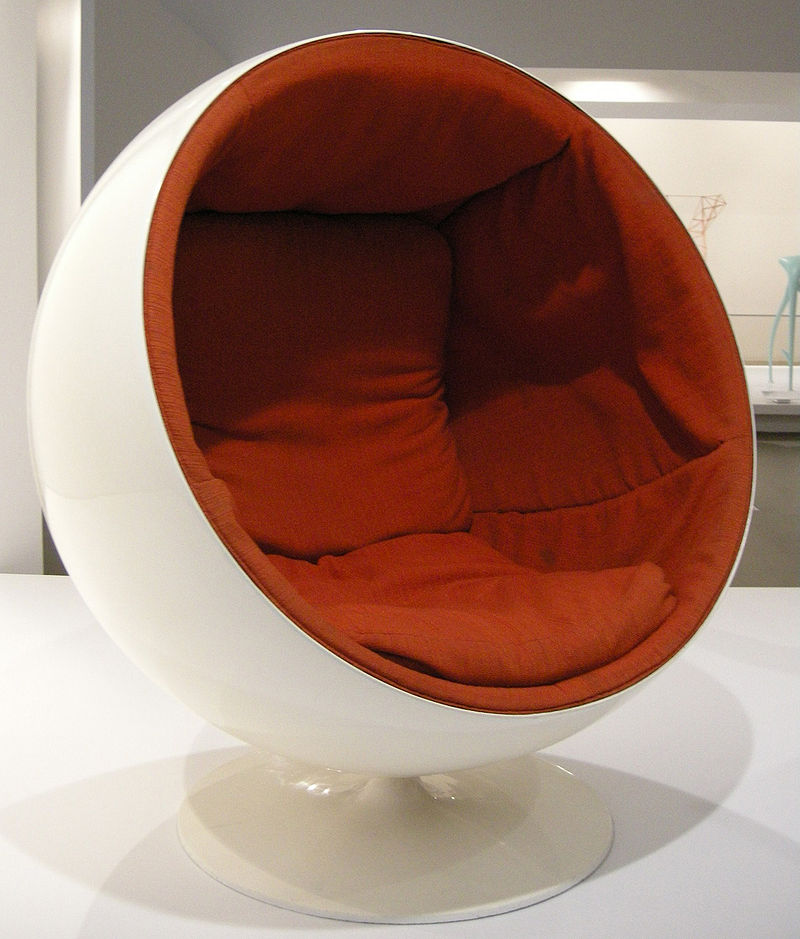
Ball Chair designed by Finnish furniture designer Eero Aarnio in 1963
Mondrian Dress by Designer Yves Saint Laurent, 1965
Doesn’t the Vault suit design make more sense once you saw the bold colors of the Mondrian dress and Paco Rabanne’s metallic dresses?
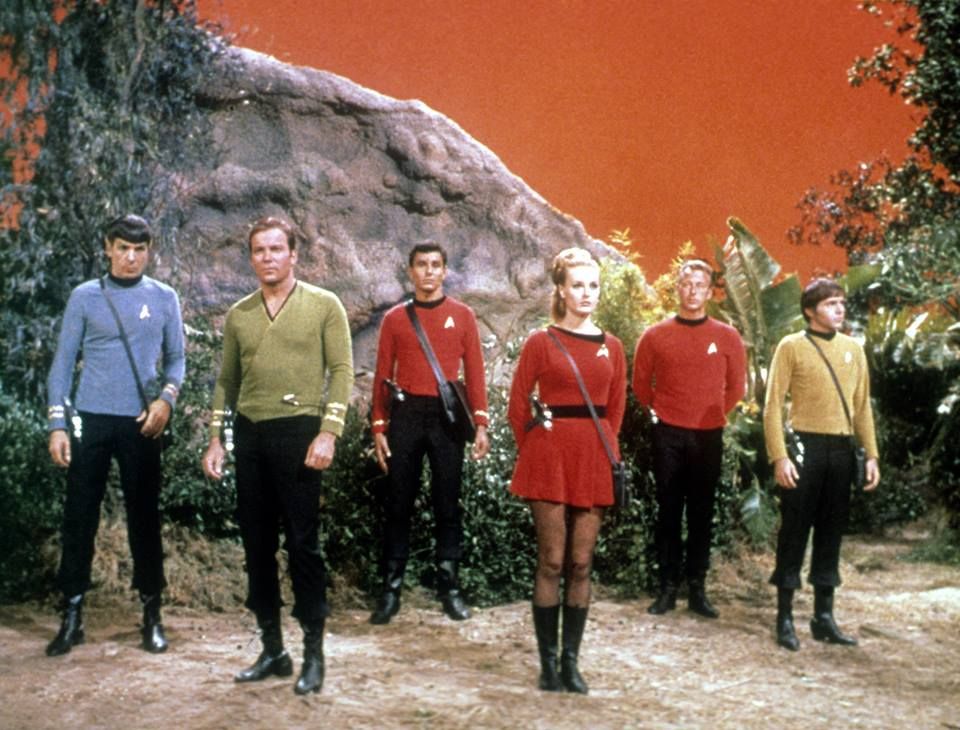
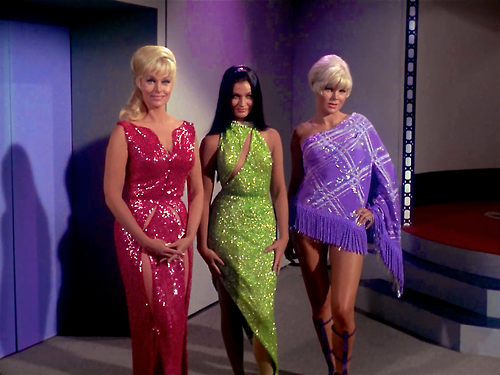
As a girl who studied Fashion Design, the fashion history from the 60s remains one of my (cheesy) favorite, with its use of PVC and man made leather, gogo boots, lurex and other knits with metallic threads, bold and metallic colors, indecent mini skirts (have a look at Star Trek women’s costumes again) and short haired women with ‘yeux de biche’ makeup. The future and technology as imagined by the people from the 60s, without the flying cars: that’s the spirit of Fallout 4, on a backgound of apocalypse, with a touch of Nuka Cola. A retro futuristic post-apocalyptic game. And all of a sudden, Fallout 4 fascinated me.
It’s actually my friend who suggested it. ‘You should do a Vault suit cosplay.’ Fallout 4 was already an ‘old’ game and once again, it wouldn’t be as trendy as a cosplay from Overwatch or from any other more recent video game. But I was tempted. And I gave into temptation.
I started analysing the Vault suit design, looking at the costume from every angle. There was certainly an intention from the concept artists to give the Vault suit a futuristic look. Conan O’Brian, in his Clueless Gamer Fallout 4 review, wearing a Vault suit, said he looked like ‘someone who was asked to leave an avant-garde Swedish pop group.‘ (If you haven’t seen this, you have to check this out. It’s hilarious.)
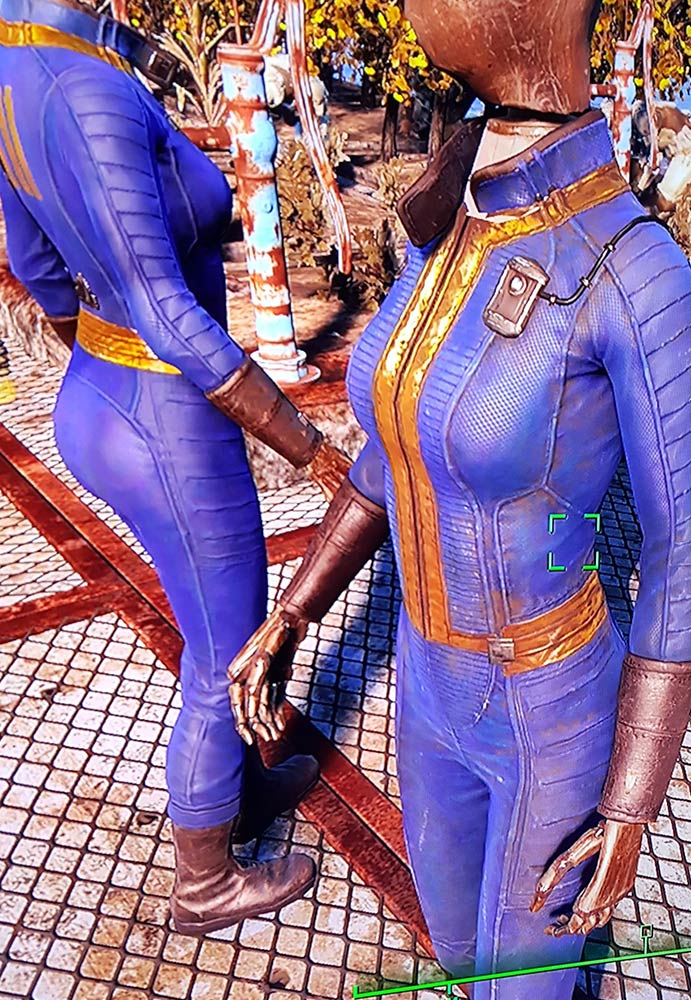
And the Vault suit actually does look like this, when you think of it. After all, this suit is meant to be worn in the vault that would protect you in case of a nuclear explosion. It’s a technological suit. The padded, quilted parts on the middle front of the suit and on the sleeves, the numerous yokes, the fabric texture applied to the 3D model in the game all give the suit a ‘futuristic’ look and the golden touch was a clear reference to the 60s retro fashion, or how a futuristic suit would have been imagined through the fashion trends of this decade. In order to make a ‘credible’ or realistic version of the Vault suit, the golden parts of the costume would obviously have to be made of gold metallic knit or thin stretch PVC, even though I would personally have prefered gold lamb skin, because metallic fabric was so popular at the time and would be so much more coherent with the game’s designs. (That being said, other costumes and armors in Fallout 4 clearly have a look of genuine leather or are identified as leather in the game, referring more to the post-apocalyptic imagery of the game.) But the Vault suit remains a clear allusion to the fashion from the 60s and with its tight fit, bold plain blue color and golden touch, I can’t keep myself from thinking of the original Star Trek crew’s costumes. Tight shirts, short dresses and so much glitters. Bring me some textured blue knits, please, so I can bring this Vault suit to life!
Then, I analysed the Vault suit’s pattern. If I had to give a medal to the actually complicated costume that is often mistaken for a simple one, I’d give it to the Fallout 4 Vault suit. So many cosplayers made that costume and none of them ever made THAT special yoke on the side of the suit that changes all the sewing order of the pieces.
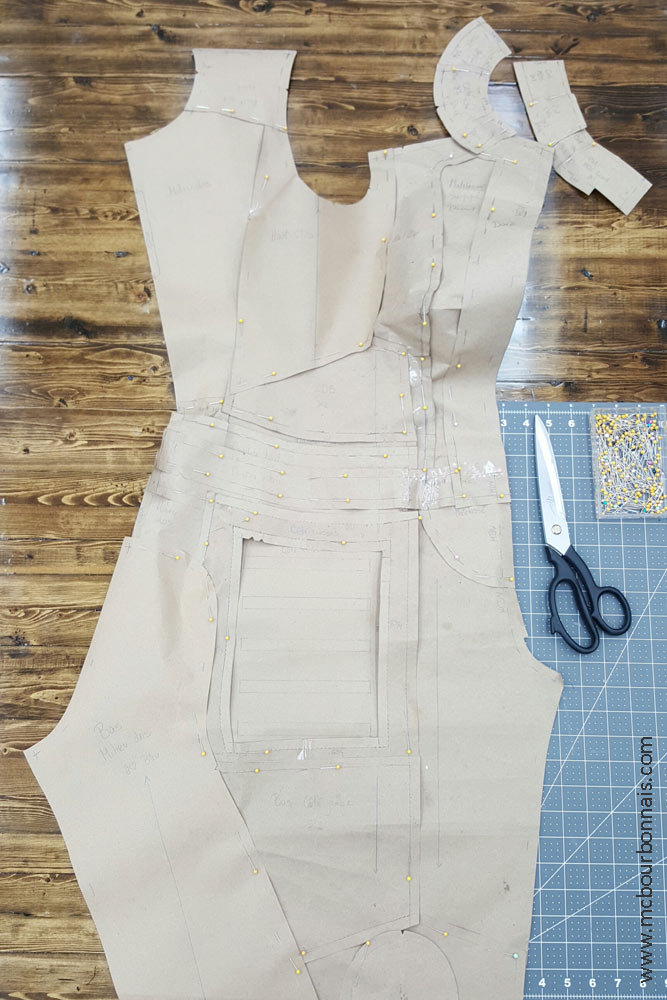
That pattern detail itself changes all the logic of how this suit could be sewed. The shape and position of this seam under the arm doesn’t only change the conventional or usual order in which a shirt or sweater or full bodusuit is sewed, but it’s simply complicated to sew. No Vault suit made in Asia and sold on the market includes that detail because it wouldn’t be profitable to mass produce this suit that way. Everybody just skips that seam. The big cosplay costume companies ignore that detail because it’s not worth it and the average cosplayer probably never noticed it. But I’m no average cosplayer, right? ;) So here’s how my Vault suit pattern looks like.
In pattern drafting, we always work on half of the body, most of the pattern pieces will be cut twice in the fabric for our left and right side (unless you’re working on an asymetrical piece of clothing.) Traditionally, for men’s clothing, we make the pattern pieces of the left side. For women’s clothing, we make the pattern pieces of the right side. (For mass produced clothes, all the pieces, left and right, in all the sizes that will be offered, will be put on many layers of fabric that will be cut with a saw. We use both sides of the pattern, left and right.) So this is the right side of my Vault suit (without the sleeve). Yes, that big bump is for my breast… Custom pattern. ;)
That analyse of a costume’s design, trying to understand what inspired the concept artist, illustrator, mangaka, costume designer or whoever created a costume, is part of the work that I always do when I undertake a new cosplay costume. There is usually a reason or an inspiration behind each design detail and in order to make a credible or realistic interpretation of a costume, you need to understand, or at least try to guess the artists’ intentions, since most of us will never be able to meet these artists or costume designers in person to ask them what they had in mind when they created this or that. Costume history, social fashion trends, traditional costumes from different countries, Fashion Designers signature look, etc. are all elements we can refer to when we try to discover and understand an artist’s original inspiration. As a cosplayer with such a strong background in the clothing industry, I have to do this work. I can’t only make fast and random reproductions of costumes for the sake of popularity and the social medias. Sometimes I’m told that I brought cosplay to another level. This is certainly part of the process.
Don’t you see the Vault suit differently, now? ;) Next time, I’ll explain how I made it!
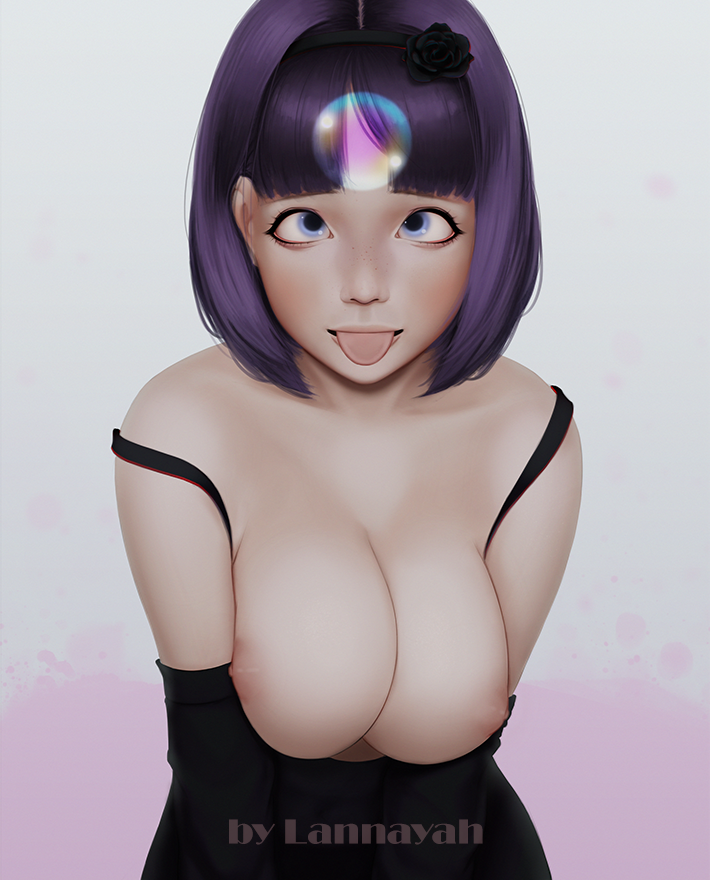
It was really interesting to chat with Lannayah and discover how sharp her work ethic is. I can foresee a bright future for her in the art community. I love her soft and refined style, I think she’s aiming to reach great sophistication. I’m really looking forward to seeing how things will evolve and I hope to collaborate again with her on a new project soon.