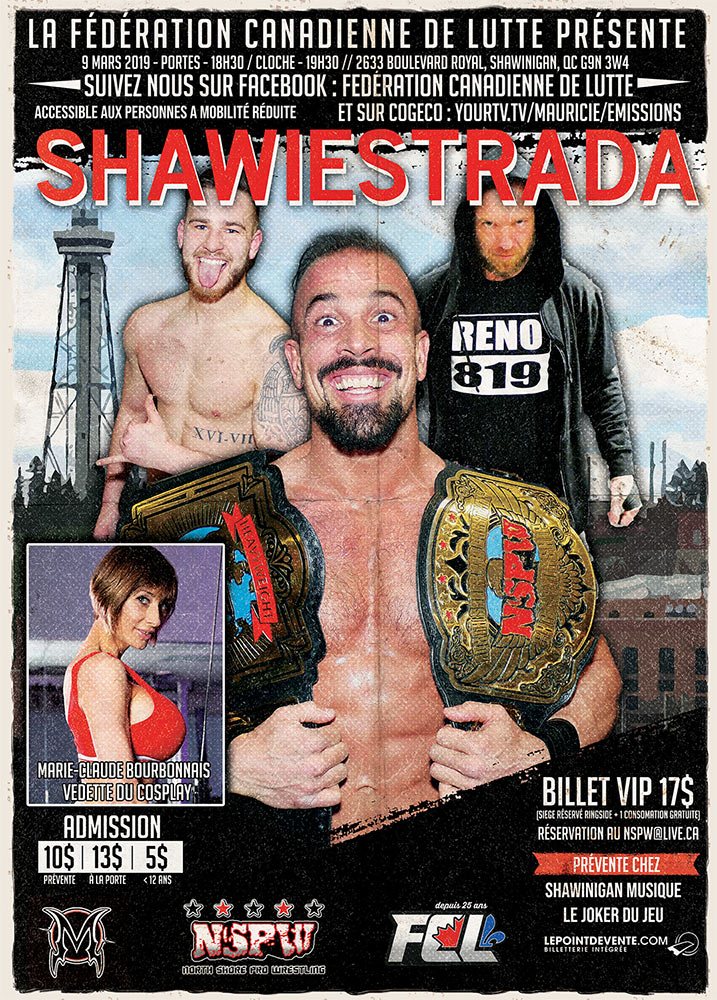
Je suis très heureuse d’annoncer que je suis reçue comme invitée par la Fédération Canadienne de Lutte pour l’événement qui aura lieu le 9 mars prochain à Shawinigan! :D Je serai disponible pour prendre des photos et signer des autographes. C’est un rendez-vous!
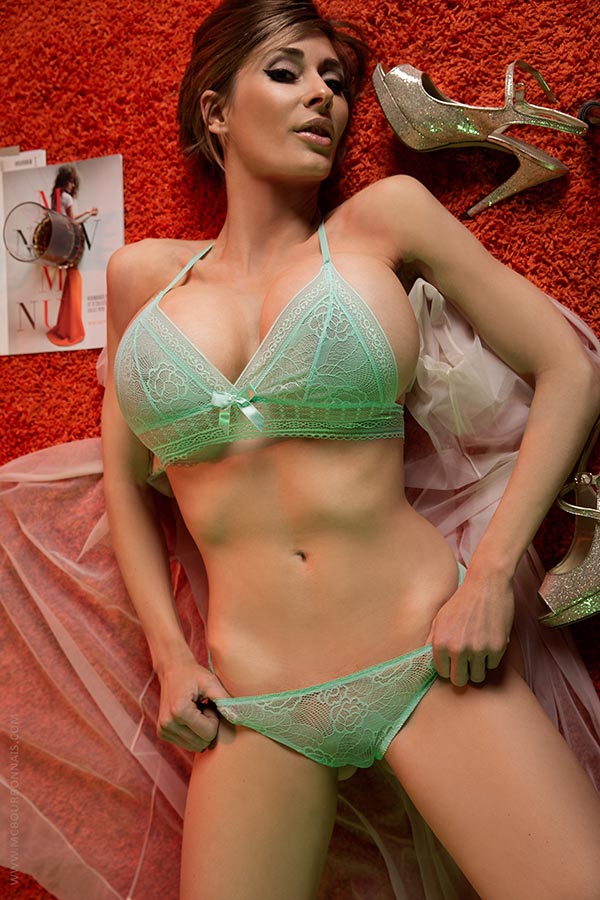
Even though I’ve been a glamour model for many years and I’ve been taken in pictures thousands of time, I always wonder what the next photoshoot will look like and I’m always impressed by the new ideas the photographers and I come up with. When I built the Jukebox set in my workshop, I was very excited because it would be my first photoshoot as a brunette, unveiling my natural hair color to the world. This set became my favorite set so far.
A few months later, out of nowhere, the photographer sent me 4 extra pics from that set I hadn’t seen, breathtaking pics on the floor we had taken at the end of the photoshoot. Glamorous, gorgeous, sensual… They became my ultimate favorite pics! Until my next photoshoot! ;)
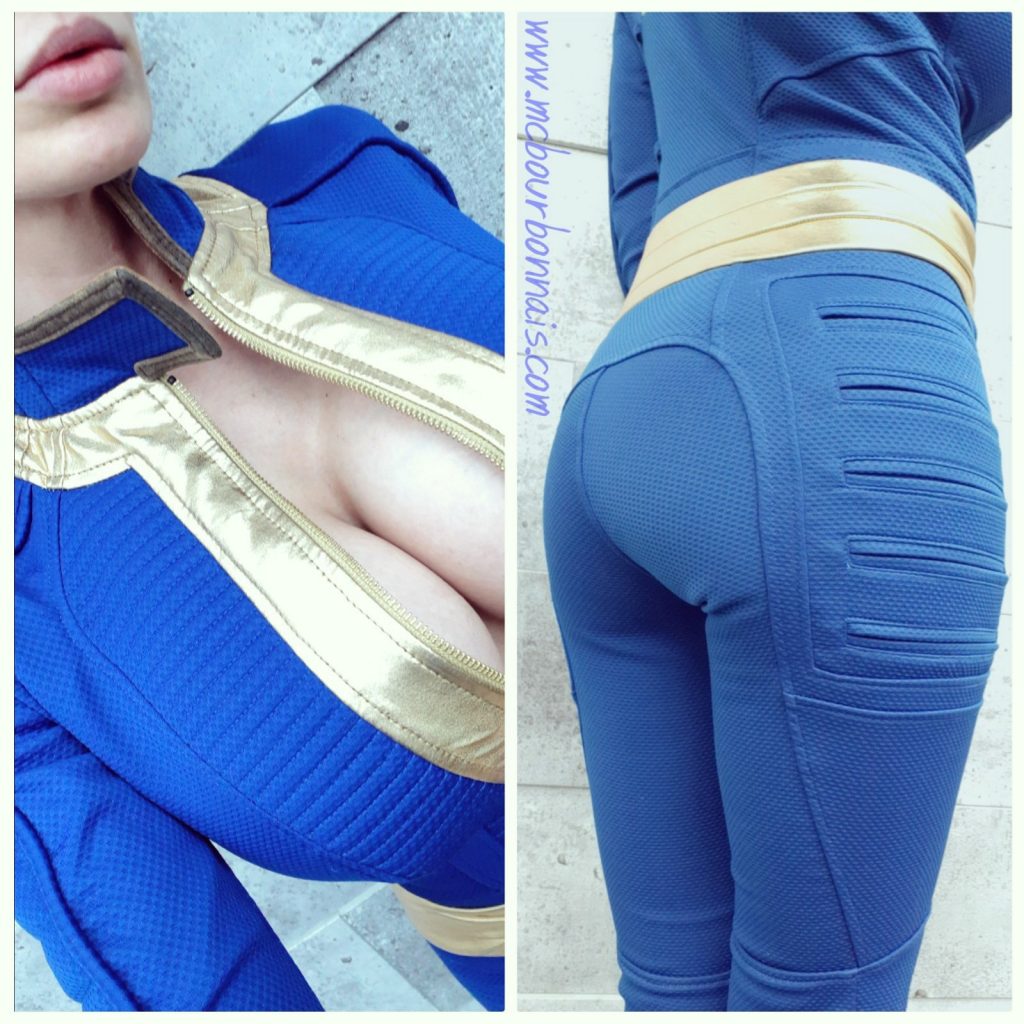
Originally published in the 2017-2018 Cosplay for a Cause Calendar, this Power Girl cosplay picture is now available on my store! Another set I built in my workshop a long time ago, when I made the costume in 2014. This time, the Cosplay for a Cause Calendar was raising money for a non-profit organization for animal rights and each cosplayer had to take a picture with an animal. Power Girl loves her cat and she just wanted to give it a hug, but she’s apparently stronger than she thought!
Finally! Unveiling that book binding Aimsee collectible I’ve been working on for so long! And there’s a long story behind that project! :D
Il y a plus d’un an, j’ai visité le grand-père d’un de mes amis. Le vieil homme avait dans son garage d’authentiques calendriers de femmes nues des années 1960 et parmi ces précieuses antiquités, une page cartonnée présentant une photo de fille nue recouverte d’une acétate transparente sur laquelle on avait peint des vêtements. Résultat : l’acétate par-dessus la photo laisse voir une fille habillée et vous n’avez qu’à soulever l’acétate pour voir la fille nue. Une rapide recherche sur Internet m’avait permis de trouver une image de Marilyn Monroe faite de cette façon et quelques calendriers, datant tous des années 1950 et 1960. Et je me suis dit: « Quelle idée géniale! Pourquoi est-ce que je n’ai vu nulle part un produit récent fait comme ça? » S’agirait-il d’un vieux, mais brillant concept oublié?
More than 1 year ago, I visited one of my friend’s grandfather. The old man had in his garage genuine calendars from the 60s showing naked women and among these precious antiques, a printed cardboard showing the picture of a naked woman, covered with a transparency film on which garments were painted. Result: the transparency film over the picture shows a woman with clothes on and all you have to do is to lift up the transparency film to see the naked woman. A fast Internet search allowed me to find a picture of Marilyn Monroe made like this and a few other calendars, all from the 50s and 60s. I thought to myself: ‘What a brilliant idea! How come that I haven’t seen any recent product made like this?’ Would it be an old, but brilliant forgotten idea?
À cette époque, je collaborais avec Andr01d, un artiste illustrateur de grand talent dont je trouvais le style approprié pour réaliser un dessin d’Aimsee. Je l’avais engagé pour faire une illustration précise d’Aimsee qui me permettrait d’utiliser le concept de l’acétate : l’encre, qui est théoriquement l’équivalent des « vêtements » d’Aimsee lorsqu’elle est connectée à sa pieuvre yokai, serait imprimée sur l’acétate et sur la photo en dessous de l’acétate, Aimsee serait nue. :)
At this time, I was collaborating with Andr01d, a talented artist whose style would be perfect to make a specific drawing of Aimsee. I hired him to draw an illustration of Aimsee that would allow me to use the transparency film concept: the ink, that is the equivalent of Aimsee’s clothes when she’s connected to her octopus yokai, would be printed on the transparency film and on the picture under the transparency film, Aimsee would be naked. :)
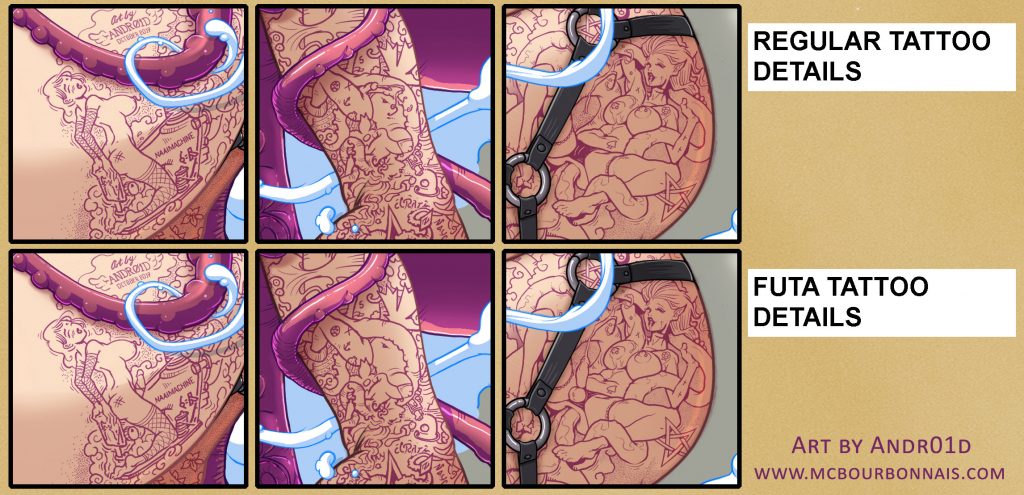
Andr01d m’a présenté une impressionnante première version de son dessin. Je l’adorais! Puis dans un excès d’enthousiasme, il ajouté plus de détails, prenant la liberté de dessiner Aimsee avec une panoplie de tatouages sexy, même si je n’avais jamais présenté Aimsee avec des tatouages auparavant. Les taouages sur l’illustration n’ont donc pas été faits à ma demande, il s’agit d’une initiative personnelle de l’artiste. Une infinité de petits détails coquins se cachent dans ces tatouages… Tellement de détails, en fait, que j’ai rapidement réalisé que mon format habituel d’impression, 8 pouces par 12 pouces, ne serait pas assez grand pour tout montrer.
Andr01d showed me a first impressive version of his drawing. I loved it! And then, I guess he was very enthusiastic about drawing Aimsee because he continued drawing, adding more and more details, including sexy tatoos. I never presented Aimsee with tatoos, this detail wasn’t made because I requested it, it was really the artist’s initiative. An infinite number of little details are hiding in these tattoos, so many details, actually, that I quickly realized that my usual 8’’ X 12’’ prints wouldn’t be big enough to show them all.
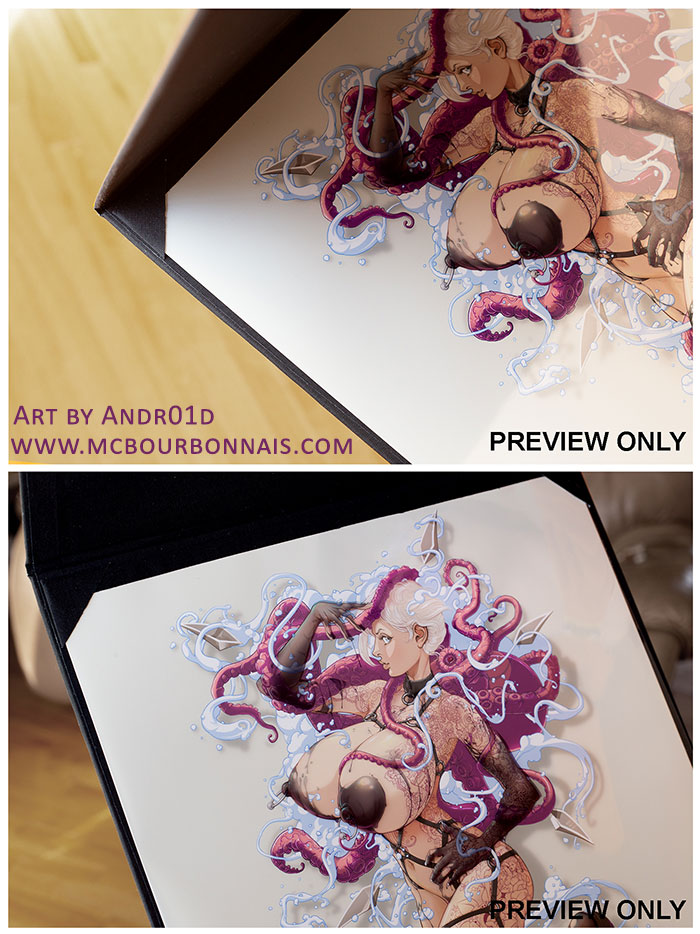
Avec son impression sur acétate, cette pièce d’Andr01d était déjà destinée à être une pièce de collection. Elle l’était maintenant d’autant plus que j’étais très impressionnée par la qualité du travail livré par Andr01d et désormais convaincue que je devrais offrir une version grand format de cette œuvre pour bien en montrer tous les détails. Il me faudrait donc non seulement déterminer un nouveau format d’impression possible avec mon imprimeur, mais aussi trouver une façon décente de présenter cette impression haut de gamme.
With its printed transparency film, this commissioned artwork by Andr01d was already intended for collectors. But I knew it would be an even greater collectible since I was so impressed with the quality of the work delivered by Andr01d and I was now convinced that I would have to offer a larger size in order to show all the details properly. So I would not only have to determine a new possible printing size with my printer, but also to find a decent way to showcase that high-end print.
Une oeuvre encadrée aurait été géniale, mais les cadres coûtent tellement cher à faire faire et coûtent aussi très cher à envoyer par la poste. Puis j’ai pensé faire produire des cadres en carton, une sorte de portfolio sur mesure, avec de la dorure, des embossés, etc. mais aucune des compagnies d’impression spécialisée en emballage que j’ai contactées n’acceptait de produire une quantité assez petite. Les quantités minimales de commande étaient gigantesques. Un imprimeur m’a mentionné le nom d’une dame qui faisait de la reliure. Une des rares relieures encore en fonction dans la province de Québec, un autre de ces métiers d’artisans en voie de dispariton au Canada. La dame se spécialise dans la réparation de livres et dans la fabrication de reliures sur mesure. À la main. Et elle donnait des formations. Je me suis donc inscrite à son prochain cours de reliure. J’ai appris en quelques cours des techniques de reliure de base. Il n’en fallait pas plus pour que je décide de fabriquer moi-même des portfolios pour présenter l’impression d’Andr01d. J’ai finalement déterminé 2 formats : un petit portfolio pour présenter une impression de 8 pouces par 12 pouces et un grand portfolio pour présenter une impression de 13 pouces par 19 pouces, un format qui permettrait de mettre en valeur les petits détails dessinés par Andr01d dans les tatouages d’Aimsee. La technique de reliure que j’ai choisie n’est pas si compliquée. Cela demande surtout de la minutie. Mais le grand format a rendu la chose vraiment plus complexe. Un portfolio assez grand pour présenter une impression de 13 pouces par 19 pouces, c’est grand! Et c’est pour cela que je n’ai fait que 25 grands portfolios.
A framed artwork would have been awesome, but framing is so expensive and shipping a frame is also very expensive. Then I considered making kind of a fancy cardboard frame or portfolio, with metallic foil, stamped patterns, etc. But all the specialized printing companies I contacted had gigantic minimum order quantities. That wouldn’t be possible. A printer mentioned the name of a woman specialized in book binding. One of the latest craftsperson to still make a living out of book binding in the province of Quebec. Another of these trades that is slowly disappearing in Canada. The woman was specialized in fixing old book covers and in making various types new book covers. Handmade stuff. And she was giving lessons. I signed up for the next book binding course. I learned a few basic book binding techniques and decided to make by myself portfolios that would allow me to showcase Andr01d’s prints. I made 2 sizes: a small portfolio for a 8’’ X 12’’ print and a big portfolio for a 13’’ X 19’’ print, a size that would allow to see properly all the details in Aimsee’s tattoos. The book binding technique I chose wasn’t that complicated. Making such a large portfolio using that technique, though, was a real challenge! That’s why I made only 25 big portfolios.
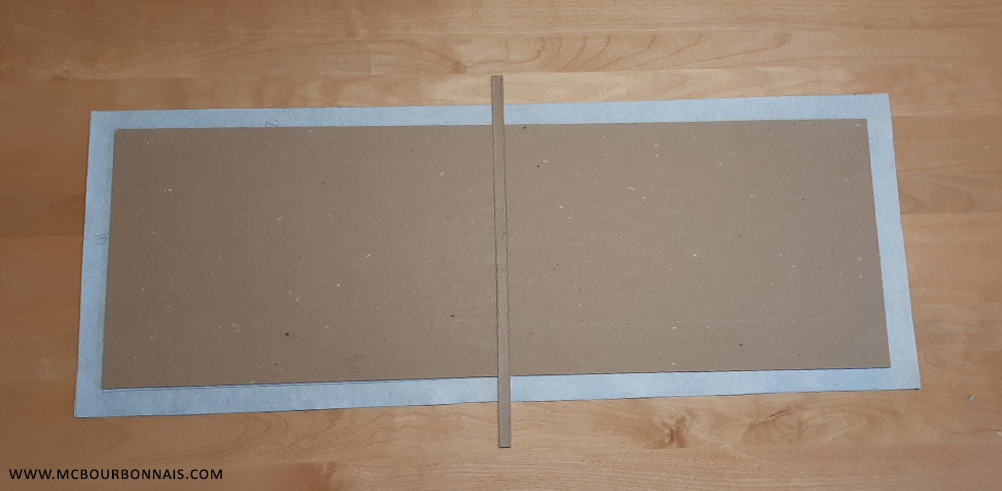
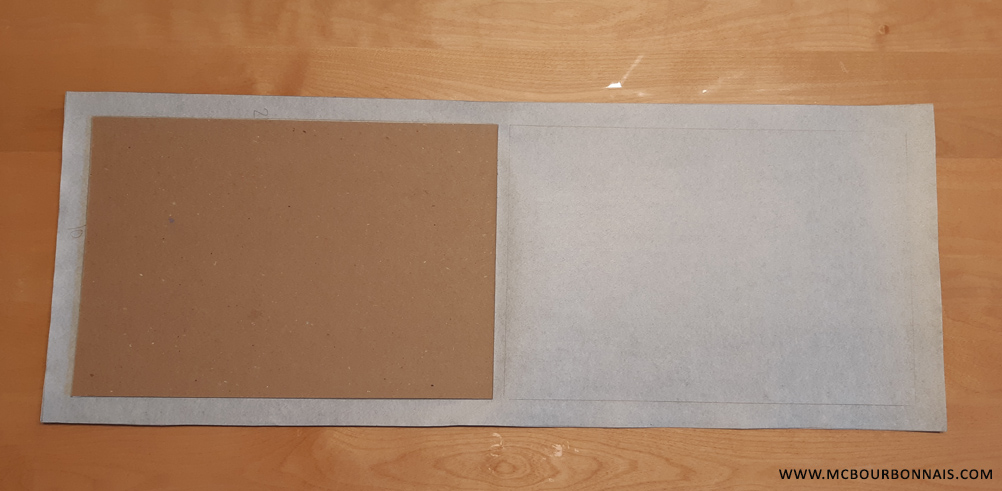
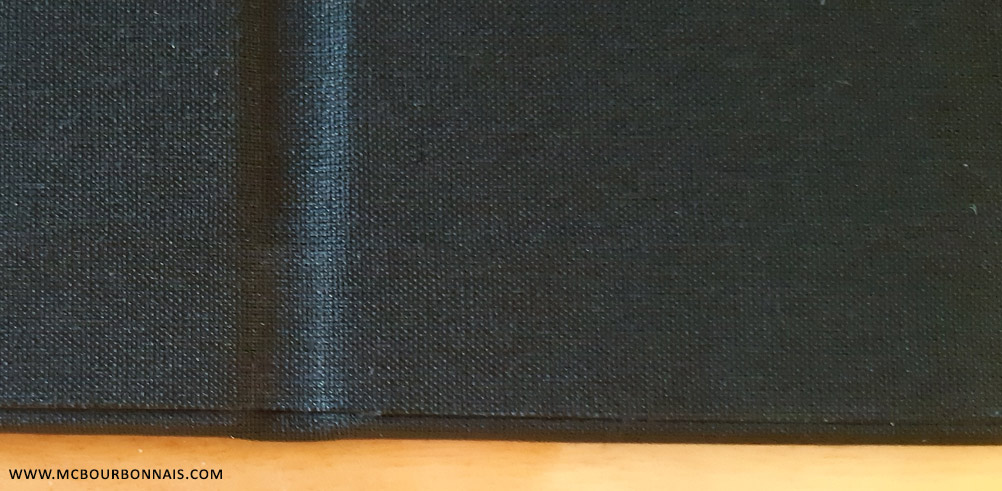
La première étape consiste à couper 2 cartons légèrement plus grands que l’illustration qui sera présentée à l’intérieur. J’ai tracé les contours de chaque carton sur l’envers du matériel de reliure. L’espace entre les 2 cartons correspond à l’épaisseur du portfolio. Si l’on fabriquait une reliure de livre, il s’agirait du dos ou de l’épine du livre. Notez que pour couper ces cartons, j’ai dû me rendre chez la relieure et utiliser une presse à couper géante qui m’a permis de couper plusieurs épaisseurs de cartons à la fois. Ce type de carton est très difficile à couper avec une lame XACTO.
First step is to cut 2 cardboards that are slightly larger than the print they will protect. I traced the shape of the cardboards on the wrong side of the book binding material. The space between the 2 cardboards is the width of the portfolio. If I was making a book cover, it would be the spine of the book. This type of cardboard is very hard to cut with an XACTO blade, so I had to go to the book binding store and use a giant cutting machine in order to cut perfectly many layers of cardboards at the same time.
J’ai ensuite appliqué une couche de colle vinylique sur le dos de chaque carton en utilisant un petit rouleau.
Then a applied a layer of PVA adhesive.
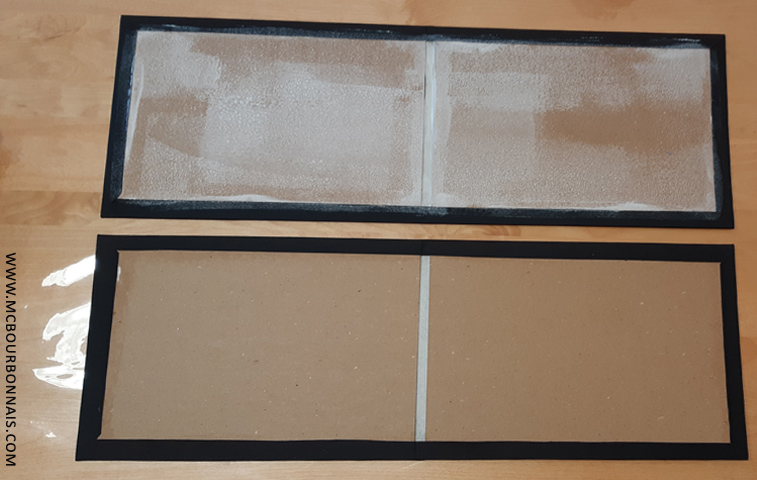
Puis j’ai collé chaque carton sur le matériel de reliure en suivant les marques dessinées à l’étapes précédente.
Then I glued each cardboard on the book binding material following the marks drawn in the previous step.
L’étape suivante consiste à plier et coller le surplus de matériel de reliure autour des cartons. Couper l’excédent de matériel dans les coins permet de plier chaque coin proprement. Il faut ensuite ajouter une couche de colle partout sur les cartons sans se rendre sur les bords.
Next step : you fold and glue the excess material around the cardboards. Cutting the excess material in the corners allow to fold the corners properly. Then you have to add a layer of glue everywhere on the cardboards, but not too close to the edges.
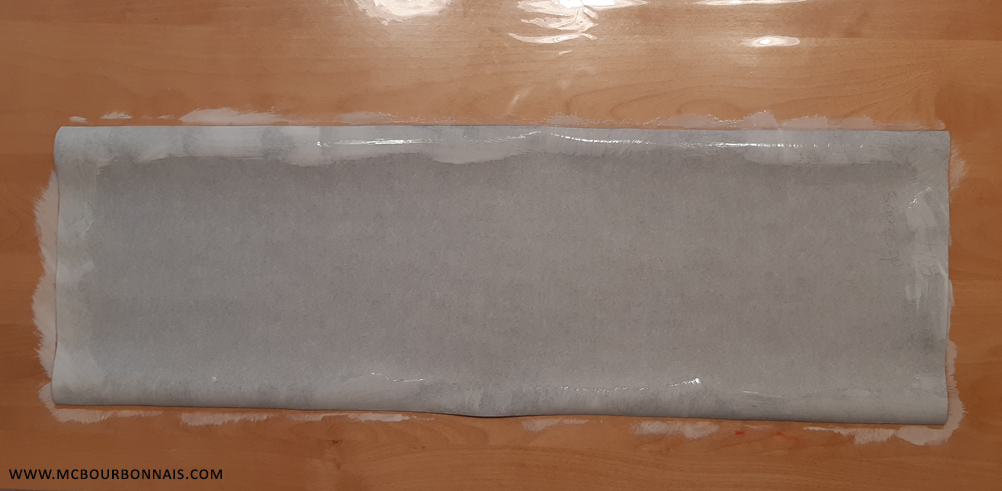
Un dernier rectangle de matériel de reliure sera utilisé pour faire la finition à l’intérieur du portfolio. S’il s’agissait d’une couverture de livre, ce serait l’intérieur de la couverture. Ce rectangle est légèrement plus petit que les contours extérieurs du portfolio. Il faut couvrir entièrement cette pièce de colle.
One more rectangular piece of book binding material will be used for the finishing step of the portfolio. If it was a book cover, this would be the inside of the book cover. This piece has to be slightly smaller than the edges of the outside part of the portfolio. You should apply glue all over that rectangular piece.
Cette étape a été la plus difficile à réaliser pour les grands portfolios. Impossible à réaliser seul pour les portfolios de 13 pouces par 19 pouces, il a fallu être 2 personnes pour réussir à tenir dans les airs, puis déposer, un côté à la fois, le grand rectangle de matériel en suivant parfaitement les contours du portfolio. Si cette pièce était collée de façon inégale, elle ruinerait le portfolio et le rendrait inutilisable. En fait, le portfolio pourrait être utilisé, mais sa finition laisserait à désirer. Une finition professionnelle présente un morceau collé parfaitement centré à l’intéreur du portfolio, laissant une bordure égale tout autour.
This step was the most complicated step to make for the bigger portfolios. For the 13’’ X 19’’ portfolios, it was impossible for 1 person alone to apply the latest piece of book binding material. I had to ask someone else’s help to lift in the air and apply, one side at the time, this rectangular piece, following the edges of the portfolio. A piece glued unevenly would ruin the portfolio. Actually, we could still use the portfolio, but it wouldn’t look professional. This latest piece of book binding material has to be glued perfectly centered in the middle of the portfolio, showing an even edge all around the inside of the portfolio.
La toute dernière étape consiste à couper, assembler et coller les triangles qui serviront à insérer l’impression et à la tenir en place dans le portfolio.
The very last step was to cut, assemble and glue the triangles that will hold the print in the portfolio.
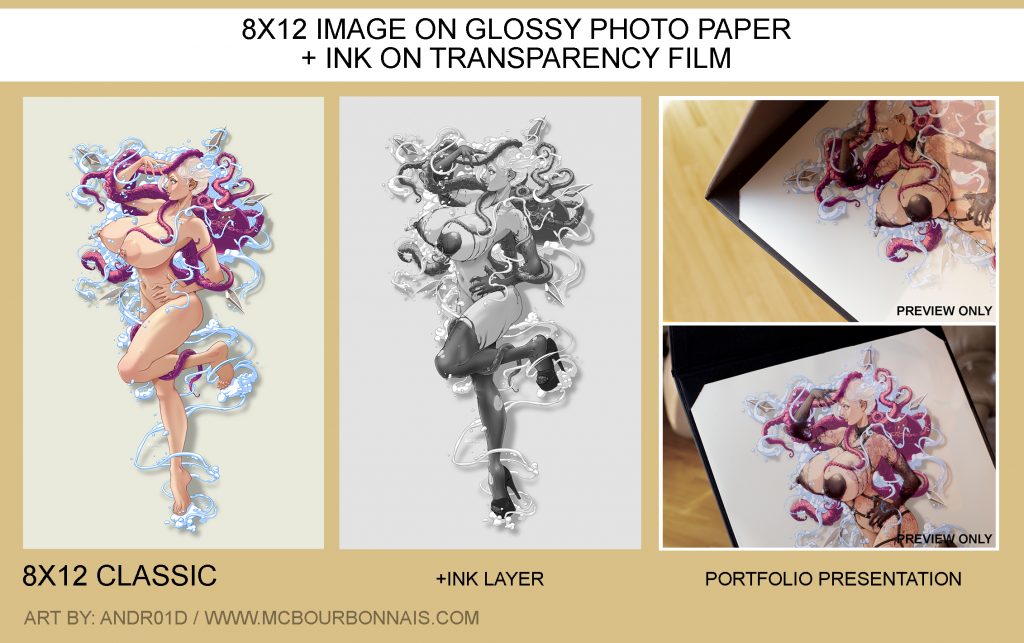
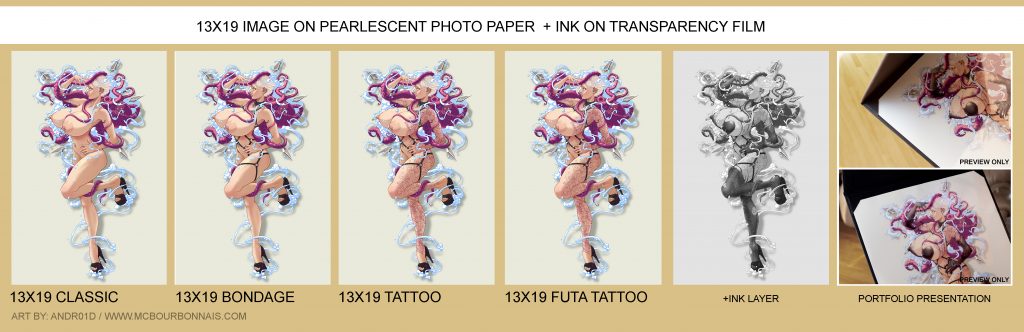
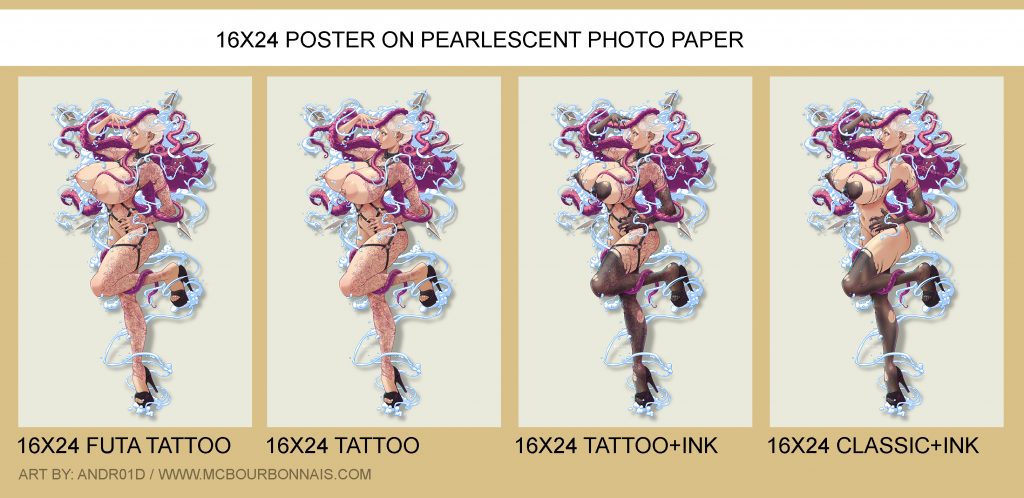
J’ai fait plusieurs petits portfolios pour les impressions de 8 pouces par 12 pouces. Plus rapides et faciles à faire, je ne crois pas que je limiterai leur nombre. Je pourrai toujours en refaire d’autres plus tard. Par contre, les portfolios pour les impressions de 13 pouces par 19 pouces ont été très longs et complexes à fabriquer, alors je n’en ai fabriqué que 25. Si vous désirez commander une impression format 13 pouces par 19 pouces avec acétate du dessin d’And01d dans un portfolio, sachez qu’il n’y en aura que 25 à vendre. Il s’agit d’une édition très limitée. J’offrirai aussi le dessin d’Andr01d en poster format 16 pouces par 24 pouces (sans acétate, avec l’encre intégrée dans le dessin) comme les autres posters sur papiers irridescent offerts sur ma boutique. Ces posters livrés dans un tube de carton deviendront un item régulier de ma boutique, ils ne seront pas offerts en quantité limitée.
I made many small portfolios for the 8’’ X 12’’ prints. I don’t think I will make them a limited edition, I could always make more small portfolios later. However, the 13’’ X 19’’ portfolios were so complicated and long to make that I made only 25. If you want to order a 13’’ X 19’’ Andr01d print with a transparency film in a portfolio, there will be only 25 available. It’s a very limited edition. I will also offer Andr01d’s art as 16’’ X 24’’ posters on pearlescent photo paper. These posters (without the transparency film, with the ink as part of the printed drawing) will become permanent items on my store, they won’t be a limited edition and they will be shipped in a cardboard tube like all my other posters.
Alors, voici vos options! L’impression format 8 pouces par 12 pouces avec acétate présentée dans un portfolio et les différentes versions de posters format 16 pouces par 24 pouces sont disponibles directement sur ma boutique. www.store.mcbourbonnais.com Pour commander un des 25 portfolios format 13 pouces par 19 pouces Édition Limitée, contactez-moi au contact@mcbourbonnais.com. Le prix est de 84,95$. Vous avez le choix entre 4 versions du dessin d’Andr01d, avec l’encre imprimée sur l’acétate, le tout présenté dans un portfolio grand format. Indiquez votre choix d’illustration dans le courriel. Pour les frais de poste, prévoyez 15$ à 20$ pour un envoi au Canada (varie selon les provinces), environ 30$ pour un envoi aux États-Unis, environ 85$ pour le Mexique, l’Europe, l’Amérique du Sud et l’Afrique et 90$ pour l’Australie. Je vous offrirai les options d’envois postaux précises par courriel et vous enverrai une facture Paypal. Maintenant, faites votre choix!
So here are your options! The 8’’ X 12’’ print with transparency film presented in a portfolio and the various versions of the 16’’ X 24’’ poster on pearlescent photo paper are sold directly through my online store. www.store.mcbourbonnais.com
To order one of the 25 Limited Edition 13’’ X 19’’ Portfolios, send me an email at contact@mcbourbonnais.com. The price is 84,95CAD. You can choose 1 of the 4 versions of Andr01d’s art, with the ink printed on the transparency film, with both the print (on pearlescent photo paper) and the transparency film sold in a handmade portfolio. Shipping fees will vary. Canada: from 15$ to 20$ depending on the provinces, USA: around 30CAD, Europe, Mexico, South America and Africa: around 85CAD and Australia: around 90CAD. I will personally send you the detailed shipping options through email depending on your country and I will send you a Paypal invoice. Now let’s make your choice! :)
Bien que quelques jeunes couturières suivent mon travail, je sais que plusieurs d’entre vous (si ce n’est pas la plupart d’entre vous) êtes davantage intéressés par la fabrication d’accessoires, l’impression 3D, les techniques de moulage, de tirage, de peinture, etc. que par la confection textile. Mon blog sur la fabrication de Lug, le robot de fibre de verre, et celui sur Rachnera, l’araignée de fibre de verre, sont de loin ceux dont on m’a le plus reparlé. C’est pourquoi je tiens à vous remercier d’avoir tout de même fidèlement suivi mes blogs même s’ils ont souvent été plus orientés sur la confection vestimentaire. À travers le cosplay, j’aurai au moins eu le mérite d’intéresser à la couture certaines personnes qui ne s’y seraient peut-être pas intéressées sinon.
Even though some young seamstresses are following my work, I know that many (if not most) of you are more interested in the making of props, 3D printing, molding, casting and painting techniques than in sewing techniques. My making of blog about Lug, the fiberglass robot, and my blog about Rachnera, the fiberglass spider, were by far the most popular. So I want to thank you because you’ve been loyal supporters and you kept reading my blogs even if they were often focusing on sewing. At least I can say that through my cosplay making of blogs, I suceeded in having people reading about sewing while they maybe wouldn’t have been interested in sewing in other circumstances.
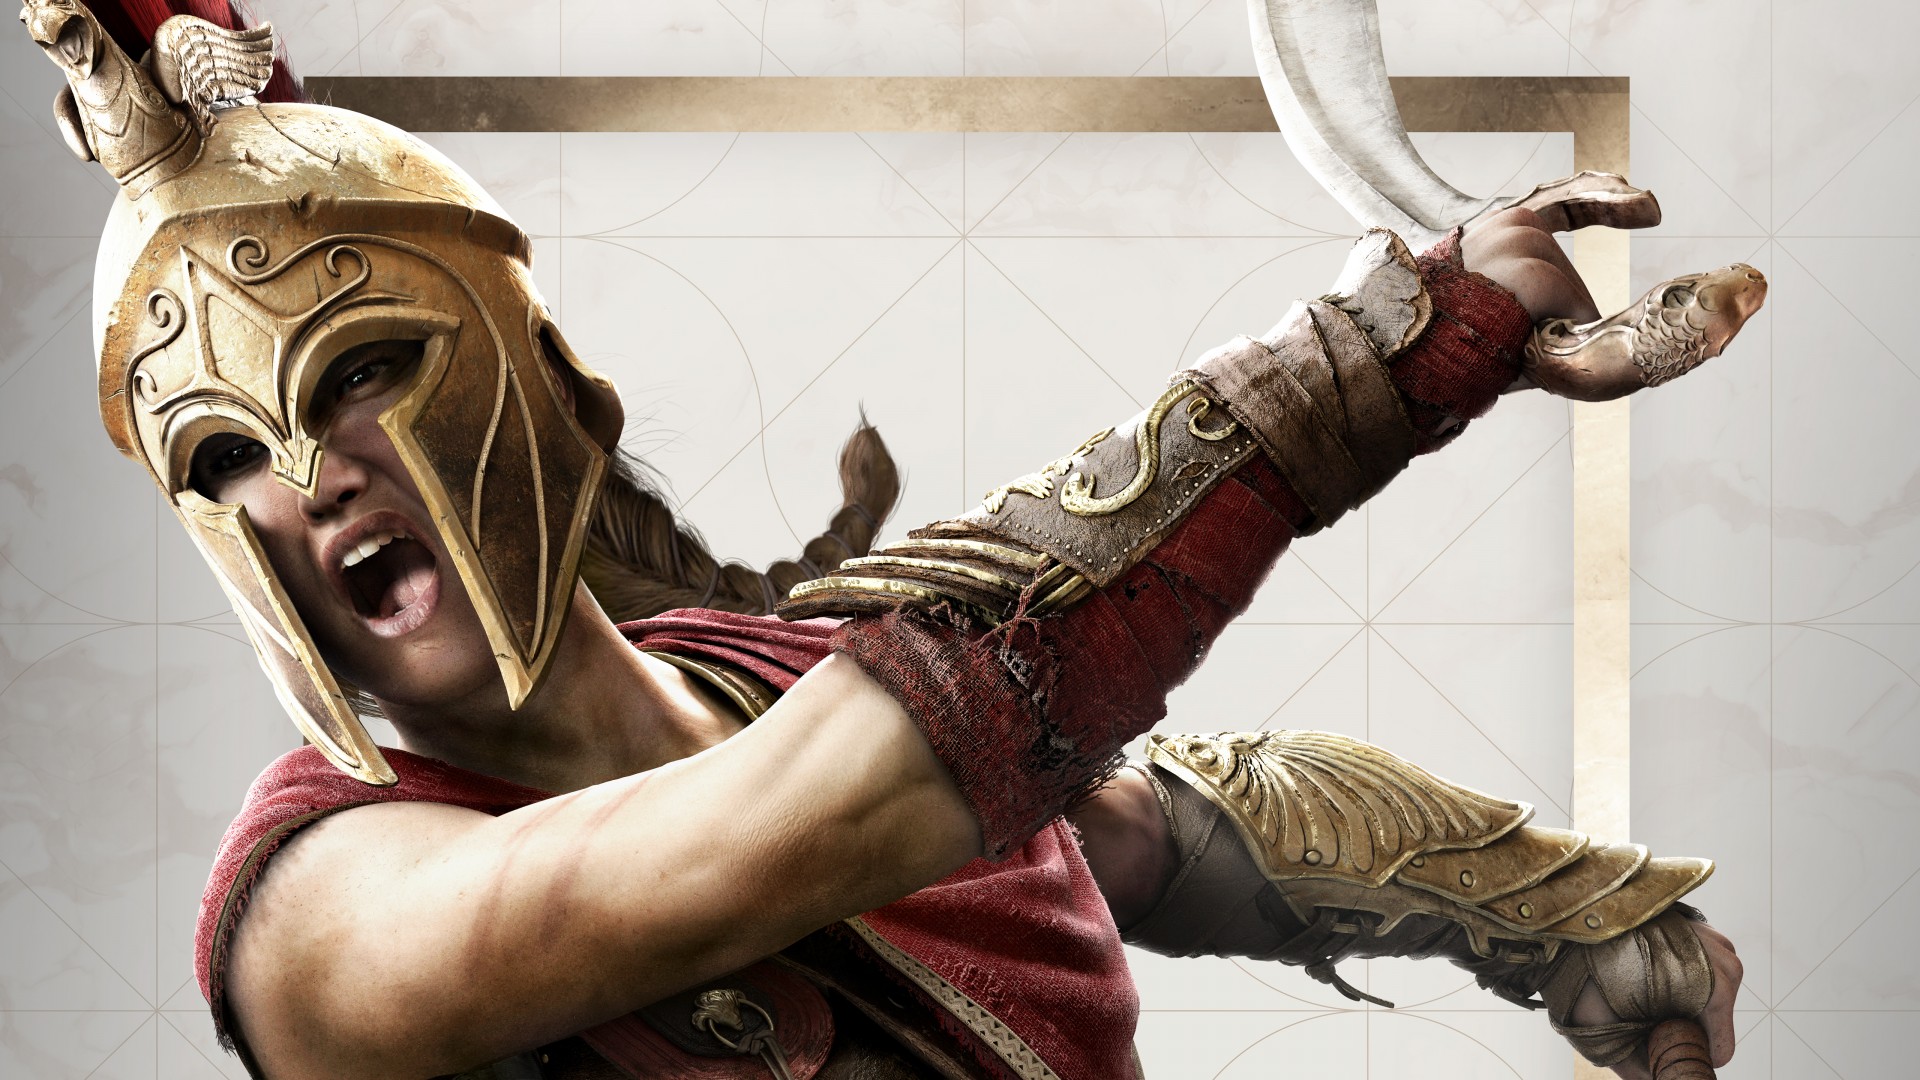
Dans cette partie du blog, j’aborderai tel que promis la fabrication des pièces d’armure de mon costume de Kassandra. Je me dois de répéter que je ne suis pas une experte dans la fabrication d’accessoires. C’est un domaine dans lequel j’ai été très autodidacte, apprenant par essais et erreurs, et je ne saurais donner des conseils techniques aussi précis que ceux que je peux donner à propos de la couture. Je ne suis pas en mesure d’expliquer chaque étape du processus en détails puisque je le découvre et l’expérimente encore. J’ai d’ailleurs beaucoup moins de photos de fabrication d’accessoires parce que je suis tellement concentrée à effectuer ces étapes encore nouvelles pour moi que je n’ai pas le réflexe de les documenter comme je peux le faire facilement quand je couds. Vous trouverez ailleurs d’autres blogs et vidéos qui expliqueront ces techniques beaucoup mieux que je ne peux le faire. Il ne s’agira donc pas d’un blog sur les techniques de moulage et de tirage, mais plutôt du partage honnête de mes essais, expérimentations et découvertes à ce sujet, même lorsque je n’ai pas utilisé la meilleure ou la plus professionnelle des techniques.
As promessed, in this part of the blog, I’ll talk about the making of Kassandra’s armor pieces. I have to say one more time that I’m not an expert in prop making. I’m a self-taught prop maker. It was a trial and error learning process. I couldn’t give precise advices about prop making as I can do it for sewing techniques and I couldn’t explain each step of the process in detail since I’m still experimenting and discovering these techniques. I have way less work in progress pics of the props because I’m so focused on each step when I’m doing this that I don’t have the reflex to take each step in picture as I can easily do it while I’m sewing. You’ll find elsewhere other blogs and videos that will explain prop making techniques way better than I do. This won’t really be a making of blog about molding and casting, it will be more about sharing my experiments and discoveries about it, sharing how I truly made my props and with which materials, even if it wasn’t always the best or the most professional way to do it.
Depuis que j’ai intégré l’impression 3D dans mon processus de fabrication de costumes, la première étape pour la fabrication d’un accessoire est toujours la modélisation 3D. Comme je ne suis pas modélisatrice, j’engage un modélisateur qui fait ce travail pour moi. Pour le costume de Kassandra, c’est Texelion (https://www.deviantart.com/texelion) qui m’a fourni tous les modèles 3D. Il y a plusieurs années, j’ai été scannée de la tête au pieds et je dispose donc d’un scan 3D de mon coprs que j’ai pu fournir à Texelion. Il est ainsi en mesure de modéliser les pièces directement sur le scan de mon corps, ce qui assure que les pièces auront des dimensions et des proportions parfaitement ajustées pour moi.
Since I started using 3D printing for my costumes, the very first step for the making of each prop is 3D modeling. I’m not a 3D modeler, so I have to hire someone. For Kassandra’s costume, it’s Texelion (https://www.deviantart.com/texelion) who made all the 3D models. A few years ago, I was 3D scanned from head to toe, so I have a scan of my body that I provided to Texelion. This way, he can always 3D model the armor pieces over this body scan, making sure that each piece’s size and proportions will be perfectly adjusted to my measurements.
Il faut reconnaître qu’une grande partie du résultat final dépend donc du travail et du talent du modélisateur 3D. Ceci étant dit, il ne faut pas sous-estimer le travail de direction et de supervision qui est fait en cours de processus. Avant de commander une pièce modélisée, je fournis toujours au modélisateur un montage d’images de référence et d’inspiration accompagné d’explications et d’indications pour certains détails spécifiques. Comme je l’ai déjà dit dans d’autres blogs, il ne s’agit pas seulement de reproduire un costume ou un accessoire, mais d’être en mesure de placer ce costume ou cet accessoire dans un contexte qui nous permettra de compredre ce que l’on s’apprête à reproduire. Dans ce cas, malgré qu’Ubisoft ait mis à la disposition des cosplayers un Cosplay Guide assez détaillé, j’ai tout de même fait des recherches pour trouver des informations à propos des différents éléments de design du costume.
We have to admit that an important part of the final result depends on the 3D modeler’s work and talent. That being said, we should not underestimate the supervision work that is made during the process. Before commissioning a 3D model, I always provide to the artist a montage of inspiration and reference pics with explanations and instructions about specific details. I said it before: this isn’t only about reproducing a costume or a prop. The process requires to put this costume or prop in context so we’ll be able to understand what we’re about to reproduce. In this case, even though Ubisoft put on its website a detailed Cosplay Guide, I still made researches to find more information about the different parts of the costume.
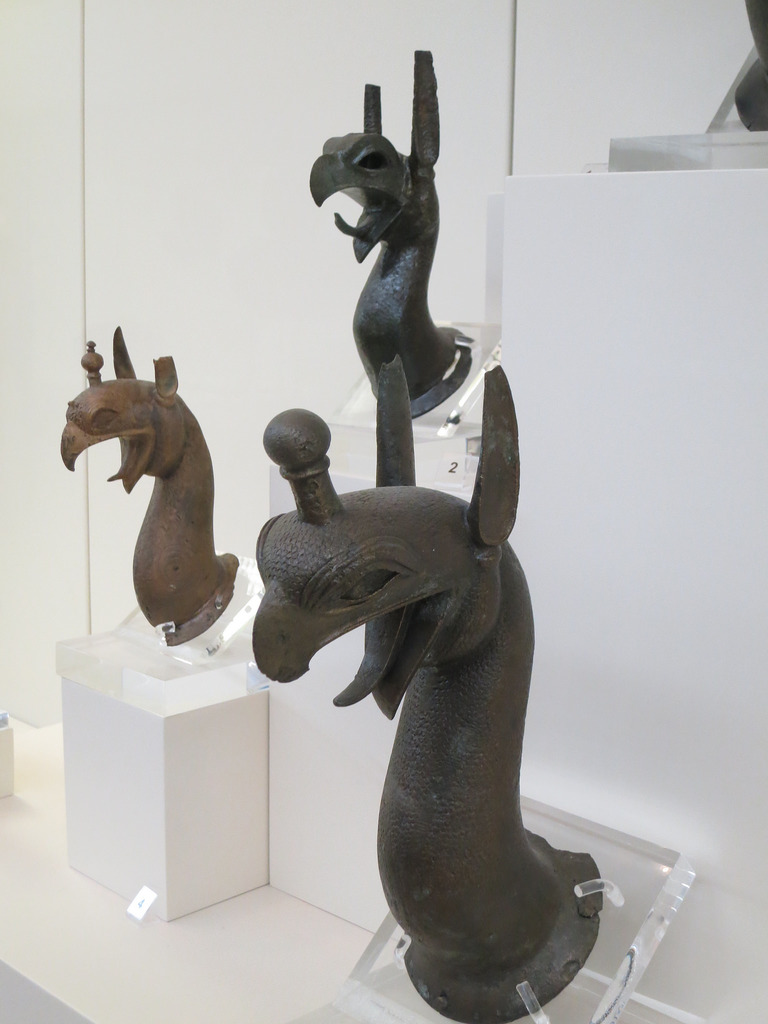
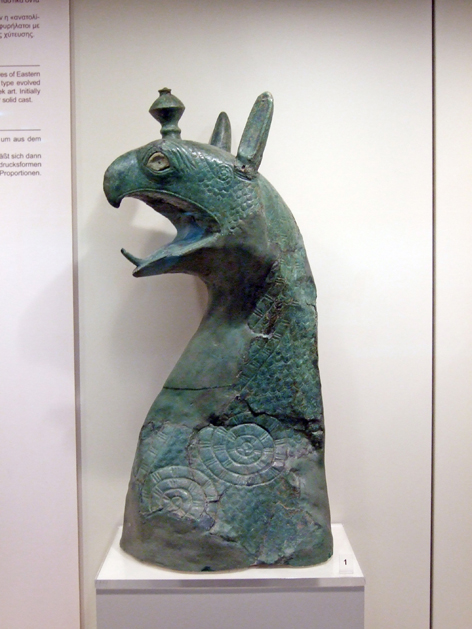
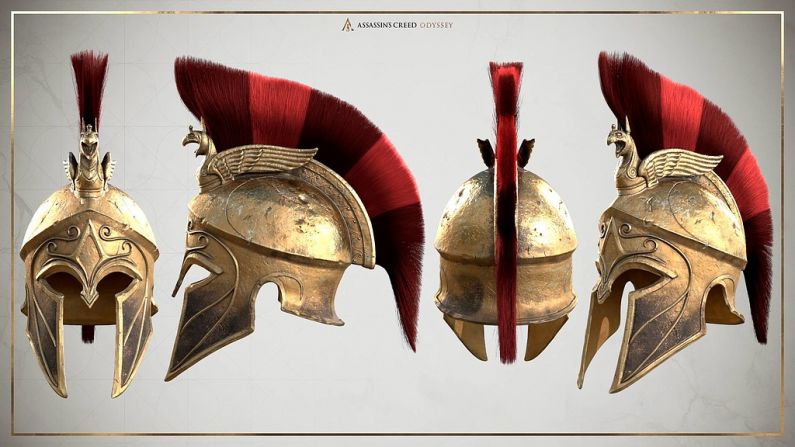
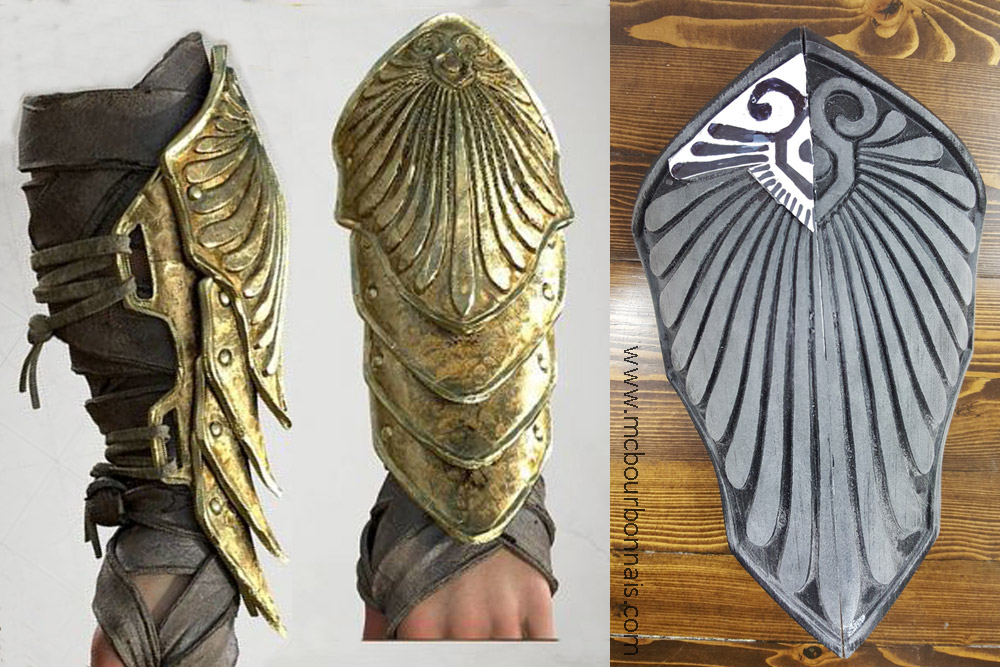
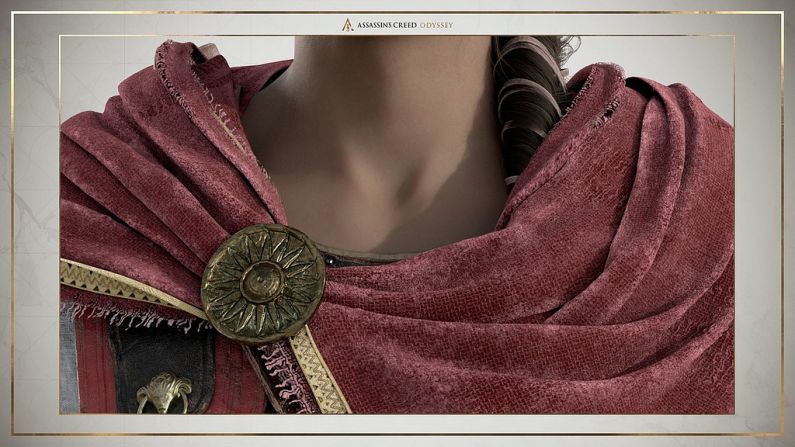
Le Cosplay Guide montre, par exemple, des vues détaillées du casque. Mais quel est cette créature qui orne le cimier, la partie qui retient le crin de cheval? S’agit-il d’un simple design imaginé par un artiste d’Ubisoft ou d’une céature mythologique de l’Antiquité? En faisant des recherches, j’ai découvert plusieurs pièces datant de la Grèce Antique exposées dans des musées et représentant un griffon, une créature mi-aigle, mi-lion. Le griffon était apparemment une figure couramment reproduite dans l’art de la Grèce Antique. Les prochaines photos montrent des représentations de griffons datant de la Grèce Antique exposées dans différents musées. Autant de pièces qui, comme tant d’autres, pourraient avoir servi d’inspiration ou de référence pour le design du casque de Kassandra.
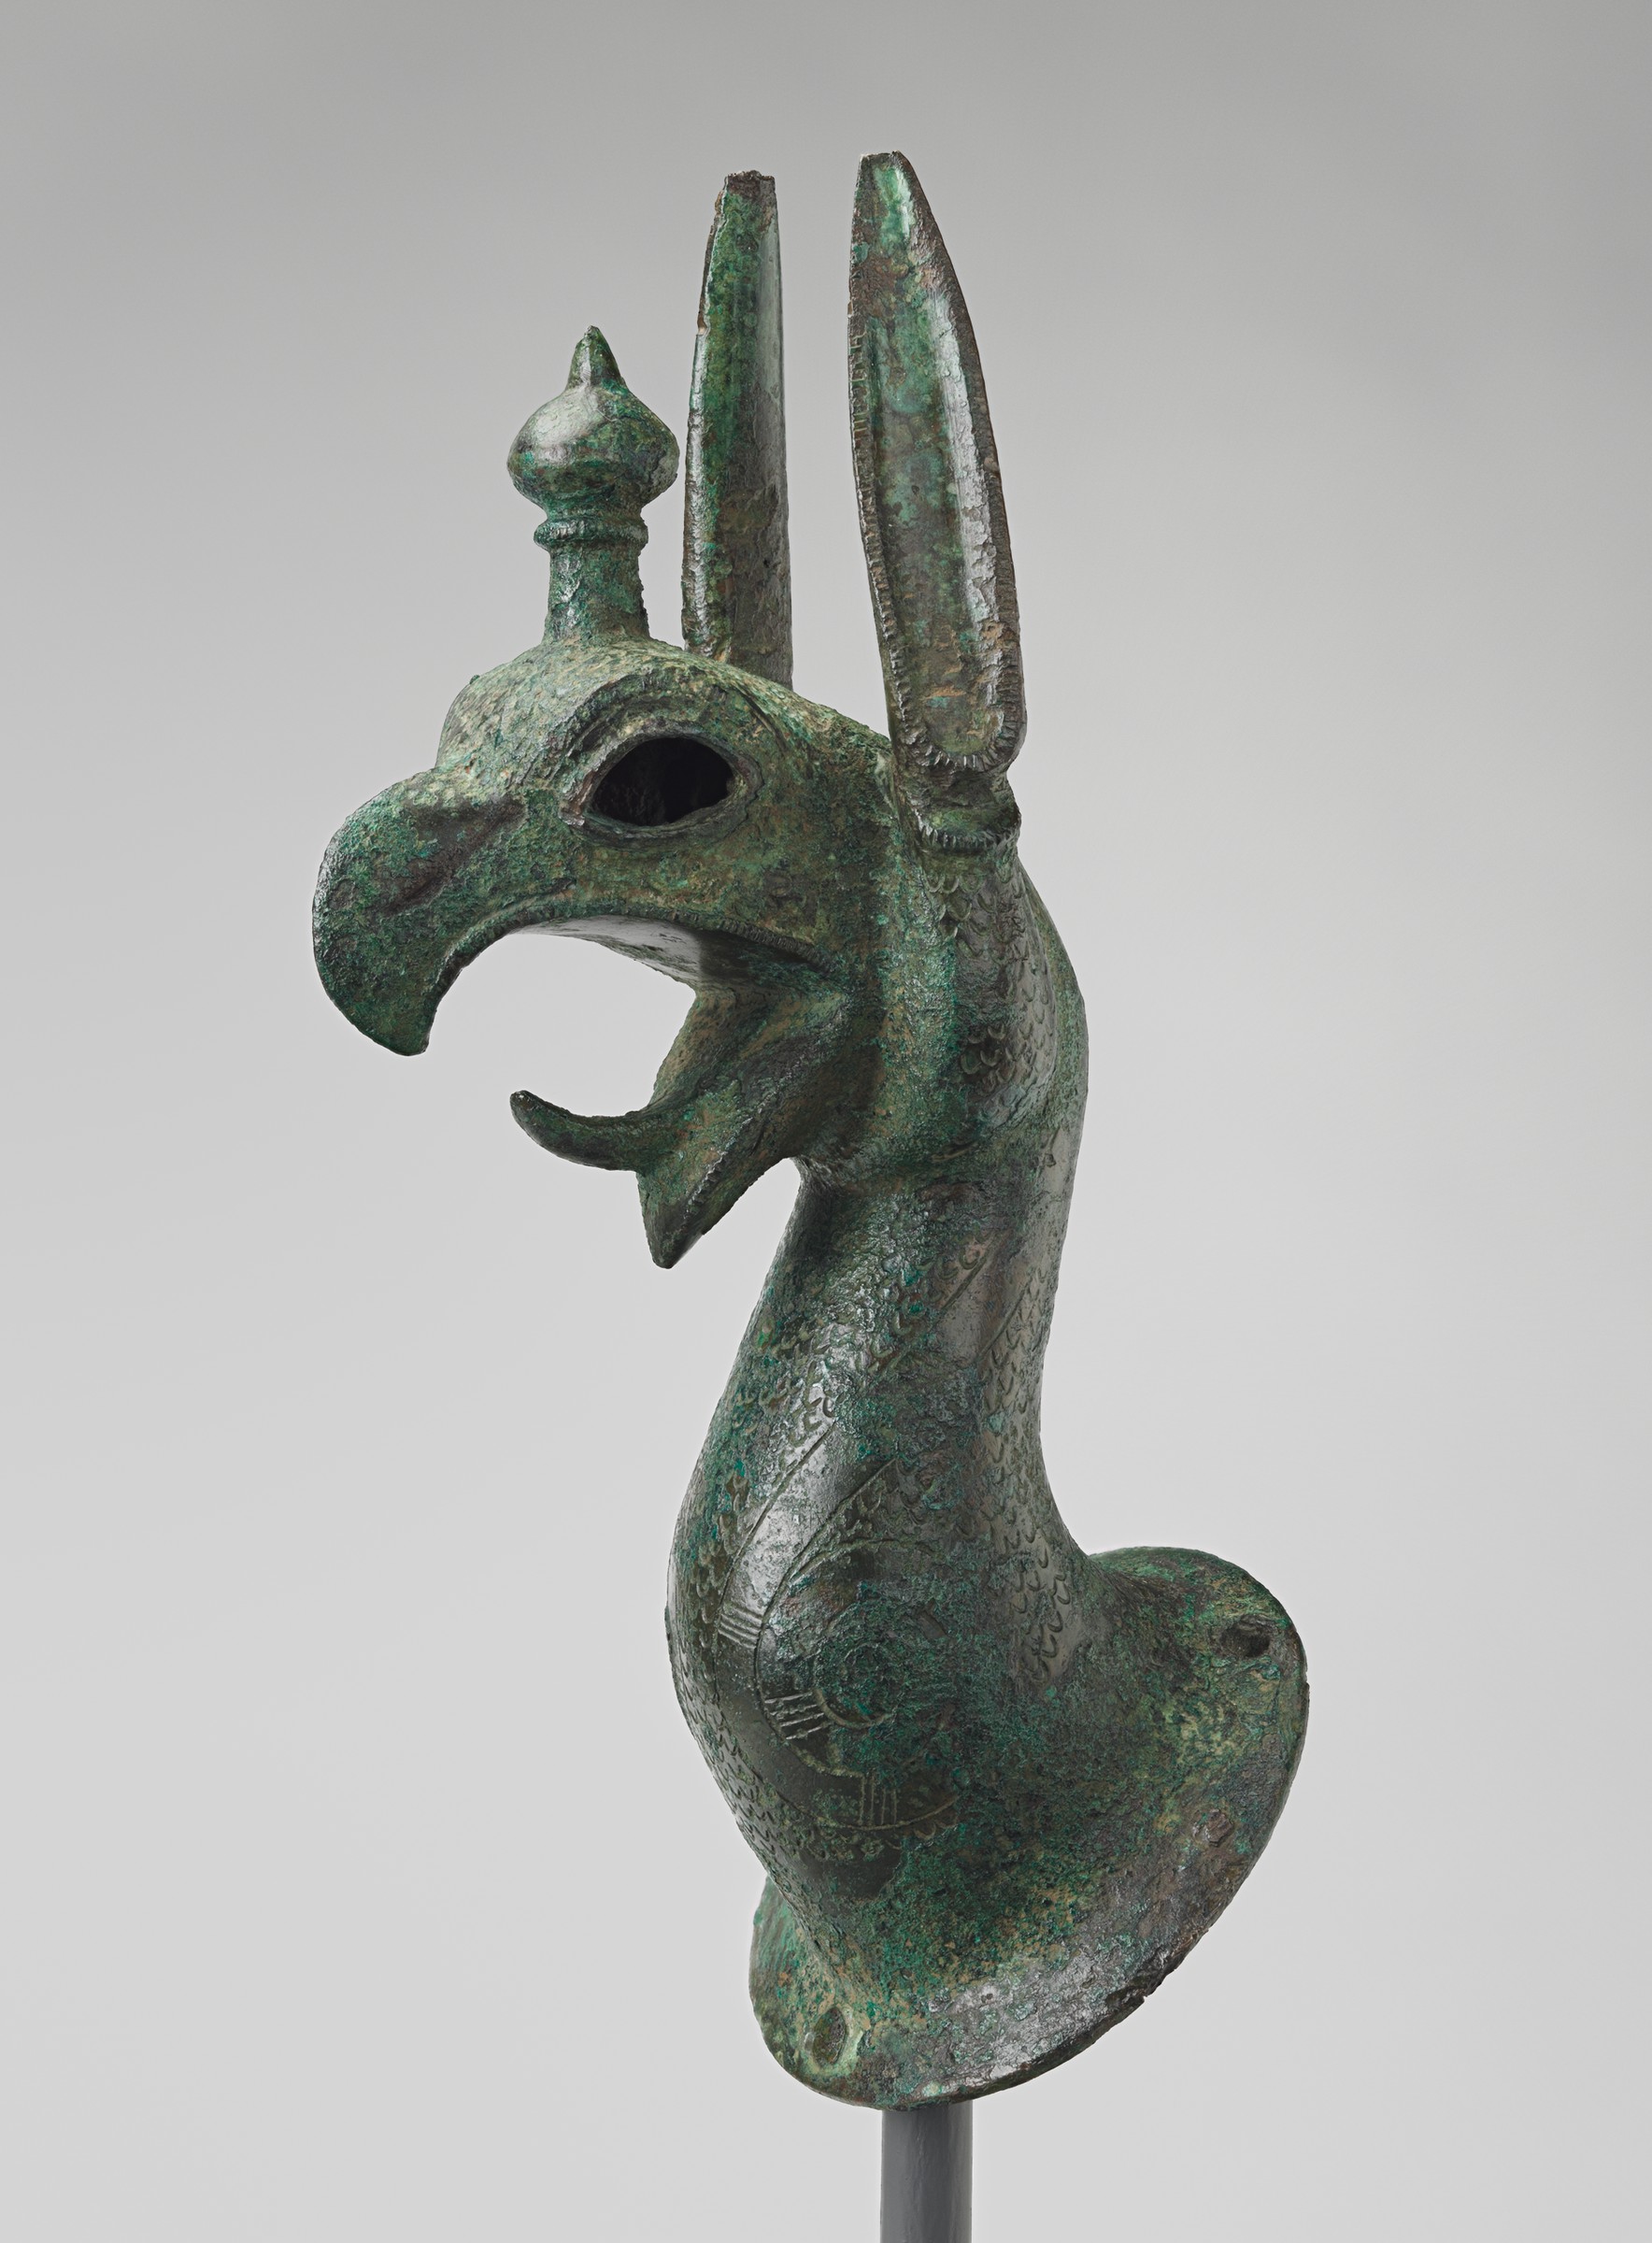
The Cosplay Guide shows, for example, many views of the helmet. But what’s this creature decorating the crest, that part holding the horsehair? Is it a simple design imagined by the Ubosoft artist or could it be a mythological creature from Antiquity? Through my searches, I discovered many pieces from Ancient Greece displayed in museums, pieces depicting a griffin, a legendary creature part eagle, part lion. The griffin was apparently a creature commonly depicted in the art of Ancient Greece. On the next pictures, you’ll see different pieces depicting griffins from Ancient Greece, displayed at various museums. These pieces, like many others, could have been used by Ubisoft’s artists as reference or inspiration for Kassandra’s helmet design.
Griffin Protome from a Cauldron, mid 7th century BCE, Harvard Art Museum
Protome of a Griffin from a Brazier, late 7th-early 6th century BCE, Harvard Art Museum
Les 2 dernières photos proviennent du site du Harvard Art Museum, où chaque pièce exposée est parfaitement décrite, pour ceux que ça intéresse.
The 2 last pictures come from the Harvard Art Museum website, where each displayed piece is perfectly described, for those who’d be interested.
Après avoir vu ces artéfacts, on voit le casque de façon différente, n’est-ce pas? Soudainement, le design du cimier prend un autre sens. Parce qu’on l’a placé en contexte. Et cela contribue aussi au travail d’interprétation du modélisateur 3D, d’où l’importance de fournir plusieurs images d’inspiration et de référence en plus des images du costume lui-même.
After seeing these artifacts, we see the helmet differently, righ? All of a sudden, the crest’s design makes sense. Because we put it in context. And it’s also helpful for the 3D modeler since it will influence his or her understanding of the design, which is why it’s important to provide inspiration and reference pictures on top of pictures of the costume itself.
Pendant le processus de modélisation, Texelion m’envoit des images pour me montrer la progression de son travail. Il a un bon œil et j’apprécie beaucoup l’interprétation qu’il fait des designs. Je lui indique s’il y a des détails que j’aimerais ajuster et il peut appliquer les modifications. Et quand j’ai le fichier final, je peux enfin procéder à l’impression! :D
During the modeling process, Texelion sends me work in progress pictures. He has a good eye for design understanding, I like how he transposes the designs in his 3D models. I sometimes point out some details that I want to modify so he can make the adjustments. And once I have the final 3D model, I can finally print it! :D
Pour les pièces qui ont beaucoup de détails, j’utilise mon imprimante Ultimaker 2 Extended +. J’adore cette machine, elle offre un excellent rapport qualité/prix. Elle a un volume d’impression de 223mm X 223mm X 205mm ce qui n’est pas si mal, mais malheureusement juste trop petit pour imprimer un casque en une seule pièce. Les plus gros modèles 3D doivent donc être coupés et imprimés en sections. La Ultimaker fonctionne avec du filament de 2,85mm de diamètre. J’utilise personnellement du PLA parce que ce filament ne produit pas de vapeurs toxiques lorsqu’il est chauffé, ce qui me permet d’utiliser mon imprimante à la maison.
For detailed pieces, I use my Ultimaker 2 Extended +. I love this machine, it offers a good quality for its value. It has a 223mm X 223mm X 205mm build volume, which isn’t too bad, but is unfortunately just a little too small to print a helmet in one piece. The biggest 3D models have to be cut and printed in pieces. The Ultimaker works with a 2.85mm diameter filament. I personally use PLA because it doesn’t produce toxic fumes when it heats, which allows me to use my 3D printer in my house.
Vous trouverez en ligne une infinité de vidéos qui parlent d’impression 3D. Chacun y va de son conseil et de sa théorie (et je me permets ici un petit commentaire personnel cinglant) pour finalement imprimer une pièce que la majorité ne sableront ou ne finiront pas vraiment. Tout ceci pour en arriver à cela… Mais bon. Pour obtenir une qualité d’impression optimale, quelques facteurs ont une influence et je vais vous récapituler rapidement mes conclusions.
You’ll easily find online an endless amount of videos talking about 3D printing. Everybody has an advice or an opinion about what will give you a good print (and I’ll go with a personal biting comment here) to finally have a piece that most of 3D printer users won’t sand or really finish at all… All this for that. Anyway. There’s a few things that will influence the quality of your final print and I will quickly sum up my personal conclusions for you.
Il y a les facteurs les plus évidents, la grosseur de la buse et la rapidité d’impression. Une buse plus fine et une impression plus lente donneront biensûr des détails plus fins. La Ultimaker vient avec des buses de 0,25mm, 0,4mm, 0,6mm et 0,8mm. Plus la buse est petite, plus il faudra de temps pour imprimer une pièce, mais les détails seront plus délicats et précis. Avec ma Ultimaker, j’utilise la buse 0,4mm la plupart du temps. Les logiciels de préparation des fichiers avant l’impression (Ultimaker utilise Cura) permettent de programmer ces paramètres d’impression ainsi que d’autres, comme l’épaisseur des couches, l’épaisseur des contours de la pièce, la densité du remplissage de la pièce, etc. Évidemment, plus les couches d’impression sont minces, plus l’impression sera fine, mais plus cela prendra du temps. Il n’y a pas de magie ou de secret, le tout est assez logique. Et pour un beau résultat, il faut être patient.
Some factors are more obvious, like the size of the nozzle and the printing speed. A smaller nozzle and a slower printing speed will give finer details, of course. The Ultimaker comes with 0.25mm, 0.4mm, 0.6mm et 0.8mm nozzles. The smaller the nozzle, the longer it will take to print the piece, but the details will be more precise. With my Ultimaker, I usually use the 0.4mm nozzle. Softwares made to prepare the files for printing (Ultimaker uses Cura) allow to choose and control many printing settings like the layers width, the edges or walls width, the filling density, etc. Of course, thinner layers will take longer, but will give a finer print. In the end, there’s no magic or secret. The whole thing is pretty logical. And for great results, you have to be patient.
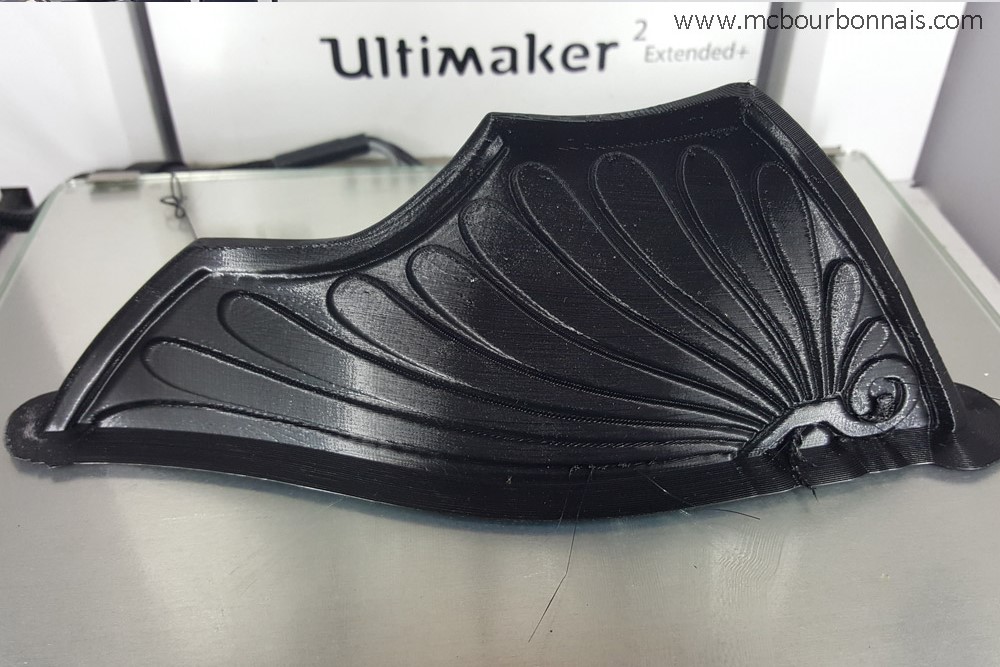
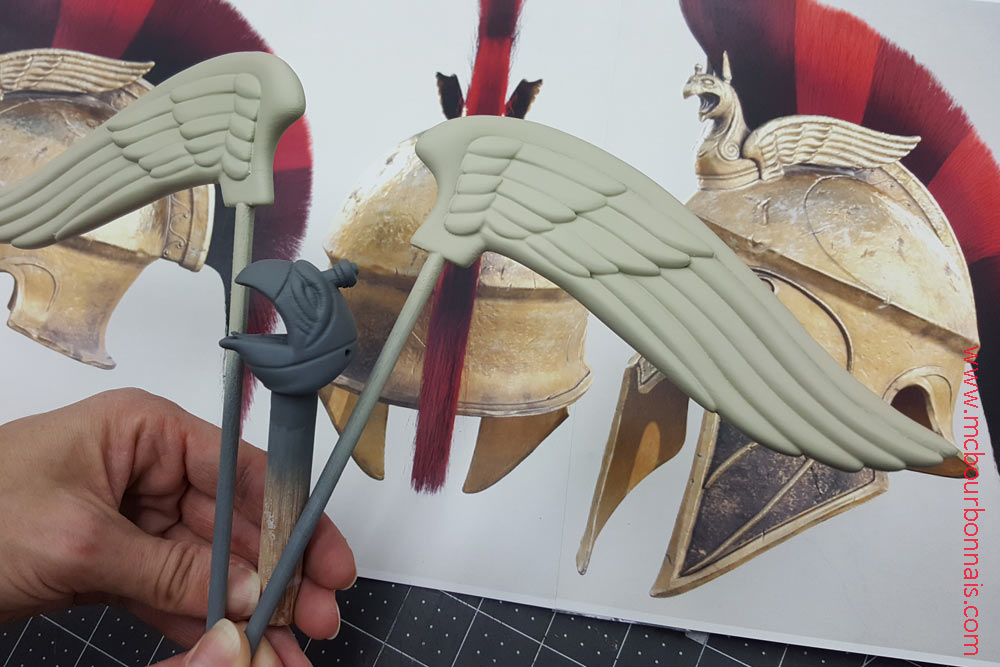
Dès que j’ai commencé à sabler des pièces imprimées 3D, j’ai réalisé qu’un facteur important était le sens ou la position dans laquelle la pièce avait été imprimée. Ces lignes typiques de l’impressions 3D, chaque couche qui forme ces stries, auront un aspect différent selon la forme de la pièce. Imaginez qu’on imprime une sphère, par exemple. Les côtés de la sphère seront finement striés, alors que le dessus de la sphère sera moins joli. L’impression 3D au filament fait une moins belle finition sur le dessus des pièces. C’est l’endroit « à sacrifier » qui nécessitera le plus de sablage. Il faut choisir dans quel sens on imprimera la pièce, quelle face de la pièce sera ce « dessus » qui sera moins joli et qui aura besoin de plus de sablage et de finition. Puis, il y a le support. L’imprimante n’imprime pas dans le vide. Le filament doit se déposer sur quelque chose. Certaines formes vont nécessiter que l’imprimante génère un support sur lequel elle imprimera une partie de la pièce. Ce support est parfois fait d’un matériel soluble dans l’eau lorsque l’imprimante a 2 buses (une pour le filament, une pour le support) ou encore le support est fait du même filament et devra être détaché de la pièce à la fin. Le support arraché à la pièce laisse parfois des traces qui nécessiteront plus de sablage. Il peut être judicieux de couper la pièce à un endroit précis pour permettre de l’imprimer dans une position choisie et éviter d’avoir besoin de support. Regardez encore la pièce que j’ai imprimée. Je l’ai coupée en deux au milieu pour m’assurer que les motifs soient sur un côté et qu’ils seraient donc finement imprimés. Le joint central ne serait pas trop difficile à coller et à finir proprement et la pièce n’aurait besoin d’aucun support pour être imprimée dans cette position.
As soon as I started sanding 3D printed pieces, I realized that an important factor was the position in which the piece was printed. These typical 3D printed lines, each layer that forms these ridges, will have a different look depending on the shape of the printed object. Imagine that you’re printing a sphere, for example. The sides of the sphere will be finely striated, while the top of the sphere won’t look that good. Filament 3D printing makes a less beautiful result on the top of 3D printed objects. You know in advance that the top of the piece won’t be perfect. You have to choose in which position the piece will be printed so you decide which part of the piece will be that ‘top’ that will require more sanding. And then, there’s support. 3D printers don’t print in the middle of nowhere. The filament has to touch something, it has to be layered on a previous layer of filament. That’s why some shapes need support to be printed. Some types of support are soluble in water, when the printer has 2 nozzles (one for the filament, one for the support) while other types of supports are simply made of the same filament used for the print itself and this support will be removed from the piece at the end. This support sometimes leaves marks on the pieces that will require more sanding. It can be a good idea to cut a 3D model in a certain way to print each part in a precise position. Look again at that piece on my printer. I cut it in half so the pattern would be on the side of the piece and would be finely printed, the join in the middle of the piece wouldn’t be too complicated to glue, sand and hide and the piece in that position wouldn’t need any support to be printed.
J’ai fait imprimer les 2 moitiés, les ai réunies et très rapidement sablées pour voir le look général. Quelque chose me semblait suspect dans le détail du design. En prenant le temps de bien observer l’image de référence et de calculer le nombre de lignes dans le motif, j’ai réalisé qu’il manquait une petite ligne dans la partie supérieure du motif. J’ai dessiné la correction sur un papier que j’ai collé sur la pièce pour comparer. Puis j’ai envoyé une photo à Texelion pour qu’il puisse faire la correction sur le modèle 3D.
I printed the second half, glued the 2 pieces together and quickly sanded them to see the general look. Something in the details of the design didn’t seem right to me, so I analysed the reference pics again, calculated the amount of lines and realized that one little line was missing in the top part of the pattern. I drew the proper design on a piece of paper and glued it on half of the piece to compare. Then I sent a picture to Texelion so he could modify the 3D model.
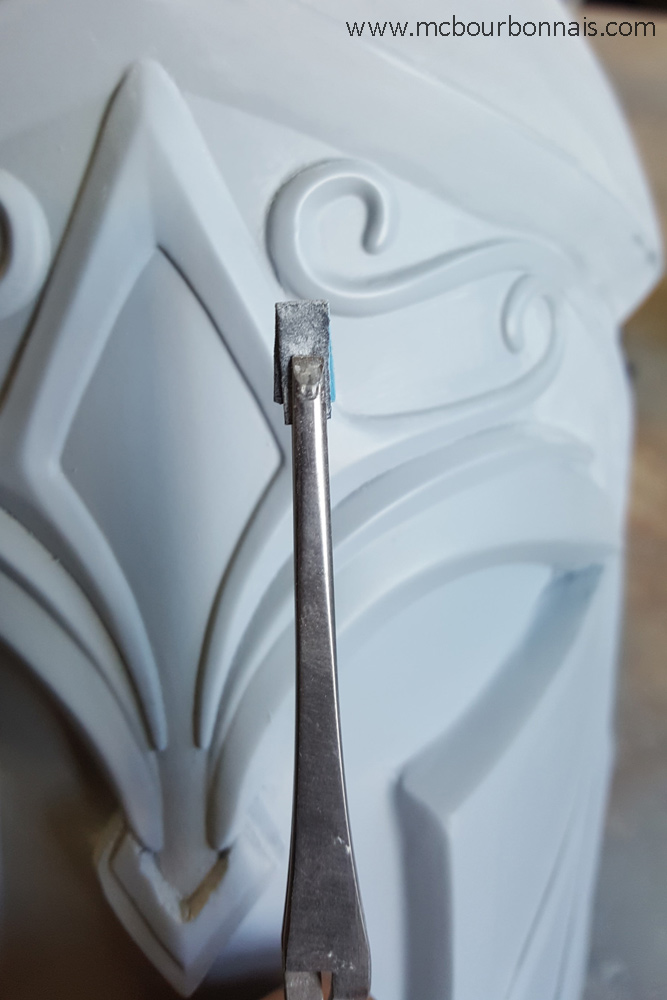
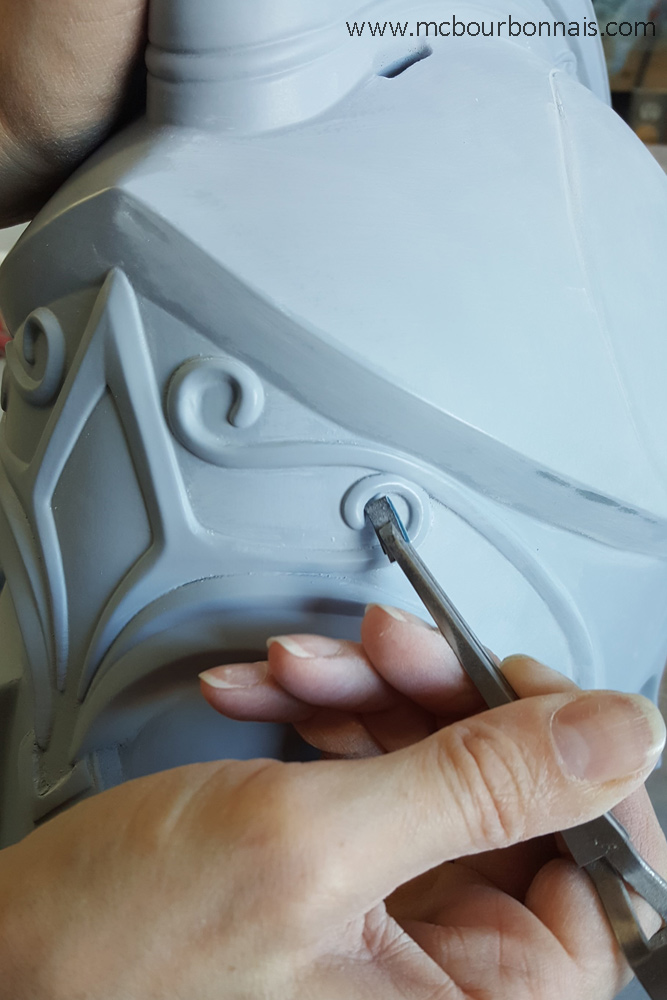
J’ai réimprimé le modèle corrigé. Mêmes étapes, assemblage et sablage. J’ai déjà expliqué dans mon blog sur le bâton magique en dragon de mon costume de Severina comment je procède au sablage des pièces imprimées en PLA. Pour remplir les imperfections mineures, j’utilise du mastic de marque Tamiya vendu pour les miniatures (à Québec, je m’en procure chez Passe-Temps 3000.) Pour les grandes surfaces, on serait tenté d’utiliser des outils de sablage électriques, mais la haute vitesse de ces outils réchauffe et fait légèrement ramolir la surface du PLA, ce qui gomme rapidement le papier abrasif et le rend inutilisable. C’est là que j’avais découvert le papier abrasif à l’eau. Ce papier est fait pour être mouillé et utilisé sur une surface humide et permet de sabler sans la chauffer une surface en PLA. Le papier abrasif à l’eau est un papier de finition disponible dans des grades très fins. Pour mes accessoires de costumes, je me rends jusqu’à un grade 1000 ou 1200. Oui, il est possible de transformer un morceau strié imprimé 3D en un morceau parfaitement lisse sans trace d’impression, mais il faut sabler méticuleusement et longtemps. Je colle mes feuilles de papier abrasif sur des tuiles de « foam EVA » et je coupe des petits blocs de sablage de toutes les formes pour être capable de sabler tous les recoins. Des blocs à sabler de toutes les formes, des limes de toutes les types et du papier abrasif plié de toutes les façons possibles, c’est comme ça, armée de mon outil et de ma patience, que je sable pendant des heures. Sur la prochaine photo, vous voyez le casque de Kassandra. Oui, il s’agit de l’original imprimé 3D. La pièce du nez montre encore des traces d’impression, alors que le reste est rendu à un stade de sablage de finition plus avancé. Un minuscule morceau de papier abrasif plié et tenu avec des pinces me permet de sabler les contours des motifs. En cours de sablage, on peut appliquer une couche d’apprêt qui nous permettra de voir, dès le sablage suivant, où sont les imperfections restantes.
I printed again the new 3D model. Same steps, glued the pieces together and sanded them. I explained in another blog, the making of my Severina dragon staff, how I sand PLA printed pieces. To fill up small defects and holes, I use Tamiya Putty that is sold in hobby stores for miniature making. For larger surfaces, it would be tempting to use electrical sanding tools. But the high speed of these tools heats up and softens the PLA surface and the sandpaper quickly becomes unusable. This is when I discovered wet sanding. Made to literally be used wet and on a wet surface, wet sandpaper is perfect to sand a PLA object without creating heat. This sandpaper is made for finishing sanding and is available in fine grits. For my 3D printed props, I go up to a 1000-grit, sometimes a 1200-grit. Yes, it’s possible to turn a 3D printed piece full of little ridges into an object with a perfectly smooth surface, but you have to sand meticulously and for a long time. I glue sheets of sandpaper on EVA foam and cut different shapes of sanding blocks to be able to sand every little corner. Sanding blocks of every shape, files of every type, sandpaper fold in every possible way, that’s how I attack my 3D printed pieces, with my tools and a lot of patience. On the next picture, you see Kassandra’s helmet. Yes, it’s the original 3D printed one. The nose piece still shows traces of 3D printing while the rest of the helmet is at a more advanced stage of sanding. A tiny piece of folded sandpaper that I’m holding with pliers allows me to sand the fine edges of the pattern. During the sanding process, you can apply a coat of primer so you’ll see, next time you’ll sand, where are the remaining imperfections.
Sabler des pièces imprimées 3D fait réaliser qu’il faut prévoir à l’impressions des parois assez épaisses. Si on choisit de faire imprimer des parois minces pour sauver du temps ou du matériel, on réalisera peut-être au sablage qu’on aurait eu besoin de plus d’épaisseur pour sabler.
Sanding 3D printed pieces made me realize that you have to set thicker walls when you print your object. If you set thinner walls to save time or material, you may realize you would have needed more thckness to be able to sand properly.
La dernière étape avant de mouler une pièce sera toujours d’appliquer une couche finale d’apprêt. (Il peut être nécessaire de sabler finement une dernière fois.) N’oubliez jamais qu’il faudra prévoir un endroit sur la pièce où elle pourra être accrochée, suspendue ou maintenue en place le temps d’appliquer l’apprêt. Sur la prochaine photo, la tête et les ailes du griffon du casque ont été collées sur des goujons. (Notez qu’elles ont été modélisées et imprimées séparément du casque.)
The last step before molding is to apply a final coat of primer. (It could be necessary to sand the piece one last time.) Always remember that the piece will need to be suspended or hold in place in a way in order to be primed. On the next picture, the griffin’s head and wings were glued on a dowel. (Notice that they’ve been 3D modeled and printed separately from the helmet.)
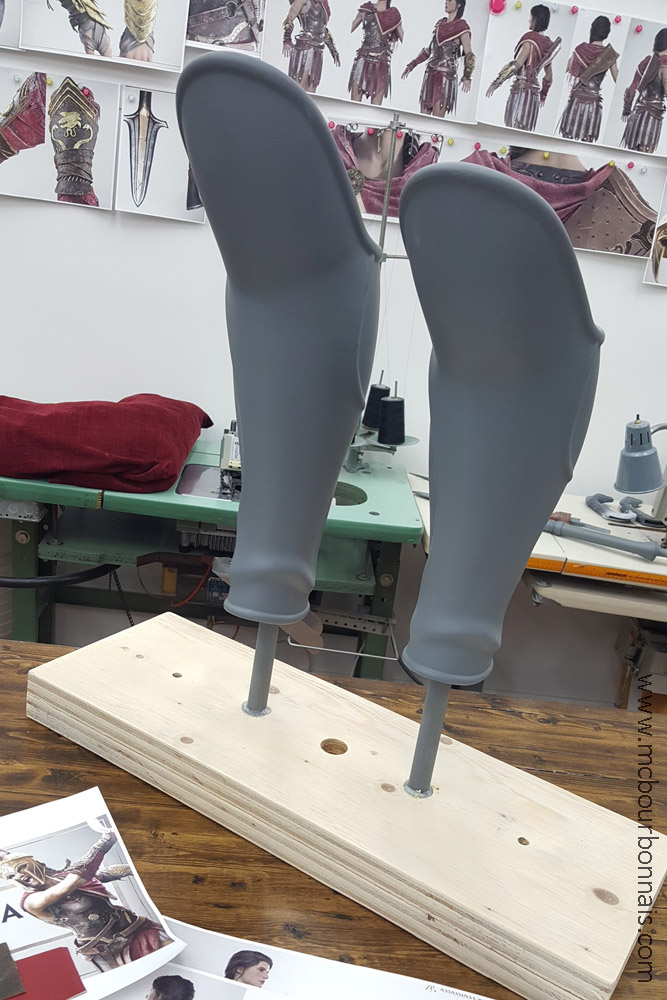
Sur la prochaine photo, 2 tests de pièce d’armure de la jambe gauche, pièce d’armure appelée « grève. » L’une des 2 a été imprimée après qu’on ait modifié l’échelle d’impression du fichier. C’est celle qui était légèrement plus longue que l’autre qui me convenait le mieux. La pièce, imprimée vide pour que je puisse procéder à un essayage, a ensuite été bouchée aux extrémités en vue d’être moulée. Cela a aussi permis de coller le goujon qui la tient en place le temps d’appliquer l’apprêt.
On the next picture, 2 prototypes of left leg armor piece (called ‘greave’.) One of them was printed after the file scale was slightly modified. The longer one was the best fit. The pieces were printed empty so I could try them on. The openings of the armor piece were then blocked to prepare the piece for molding. It also allowed to glue a dowel so the piece could be primed.
Et maintenant, la partie compliquée: les moules. Pourquoi mouler une pièce plutôt que d’utiliser l’original imprimé 3D? Le but premier est de pouvoir faire des copies, par exemple si l’on sait qu’on aura besoin de plusieurs exemplaires d’un même item. Cela peut aussi être parce qu’on veut faire des copies différentes. Pour mon costume de Kassandra, j’avais l’intention de tester des peintures et des finis différents, j’aurais voulu faire des versions d’armures différentes. À chaque copie son fini. Cela peut être parce qu’on veut une copie dans un matériel précis, comme une épée en mousse, par exemple. L’épée originale est moulée et on pourrait en faire des tirages en matériel solide, souple, flexible, etc. selon les usages. Le moulage a aussi l’avantage qu’il nous permet de garder notre original. Si l’on perd ou qu’on se fait voler une pièce de costume, on pourra toujours faire un nouveau tirage dans notre moule. Si l’on perd notre original, il faudra en imprimer un autre. Certains moules coûtent très cher à produire, alors pour des considérations budgétaire, on pourra décider de ne pas faire de moule et prendre le risque d’utiliser l’original. Mon bâton magique en dragon, de mon costume de Severina, était gigantesque. Je ne l’ai pas moulé, ça m’aurait coûté trop cher, alors j’ai utilisé l’original. Mais si je l’avais perdu, j’aurais eu des centaines d’heures d’impression et de sablage à reprendre.
And now, the tricky part : molding. Why would you make a mold instead of using your original piece? The obvious reason is that you want to make copies, when you know that you’ll need many copies of the same object. It can be because you want different copies of the same object. For my Kassandra costume, I wanted to have many armors with different paints. Different versions of the same armor, each armor with its own golden color/look. You can also make a mold because you want your object to be made of a specific material, like a foam sword, for example. The original sword is molded and you can cast one in a solid, smooth, flexible, etc. material depending on the use of the sword. Molding also allows you to keep your original piece. If you loose your prop or if it’s stolen, you’ll always have your mold at home and it will always be time to cast a new copy. If you loose the original, you’ll have to print a new one. Some molds are very expensive to make so you may decide, for financial reasons, no to make a mold. My Severina dragon staff was huge, molding it would have been very expensive, so I decided to use the original. But if I had lost it, I would have had hundreds of printing and sanding hours to do again.
Il existe plusieurs types de moules faits dans différents matériaux. Chaque moule permettra de mouler des objets aux formes différentes. Des objets simples pourront être moulés facilement avec un moule solide en une seule pièce. Des objets complexes nécessiteront des moules souples (comme un moule à glaçons en silicone que l’on peut tourner à l’envers pour en extraire le contenu) avec une coquille de support en plusieurs pièces. Les objets dont on veut mouler l’extérieur ET l’intérieur, comme un casque ayant un intérieur fini, sont les plus complexes à mouler. Les casques sont d’aileurs un excellent exemple, ils sont l’une des pièces de costume les plus difficiles à mouler. Les grosses pièces nécessitant de gros moules, plus lourds et difficiles à manipuler, représentent aussi un défi. Comme je l’ai dit, je ne suis pas une spécialiste en moulage. Avec mon ami grincheux qui a étudié en arts il y a plusieurs années et qui était aussi intéressé à apprendre à mouler, j’ai exploré et découvert les techniques et les produits de moulage. Nous avons fait beaucoup d’erreurs. Il y a plusieurs de mes moules que je ne vous montrerais jamais en photos! lol Je n’ai pas documenté tous mes désastres et je peine encore à me souvenir du nom des types de moules en français (alors qu’on ne s’attende pas à ce que je les traduise en anglais…) mais je vais faire un survol des informations de base que j’ai apprises. Si vous êtes un expert en moulage, cela vous sera tout à fait inutile. Si vous êtes novice, cela vous donnera une idée générale et vous donnera peut-être un petit coup de pouce.
There’s many types of molds made of different materials. Each type of mold will allow to mold an object with a specific shape. Simple objects can easily be molded with a one-piece, solid mold. Objects with intricate shapes will require flexible molds (like a silicone ice mold) with a solid shell made of many pieces. You want to mold the outside AND the inside of an object, like a helmet with a finished inside? You’ll need to make one of the most complicated type of molds. Helmets are by the way a good example, they are some of the most complicated costume part to mold. Big pieces that require a huge mold are heavy and hard to handle and are a great chalenge too. As I said, I’m not a molding expert. With my grumpy friend who had never made molds either but who was interested in learning, I explored and discovered the molding techniques and materials. We made a lot of mistakes. A lot. There’s some mold I would never show you in pictures! lol I didn’t take each of my disasters in picture, anyway… I have a hard time remembering the names of the molds in French, so don’t expect me to translate that in English! lol But I want to summarize the basic things I’ve learned. If you’re an expert at molding, reading this will be a waste of time for you. But if you’re new at molding, maybe it will give you a general idea and give you some hints and tips.
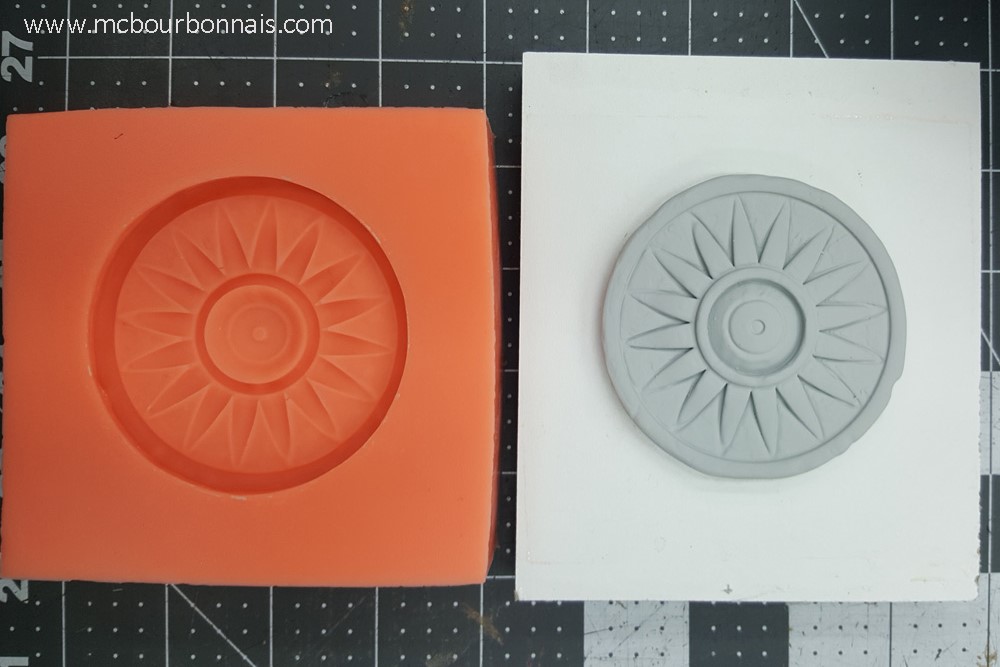
Voici par exemple le médaillon qui orne le châle de Kassandra. Une pièce simple qui aurait peut-être même pu être moulée dans un bloc de plâtre, le plus facile des moules. Mais comme la plupart des pièces de costumes nécessitent des moules souples en silicone, je n’utilise plus le plâtre que comme support et j’utilise du silicone pour tous mes moules. Si j’avais eu un petit contenant de la bonne grandeur, j’aurais pu coller le médaillon directement au fond du contenant et couler le silicone par-dessus. Mais je n’en avais pas, alors j’ai collé le médaillon sur une petite planche autour de laquelle j’ai collé des murs avec de la colle chaude. J’ai donc fabriqué un petit contenant temporaire dans lequel j’ai versé du Smooth-On Rebound 25 jusqu’à temps de couvrir le médaillon. Pour mes moules et mes tirages, j’utilise les produits Smooth-On que je me procure chez Sial à Laval. Ce sont des produits malheureusement assez dispendieux, mais très efficaces. Tous les produits Smooth-On de moulage et de tirage sont des liquides en 2 composantes qui doivent être mélangés ensemble dans des proportions précises et qui réagiront dans un temps variable selon le produit. Une fois le Rebound 25 durci (après le temps de cure), j’ai pu arracher les murs de ma boîte et sortir mon moule qui est en fait un petit bloc de silicone. Voici la pièce originale et son moule.
Here’s for example the medallion that decorates Kassandra’s shawl. A simple piece that could probably even have been molded with plaster. But since most of costume pieces require silicone molds, I only use plaster to make the supporting shells of my molds and I use silicone for all my molds now. I didn’t have a plastic container of the proper size, so I glued the medallion on a plank and built walls around it with hot glue. I literally built a temporary container in which I poured Smooth-On Rebound 25 until the medallion was totally covered. For my molds and casts, I use Smooth-On products that I buy at Sial in Laval, QC. They’re all unfortunately very expensive products, but they’re good products. All the Smooth-On molding and casting products are actually 2 liquids that have to be mixed together in specific proportions and they all have different pot life and cure time. Once the Rebound 25 was cured, I removed the walls of my box and took off the mold that is actually a small silicone block. Here’s the original piece and its mold.
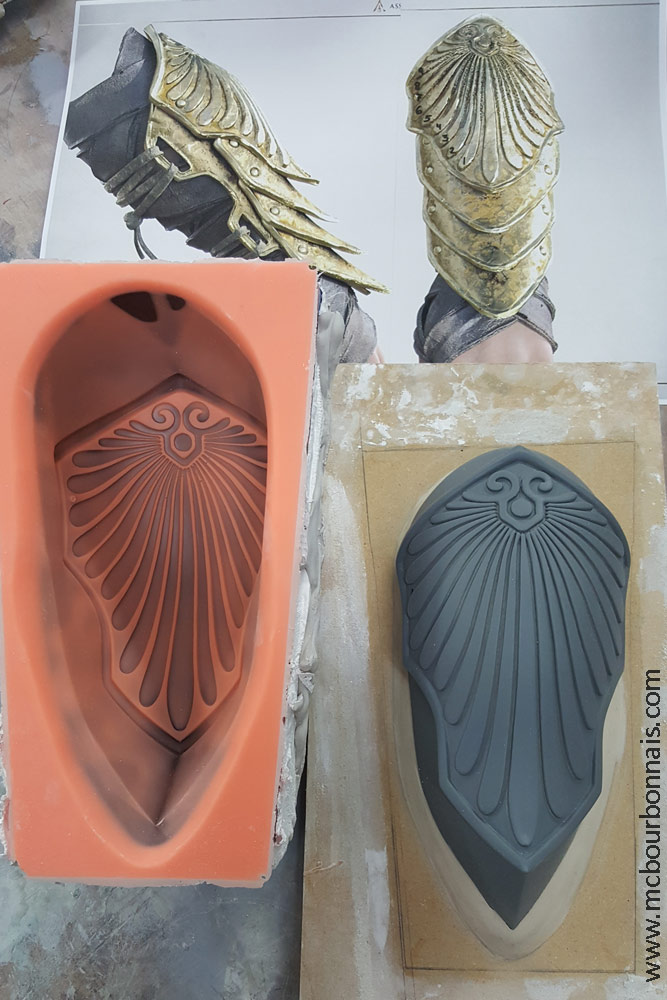
Voici la pièce de bras du début. Beaucoup de pièces d’armure comme celle-ci n’ont besoin d’être moulées que de l’extérieur. Nous n’avons besoin que de la forme, d’une empreinte du motif extérieur et des contours. L’épaisseur de la pièce sera formée par les couches successives de résine qui seront coulées dans le moule. Selon la forme de la pièce, il ne sera probablement pas possible de la coller à plat sur une surface comme le médaillon de l’exemple précédent. Cette partie d’armure courbée qui suit la forme de l’avant-bras ne tiendra pas à plat et si on versait du silicone dessus, le silicone déborderait et s’infiltrerait sous la pièce alors qu’on ne veut mouler que le dessus (ou l’extérieur.) Il faut réussir à « asseoir » la pièce sur une base qui permettra de la tenir en place et d’en mouler l’extérieur seulement. En faisant des recherches, j’ai vu beaucoup de mouleurs placer leur pièce sur un lit de glaise. La glaise est peu dispendieuse et peut être réutilisée. On la conserve à l’humidité dans un contenant fermé. (Cette même glaise peut servir à sculpter si l’on en a le talent et l’envie. Il ne faut pas oublier qu’elle sèche à l’air libre et qu’une sculpture de glaise en cours devra être conservée à l’humidité sous un sac de plastique. Plusieurs sculpteurs utilisent maintenant plutôt de la plasteline, genre de pâte à modeler haut de gamme qui ne sèche pas à l’air libre. La Monster Clay est une marque populaire. Ceci dit, j’ai bien peur que le métier de sculpteur ne soit appelé à disparaître avec l’invasion de la modélisation 3D.) Il m’arrive parfois de carrément demander à Texelion de modéliser ce bloc que j’aurais fait en glaise directement sous la pièce. Je ferai donc imprimer une copie de la pièce que je ne sablerai pas, seulement pour l’essayer, vérifier le design et les proportions, et j’en ferai imprimer une copie avec le bloc déjà intégré, rendant la pièce imprimée et sablée directement prête pour le moulage.
Here’s the arm piece from the beginning. Many armor pieces like this one need to be molded from the outside only. We need the shape and an imprint of the pattern and edges. The thickness of the final piece will come from the layers of resin that we’ll pour in the mold. Depending on the piece’s shape, it probably won’t be possible to glue it on a flat surface like the medallion from the last example. This part of the armor that is curved to follow the shape of the forearm wouldn’t stay flat by itself. If we’d pour silicone on it, the silicone would go all over and under the piece, while we need to mold only the top (or the outside.) We should succeed in ‘sitting’ the piece on a base that will hold it in place and allow us to mold the outside only. Making searches, I saw many mold makers putting their piece on a bed of natural clay. Natural clay is cheap and can be reused. We have to keep it wet in a closed container. (This same natural clay could be used to sculpt if you wanted to. Just remember that is dries in open air and that any natural clay sculpture in progress has to be kept wet under a plastic bag. Sculptors also use synthetic clay, kind of a high hand plasticine that doesn’t dry in open air. Monster Clay is a popular brand. That being said, with the invasion of 3D modeling, I wonder how long the job of traditional sculpting will continue existing.) Sometimes I literally ask Texelion to 3D model that part I would have made in natural clay directly under the piece. In this case, I will print a first costume piece that I won’t sand, just to try it on, see how it looks and check out the desing and proportions. Then I will print the other version of the piece with the integrated block that will be ready, once sanded, to be molded.
La boîte pour couler ce moule a été faite de la même façon que celle du médaillon. Une fois le bloc soutenant la pièce bien collé à plat sur une planche, j’ai collé des murs autours de la planche, créant une boîte temporaire.
The box in which I poured the silicone to make this mold was made the same way I made the one of the medallion. Once the block supporting the armor piece was perfectly glued flat on a plank, I glued walls around the plank, creating a temporary box.
Il y a beaucoup de détails dans ce morceau. Les petites lignes dans le haut du motif sont très près les unes des autres. En théorie, les silicones de moulage sont faits exprès pour cela, pour être en mesure de prendre l’empreinte précise d’une forme complexe. Mais personne n’est à l’abri d’une bulle d’air encapsulée entre le modèle et le moule… Et il n’y a rien de plus frustrant dans l’aventure du moulage/tirage que de rater un moule et gaspiller du matériel. J’ai décidé d’utiliser du Smooth-On Rebound 25 pour ce moule. C’est un silicone plus dense qu’on dit « idéal pour les applications verticales au pinceau» parce qu’il est très visqueux. Il ne coule pas vite. Il ne fonctionne PAS bien pour les moules dans lesquels on a besoin de verser un silicone moins dense qui doit bien couler. Mais j’ai pensé que le Rebound 25 serait bien pour appliquer au pinceau sur ce motif, en m’assurant qu’il y ait du produit entre chaque petite ligne. J’ai appliqué une première couche au pinceau et quand le motif a été bien couvert, j’ai versé d’autres couches de Rebound 25 jusqu’à temps d’avoir une épaisseur suffisante partout sur la pièce. On recommande de teinter avec du pigment chaque couche de silicone d’une couleur différente de la précédente. De cette façon, on s’assure que la couche précédente, d’une couleur contrastante, a bien été couverte. Sur l’image, on voit que le moule a été fait en couches de 2 couleurs, orange (la couleur originale du Rebound 25) et noir (la couleur obtenue avec du pigment.)
There’s a lot of details in this piece. The delicate lines on top of the pattern are very close to each other. Theoretically, molding silicones are made especially to mold intricate shapes like this one and obtain a precise imprint. However, everything can happen, you never know when there will be a tiny air bubble trapped between your model and the silicone and nothing is more frustrating in the molding/casting world than missing a mold and wasting material. For this mold, I decided to use Smooth-On Rebound 25 platinum-cure silicone rubber, because it ‘can be applied with a brush or spatula to vertical surfaces without sagging’ and it’s ‘good for making molds of models with deep undercuts.’ I applied a first coat of Rebound 25 with a brush, making sure there was some product between each line of the pattern and once the pattern was completely covered, I poured more layers of Rebound 25 until the total coat of Rebound was thick enough all over the model. It’s recommended to dye each layer with a different pigment color so you always know, when you pour more silicone, that the previous layer, which is a different color, is perfectly covered. On the picture, you can see that this mold was made using 2 colors, orange (which is the Rebound 25 original color) and black (the pigment I used.)
Il faut garder en tête que tous ces produits de moulage et de tirage sont des produits chimiques. Chaque produit vient avec une fiche signalétique et des recommendations qu’il faut prendre le temps de lire. Il faut généralement porter des gants et travailler dans un endroit bien ventilé pour manipuler ces produits. NOTE : les gants de latex peuvent causer une réaction au contact de certains silicones, alors il est préférable d’utiliser des gants de nitrile. Certaines résines pour les tirages nécessitent d’être mélangées dans des contenants de plastique et brassées avec un bâton ou instrument de plastique plutôt qu’avec un bâton de bois. Plusieurs produits de moulage et tirage ne réagissent pas bien lorsqu’ils entrent en contact avec un matériel en particulier et plusieurs de ces produits nécessitent d’être utilisés à des températures et taux d’humidité ambiante précis, sinon le moule ou le tirage ne fonctionnera pas et vous gaspillerez du matériel. Tout cela est précisé dans les instructions qui accompagnent les produits. LISEZ LES INSTRUCTIONS. C’est le meilleur conseils que je peux vous donner.
You should keep in mind that all these molding and casting products are chemical products. Each product comes with its data sheet that we should take the time to read. Most of the time, it’s recommended to wear gloves and to work in a ventilated area when you use these products. NOTE: latex gloves can cause a reaction when they’re in contact with some silicones, so you’d better go for nitrile gloves. Some casting resins need to be mixed in a plastic container and using a plastic stick instead of a wooden stick, otherway, it will not cure properly. Many molding and casting products won’t work properly if they touch some particular material and some casting resins need to be used at a precise temperature and humidity level, otherway, they won’t cure properly and you’ll waste these products. This is all written in the data sheet and instructions that come with the products. READ THE INSTRUCTIONS. That’s the best advice I can give you.
Une fois le Rebound 25 bien catalysé, l’étape suivante consiste à recouvrir le Rebound d’une couche de plâtre amovible qui servira de support à ce moule souple. Si le moule souple n’était pas soutenu par une coquille solide, il pourrait se déformer pendant l’étape du tirage et donner une pièce finale qui serait elle aussi déformée. Il peut être nécessaire de faire la coquille de support en plusieurs morceaux, car si le moule de silicone est souple et pourra s’étirer pour laisser sortir la pièce finale, la coquille de plâtre, elle, ne s’étirera pas pour laisser sortir le moule de silicone. Si la forme moulée est complexe et que le moule de silicone comporte des contre-dépouilles, sa coquille de support devra être faite en 2 ou plusieurs pièces pour être démontée. D’autres matériaux pourraient être utilisés pour faire cette coquille de support. Le plâtre demeure l’option la moins dispendieuse. Observez encore la photo. On voit une subtile coquille de plâtre déborder autour du moule.
Once the Rebound 25 is cured, the next step is to cover the silicone mold with a layer of plaster that will become a supporting shell. If the flexible silicone mold wasn’t supported with a hard shell, it could move during the casting process and produce a cast that would be distorted. It can be necessary to make a plaster shell in many pieces. If the silicone mold can be stretched to take off the cast, the hard shell can’t obviously be stretched that way to take off the mold. If you’re molding an object with an intricate shape and if the mold has undercuts, the plaster shell will need to be made of many pieces in order to be removed. The supporting shell could be made of many materials, but plaster remains the cheaper option. Look at the picture again. You can see the plaster shell around the silicone mold.
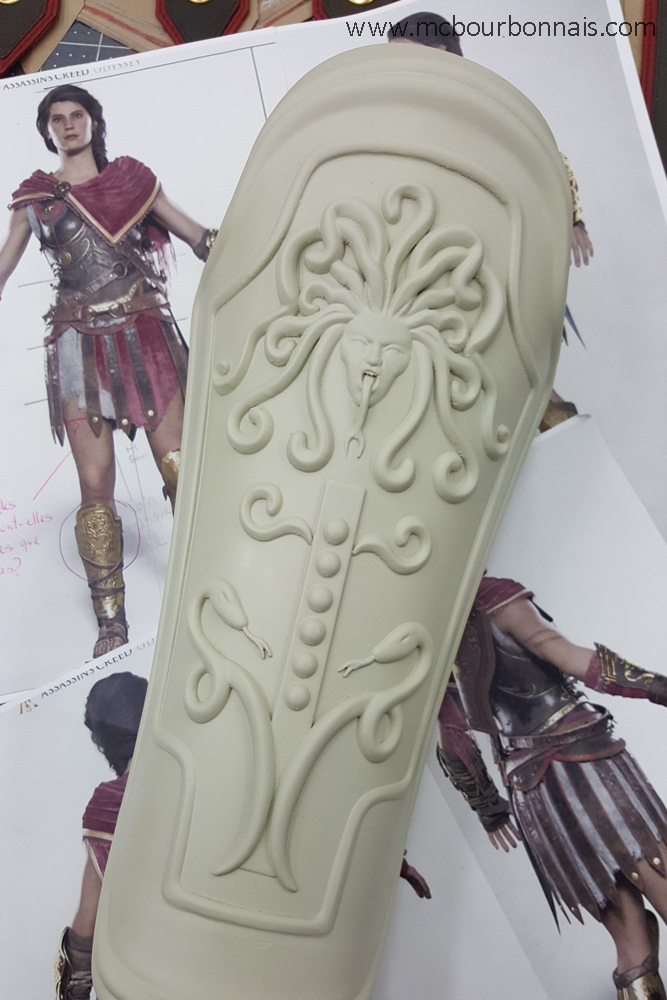
La jambe droite de l’armure de Kassandra a été fabriquée de la même façon. Imprimée 3D, sablée, puis moulée. Voici la pièce originale imprimée 3D, prête pour le moulage.
Kassandra’s right leg armor piece was made the same way. 3D printed, sanded, then molded. Here’s the original 3D printed piece ready to be molded.
J’ai procédé exactement de la même façon pour faire le moule de cette pièce. La coquille de plâtre du moule est plus visible sur cette photo.
I did the exact same thing to make the mold of this piece. The mold’s plaster shell is easier to see on this picture.
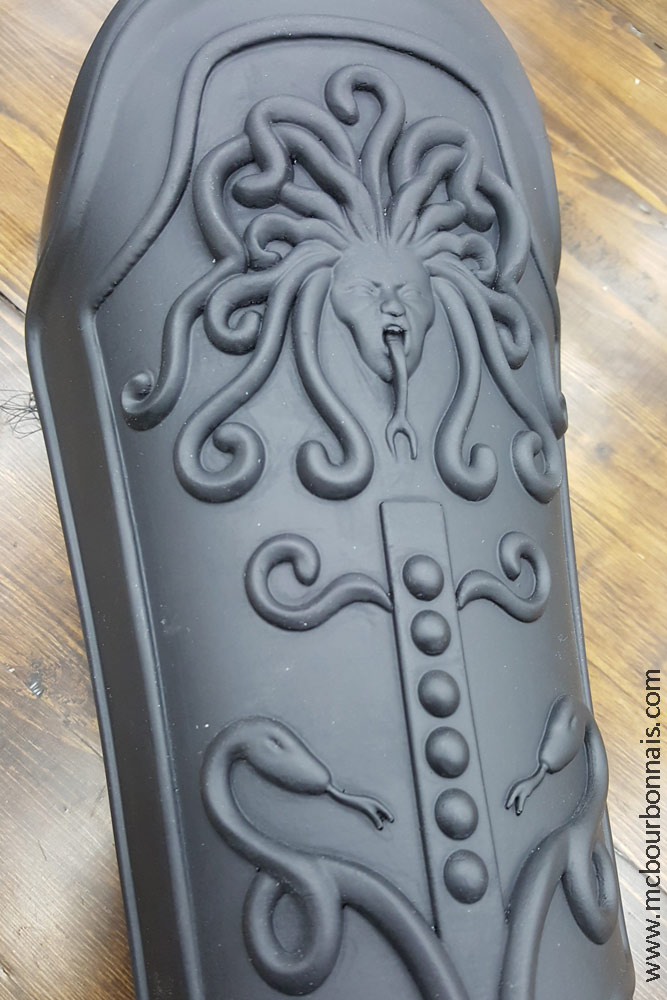
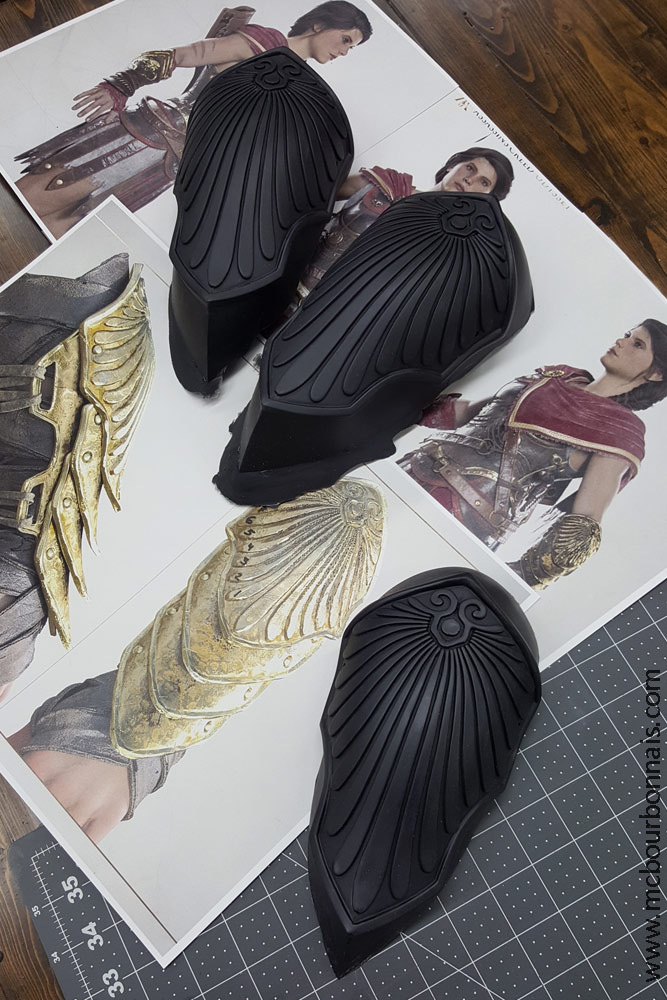
Et finalement, les tirages! J’ai choisi la résine Smooth-On ONYX pour faire ces pièces parce que cette résine est déjà noire, une couleur de base parfaite pour ce projet. Si la peinture d’une pièce devait être égratignée, on verrait du noir en dessous. Notez qu’il peut y avoir un excédent de matériel à couper autour de la pièce et que des lignes de moulage (inexistantes dans ce cas-ci puisque que le moule n’est fait que d’une seule pièce) pourraient devoir être sablées.
And finally, the casts! I used Smooth-On ONYX urethane resin to make these pieces bacause it’s black, the perfect color for this project. If a painted piece was scratched, we’d see some black under the paint. Notice that you have to trim the excess material around the casts and that some molding marks (there’s no molding mark in this case since the mold was made in one single piece) could have to be sanded.
Le tirage se fait en versant des couches successives de résine dans le moule. L’épaisseur de la pièce sera déterminée par le nombre de couches de résine versées et réparties dans le moule. J’ai dû faire plusieurs tirages avant d’obtenir des pièces parfaites. Non seulement parce que de petites bulles d’air avaient parfois créé de minuscules trous dans les endroits plus détaillés des pièces, mais aussi parce que l’ONYX, comme toutes les résines uréthane, est sensible à l’humidité ambiante. Cet été, le taux d’humidité trop élevé dans mon atelier faisait que la résine catalysait en se transformant en mousse souple plutôt qu’en plastique solide… Très loin de l’effet escompté et beaucoup de matériel gaspillé. J’ai dû faire fonctionner mon déshumidificateur à fond et faire descendre le taux d’humidité de mon atelier à 35% pour réussir à faire des tirages d’ONYX décents. Le climat très variable des saisons du Québec rend l’utilisation des produits de moulage et de tirage plus complexe.
Casting is made by pouring resin in the mold. Many layers of resin will form the piece’s final thickness. I had to make many casts to get perfect ones. Not only because some little air bubble made tiny holes in the pieces where there was more details, but also because ONYX, like every urethane resin, reacts to the humidity level in the room. Last summer, the high humidity level in my workshop transformed all my ONYX casts into foam instead of solid plastic… Not the result I was looking for and a lot of wasted material. I had to use a dehumidifier and make the humidity level drop to 35% before I finally got perfect ONYX casts. The province of Quebec’s changing weather makes the use of molding and casting products way more complicated.
Il y a encore tellement de choses à dire à propos des techniques de moulage et de tirage! (Et je ne suis tellement pas celle qui vous expliquera tout ça! lol) Mais je continuerai mes aventures de moulage et de tirage dans la prochaine partie de mon blog. :) Assez pour cette partie! La suite la prochaine fois!
There’s still so much more to be said about molding and casting techniques! (and I’m not sure I’ll be the one who will be able to explain all this! lol) Enough for now. I’ll continue my molding and casting adventures in next part of my blog!
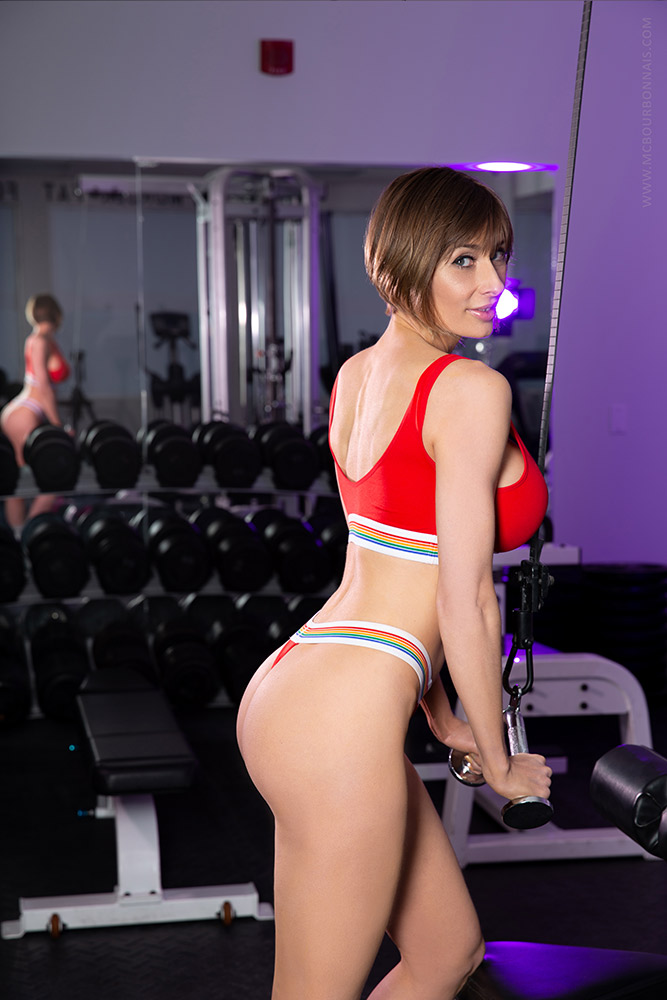
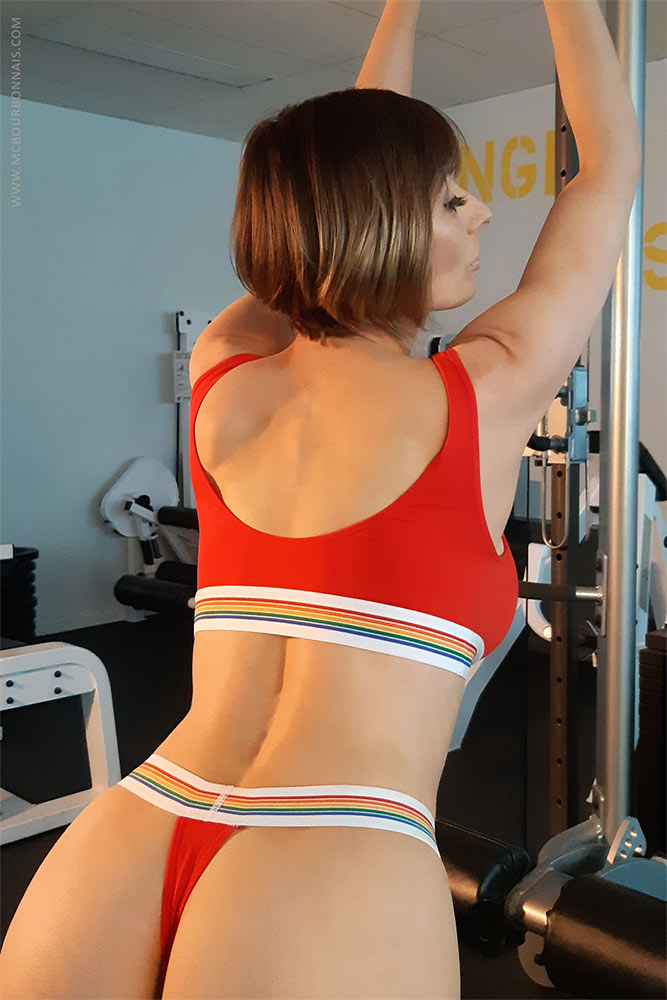
How do you like me as brunette with my brand new hairstyle? Bob with a bang, so different from before! :D Check out my latest glamour photoshoot! In a gym, this time… Are you ready for a good training? ;)
Merci pour votre patience, je sais qu’il me faut parfois beaucoup de temps avant de publier la partie suivante de mes blogs. Mes 2 petites mains sont toujours occupées, mais aujourd’hui, elles ont écrit pour vous! :D
Thanks for your patience, I know it takes me a lot of time to post each part of my Making of blog. My 2 little hands are always very busy, but today, they wrote for you! :D
Je vais rapidement passer sur la fin de la confection de la ceinture parce que je sais que la plupart d’entre vous sont sans doute plus intéressés par les accessoires imprimés 3D et par mon bustier de fibre de verre recouvert de cuir. Mais la ceinture est tout de même une belle démonstration de plusieurs techniques de confection du cuir et vaut la peine d’être analysée, pour ceux et celles que le cuir et la couture intéressent davantage.
I’ll quickly talk about the remaining steps of the making of the belt because I know that most of you are probably more interested about the 3D printed props or about my fiberglass plastron covered with leather. But the leather belt remains a good exercise to explain many leather sewing techniques and it’s worth the analyse for those who are into sewing and leather.
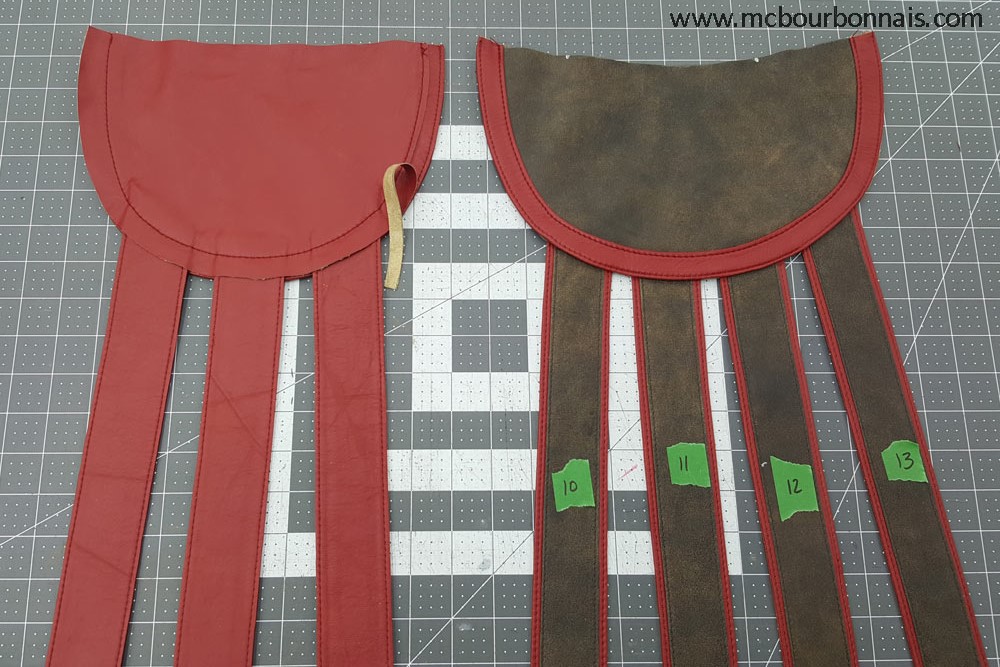
Dans la partie 1 de mon blog, j’ai complété la fabrication de chaque bande de cuir qui constitue la ceinture. Maintenant, attaquons les pièces qui couvrent les hanches et la ceinture sur laquelle elles seront cousues.
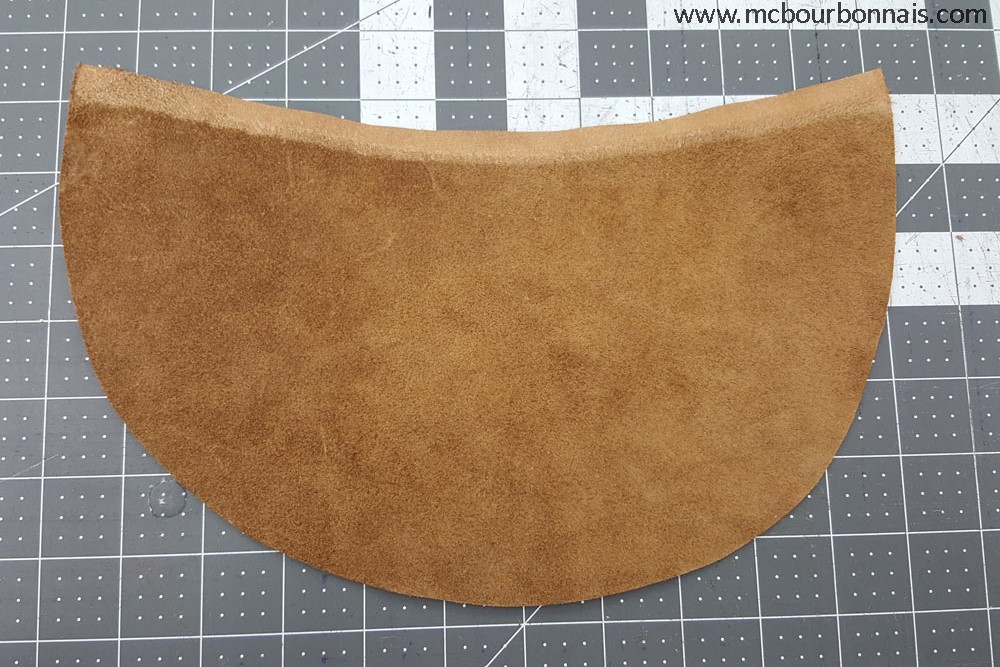
Je n’ai pas dessiné ces formes au hasard. Comme pour tous les vêtements, j’ai d’abord fait une toile, un prototype pour tester mon patron et évaluer les formes et les dimensions de chaque morceau en forme de pétale. Il s’est avéré que pour reproduire le design original avec mes proportions, la pétale du devant, celles des côtés et celle du dos ont des formes et des dimensions différentes. Lorsque mon patron final a été prêt, j’ai taillé chaque forme de cuir brun et j’ai paré le haut de chaque pièce, qui sera cousu dans la bande de taille, avec ma machine à parer (skiver.)
In Part 1 of my blog, I completed the making of the leather strips that form the leather belt. Now, let’s attack the petal shaped pieces that cover the hips and the belt to which they will be sewed.
I didn’t drew these shapes randomly. Like for any garment, I first made mockups, prototypes to test my pattern and see what would be the proper shape and size for each petal shaped piece. As a matter of fact, to reproduce the original design and make it fit my proportions, the front piece, the side pieces and the back piece all had different shapes and sizes. Once I had my final pattern, I cut each leather piece and skived the top part, that will be sewed in the waist band, with my skiving machine.
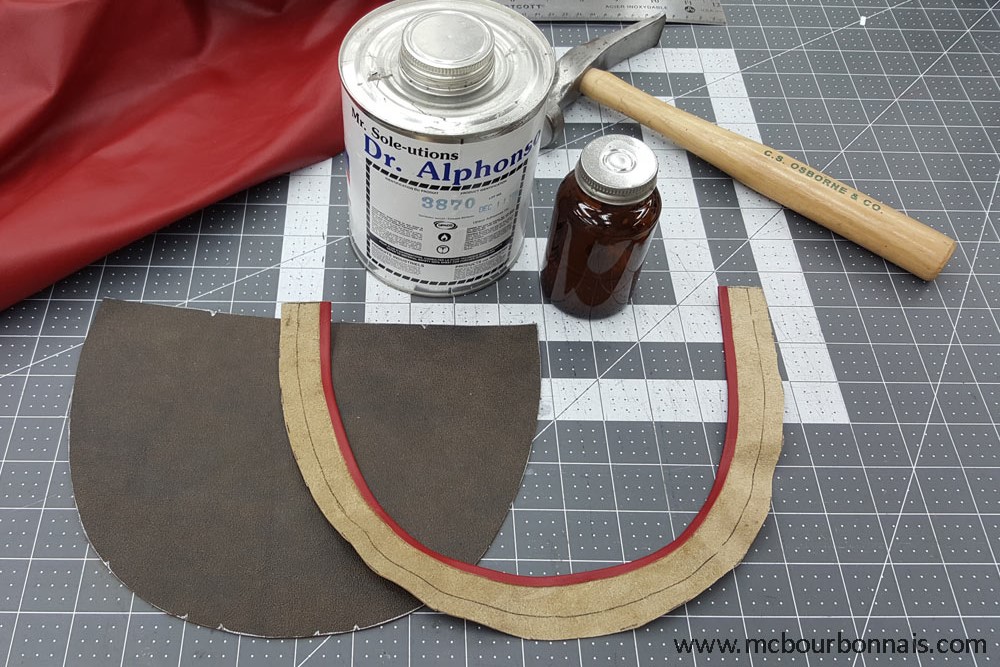
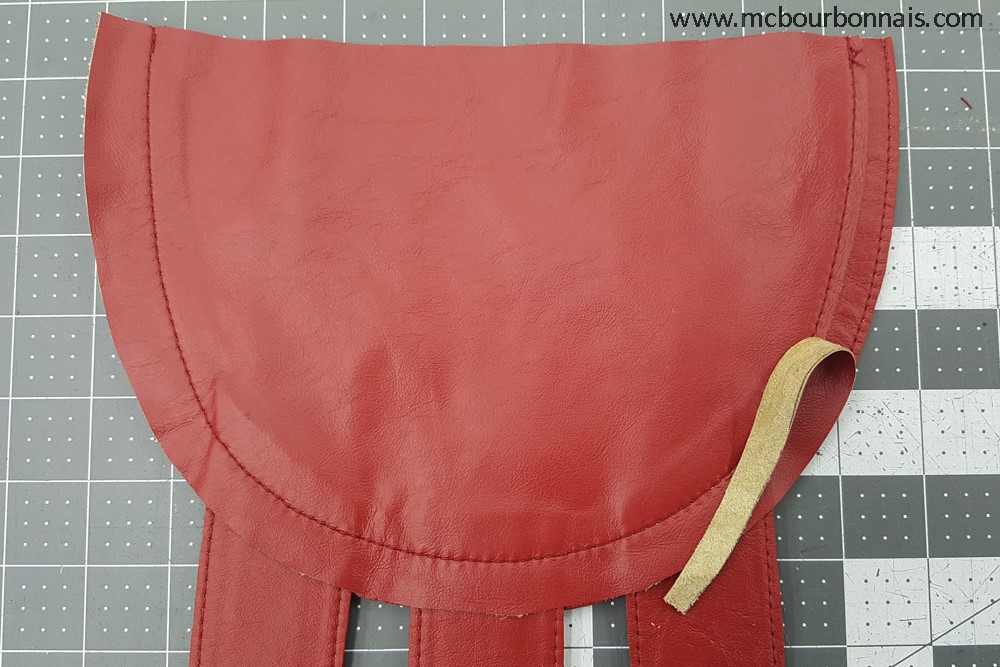
Pour reproduire le design original, j’ai décidé que la bordure rouge autour de chaque morceau brun serait faite d’une pièce appliquée par-dessus le cuir brun grâce à une technique qui est beaucoup utilisée en confection de vêtements de cuir. Le cuir ne s’assemble pas toujours selon les mêmes méthodes de confection que le tissu. Dans certains cas, plutôt que d’assembler 2 pièces ensemble en les cousant endroit contre endroit, comme on le fait la majorité du temps dans le tissu, on repliera plutôt les valeurs de coutures d’une pièce et on l’appliquera avec une surpiqûre, comme on le fait pour une poche appliquée au dos d’un jeans, par exemple. La différence est que pour le cuir, les valeurs de couture repliées seront collées et la pièces à appliquer, qui ne peut pas être épinglée dans le cuir, sera aussi légèrement collée en place avant de faire la surpiqûre. C’est la technique que j’ai utilisée pour coudre les bandes brunes sur les bandes rouges dans la partie 1 de ce blog.
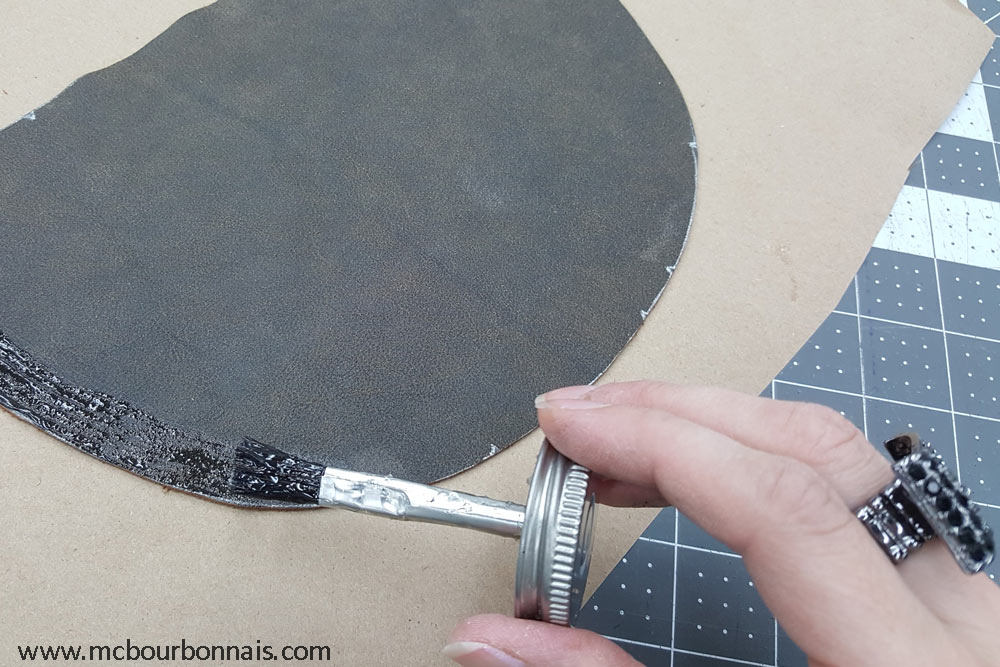
Voici la bordure rouge qui sera appliquée sur la piece brune avec la colle de montage Dr. Alphonso.
To reproduce the original design, I decided that the red line around each brown piece would be a separate piece applied on top of the brown leather thanks to a technique that is commonly used in leather garment sewing. Leather isn’t always sewed like fabric is. In some cases, instead of assembling 2 pieces together by sewing them the good side on the good side, we will fold the sewing allowances of a piece and apply it on top of another piece with a topstitch, as we do it for jeans’ back pockets, for example. The difference is that for leather, the sewing allowances will be glued with leather glue and the piece to be applied will also be glued lightly before it will be sewed with a topstitch. This is the technique I used to sew the brown leather strips on the red ones in Part 1 of this blog.
Here’s the red piece that will be applied to the brown petal shaped piece using Dr. Alphonso assembling glue.
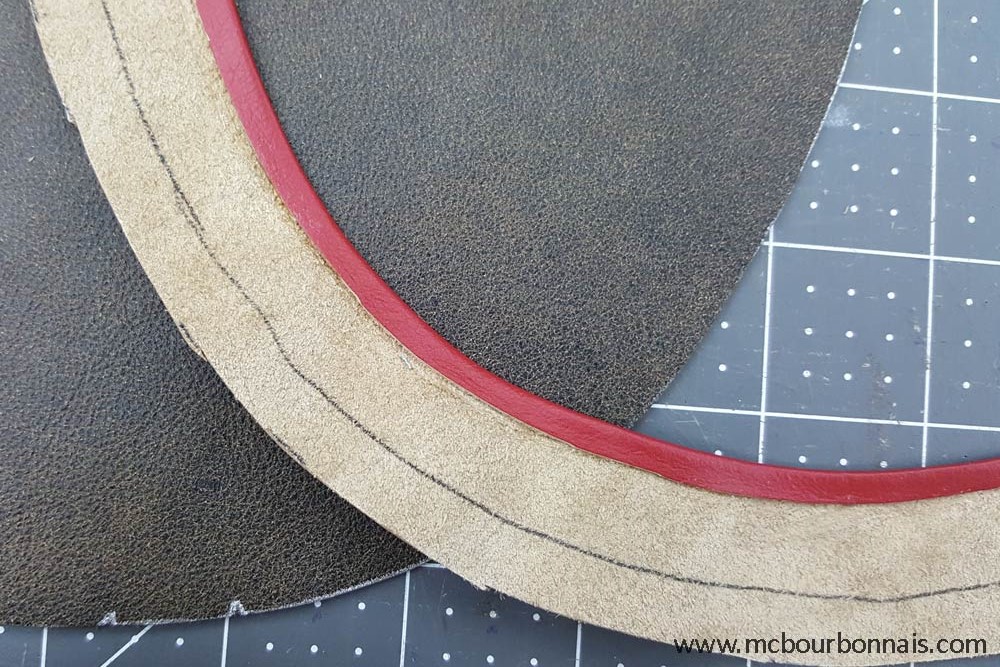
Remarquez la valeur de couture de la pièce rouge que j’ai repliée et collée.
Notice the sewing allowance of the red piece that was folded and glued.
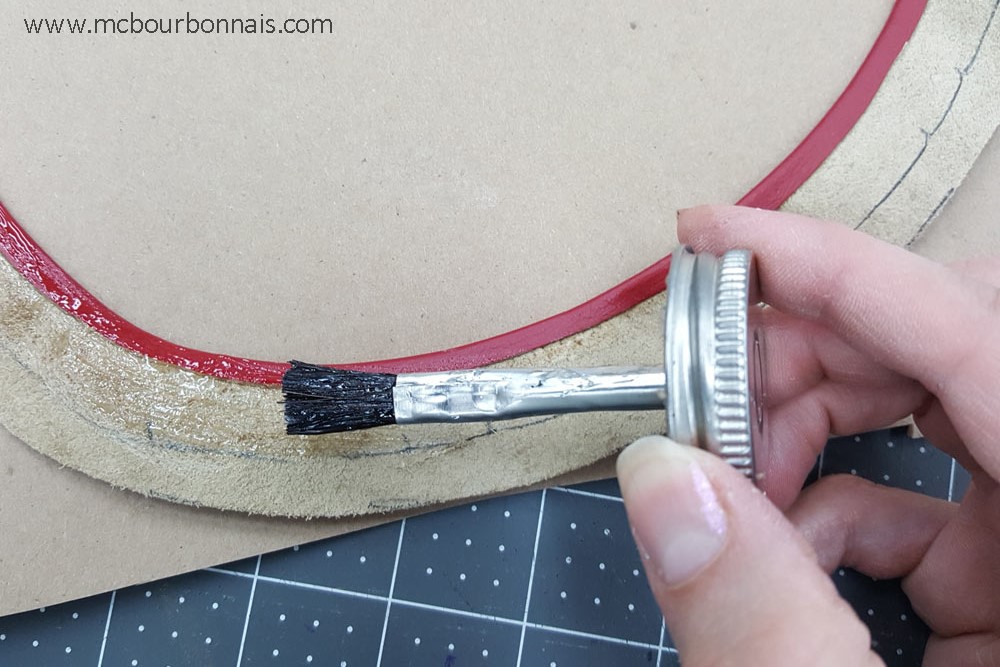
L’étape suivante consiste à appliquer le morceau rouge sur le brun en commençant par le côté avec la valeur de couture repliée. La colle à cuir est une colle contact, alors j’ai appliqué de la colle sur l’envers du morceau rouge et sur l’endroit du morceau brun.
Next step is to apply the red piece on top of the brown one. Leather glue is a contact glue, so I put glue on the wrong side of the red piece and on the good side of the brown piece.
Observez bien comment j’ai appliqué la pièce brune sur la rouge en suivant une ligne que j’avais tracée sur l’envers du cuir rouge.
Watch how I applied the brown piece on the red one following a line I traced on the back of the red leather piece.
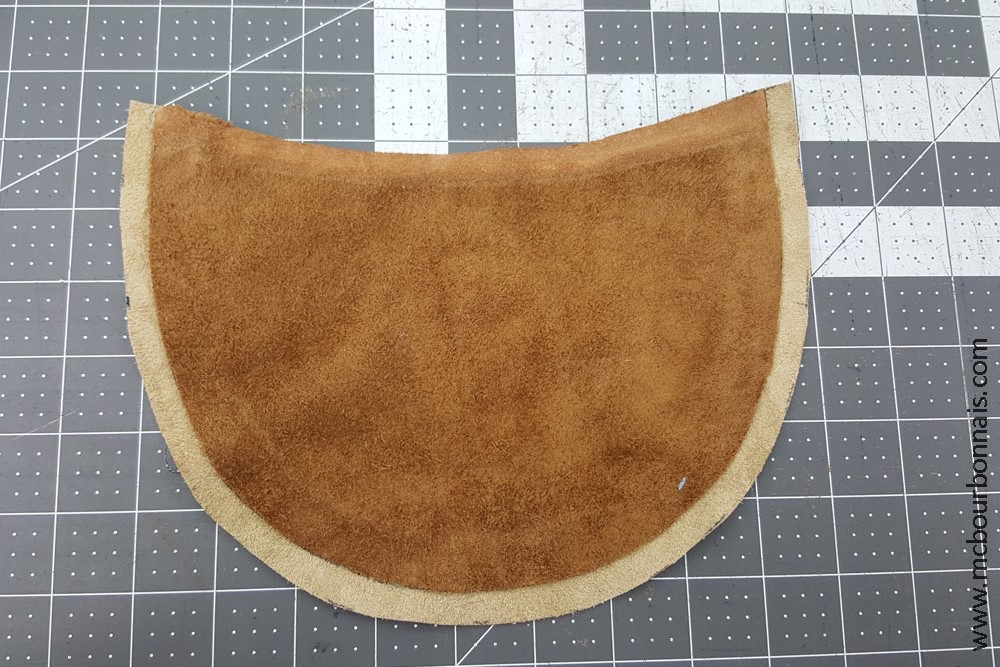
Voici le dos de la pièce assemblée. La ligne claire autour du morceau est l’envers du cuir rouge qui dépasse de la pièce de cuir brun.
Here’s the back of the piece. The lighter line around is the back of the red leather that comes out from the brown leather.
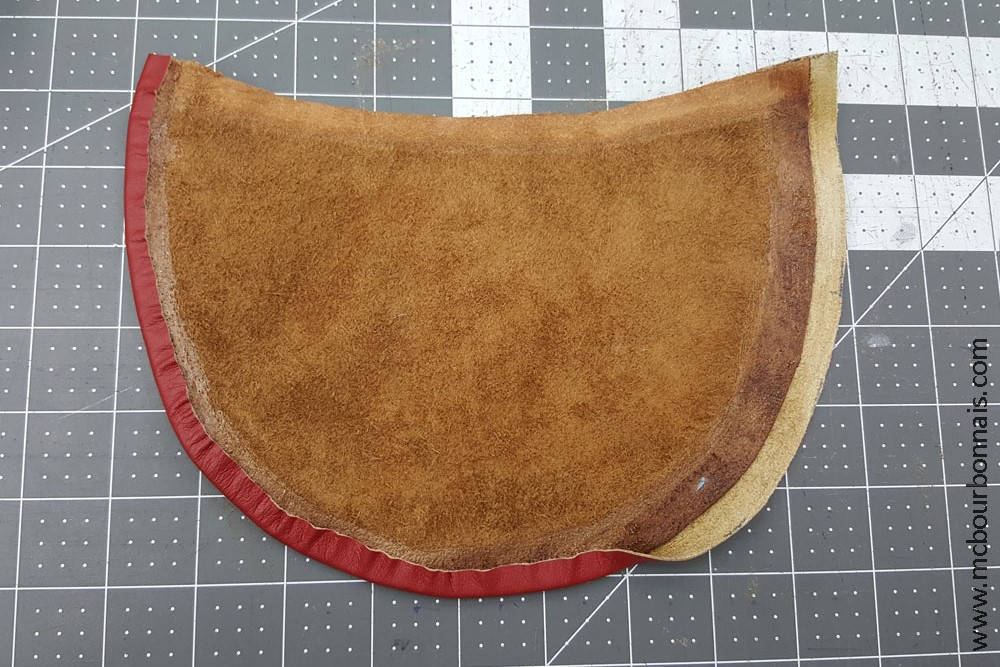
Il faut ensuite replier la valeur de couture de la bordure rouge par-dessus le contour du morceau brun. La valeur de couture sera évidemment collée.
Then I folded the sewing allowance of the red piece over the edge of the brown piece. The sewing allowance was of course glued.
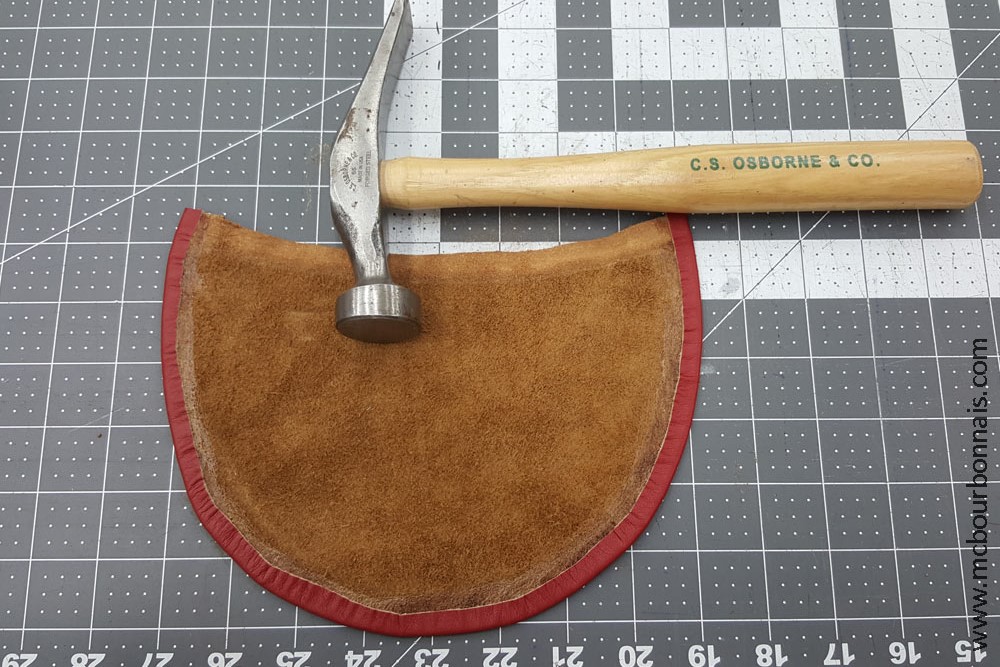
La valeur de couture collée doit ensuite être aplatie au marteau.
The glued sewing allowance now has to be flattened with a hammer.
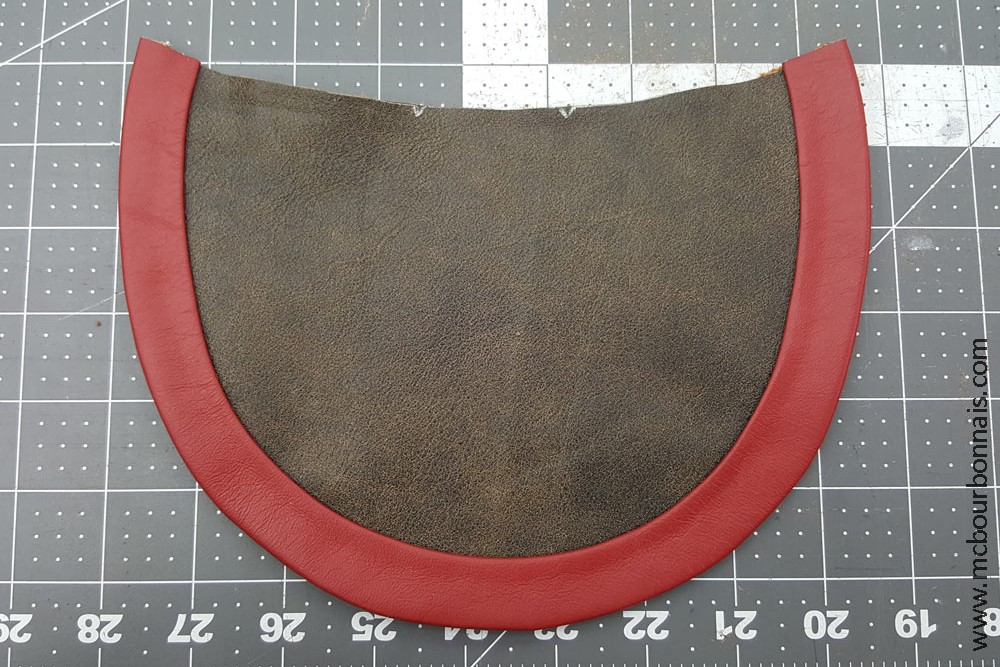
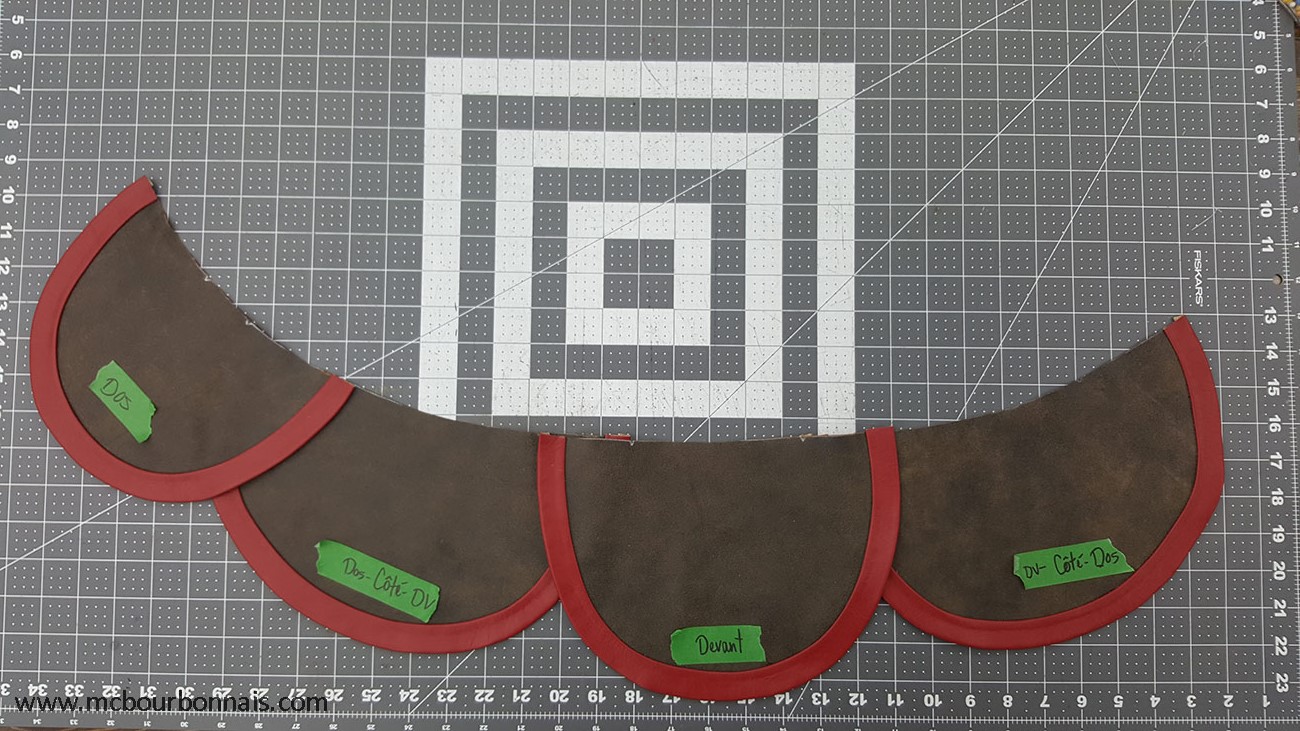
Voici la pièce assemblée sur l’endroit, puis les 4 pièces dans l’ordre.
Here’s the glued piece on the good side and then the 4 pieces in order.
Ces pièces avaient besoin d’une finition. Ce n’est pas parce que l’envers d’un vêtement est caché qu’il ne peut pas être beau. La finition est ce qui fait la qualité d’un vêtement haut de gamme.
J’ai commencé par coller un morceau de cuir rouge qui deviendra la doublure du contour de la pièce brune. Sur l’endroit de la pièce, j’ai fait une surpiqûre autour de la bande rouge. Cela fixe la doublure et fait la finition du morceau. Il ne reste plus qu’à couper l’excès de cuir. J’aurais aussi pu replier et coller la valeur de couture de cette doublure rouge et la coller face à face avec la bordure rouge qui a aussi une valeur de couture pliée et collée. Il aurait s’agit d’une finition encore plus haut de gamme. Par contre, la technique que j’ai choisie (couper l’excédent de la doublure) est plus simple et beaucoup plus rapide.
These pieces needed proper finishing. It’s not because the inside of a garment is hidden that it can’t look good. Finishing is what makes a high-end garment.
I started by gluing a red piece of leather that would become the lining of the brown piece’s edge. On the good side of the piece, I made a topstitch around the red line. It holds the lining and becomes the piece finishing. The last step is to cut the excess leather around the edge. I could also have folded and glued the sewing allowances of that red lining and glue it, wrong side facing the wrong side, with the other red piece that has a folded edge. It would have been an even fancier finishing. However, the technique I used is simpler and way faster.
Cette doublure de cuir rouge coupée au ras du bord (technique appelée franc bord) expose la tranche du cuir. Tout comme je l’ai fait pour les bandes de la ceinture dans la partie 1 de ce blog, j’ai utilisé une teinture à cuir pour teindre la tranche en rouge.
This red leather lining that was cut flush to the edge of the brown piece shows the edge of the leather. Just like I did for the edges of the belt’s leather strip in Part 1 of this blog, I used red leather dye to dye the edge of each leather piece.
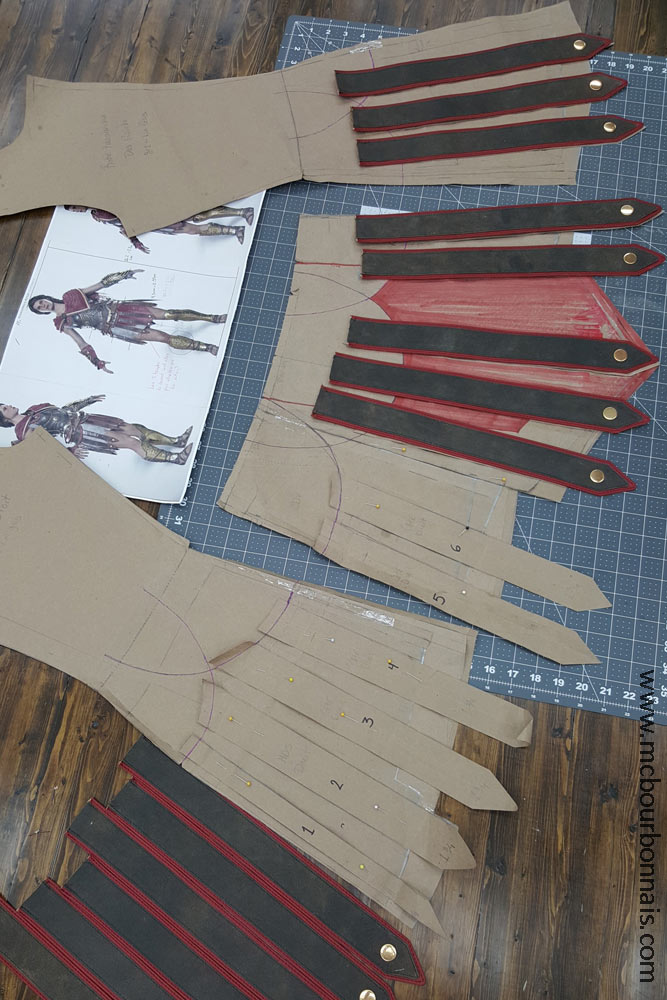
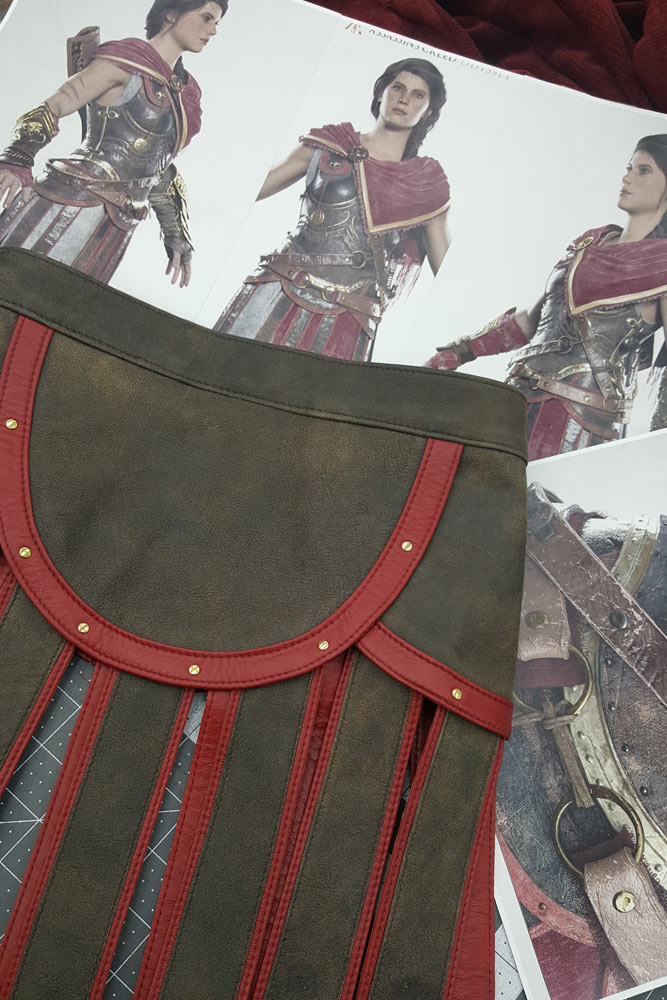
Pour éviter des épaisseurs, j’ai décidé de fixer les bandes de cuir au bas des morceaux en forme de pétales plutôt que de les faire continuer sous ces morceaux et de les coudre dans la bande de taille. J’ai donc utilisé la largeur de la bordure rouge pour y fixer par-dessous les bandes de cuir cousues précédemment (voir Partie 1 de ce blog.) Grâce à mon patron et à tous les prorotypes que j’ai faits (vous pouvez voir sur la photo toutes les modifications que mon patron a subies au fil du projet, à chaque toile/prototype) je savais exactement quelle longueur et quel angle donner à chaque bande de cuir. Chaque bande a été collée à un endroit et avec un angles précis au bas de chaque morceau en forme de pétale.
To avoid extra thickness, I decided to sew the leather strips at the bottom of the petal shaped pieces instead of making longer leather strips that would have continued under the petal shaped pieces and would have been sewed in the waist band. I used the width of the red line to sew the leather strips that had been prepared in the previous steps (see Part 1 of this blog.) Thanks to my pattern and mockups (you can see on the picture all the modifications and adjustments that I made to my pattern during the project, each time I would make a new mockup/prototype) I knew exactly the place and angle to give to each leather strip on each petal shaped piece. Each leather strip was glued to a specific place and with a specific angle under the petal shaped pieces.
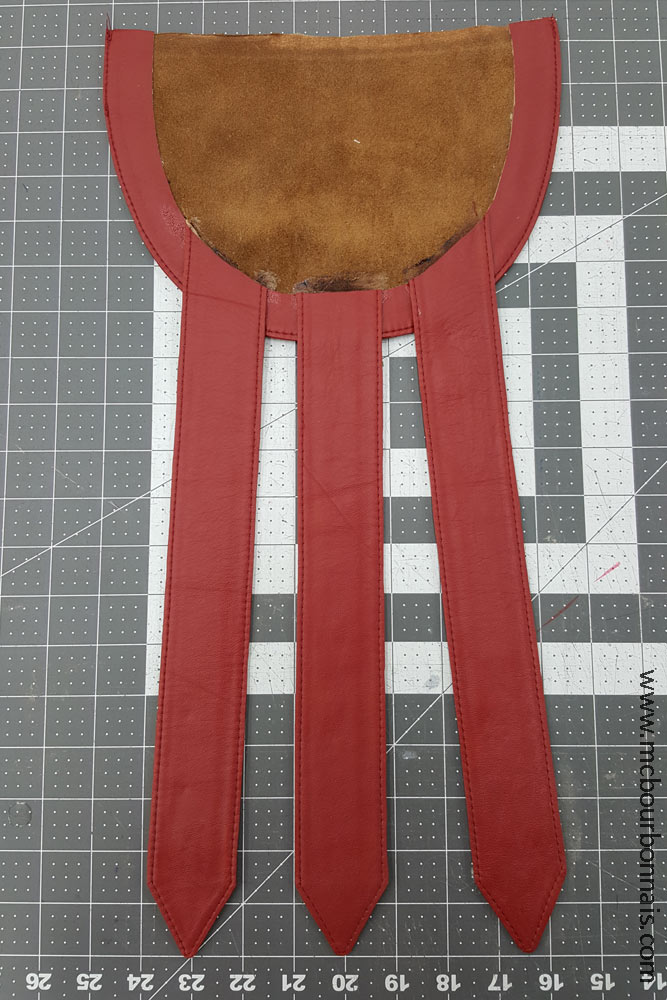
Pour faire une belle finition, j’ai collé une doublure du même cuir rouge au dos de chaque morceau en forme de pétale. Notez que la doublure cache le haut des bandes de cuir qui seront cousues à la prochaine étape.
For a nice finishing, I glued a lining of the same red leather on the back of each petal shaped piece. Notice that the lining covers the top of each leather strip that will be sewed at the next step.
Pour fixer de façon permanente et solide les bandes de cuir sur les morceaux en forme de pétales, j’ai fait une 2ième surpiqure sur l’endroit, au haut de la bande rouge. Cette surpiqûre, en plus de faire une belle finition autour de la bande rouge, a cousu en place les bandes de cuir tout en passant à travers la doublure de cuir collée sur l’envers. Une surpiqûre qui tient tout.
Il ne reste plus qu’à proprement couper le surpous de doublure de cuir sur l’envers.
To permanently attach the leather strips to the petal shaped pieces, I made a topstitch, on the good side of the piece, on top of the red line. This topstitch is not only a nice finishing touch on the good side, it’s also sewing the leather strips and the red lining glued on the other side. One topstitch that holds everything together.
Then I cut the excess leather lining.
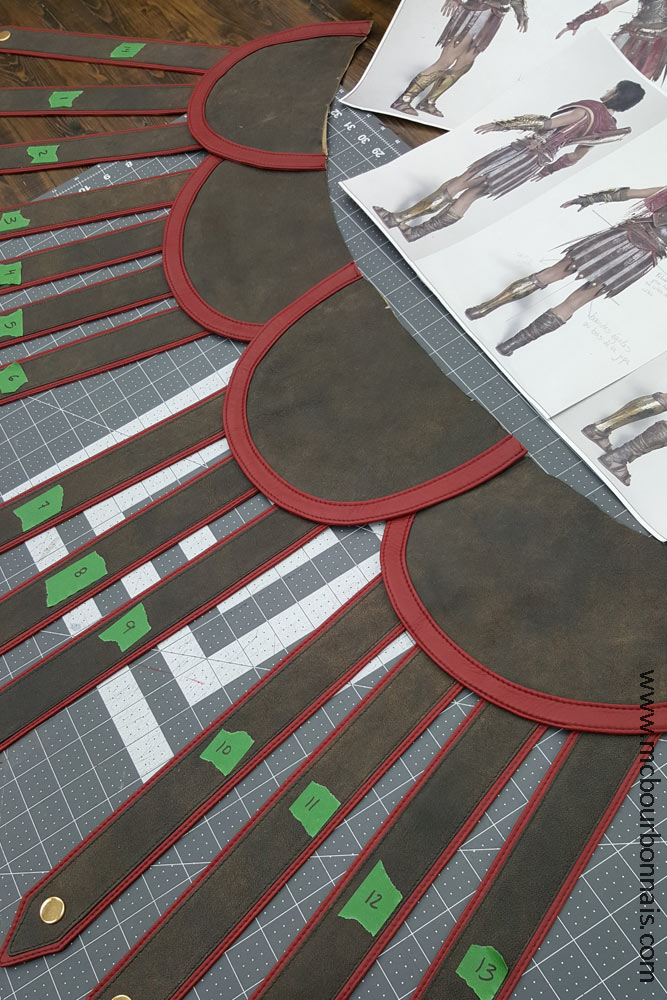
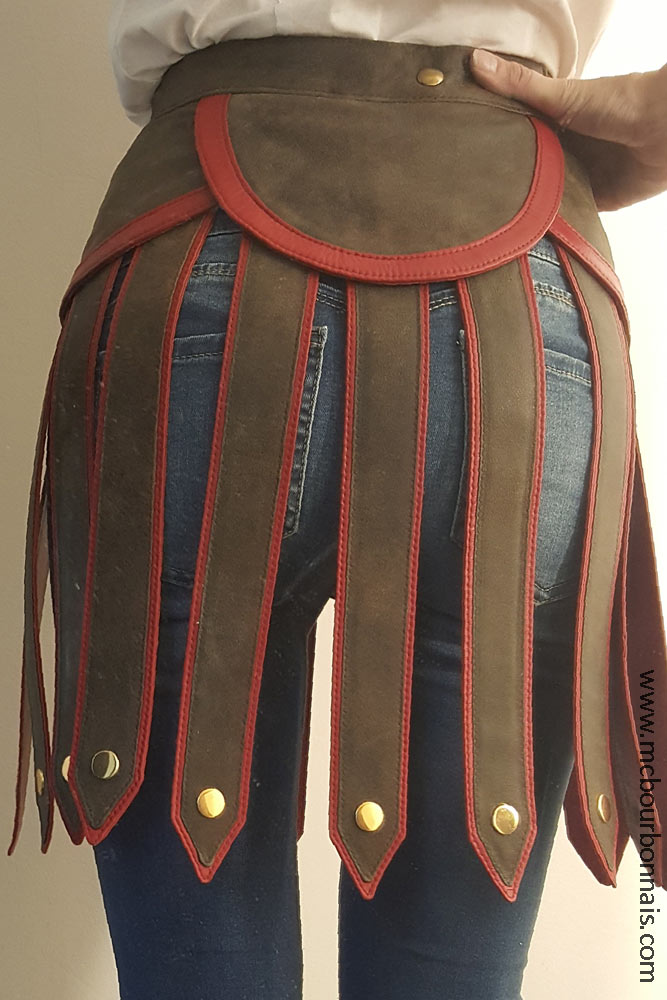
Voici les 4 pièces et leurs bandes de cuir cousues prêtes à être assemblées dans une bande de taille, une simple ceinture étroite qui sera cachée par le plastron.
The 4 completed pieces with their leather strips ready to be sewed in a waist band, a simple narrow belt that will be hidden under the plastron.
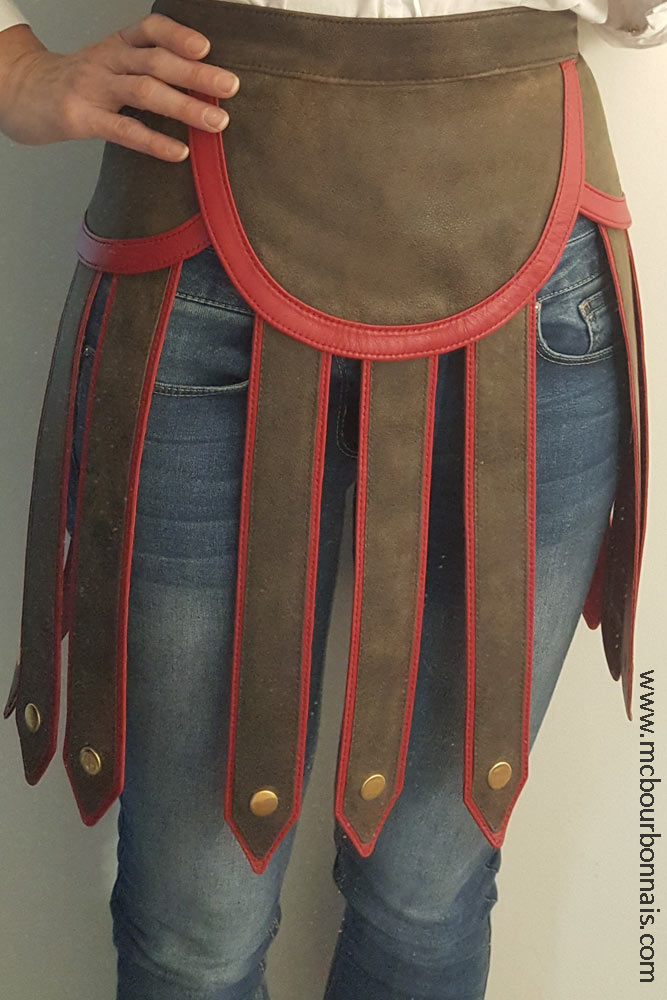
La partie confection est maintenant terminée. La ceinture s’ouvre grâce à un bouton pression au dos.
The sewing part is done. The belt opens thanks to a snap at the back.
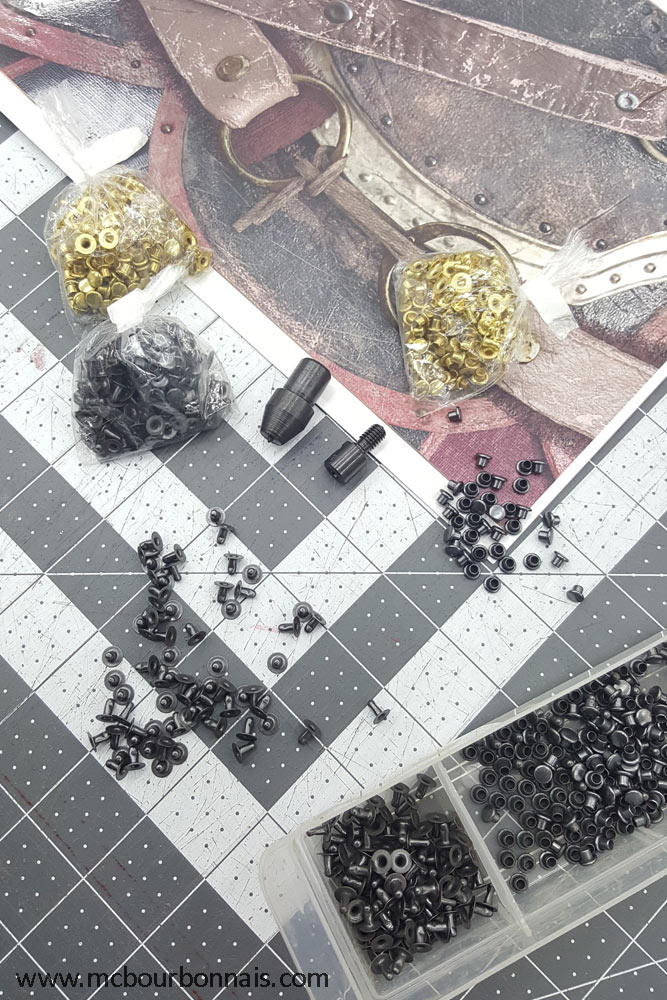
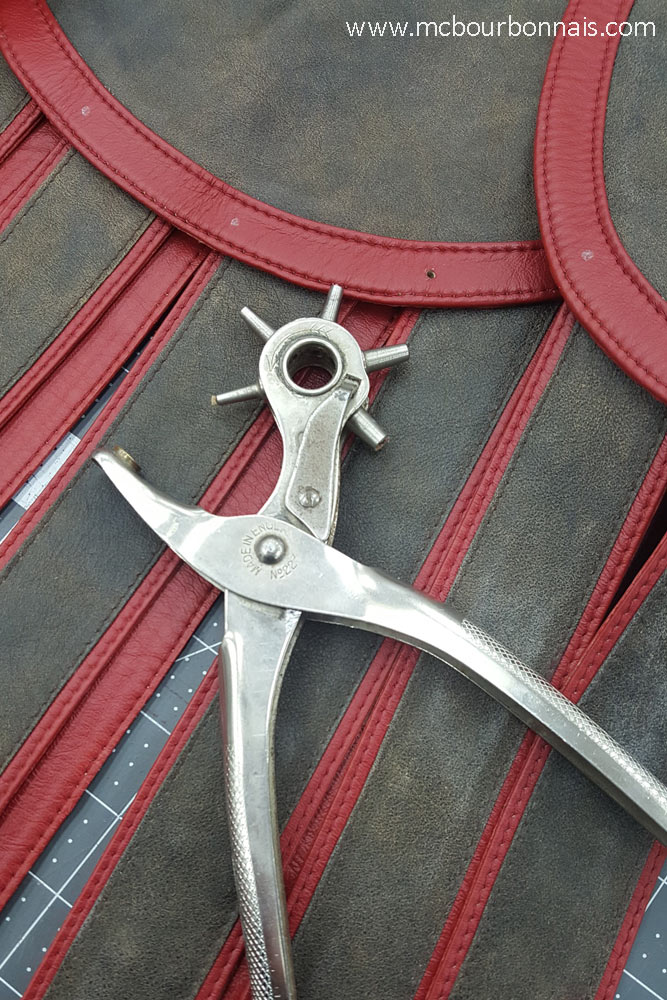
Il ne manquait plus que les rivets! J’ai marqué l’emplacement de chaque rivet et j’ai préalablement percé un trou avec ma roulette à percer le cuir avant de placer chaque rivet avec ma machine. Des têtes interchangeables permettent de placer des rivets, boutons pression, œillets, etc. de différentes grosseurs en utilisant toujours la même machine. Percer un trou d’abord est essentiel. Les rivets, boutons pression et œillets ne transpercent pas le cuir. Le trou pour les insérer doit être déjà fait.
Only the rivets were missing! I drew a dot to mark the place of each rivet and I first pierced a hole with my revolving punch pliers before adding the rivet with a machine. Interchangeable heads allow to put rivets, snaps, grommets, etc. of various sizes using always the same machine. Make a hole first is essential. Rivets, snaps and grommets don’t pierce the leather. They have to go through a hole that was made first.
Et voilà! Une première pièce de mon costume d’Assassin’s Creed Odyssey était faite! Dans mon prochain blog, je parlerai des accessoires imprimés 3D avant de retourner à d’autres étapes de couture. Un peu de techniques pour tous les goûts et tous les types d’intérêts! :)
Et voilà! A first piece of my Assassin’s Creed Odyssey costume was ready! In my next blog, I’ll talk about the 3D printed props before going back to more sewing steps. A little bit of everything for everybody’s tastes and interests. :)
Good news! I made a new glamour photoshoot in a gym a few days ago, which means you’ll have plenty of sexy pics to enjoy in the next weeks! :D Until then, a little teaser… so you can also see my new hairstyle! Brunette, bob, bang… So different! I think I’ll try many hairstyles in the next months. :)