A word about zippers
It was now time to prepare the zippers. There are many types of zippers that I would put in 3 categories: nylon coil, plastic molded and metal zippers. The nylon coil looks like a ‘spiral’ that is sewn on to the zipper tape. It’s a very resistant zipper. Invisible zippers are like ‘reverse coil’ zippers. The zipper itself is hidden under the tape, so when you sew an invisible zipper, the zipper from outside looks like a seamline. It’s mainly used for women clothing like dresses and skirts. Invisible zippers are, however, very fragile. Many years ago, when I was working as a seamstress in a sewing workshop where we were doing alterations, I changed a lot of invisible zippers in skirts that were probably too small for the clients who had purchased them. ;) Then you have plastic molded zippers. They are made of symetrical little molded plasic ‘teeth.’ That type of zipper tends to form ‘waves’ when you sew it, for example, in front of a jacket or hoodie. For a colored leather jacket for which you’d like to use a colored zipper, it would be better to go for a coil zipper. Plus, molded zippers are easy to break over the time. When one teeth breaks, your zipper is done. There’s no way to fix it. Finally, there are metal zippers. They come in various finishes like brass, antique brass, nickel, antique nickel, gun metal. Metal zippers are commonly used for jeans. Look at a pair of jeans you have. The zipper is a metal one.
A golden touch
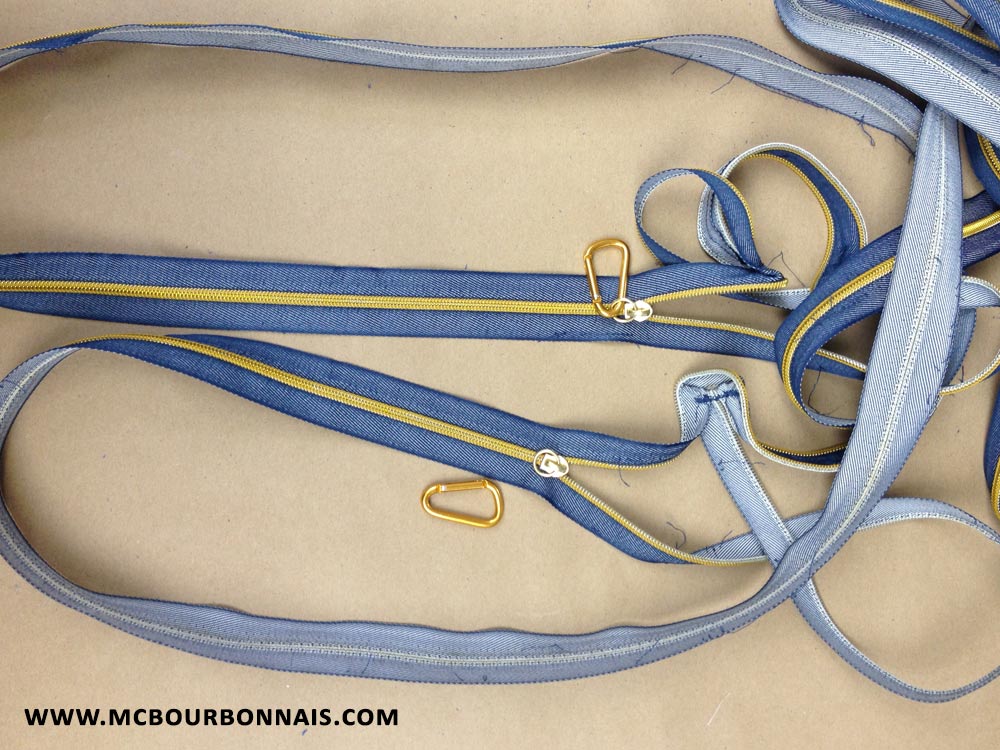
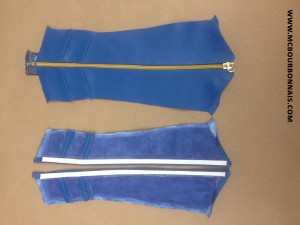
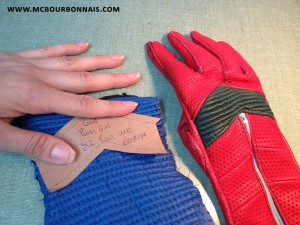
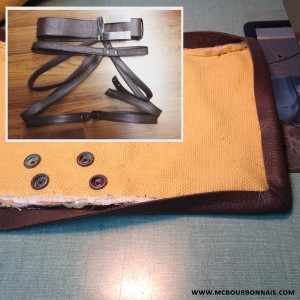
Since the golden zippers are visible in Conner’s gloves design, I had to find a golden zipper with a blue tape, because the zipper’s fabric tape shows off on the side of the coil or theet when you sew it. Metal golden zippers exist, but they are commonly sold in very basic tape colors like black, white, beige, navy blue. No Power Girl blue tape zipper with golden teeth. And then, I found a little treasure, certainly a sign from the God of Cosplay who put on my way these pencil cases made of a very long, custom golden coil zipper on a blue tape.
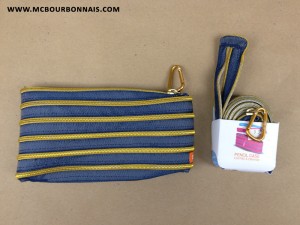
If that isn’t a sign, I’m asking you, what is it? These pencil cases were yelling at me: ‘Buy me! I’m meant to be part of your Power Girl costume!’ At $10 each pencil case, yes, they turned out to become $10 zippers… But when you need it, you need it.
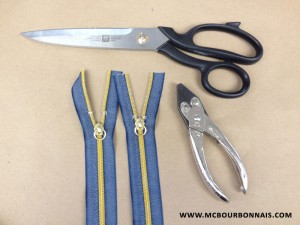
Next step was to unsew the pencil cases to have one single zipper ready to be sewed.

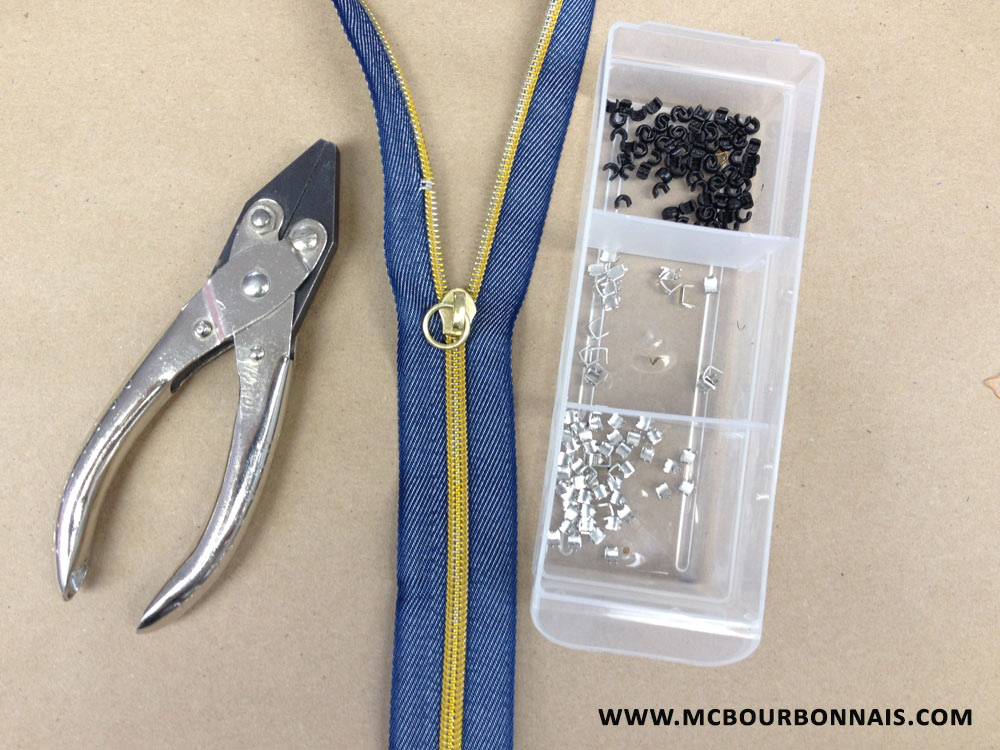
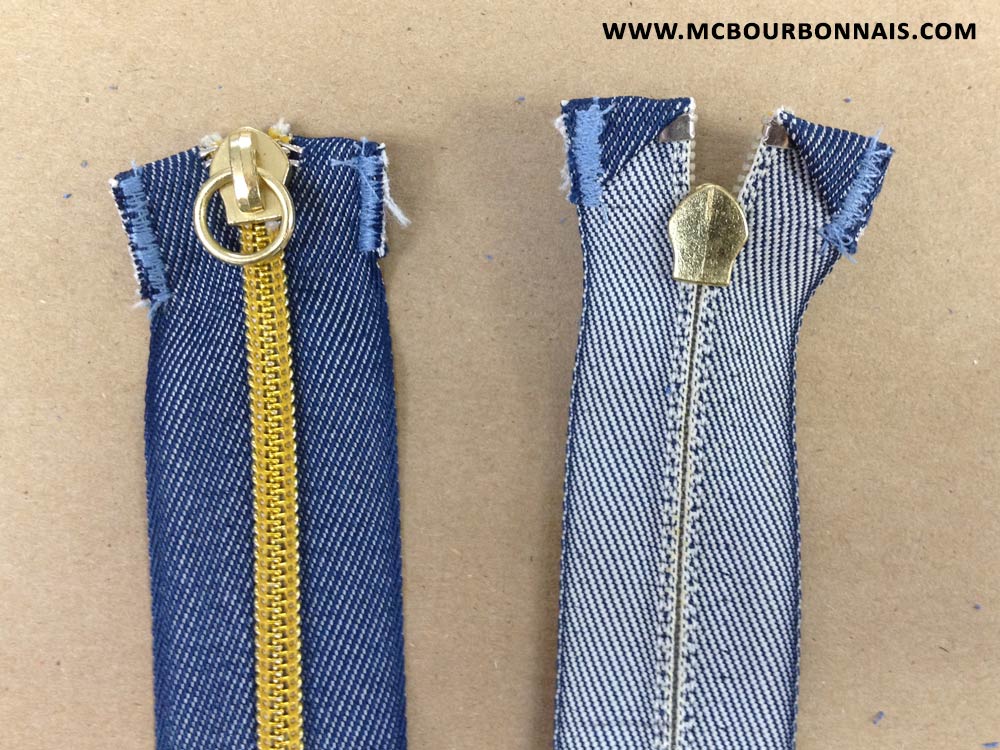
But since the zippers were so long, I had to cut them before sewing them to the gloves, which means that I had to add new little stoppers. It’s easy to cut a zipper from the top or from the bottom when it’s not a separated zipper. In any case, you’ll have to add the appropriated stoppers. Coil, plastic molded and metal zippers need various stoppers. Since these golden zippers were coil zippers, I used these stoppers that you have to insert between 2 ‘teeth’ of the ‘spiral.’ Then you flatten down the stopper with pliers.

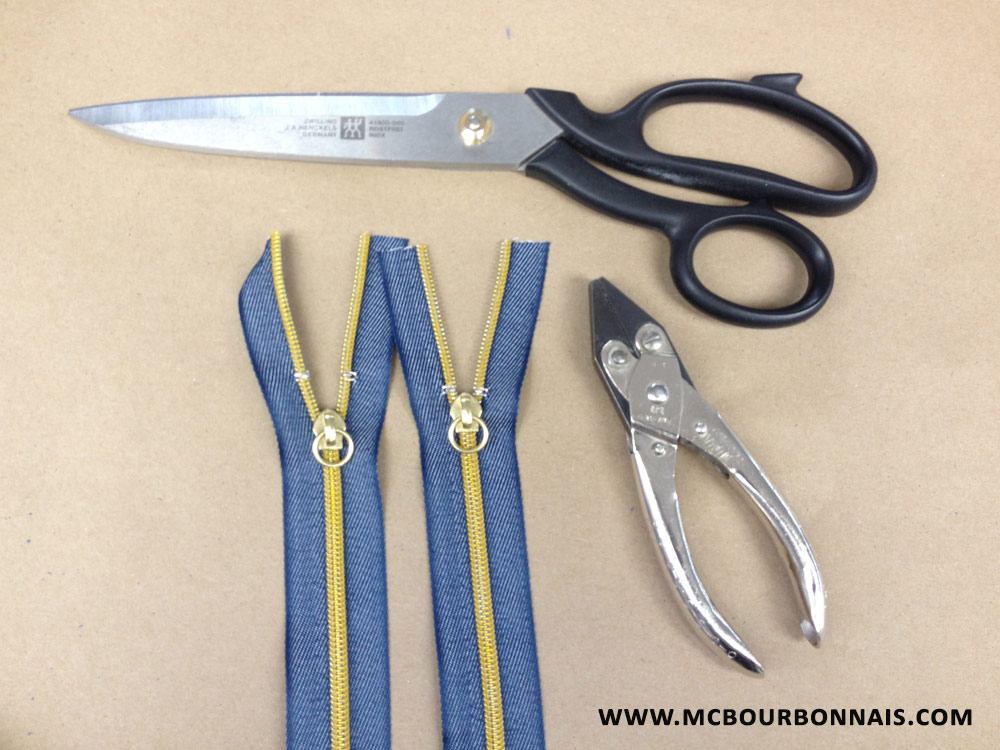
Preparing both zippers and cutting them to the correct length for the gloves.
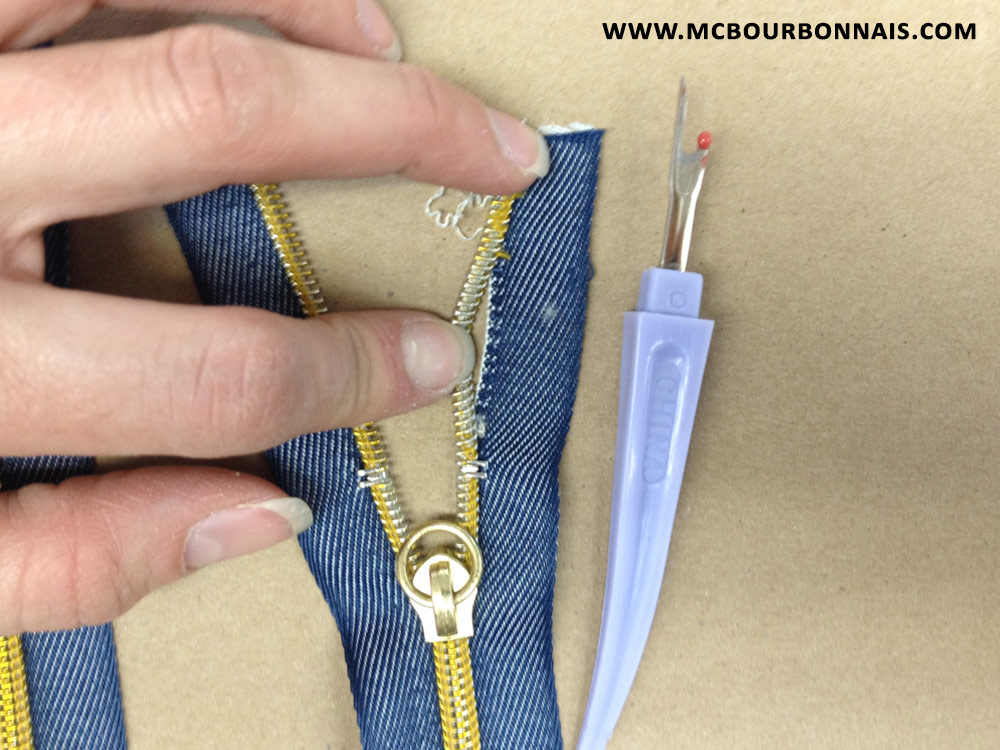
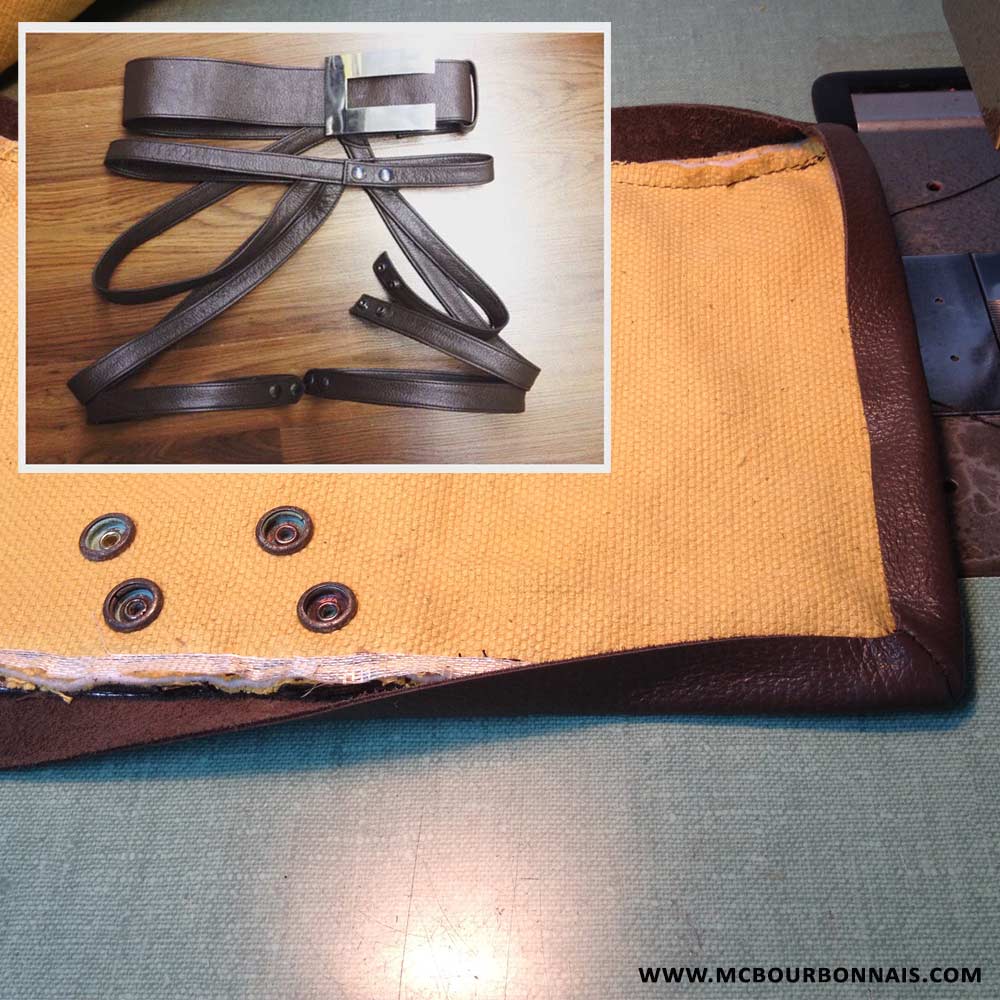
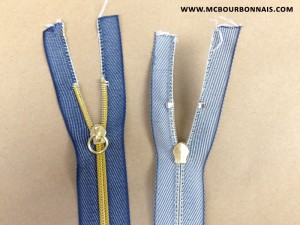
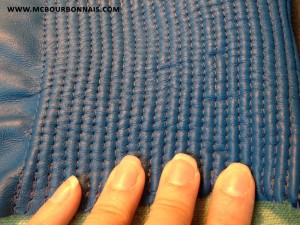
In order to make a nice finish when you sew your zipper, you have to get rid of the extra teeth or coil. In this case, the coil is stitched to the tape, so you simply have to unsew it.

The zippers with the extra part of the coil unsewed. Notice how the fabric tape remains intact.
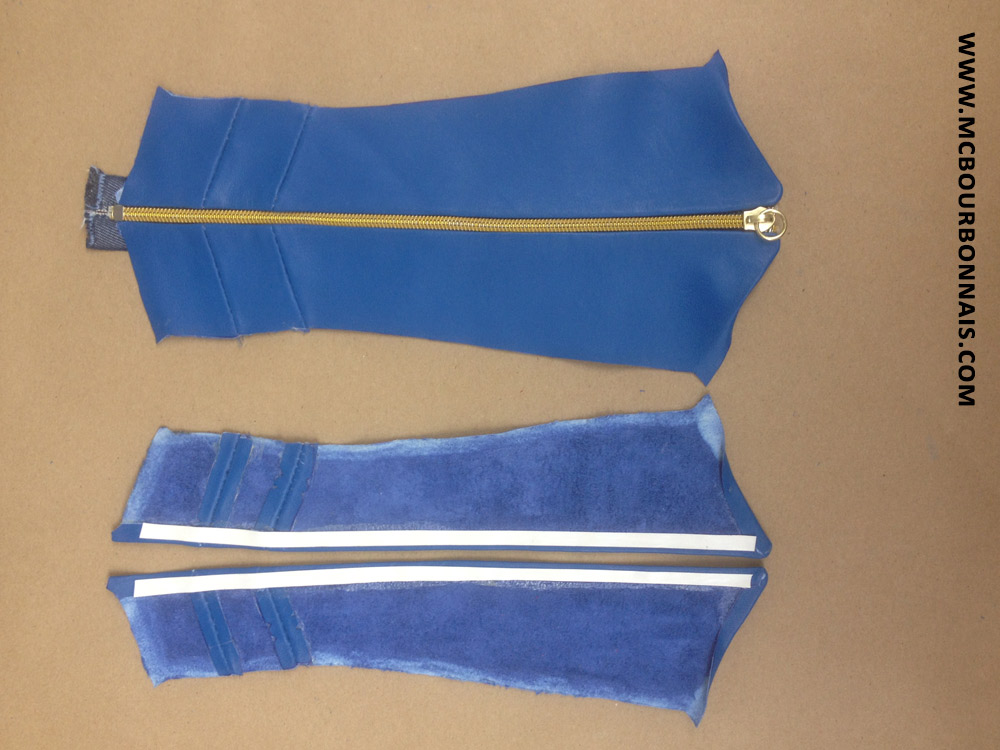
There are various way to sew the top part of the zipper tape before sewing the zipper. It can also be done directly when you sew the zipper to the garment. The seamstress or tailor will have enough skills to hold the tape with her or his fingers while sewing it. Since I can take my time and I want to do a very clean job, I choose to tack the zippers’ tape first.

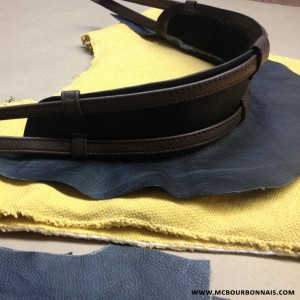
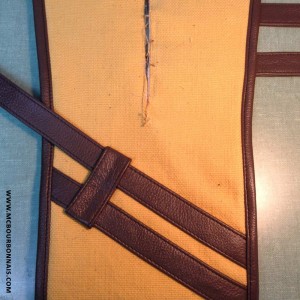
Leather sewing tip: the miraculous double sided tape
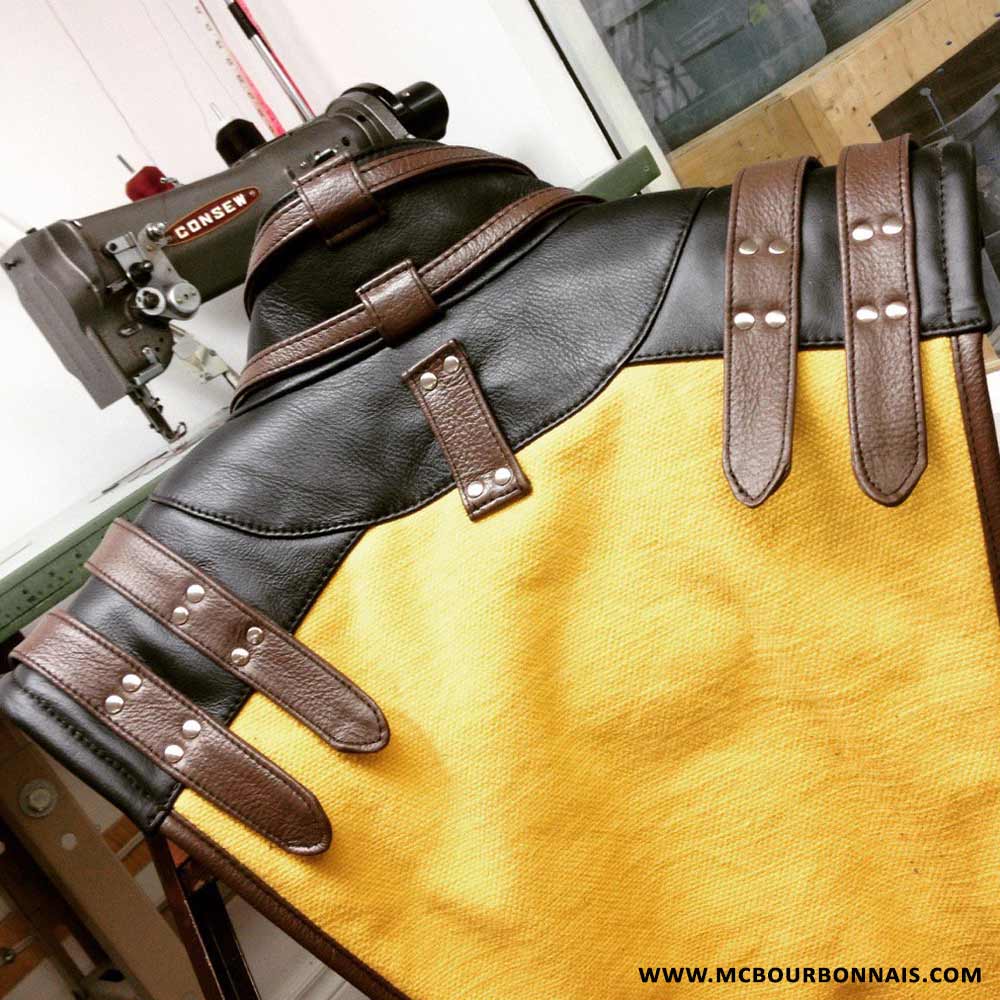
Since you can’t use pins in leather (because they leave holes), the most amazing trick I can give you to hold leather pieces in place is to use double sided tape. You can use it before sewing hems, zippers and so much more. Using double sided tape was one of the tips that the teacher gave me when she went to my workshop and it allowed me to sew things that I couldn’t have made otherway. If you plan to sew leather, always have double sided tape next to you. It’s so handy. On the picture, you can see that I used stripes of double sided tape to apply the leather pieces on the zipper before sewing it with a top stitch.
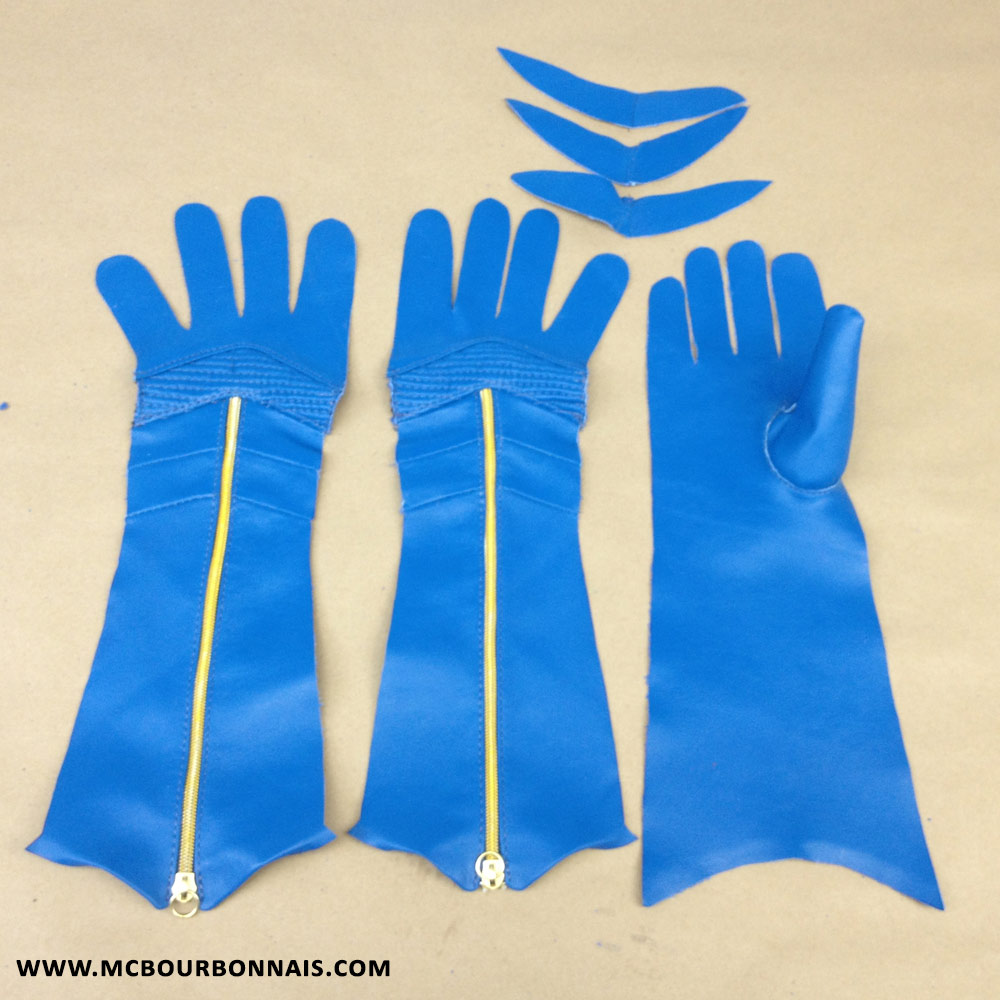
Work in progress picture of the gloves with the zippers, assembling more and more pieces together.

One of the many prototypes I had to make before I suceeded in sewing that strange piece of pattern in the hole to form a thumb. Very tricky stitches that have to be done in a particular order.
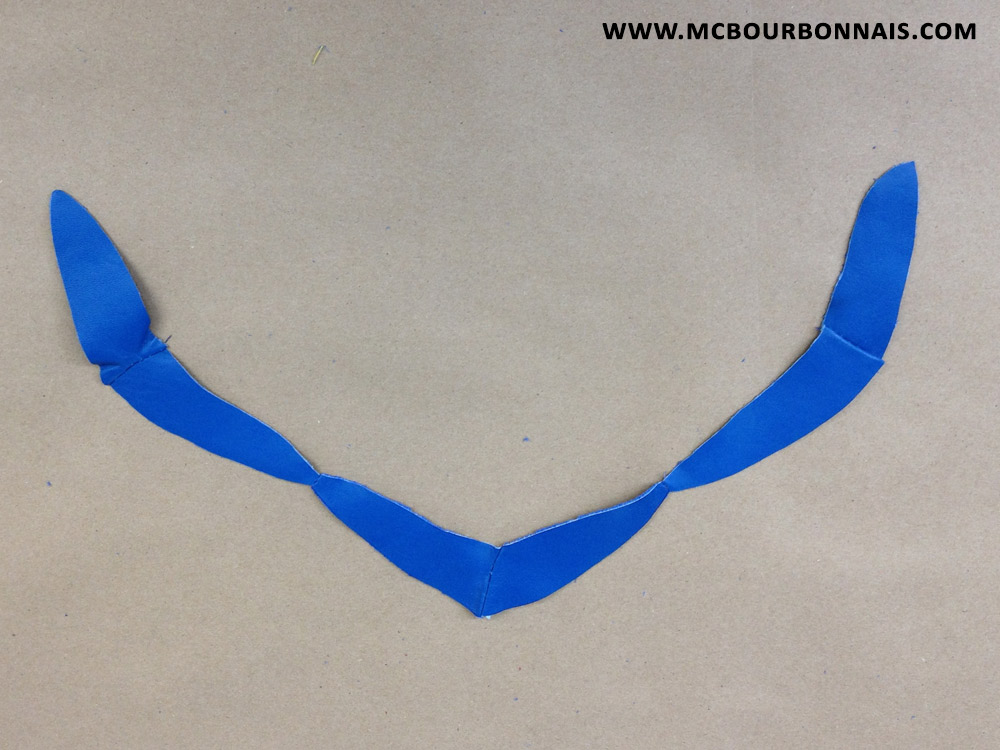
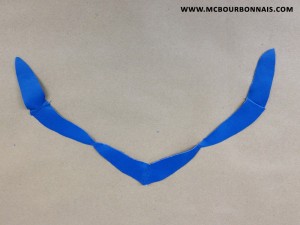
Strange step that looks like nothing: sewing together the tips of the small pieces that go between each finger. That stripe will be sewed all over the fingers, which is, in my opinion, the most complicated step in the whole process of sewing that precise glove pattern.
The gloves are looking more and more like gloves now. The fingers have their ‘thickness.’
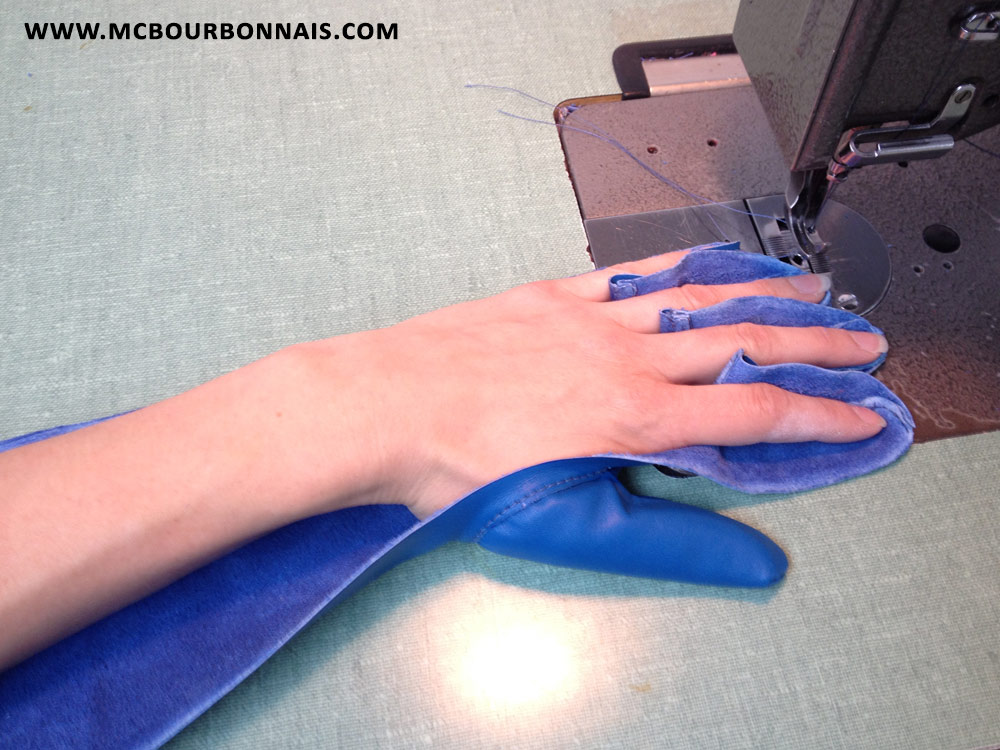
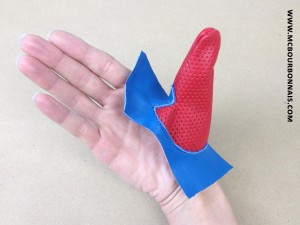
On the next picture, I put my hand in the glove to show better which parts were sewn together.
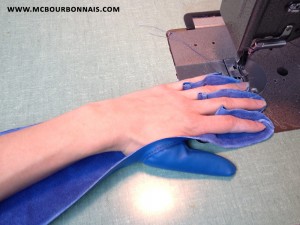
That’s the part inside the hand and arm. Now I had to sew the top part of the glove. Same challenge, going around those little pieces that go between each finger. That step requires a lot of precision. Otherway, the fingers will be unheaven or may ‘turn’ or ‘twist.’ There’s a lot that can go wrong in that step. That’s what I found the most difficult to do.
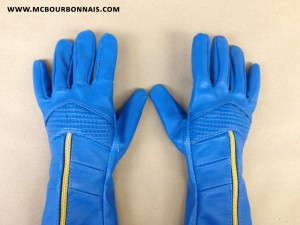
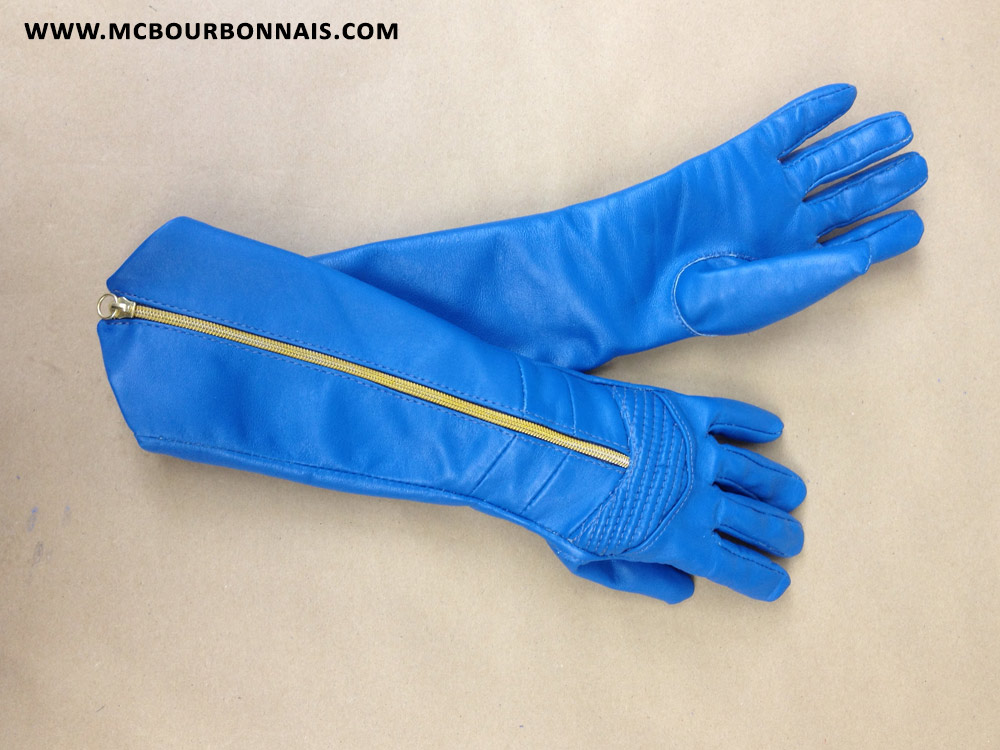
All the pieces of the gloves are now assembled. At the beginning, I mentioned that this blue cow hide had the perfect thickness to make boots, but that it was too thick to make delicate women’s gloves. Notice how the fingers have a bulky look. Lambskin would have given a more delicate result.

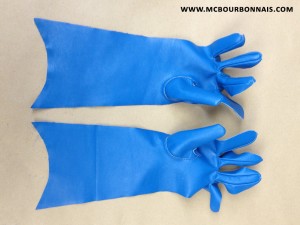
The finished gloves. They are not lined, but high quality leather gloves are generally lined. I wasn’t equipped to sew a delicate lining and honestly, I had enough challenges sewing the gloves themselves. I think that I didn’t have enough patience to sew a lining. The gloves looked good enough as the were. They are not perfect, but for the very first pair of leather gloves that I had ever made, I was very, very proud of myself. :)
Part 4 coming soon!
Torturing my mind
So that was it. I would make a Power Girl cosplay. But I would make it in a different way. I never make things like everybody else, right? I HAD to find a way. But how the hell would I make a version of that costume that had never been done before? How can you reinvent or give a twist to such a simple design? First decision to make, and it would be a wrenching choice: which version of the costume would I make? Adam Hughes’ or Amanda Conner’s version? Conner’s version presents Power Girl wearing a big golden shoulder piece held with a strap and from which the cape comes out. In that version, Power Girl has blue gloves and boots showing design details, including golden buckles on the boots and golden zippers on the gloves. Hughes’ version presents Power Girl with plain blue boots and gloves, sometimes with a cuff. And most importantly, Hughes replaced the shoulder piece by a smaller, more delicate golden medallion held with a chain instead of a strap. From what I have seen, but it may only be my impression, most of cosplayers seem to go for Hughes’ version. But my seamstress’ instinct tells me that it’s probably just because the plain gloves and boots from that version are easier to recreate than the more detailed ones from Conner’s version. So, what am I gonna do? What should I choose? I personally prefered Hughes’ medallion, but thought that Conner’s boots and gloves looked fancier and more feminine, almost like designer boots and gloves. I decided to make a mix of both versions, awared of the fact that Power Girl being such an iconic character, mixing both versions may as well be a sacrilege. But as you can guess, there’s not that much that people can say that will offend or bother me. I was willing to do an hybrid version and in the end, I was mentally ready for an outcry that finally never came.
Now that I had choosen which boots and gloves I would make, it was clear in my mind that these pieces had to be made or genuine leather. No superheroe would ever walk around wearing spandex gloves. Ever. Does Batman have spandex gloves? No. Does Captain America have spandex gloves? Of course not. What? Spiderman has spandex gloves. Right. But it’s a high tech, custom made stretch fabric garnished with a printed silicone pattern. That doesn’t count. It’s not plain spandex. Don’t you guys try to fool me. ;)
At that time, I had just started learning how to work with leather. I had no real specialized knowledge, I was just experimenting and applying to leather the techniques I had developed for regular fabrics. During 3 years, I made various leather costumes that all had little technical problems and flaws. I made a first leather suit for Soda Pop Miniatures, the costume of my character in their game Relic Knights. It was a white suit where the boots were part of the pants, so it was also my first attempt at making leather boots. It was during these years that I made 7 leather costumes for the characters of Heroes of the North – Season 2, including the costume of my own character in the series, Hornet. Even though I was very proud of those costumes, I could see that some details were wrong, but I didn’t know why. It was frustrating to put that much time and effort in making costumes that were not perfect in the end.
I hosted a panel in a convention about how I made the leather bomber jacket for my costume of Koshka, from the tabletop game Dust, and a young lady came to talk to me at the end of the panel. She pointed out a detail of my jacket that was made the wrong way. She was actually studying sewing leather techniques in a school nearby. Yes, there was a school in a city around that was offering classes about leather work and leather clothing sewing techniques and I didn’t know! The young lady gave me the name of her teacher, a passionate woman who was generous enough to come to my workshop. The teacher stayed in my workshop for 3 hours, answering all my questions, showing me the right techniques, giving me tips and tricks, pointing out the flaws in my Heroes of the North suits and teaching me the correct way to do everything in leather. I learned more during these 3 hours than in the past 3 years spent experienting by myself. I was ABLE to do a perfect leather costume, I just needed to KNOW how. And now, I knew. My little hands could do it all. Thanks to this teacher, I knew all the proper techniques to do any piece of clothing in leather. It was now time to use those techniques.
I bought a blue cow hide to make Power Girl’s boots and gloves. The leather had the perfect thickness to make boots, but was too thick to make fancy woman’s gloves. It would have been better to use a thinner leather, like lambskin, to make Power Girl’s gloves. I didn’t want to make big working gloves like the ones you can get in hardware stores. I wanted to make delicate women gloves. I had 3 options: I could try to find a thinner, matching blue leather for the gloves, I could buy white lambskin and try to dye it (changing the color of chrome-tanned leather is a speciality in itself and isn’t easy) or I could use the same blue leather for both the boots and gloves. Chances to find a matching blue leather were pretty low and I had no skills or knowlegde in leather dying, so I decided to take the chance to use that thicker leather to make the gloves, knowing that the final result wouldn’t be as good as it could have been.
In my blog about my Scorpion costume, I mentioned a few things about leather. One of those things is a very important step that needs to be done prior to sewing leather pieces. It’s called skiving. It’s the process of ‘shaving’ the edges of any thick leather piece where there are sewing allowances in order to have nice, flat stitches without too much thickness. Working with a thick leather to sew something as delicate as gloves, it would be more essential than ever to carefully skive each piece of the gloves.
But first, I had to find a pattern. There are various possible patterns to make gloves, depending on the types of gloves: working gloves, gardening gloves, gloves made out of stretch fabrics, delicate leather gloves for women, etc. All of these gloves patterns are pretty tricky. Gloves are certainly some of the most complicated pieces of clothing to sew. No wonder why this is a piece that most of cosplayers will buy from the store. Sewing gloves require strong skills and specialized equipment. Some gloves are sewed using a sewing machine for fur which makes a very narrow serger stitch. Some gloves are sewed using different styles of walking foot (sewing machine for leather.) I only had my regular flat bed Consew walking foot, so that’s what I used. A different sewing machine could have made my work easier, but at that time, I didn’t know.
The gloves’ journey: Let’s get started
I took a pair of gloves that I had and unsewed it. I drew each pattern piece on paper and got a first pattern to work from. I used old leather pieces from previous projects to cut and sew a first sample of glove that was… a total disaster. I really thought that I had undertaken something that I wouldn’t be able to do. I even considered giving up the whole thing and calling my friend Riki to tell her that I had changed my mind and that I wouldn’t be doing a Power Girl cosplay anymore. But if gloves are sold in stores, it’s because someone, somewhere, knows how to sew gloves. It’s doable. Some people do it. So I could do it too. I needed 8 prototypes and worked for a full week before I was finally able to sew gloves that looked like gloves and that were wearable.
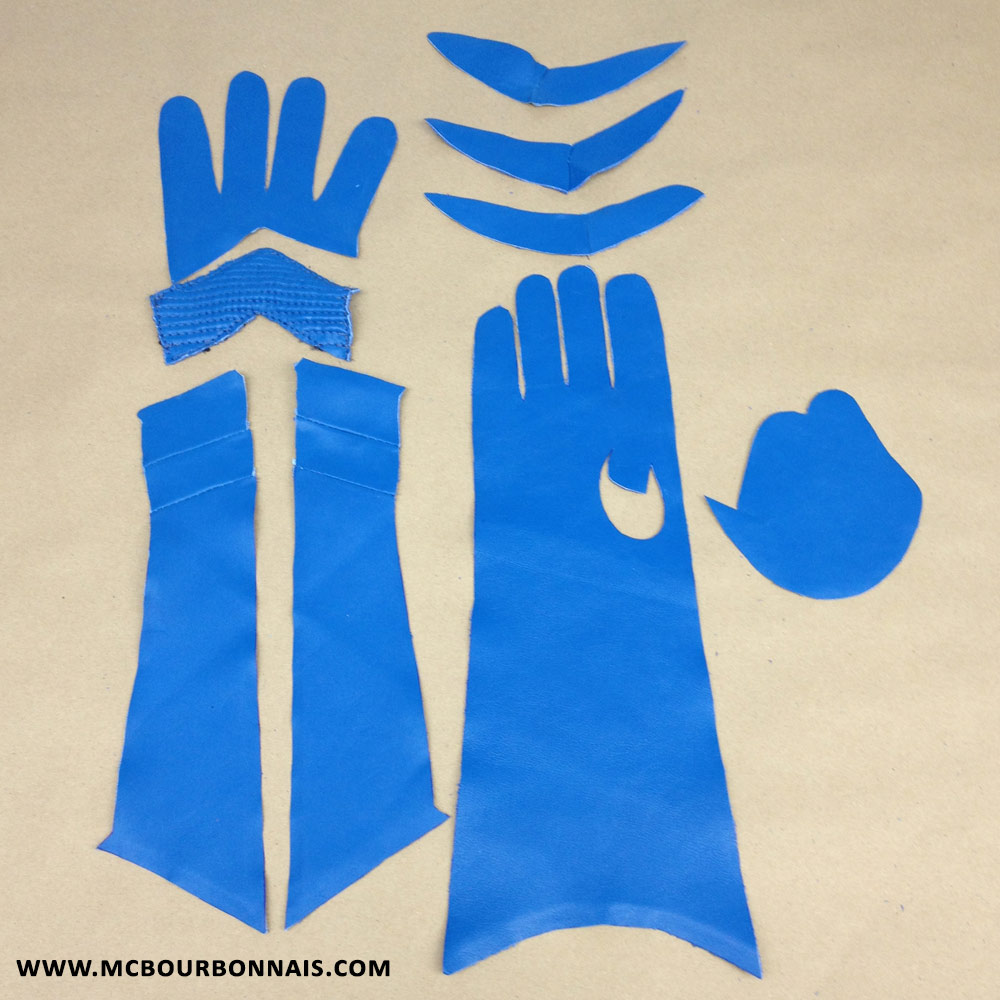
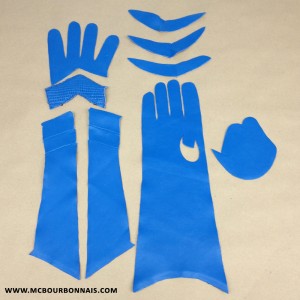
Here are all the pieces of that specific glove pattern. I needed all these pieces to make 1 glove. In fancier, delicate gloves, there’s a narrow piece that goes in between each finger. These are the 6 pieces on the top right of the pic. The round shape piece on the bottom right of the pic is the thumb. Notice the hole where the thumb has to be stitched, the white marks around each piece which is where it was skived and the arrow shaped pieces on the left that will allow to reproduce Amanda Conner’s design on the gloves. I had to skive the smaller pieces by hand using a special knife. That’s why some of the pieces’ edges are unequally skived while others, that I skived using my skiver machine, are perfectly skived.
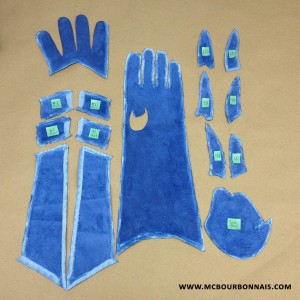
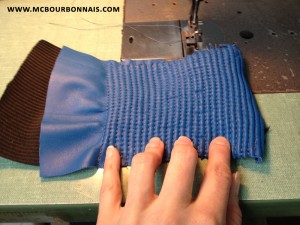
For a better adjustment, I decided to integrate an additional piece of design that was not part of Conner’s drawings. It’s a piece of leather stitched on a large elastic, which gives the leather a textured pattern and allows the piece to stretch over my knuckles when I close my hand to make a fist.
This is commonly seen in motorcycle clothing. Some of you have probably noticed these elastic leather pieces integrated in the design of jackets and pants.
In the industry, they will stretch a large piece of elastic in a frame and make multiple stitches through the hyde and elastic piece. When you take off the elastic from the frame, the whole piece of leather shrinks with the elastic to form that typical textured pattern and then, you can cut the pattern pieces. Of course, I did my pieces by hand, one stitch at the time, stretching the elastic before each stitch.
Here’s another step where I had started sewing some of the pieces together.
And if you want to see more, you’re gonna have to wait for Part 3! You won’t be disapointed. Power Girl’s gloves are worthed a little wait. ;)

Introducing Power Girl
Most of you already know that I discovered cosplay in 2009 with the release of my tribute pics to Mortal Kombat where I was dressing up as Frost. I had no idea at this time of what cosplay was. It’s people’s reaction to those pics that made me wonder why they were so popular and that’s how I found out about the whole cosplay phenomenon, searching on the Internet. Even though I liked to read comics and watch animes, I realized, when I started attending my first conventions in 2010, that there were people out there who were way bigger comic fans, or should I say comic experts, than I could possibly ever be. I grew up in Quebec, my French speaking province, watching Japanese animes translated in French. For those who may be wondering, I watched as a kid Grendizer (in French: Goldorak), Nobody’s Boy: Remi (in French: Rémi sans famille), Lady Oscar, The Adventures of Hutch the Honeybee (in French: Hutchi le petit prince orphelin), the French-Japanese collaboration Belle et Sébastien, and my favorite of all time, the American-Japanese collaboration Jem and the Holograms (in French: Jem et les Hologrammes.) I wasn’t awared of the whole insanely popular American pop culture with all the Mavel and DC superheroes that are commonly known by mostly everybody in the USA. There were some characters that any comic book fan knows and that I had never heard of. Believe it or not, Power Girl was one of them.
I was just starting as a cosplayer when I got my very first interview. The guy’s name was Dave and we later became friends. ‘Have you ever thought of doing a Power Girl copslay?’ Dave asked. I said: ‘Power who?’ I can still remember Dave’s face! He looked at me like if I was an alien! lol No, I didn’t know who Power Girl was. Yes, such human beings do exist. And that’s how I was introduced to Ms Karen Starr. No need to say that once I was back home, I went to my local comic book store and bought a whole bunch of Power Girl comics.
It seems that Power Girl and I share some very similar features, talking about the short blond hair and big… eyes, of course, because the Power Girl cosplay suggestion became a weekly thing in the following months and years. Everybody wanted me to cosplay that character dressed up with the simpler, almost cheesy costume I could think of: white bodysuit, plain blue gloves and boots and the classic superheroe cape. Boring stuff, I thought, in my costumer’s mind in search of a new sewing challenge. But the Power Girl cosplay suggestion continued flooding my mailbox for the months and years to follow.
People often ask how I choose the costumes I will make. There are different reasons that all have one thing in common: I like technical costuming challenges and I like learning new techniques. It can be a character that I personally love, it can be a suggestion from fans, it can be a character that I don’t know but whose costume I like. In any case, I have to be challenged by the costume. What new will I learn making that costume? What new material will I have to learn to work with? Is there an aspect of the drawing that will be particulary complicated to build in real? A pattern making chalenge? But there has to be a challenge. And when I first looked at Power Girl’s costume and at various Power Girl cosplays, I saw no challenge. A stretch bodysuit too often made out of shiny spandex (which is against my religion), blue store-bought gloves (also often spandex gloves, like the ones they sell to go with prom dresses), random blue fake leather boots, or even worst in my opinion, spandex boots or boot covers (it took me a while to forgive the superheroe movies’ studios who started making fancy shoe covers to imitate leather boots, well made, but still shoe covers) and a boring red cape. Here’s your costume, Ma’am. And it will be a hit no matter what because the character is so popular and the window cleavage can only give you more points. Don’t think no more, let’s make a Power Girl cosplay. There was nothing there for me. It had already been done ten million times. Too much, too often, too bad. What more could I do? One more version of Power Girl to offer to the world? Who would notice, anyway? And yet, it happened.
A quick word about spandex
About spandex, I just want to say that I’m awared of the fact that it’s an easy material to work with and that it’s why so many cosplayers use it. As any stretch fabric, it allows you to have a pattern that requires less adjustments. If your patern doesn’t match your measurements perfectly, the fabric will stretch and will follow the shape of your body, so it’s gonna be alright anyway. Plus, it shows the body’s shapes. Very accessible because it’s easy to find and not too expensive, relatively easy to sew when you have a serger and a little experience, adding a sexy touch since its extensibility makes any spandex costume look skin tight, all these reasons make spandex an obvious choice for many cosplayers. I personally hate that material for most of these exact same reasons, but it’s just me. Please don’t be offended by my comments about spandex if it’s a material that you enjoy using. I just think that with all the skills and exerience I have as a pattern maker and seamstress, it would be an act of lazyness for me to use simple spandex when other more complicated options are possible. But this way of thinking applies to me only.
Cosplay for a Cause
My lovely friend and cosplayer Riddle contacted me one day about that new Cosplay for a Cause calendar she wanted to produce. I had been part of the first 2012 Calendar issue back in 2011 when she had thought of doing a non-profit project to help and support people from Japan after the tsunami. She had came up with the idea of a cosplay calendar featuring only characters from Japanese animes that we would all sell and promote in order to give 100% of the proceeds to the Japanese Red Cross Society. The whole thing had been a huge success and the fans had been asking for a new calendar for a while. This time, she wanted to give the proceeds of the calendar’s sales to an organization supporting animals rights, suggesting to present pictures of each cosplayer with a live animal. ‘I’d like you to be part of the calendar’ she said. ‘And we already have many cosplayers who have choosen Marvel characters.’ I knew exactly where she was going. ‘Since Power Girl is a DC character and has a cat in the story…’ She stopped, waiting for my reaction. ‘You would be the perfect Power Girl.’ And I said yes. Guys, you can say thanks to Riki. No one else could have convinced me to build that costume that was still, at that moment, insignificant for me.
And my struggle to build my Power Girl costume will continue in Part 2 of my blog!
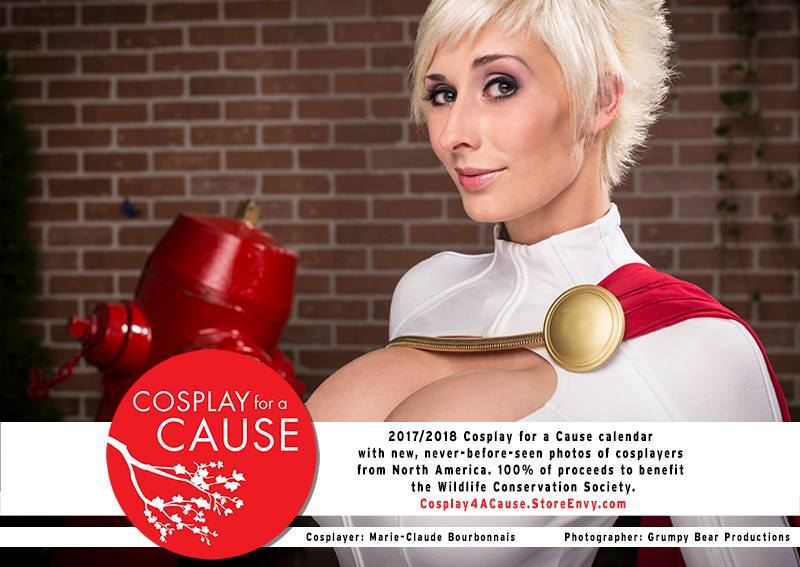
For more info about the new 2017-2018 Cosplay for a Cause calendar, featuring an exclusive picture of my Power Girl cosplay, visit www.cosplayforacause.com or order directly your calendar by clicking here. 100% of the profits will go to the WildLife Conservation Society. To buy another autographed Power Girl print, visit my store.

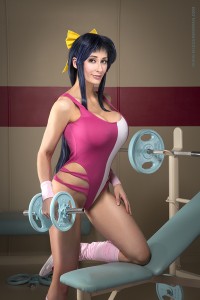
Kazumi Amano from Gunbuster Photographer: Grumpy Bear Productions
Even if, during the past months, I spent most of my time working on Soda Pop Miniatures’ robot, I still managed to organize other projects on the side on which I have slowly worked when I could. That’s how I could make that super cute costume from a Japanese anime called Gunbuster. I built the set with a friend of mine when I had a little free time and took 2 days to shoot many different pictures. That old school anime from the late 80s showcase the typical workout outfit that was so trendy at that time, with the bodysuit and leg warmers. In the anime, Kazumi Amano is the best student of the school and is seriously training on a regular basis. It was the perfect setup for a gym inspired photoshoot. We reproduced the inside of a spaceship as seen in the anime, the beige wall with a red stripe and the turquoise fake leather bench. Then we painted the training weights to match the bench’s color and we had our set!
I should eventually have more pics from that photoshoot to share, but for now, let’s start with 3 sexy and very cute pics that are available as autographed prints on my store. Enjoy a little 80s touch!

I’m always excited when I have the opportunity to visit a country where I have never been before and this time, it’s Chile! Yes, I’m received as a cosplay guest for Comiccon Chile in Santiago on June 3-5. :) Thank you so much to the organizers for giving me the chance to travel to South America again. I can’t wait to discover Chile!
Inicio 2023
Es un honor estar una invitada por la Comiccon Chile. Muchas gracias por la invitaciòn. ¡Nos vemos allí!
Making of MKX Scorpion costume – PART 4
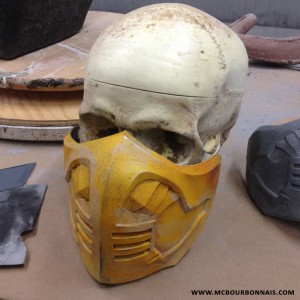
The man behind the mask
I’ve been wanting to integrate new technologies into my costumes for a while and since 3D printing is everywhere these days, I was really looking forward to finding the appropriate project to use this technology.
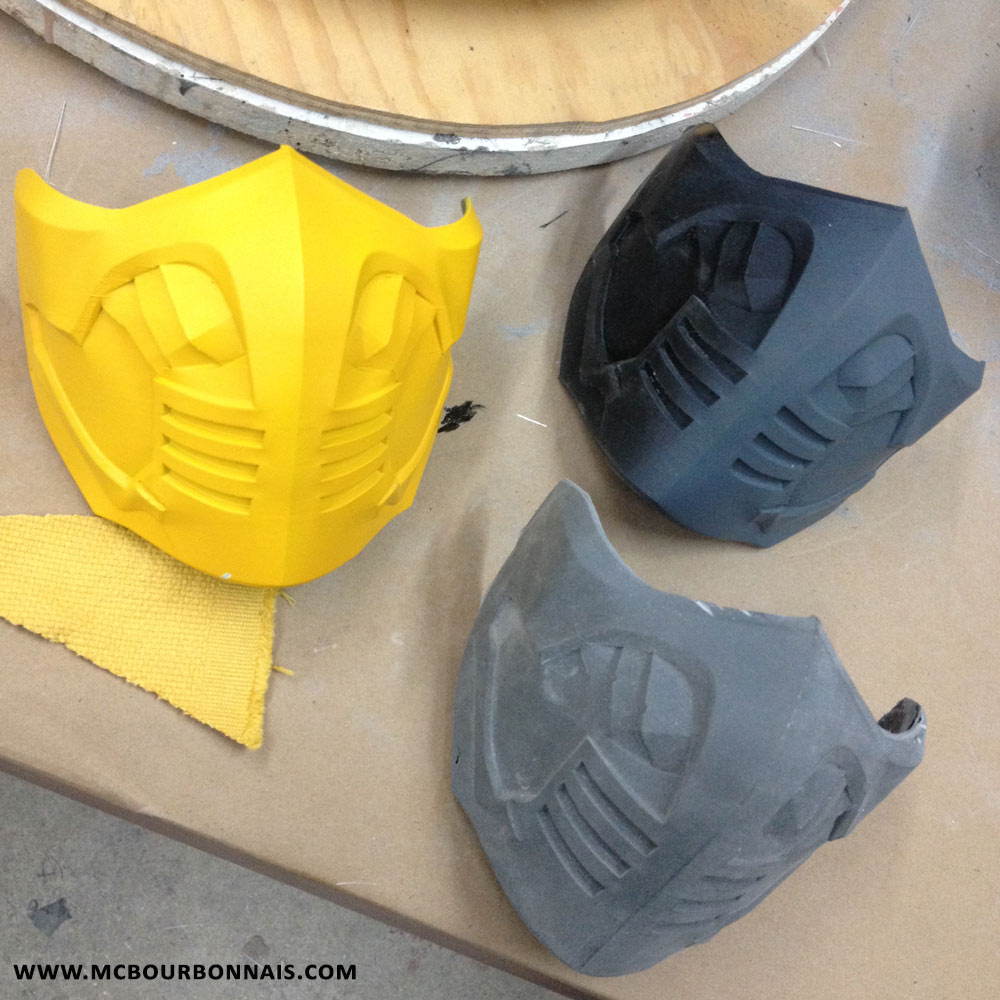
Back in 2009, when I made my Frost cosplay, a friend of mine helped me sculpting the mask on a plaster bust of myself. (I had my head molded and casted a couple times in my life.) Then I made a simple plaster mold and a fiberglass cast. That was probably the very first fiberglass prop I made. (Now, when I look at Soda Pop Miniatures’ robot, I can’t believe it… That little fiberglass mask seems like it was made a century ago.) That was old school stuff! Today, 3D printing offers infinite opportunites and since it’s still a very slow and pretty expensive technology, it’s perfect for small pieces like a mask. And if you have an unlimited budget, well, lucky you, go ahead and print an entire armor! That’s what I would do if I could. :D
So 3D printing it would be. However, 3D printing means 3D modeling first, which is something I don’t know at all. (Hey, we can’t be good at everything.) I found someone to help me with that matter.
But first, I have to tell you something that may fall into the fantasy category for some of you. A couple years ago, I had my body 3D scanned. So I do have an actual 3D model of my own body. Perfect 3D replica of myself! Before some of you think about it, no, I won’t make that 3D model available online. I know too well what you guys do with those Daz models. ;) Just kidding. I found online a 3D modeler whose work I liked and contacted Dutch Props who became my collaborator for this project. I provided him my body’s scan so he could 3D model Scorpion’s mask directly over my own face.
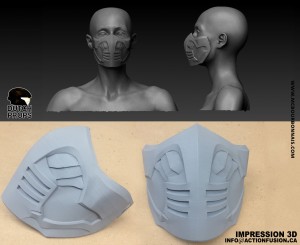
Dutch Props was very open to follow my directions and understood exactly what I wanted. He did an excellent job reproducing the original design and adapting it to my proportions. Once again, the challenge was to have a mask designed for a man’s face fitting a smaller, female face and Dutch Props nailed it.
You can see more of Dutch Props’ work here:
www.facebook.com/dutchprops
Instagram: @dutchprops
3D printing: let’s get excited!
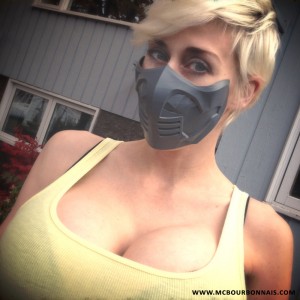
I don’t have a 3D printer, but I wish I would. One day, I went to Division XP, my local airsoft store, to buy props for an upcoming cosplay and I learned that the owner also had a 3D printing company. A high hand 3D printing machine in a store half an hour from home! Things are rarely that easy to find in Quebec City! I was blessed by the Gods of Cosplay! Division XP was already my official airsoft provider, the second company, Action Fusion, would from now on be my partner for 3D printing. All owned by the same guy, thanks, Daniel. :) I was excited like a kid when I went to get my 3D printed mask. When I said that 3D printing is a slow technology, for those who’d be wondering, it took 20 hours to print my Scorpion mask. Cleaning the support material required to print the mask’s shape, a little sanding and I could try the mask on. The fit was perfect and Dutch Props’ design adaptation was spot on.
See the biggest airsoft shop in the province of Québec:
www.divisionxp.com
For info about 3D printing services: info@actionfusion.ca
Many cosplayers use the 3D printed piece as their final piece. I prefered not to do so, for different reasons. First, the 3D printed mask remains fragile. Since it’s a thin piece, it could be broken. Each printed layer is a weakness if you force the piece. So I decided to mold the printed mask. Plus, as I would have a mold, I could easily make another cast if my mask was broken or lost. I made a silicone mold using Smooth-On Rebound 25, with a fiberglass shell for the mold. Then I made a couple fiberglass casts. I use a mix of polyester resin and auto body filler to make the print coat, the brush-on first coat that you put in the mold. That’s the coat that you will sand and finish to be painted. It’s easier to sand that mix of resin and body filler than sanding fiberglass alone. When you mix the polyester resin and the body filler, add both resin catalyst and body filler hardener. Working on various fiberglass projects, each time I had excess polyester resin mixed, I would use it to make a fiberglass cast of my mask. After a while, I already had a few copies.
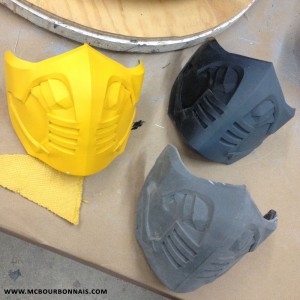
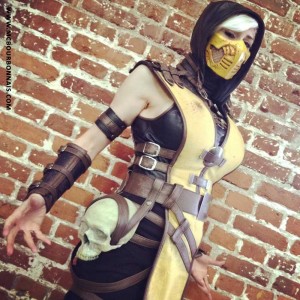
Buffing the excess fiberglass cloth around the mask, sanding the little imperfections and my mask was ready to be painted! Many types of paint will hold on fiberglass, from cheap acrylic paint to expensive automotive paint. I mixed different shades to match the yellow fabric’s color and used an airbrush to apply it. Since the back of my head is hidden by the costume’s hood, I could make the mask hold with a simple elastic. That’s what I had the time to do before leaving for Romania last October. The costume was brand new, made of clean fabric and shiny silver pieces. And that’s one of the 2 negative critics I got for this costume: it was too clean and Scorpion’s emblematic spears were missing. When I came back home after my trip to Romania, I distressed the costume, made it look used and dirty, put the silver pieces in acid and added ‘blood’ to the costume and mask. I also added the skull to the costume’s belt. And… the spears are still missing. I may have them 3D molded/printed. I think I’m getting lazy. ;) But overall, I have to say that I’m very satisfied with this costume, my tribute to Mortal Kombat X, that I even got to show to Ed Boon in person in a MKX competition in Burbank, in January 2016.
2 cow hides and one costume later…
Through the making of my Scorpion costume, I definitely learned a lot about leather techniques. It’s all in the details, and details really make the difference. It’s funny because the first thing you see, when you look at Scorpion’s costume, is a yellow garment and black pants. But I really needed a whole brown cow hide to make all the leather straps, belt and bias and almost a whole black cow hide to make the sleeveless top, hood, bracelets and other details. For me, Scorpion’s costume is a leather costume, even if it doesn’t look like one. There’s so much more to be said about this cosplay. I will certainly blog about other details eventually. It’s a pleasure for me to share the knowledge and techniques I have developed with ones who are interested. To the cosplayers and costumers among you, I hope you have learned something that you’ll be able to use for upcoming costumes. :)

Great news! I’ll be traveling to the States again this summer! I’m received as a cosplay guest for Count-I-Con in Grayslake on August 27th-28th. What about another road trip? Now, let me think of the costumes I may bring…
Visit their website for more info:
www.counticon.com
Making of MKX Scorpion costume – PART 3
Adding some metal: When jewelry meets costuming
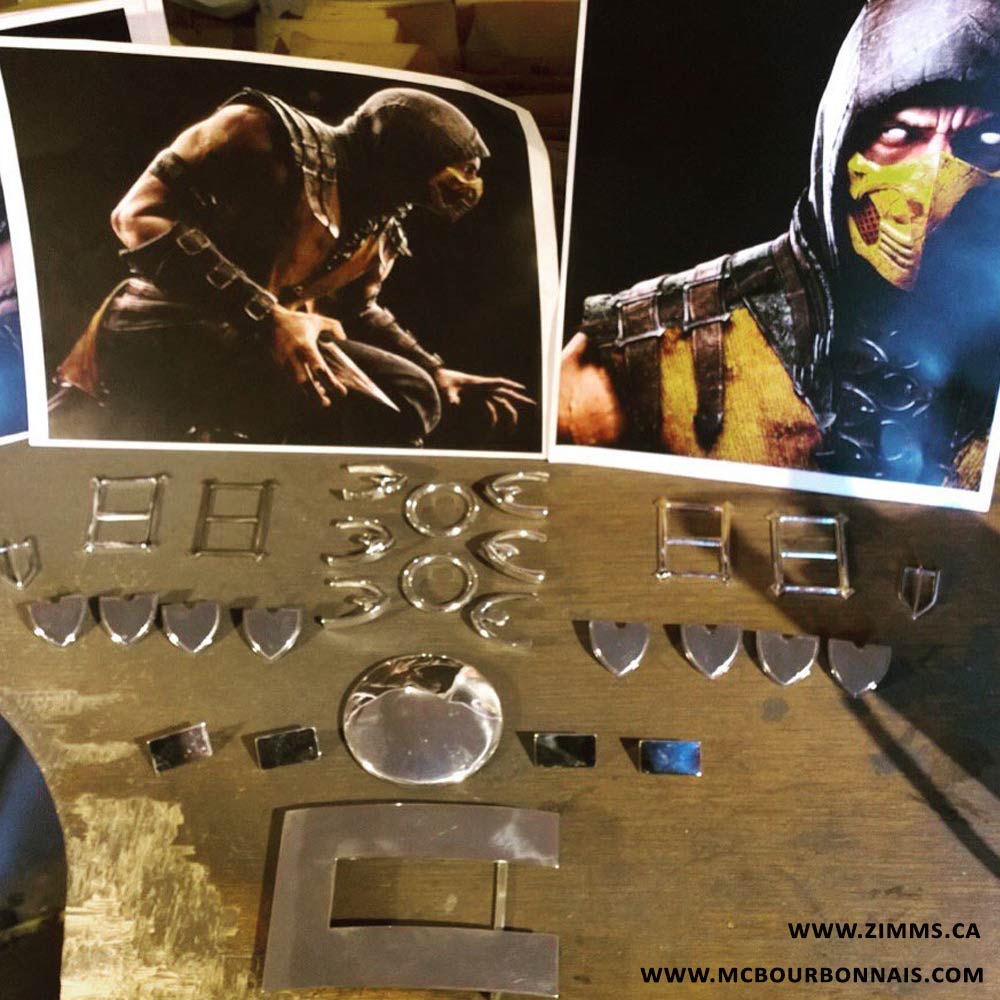
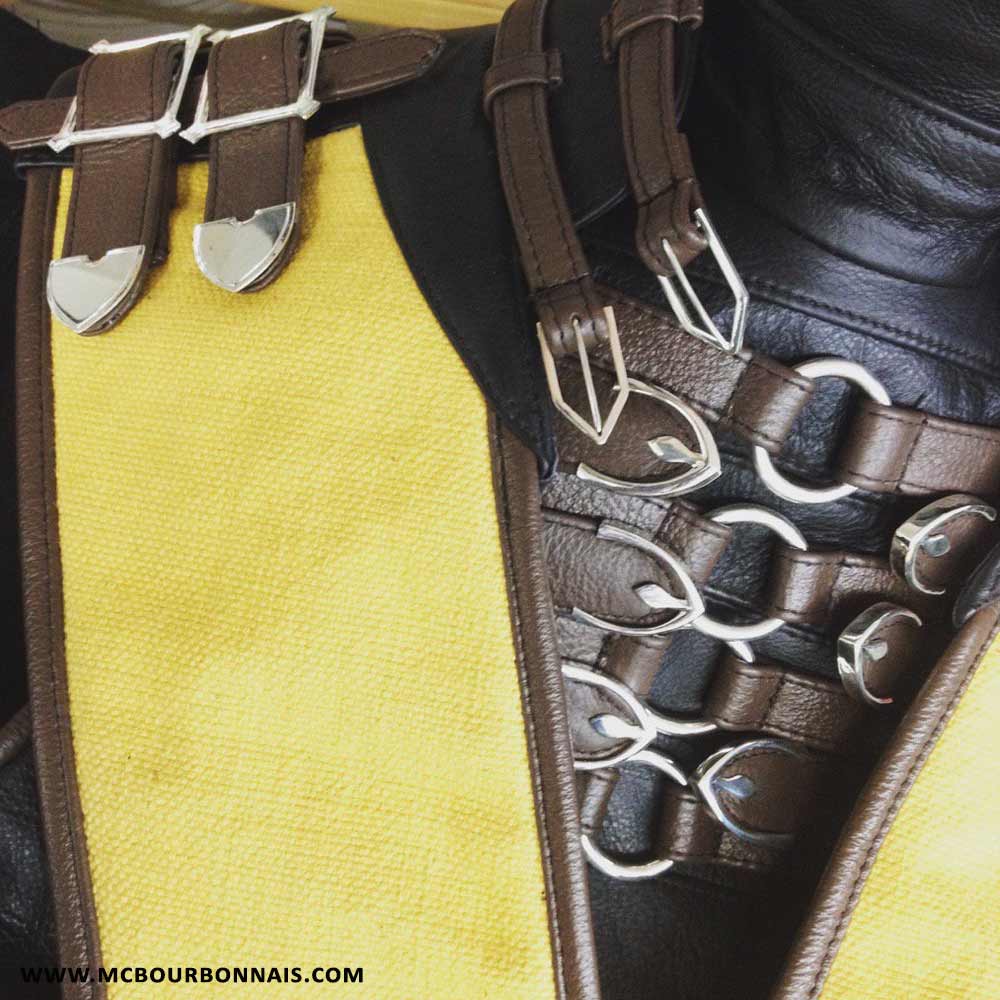
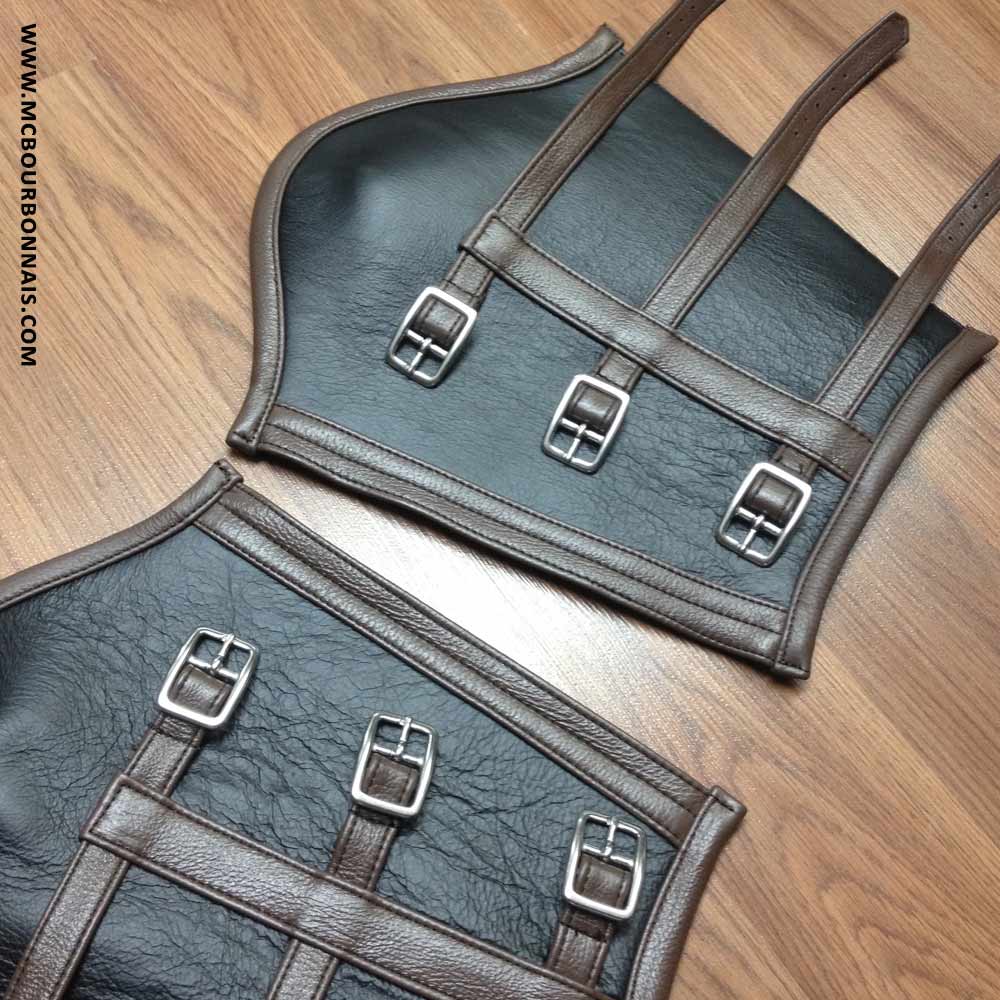
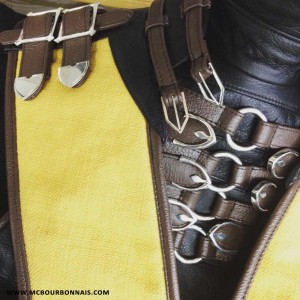
The final touches on the costume were all the silver pieces custom made by Vincent Zimmermann from Joaillerie Zimm’s in Québec City. The reference pics for Scorpion’s costume were so detailed, especially since Scorpion is the character on the game’s promo shots, that I had plenty of views of the many metallic pieces and buckles that garnish the whole costume. The most recognizable metallic pieces are of course the huge belt buckle and middle front convex circle; the 4 rectangular buckles and 8 triangular shaped pieces garnishing the leather straps on Scorpion’s shoulders; and the 6 one-of-a-kind designed pieces garnishing the black leather straps on Scorpion’s chest. These pieces, and a couple more, were hand made in silver by Vincent, each of them being a real little jewel.

That’s the most he could do before I left for Romania. I had to use ‘standard’ buckles from the store for the rest of the costume (arm pieces and accessories) but I will eventually replace these store-bought buckles with custom made silver buckles that will match perfectly the original design. At least, thanks to Vincent, the essential metallic pieces of Scorpion’s costume were ready on time, giving its personality to the costume and bringing it to another level. It was the very first time that I included jewelry in my costumes and I definitely plan to do it again instead of imitating metal with any other material. I like to go for the real thing.
You can see more of Vincent Zimmermann’s work here:
www.zimms.ca
Or visit his Official Facebook Fanpage.
Now, let’s accessorize
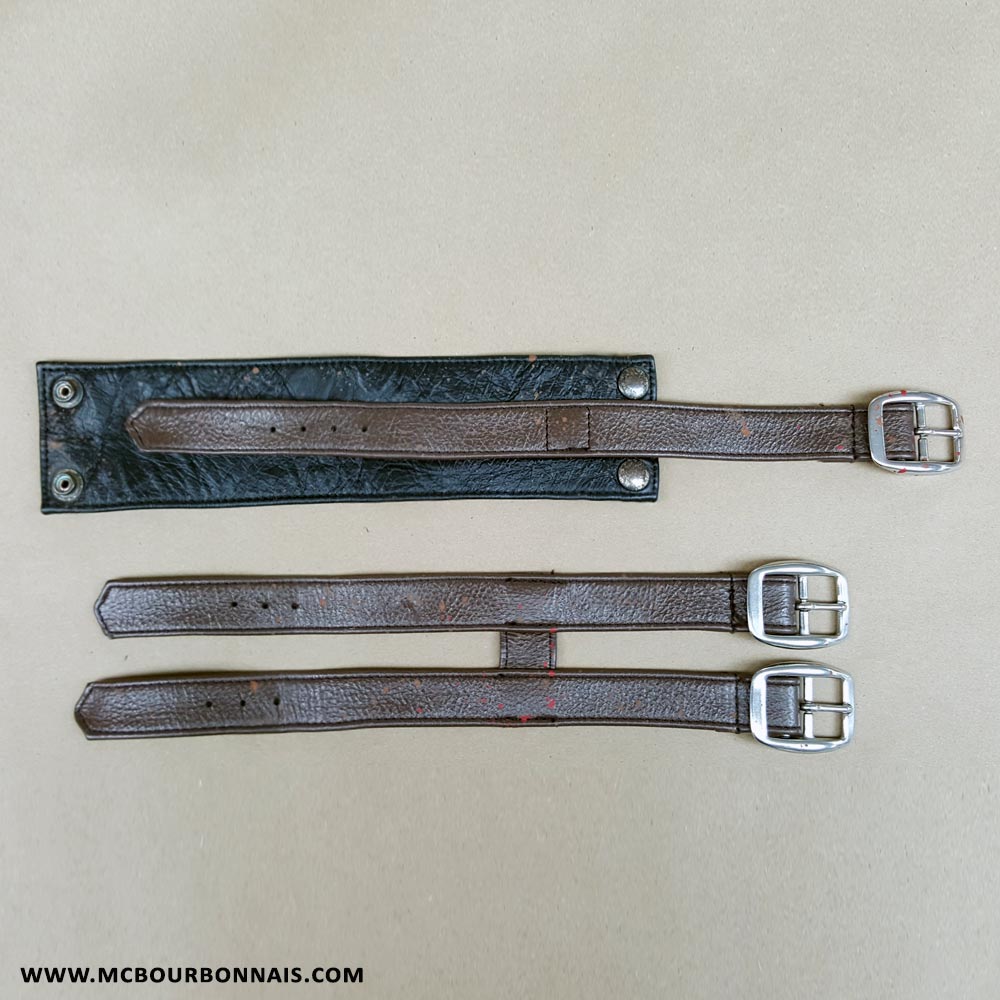
I had the pants, sleeveless top and yellow uniform with the hood, but all the arm pieces and bracelets were still missing. The 2 bracelets that Scorpion wears around his biceps were made of more leather straps, using the same chromed-tanned leather that I had used for the rest of the costume. Basic work, easy and as fast to do as making leather straps can be.
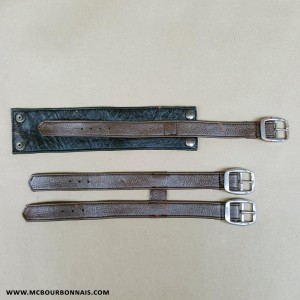
The pieces that Scorpion wears on his forearms were more complicated to do, though. I used a thick vegetable leather piece and glued a piece of black chrome-tanned leather over it, the same black leather used for the sleeveless top. I could have dyed the vegetable leather in black. This is done a lot for LARP armors, for example. But it wouldn’t have had the same texture as the other pieces of leather in the costume, so I preferred to glue the good leather on top of my vegetable leather armpiece. Since this accessory will be very curved when worn over my forearm, I glued the chrome-tanned leather piece over the vegetable leather while it was curved in its final position. When I open the armpiece and put it flat on a table, the black chrome-tanned leather is full of wrinkles. But when I curve it and put in on my arm, it’s perfectly slick.

I used the same glue that I use to glue all the sewing allowances inside every leather garment I make. Then I tried to figure out the design of the brown straps on these armpieces. There were more custom buckles that the jeweller didn’t have the time to make, so I used store-bought buckles and made a simpler version of the original design. I sewed the straps on top of the armpieces, glued one last layer of black leather inside so it would look good on both sides and made a finish with a brown bias on the edges of the pieces. This is literally the last part of the costume that I made just before leaving for Romania. I made these armpieces fast and they were not perfect. They were actually a little too long and they hurt me when I bent my arms. Later, when I came back home, I modified them and made them shorter. Eventually, I’d like to redo them with the proper custom silver buckles so it will be identical to the reference pics.

Check out for Part 4 of my blog for the making of a very important part of Scorpion’s costume: the mask!
Great news! The new 2017-2018 Cosplay for a Cause Calendar is available for pre-order! The 17 months calendar features never-before-seen photos of cosplayers from all across North America, including a shot of my Power Girl cosplay! This time, 100% of the profits are going to the WildLife Conservation Society. Visit www.cospayforacause.com and pre-order your copy now!
Visit my store for another 8” X 12” print of my Power Girl cosplay.
Making of MKX Scorpion costume – PART 2
The easy part: The pants
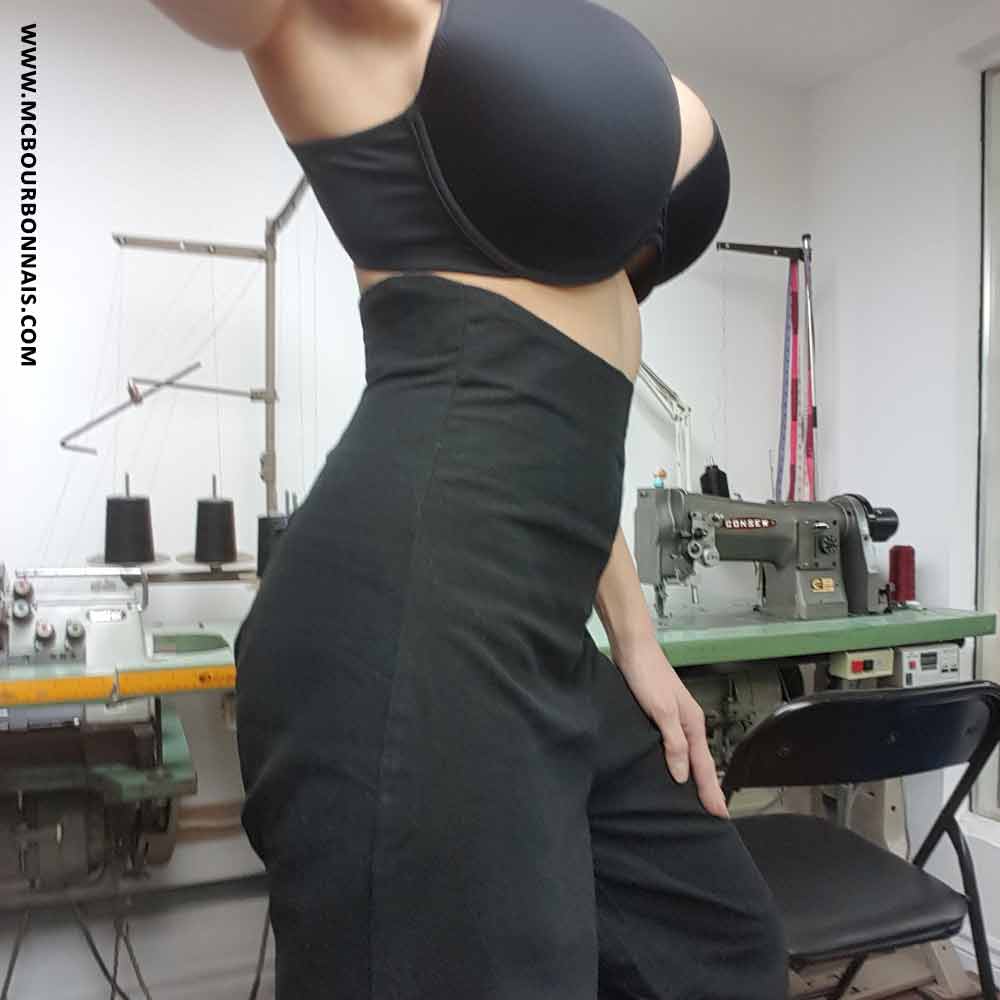
Previous versions of Scorpion showed him wearing very tight pants that would have been, in real life, made out of a stretch fabric. This version of the costume, though, shows loose pants that are way closer to the traditional ninjutsu uniform (shinobi shozoku.) However, these traditional pants have many pleats at the waist, which we don’t see on Scorpion’s pants design. I decided to cheat and to make the pattern of very high rise pants, adjusted around the waist (worn under the sleeveless leather top) and loose around the thighs and calves. Tucking these loose pants into the boots gives the same look than on the reference pics. The pants open with an invisible zipper in the back. It was, obviously, the simpler part of the costume.
Scorpion’s yellow uniform, or where the fun begins
The most complicated and recognizable part of Scorpion’s costume is definitely the yellow garment. Since all the reference pics showed very clearly a detailed woven texture, I tried to find a fabric with very visible warp and weft yarns. I finally found what I was looking for in furniture fabrics.
I used 2 layers of this yellow fabric with one layer of thermal batting (or insulated lining) in between to give the piece more thickness. Making a female version of a male character’s costume, I had to keep in mind that I wanted to reproduce the effect of a warrior costume, with structure and thickness. Male characters in MKX are particularly muscular. Scorpion, in real life, would have the figure of a bodybuilder. I not only had to adapt this costume’s proportions to my own figure, but also to use the materials to add bulkiness in order to create a more masculine and credible look. I made a mockup of this uniform and studied carefully the proportions of the black collar and shoulder yokes.
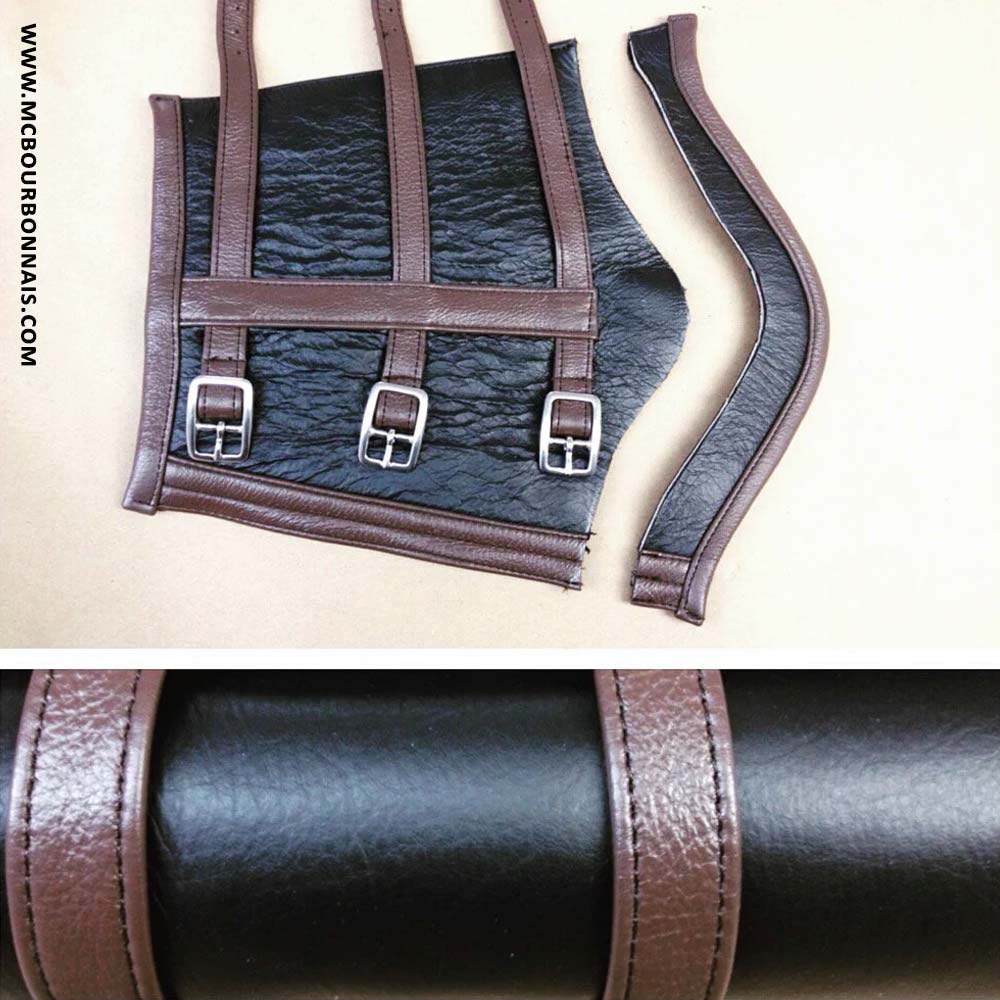
I made the collar very large around my neck to add bulkiness. I used brown leather bias to make the finish around the yellow garment, just like on the reference pics. (This brown bias, by the way, is made of leather straps that I cut in the hide and skived.)

Some details look insignificant, but are actually complicated. As an example, I had to ask a teacher who specializes in leather clothing to figure out how to sew the leather bias around the corners of the yellow garment in the bottom front and back. It was precision work and took some time. It’s a very good example of a design detail that shouldn’t be choosen for mass produced garments. Time consuming techniques that require many manipulations equal a higher cost.
I also tested with my mockup all the straps that go over the pants and yellow garment in a very particular way. If you look carefully at Scorpion’s costume, you’ll see that some straps go over the yellow garment and are attached to the belt while other straps just disappear under the yellow piece of clothing. I had to observe my mockup and think a lot before I figured out a way to make that complex strap system work.
Which strap goes where? How does it all hold together? How does it logically open to make it easy to put on and take off? I didn’t want to have a whole bunch of leather straps and a belt all sewed together. Even though costumes do have design details that you’ll never find in regular clothes, it’s my work as a designer to make these costumes wearable in a credible way. Some of the leather straps are stitched to others while some are removable with snaps so in the end, it’s a leather accessory that makes sense by itself and looks like the reference pics.
I also made a mockup for the black hood since I thought that the yoke, in the center of the hood, was larger than what I would ideally have made it in a regular pattern. The yoke, on the reference pics, is actually so large that I was afraid it would make a ‘squarish’ hood once sewed in leather. Since I had less and less time before leaving for Romania, I decided to make a removable hood using snaps inside the collar. I would make a temporary version of the hood for the convention and could change it after if I wasn’t satisfied. But the leather hood turned out very work well, so I kept it as it was, and the fact that it is removable is just as convenient as it would be for any regular garment.
By the way, there are many ways to make leather straps and each technique will produce a different result. Some techniques take more time, but the straps will look good on both sides, while other techniques are faster, but the straps will look good only on one side. I could explain these techniques more in detail in another blog. The amount of time that I spent cutting, skiving and sewing leather straps for my Scorpion costume was considerable.
Don’t miss my next blog, Making of MKX Scorpion costume – PART 3!