Brunette Marie-Claude: glamour pics coming soon!

Little preview of the first glamour photoshoot I did as a brunette. :D Be patient, the edited pics will soon be ready!

Little preview of the first glamour photoshoot I did as a brunette. :D Be patient, the edited pics will soon be ready!
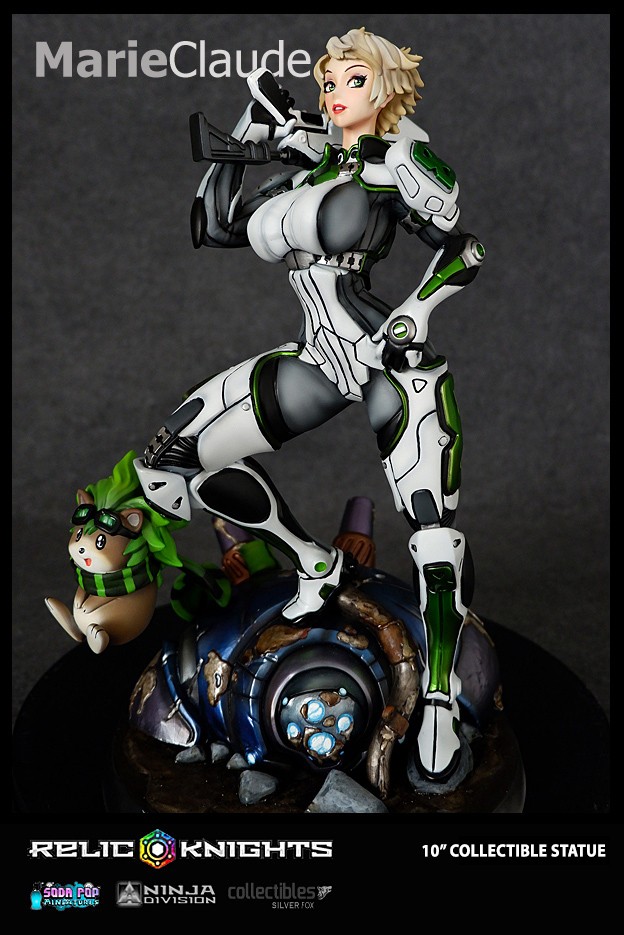
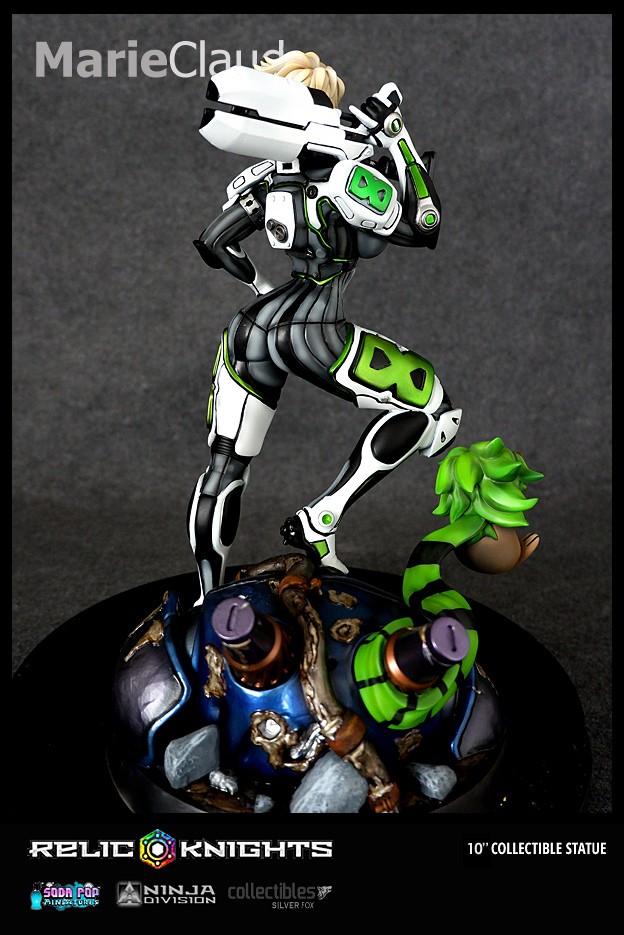
I’m so excited to finally announce my latest collaboration with Ninja Division!
Here it is, a 1:8 scale figurine of my character in Ninja Division’s game Relic Knights! :D How cool is that! Exceptionally, the figurine won’t be available through my own online store. You have to pre-order your figurine using the link bellow. The price is 179.99USD. Please note that all the figurines will be shipped from the USA by Ninja Division.
https://ninjadivision.com/products/silver-fox-collectibles/marie-claude-and-esmee-1165.html
THIS ITEM IS FOR PREORDER ONLY.
Orders will be taken until May 30. Expected delivery date is June 30.
For information regarding your order or shipping dates, please contact Ninja Divison’s Customer Service.
Collaborating with Ninja Division Publishing and Soda Pop Miniatures, Silver Fox Studios will be creating a range of collectible statues from the tabletop game Relic Knights. This 1:8 scale statue will be made of high quality polystone resin and each one will be hand painted and very limited to 500 pieces worldwide.
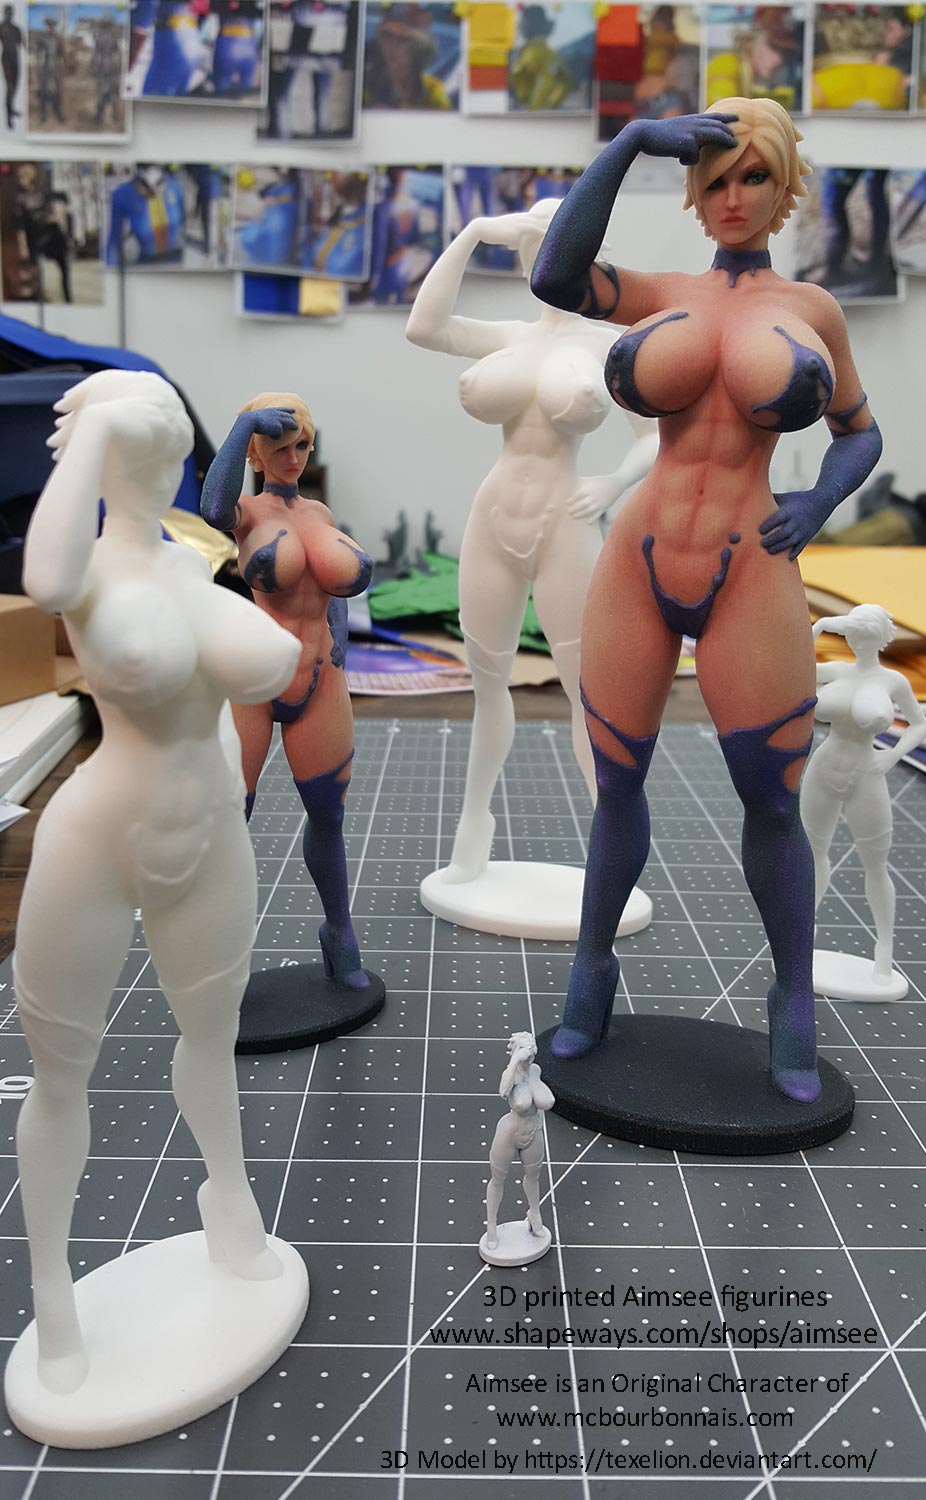
This is a nice surprise! For those who dream of having a little bit of Aimsee’s sexiness on their desk, there you go! New Aimsee 3D printed figurines are now available on Shapeways! Choose your material and size and order your figurine today! :D
www.shapeways.com/shops/aimsee
3D model made by https://texelion.deviantart.com
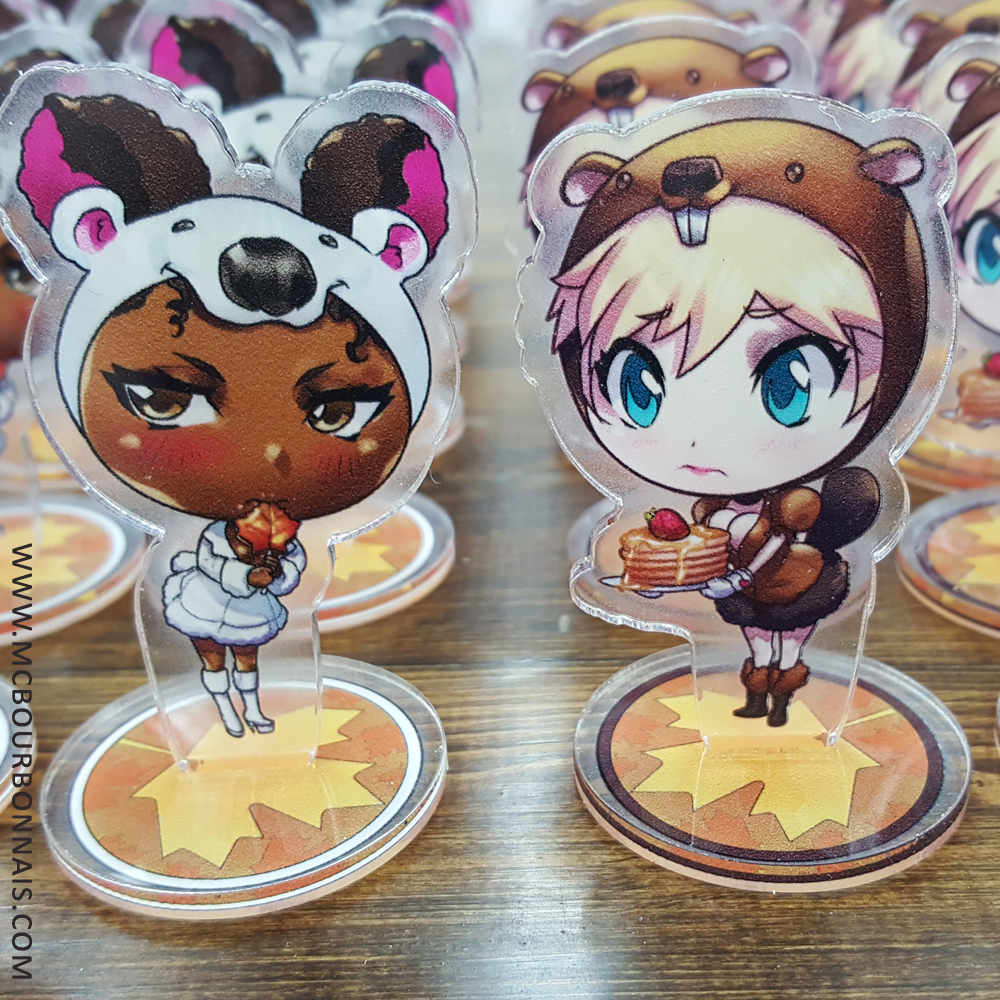
And if you prefer cute stuff, don’t miss the Aimsee & Keira Maple Syrup Special Edition Standees! They’re so lovely! :D
Art by Pop-Lee (Instagram: @popleeart)

I was also surprised to see how many people mentioned that they had been following the making of Lug online, for the little I shared. I was truly happy to hear that some people did care about the work I put in that project. I know better than anybody that sex sells and that sexy pics from cosplayers, models, pornstars or beautiful unknown girls will always be popular online. More popular than anything else. But I consider that being beautiful or looking sexy doesn’t count as a skill (I recognize that makeup artists, hair stylists and surgeons do have skills, though) and as a skilled seamstress and costumer, I’d rather receive a compliment about my skills than about my look. Beauty doesn’t last, but skills stay and can even improve as you grow old. I wish skills would get a person more recognition than beauty. That being said, you’re allowed to continue making compliments about how I look if you want to. ;)
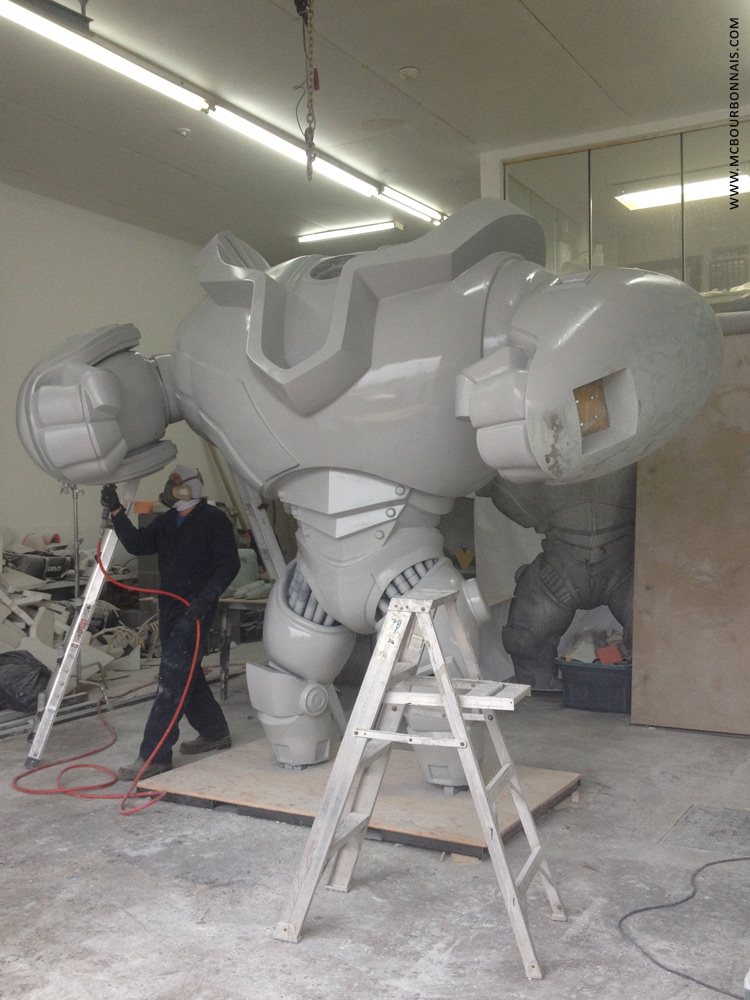
My friend and I later realized that big statues made for exhibitions and events like this usually don’t have that type of very slick finish that we obtained with fiberglass and automotive paint. I had the chance to visit the Playstation offices in San Francisco a few years ago. I saw a huge statue of Kratos from God of War. Don’t get me wrong, the sculpture was amazing, but the surface wasn’t perfectly slick like glass. I was told it was coated with a material called Polyurea. Applied with a spray gun, that material can later be painted. It has a little texture when you touch it, but it’s totally fine for a giant sculpture that will be seen by people walking by in a convention. I realized that we had overdone things. Our robot was ‘too clean’ for nothing. We could have sanded less and coated the whole thing with Polyurea and everybody would have been happy. I didn’t know that material when I was building the robot, though. And it was too late now, because it was done. Or almost done.
Because our robot didn’t have a base and its legs had been painted even if they were not properly sanded like the rest of its body. That was our agreement with Ninja Division. We would bring Lug to Gen Con 2015, then bring it back home to finish it properly. Or should I say to finish it to our taste, because most of people seemed to consider that the robot was more than acceptable already.
So Gen Con ended and it was time to put back Lug on its trailer. Summer 2015 was certanly one of the most intense moment of my life. And there was a 16 hours drive waiting for me. It was way less stressful to bring that thing back home than to bring it down to Indianapolis. We could slowly drive and take our time. We had no deadline anymore. It was almost a relaxing trip.
When we arrived to the Canadian border, we presented that letter stating that we had the robot already when we left Canada and that we were bringning it back to Canada. The letter was the proof that it wasn’t purchased in the USA. I was expecting that we would have to park and that we would be inspected. Or that we would have to go through one of these big scanners again. After all, we were carrying a trailer with a huge box hiding a giant robot. There could have been anything inside. But the custum officer was a young lady. She looked at the letter, read it and said: ‘That’s good. You can go.’ What? That’s all? Then she said: ‘Oh, wait! I forgot. Do you have alcohol, guns or tobacco with you?’ ‘No.’ I said. And guess what? We entered Canada. Like this! Without any inspection or anything! There could have been a a shit load of drug in this trailer, guns, illegal stuff, anything, name it! No wonder how criminals succeed in having drungs entering Canada… I crossed the border with a giant fiberglass statue and they never inspected it! Welcome to Canada…
And a few hours later, the robot was back to the workshop. I couldn’t believe we would really sand it all again. :S
After all this, I was pretty tired. Actually I had never been that exhausted in my whole life. I wasn’t in a hurry to start sanding that robot one more time. I couldn’t believe that my friend had accepted to bring back the robot in order to work on it again. I was sad to think that we would ruin the beautiful paint that his uncle had made for us. In the following weeks, I got back to my other projects. And months past.
October arrived and I was contacted by the organizers of a new event, a toy fair they wanted to organize for the first time in Quebec City. The event wasn’t related to the world of comiccons, but they wanted to present to the attendees different exhibitors from various domains related to games and toys in general. They wanted to include one cosplayer among their exhibitors and they chose me as a guest. I would usually have refused this invitation because I think it was too far from my cosplay niche. But at that moment, I exceptionally had something that was making me the perfect guest for that show. I had a giant robot in my workshop. :D I offered the organizers the opportunity to present the statue at their event and they accepted, of course! lol
In the meanwhile, I was also contacted by the organizers of Quebec City Comiccon. They were totally unawared of the fact that I had built that giant fiberglass statue. They hadn’t seen any of this online. I told the organizer I had the robot at the workshop and that I could bring it to the comiccon if they wanted to. They also accepted. That fall, Lug got to travel again. I rented a pick up truck and trailer one more time and Lug was ready for 2 more little trips.
It was good to present the robot in my hometown. Many people at Quebec City Comiccon had seen the robot’s making of online. On the other hand, as I thought, most of the attendees at the toy fair had never heard of cosplay. It was definitely not my crowd. But the robot was a huge hit with the kids and it gave me the opportunity to explain what I was doing in my workshop as a locally unknown, yet internationally renowned costumer and prop maker. Anyway, Lug was the big star. :)
After these 2 unexpected events where I had the chance to present Lug, the robot quietly waited in the workshop to be sanded. I was used to see it in my workshop. It was part of the place. It was winter now. And I waited after Christmas to finally start working on Lug again.
On January 2016, my friend and I undertook to finish what we had started the year before. I felt like this robot would haunt me forever. I loved it and hated it at the same time. And we started sanding the robot’s calves and knees. ‘We’re really doing it’ I thought. ‘We’re gonna have to paint it all over again.’ :(

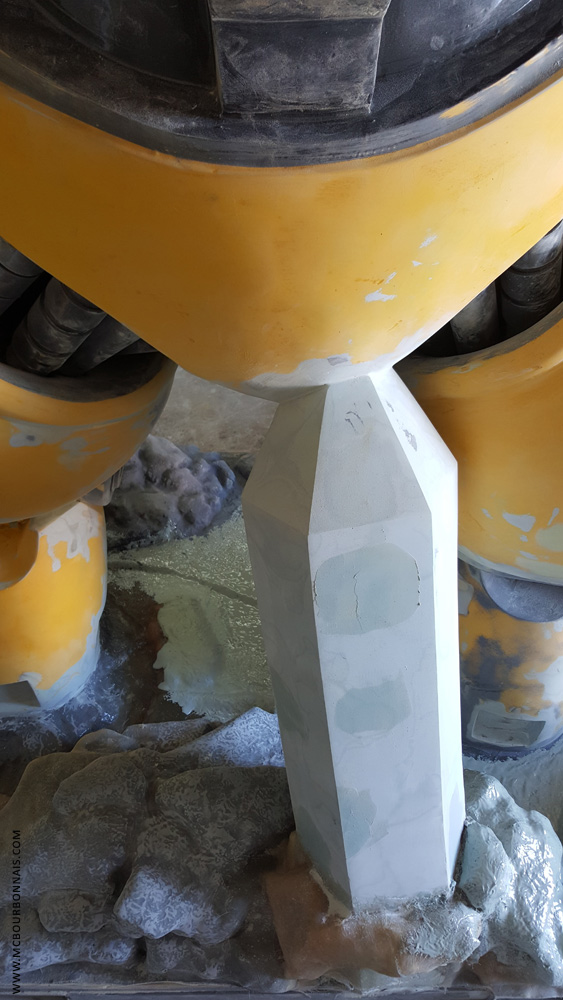
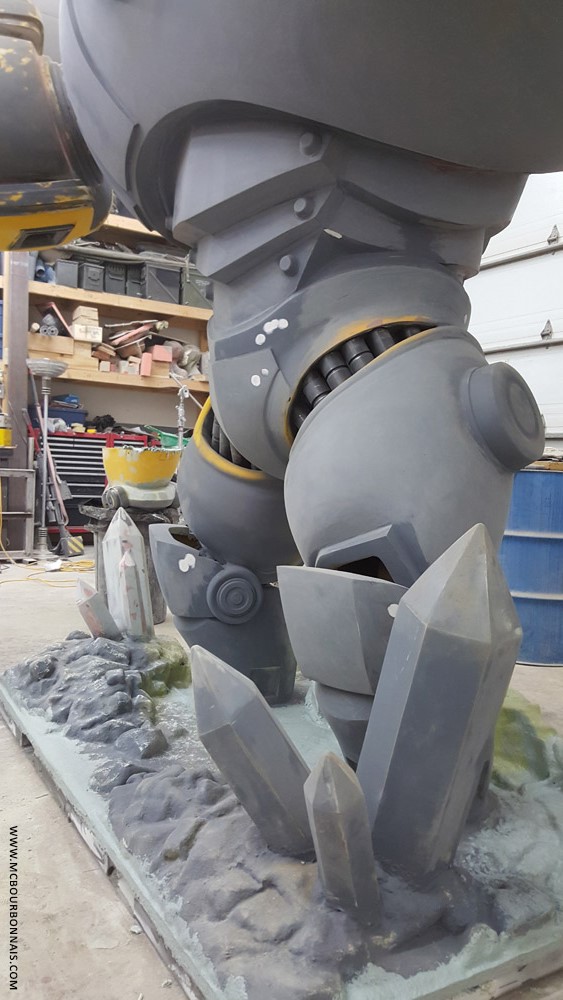
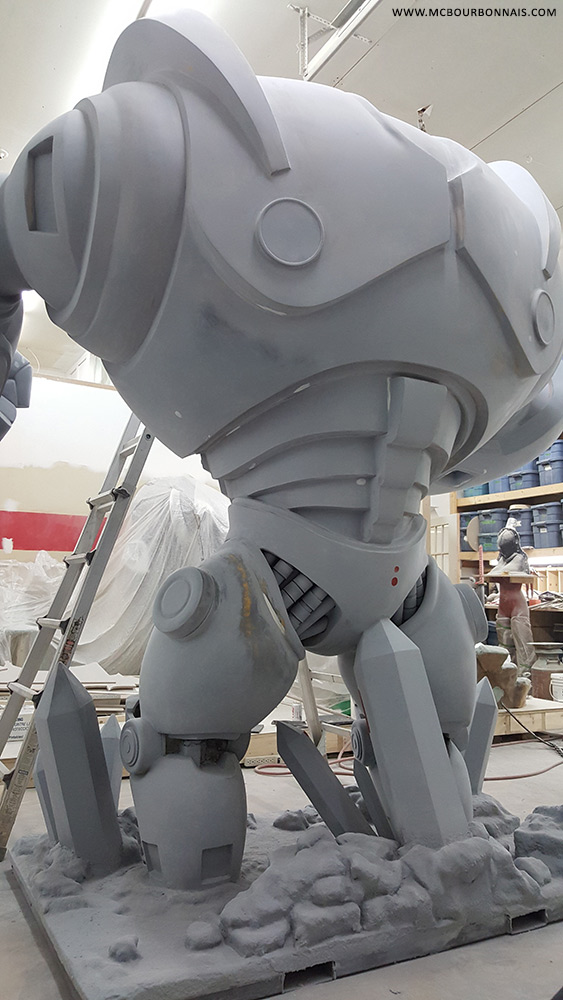
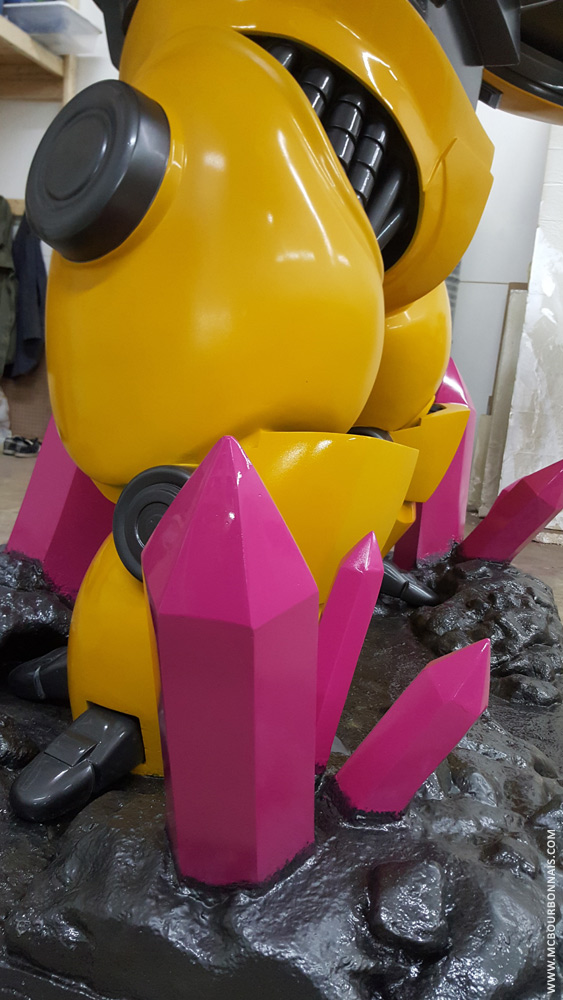
We also started building the base. Our original idea was to build decorative crystals to hide that metallic tubing coming out from the robot’s butt, that extra tubing welded to the robot’s structure and the base that we added to make sure the robot would be well balanced and stable. That’s the major thing we didn’t have the time to complete before Gen Con 2015. We made styrene shapes that we covered with fiberglass, just like we did for all the rest of the robot. We covered the rest of the base with ‘rocks’ made of randomly placed styrene pieces and fiberglass mat. That part wasn’t too complicated. It was even almost relaxing to do.
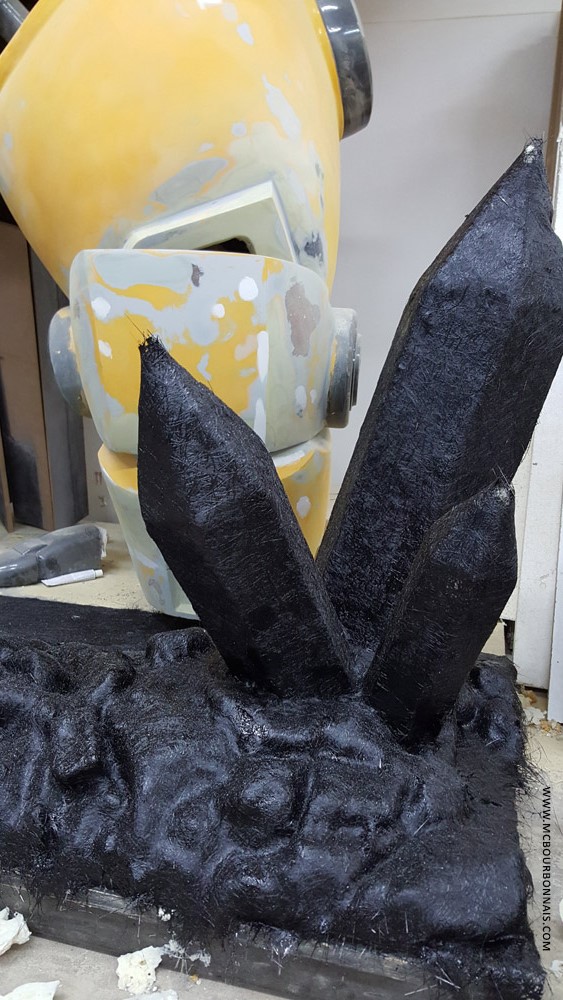
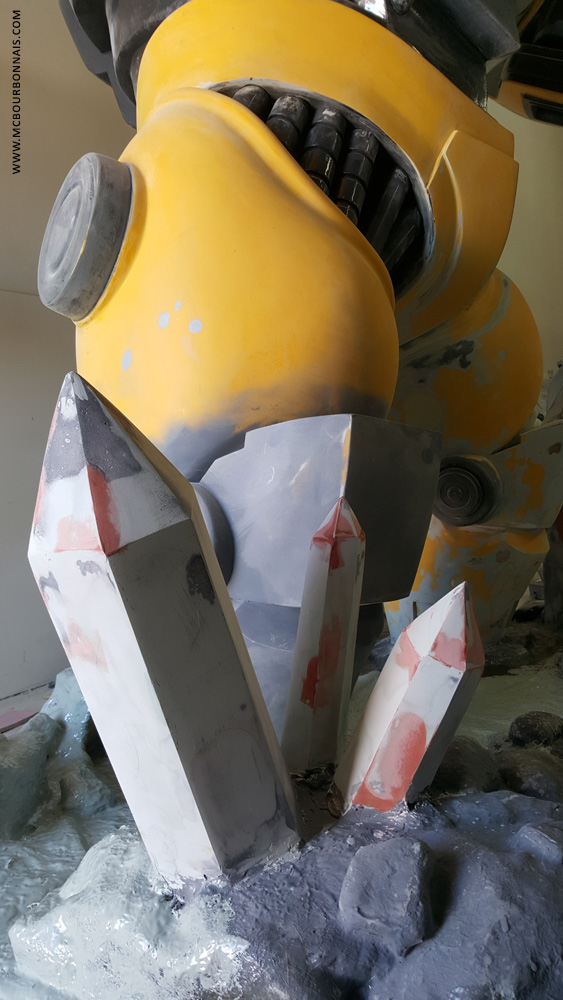
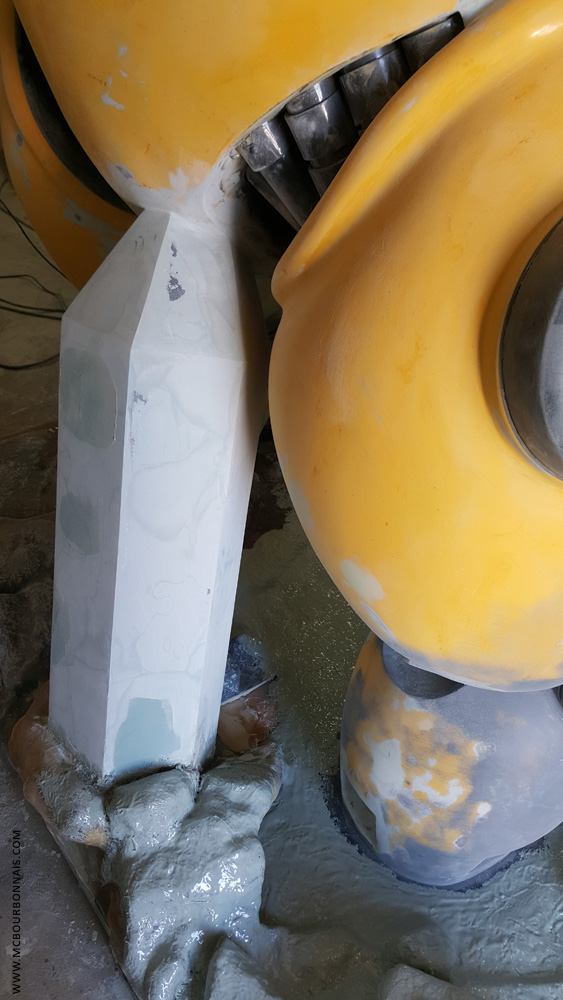
And we covered the whole thing with a mix of polyester resin and body filler that we applied with a brush. The crystals, on the other hand, were a lot of work. These sharp shapes required a lot of sanding.
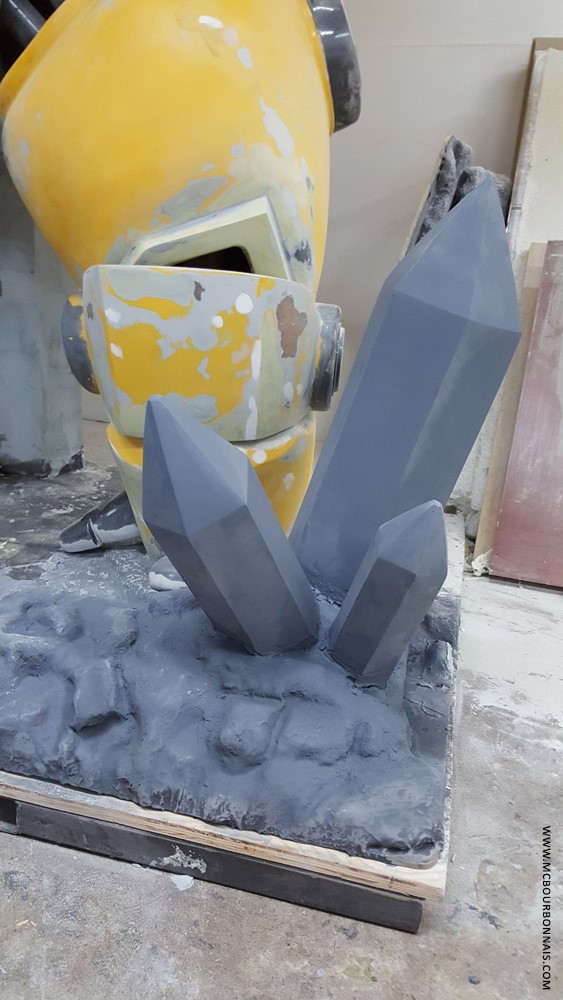
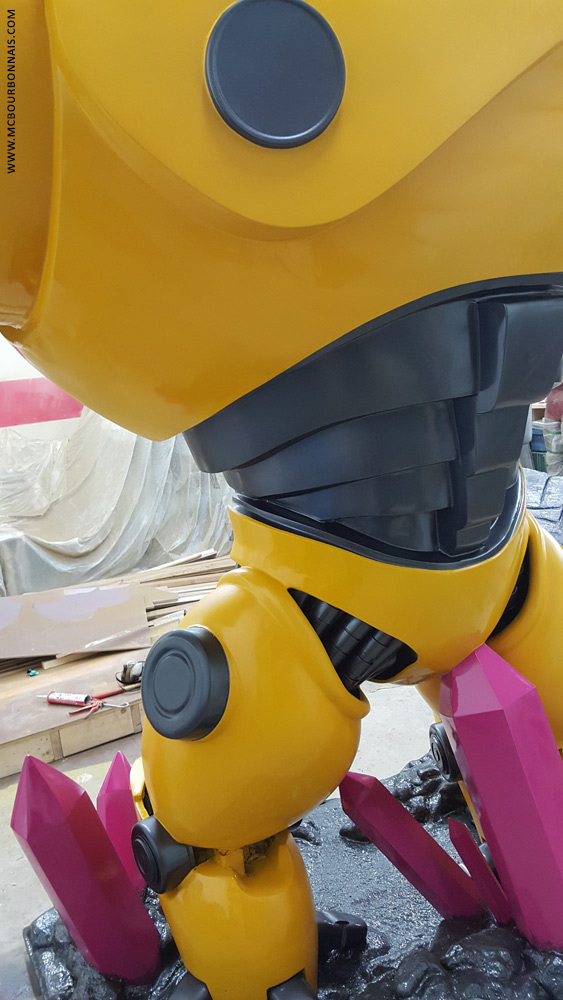
Here’s a view of all the crystals from different angles. We really wanted the base to look like a miniature’s base that someone would have decorated. But life size. :) Notice the big crystal in the back, how it hides the metallic tubing coming out from the robot’s butt. I sanded that joint a lot.
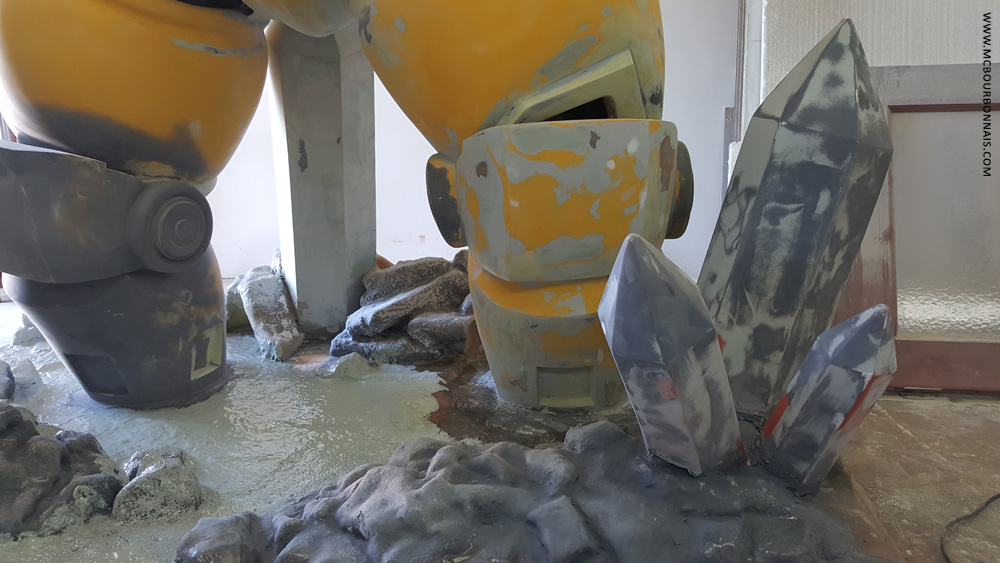

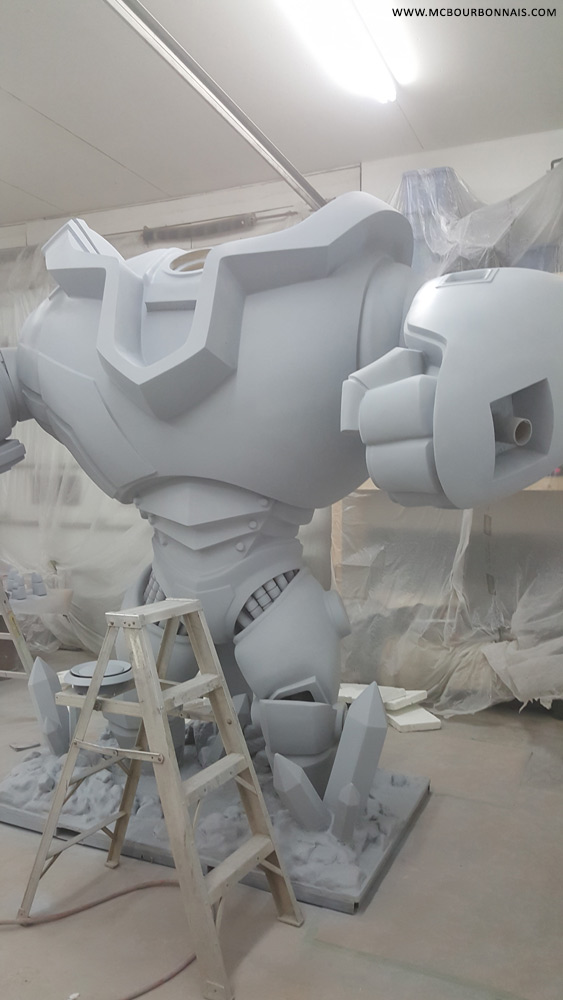
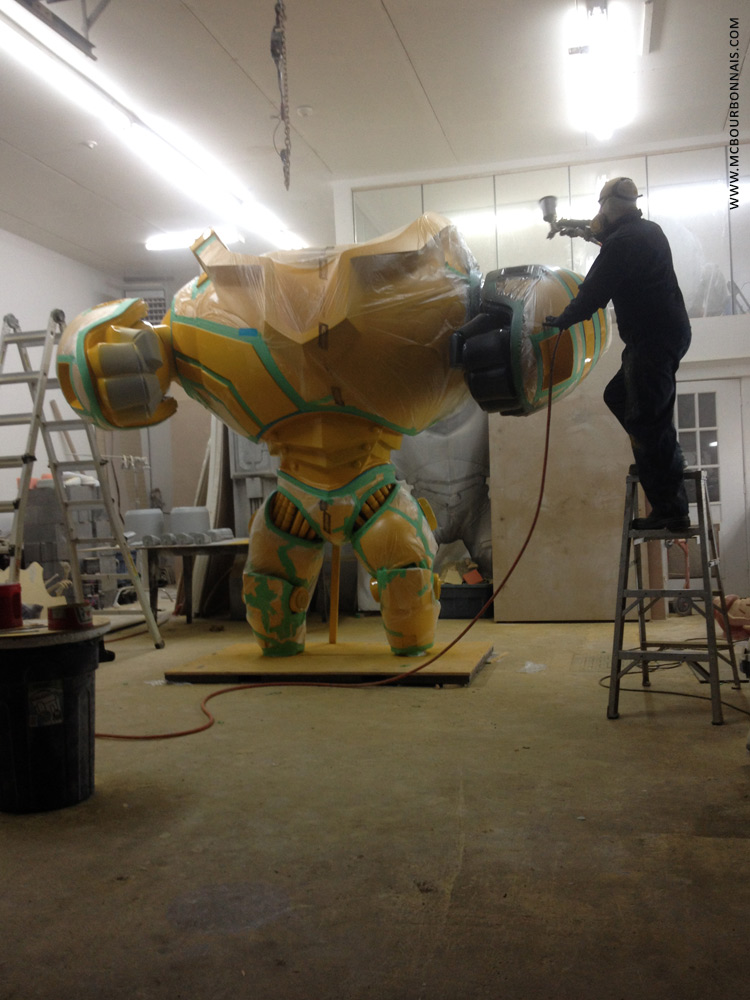
Since we were about to paint all the robot, we also sanded more all the rest of the robot: its big arms and hands, its head, pretty much every remaining defect or flaw. We had to slightly sand all the ‘old’ paint anyway before covering the whole thing with primer and start painting all over again.

Notice how I covered the walls and everything in my workshop with these plastic sheets. My workshop was never meant to do such a big paint job. I had no idea that I would build a giant fiberglass statue one day. I don’t have a paint room like in a garage. I would have needed a paint room for a truck to paint the robot. And since it’s cold in January in Quebec, we couldn’t work with the garage door open. -20 or -30 Celsius isn’t a good temperature to paint… :S So we had to work with the garage door closed knowing that there would be paint fumes everywhere. This was certainly not an ideal situation, but I had no other option. So I used the plastic sheets to protect everything from paint fumes. Note: this was before I remodeled my workshop. It doesn’t look like this anymore.
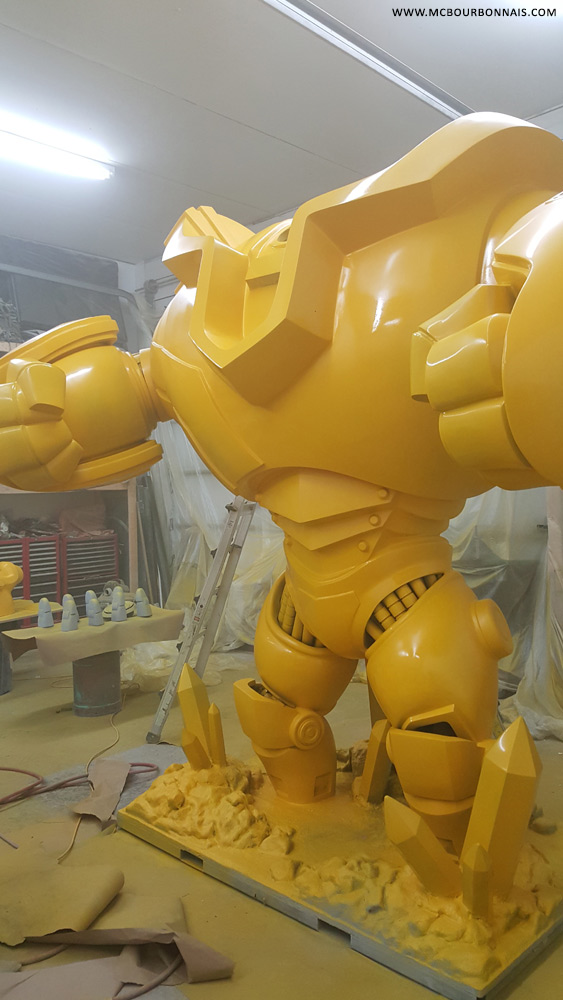
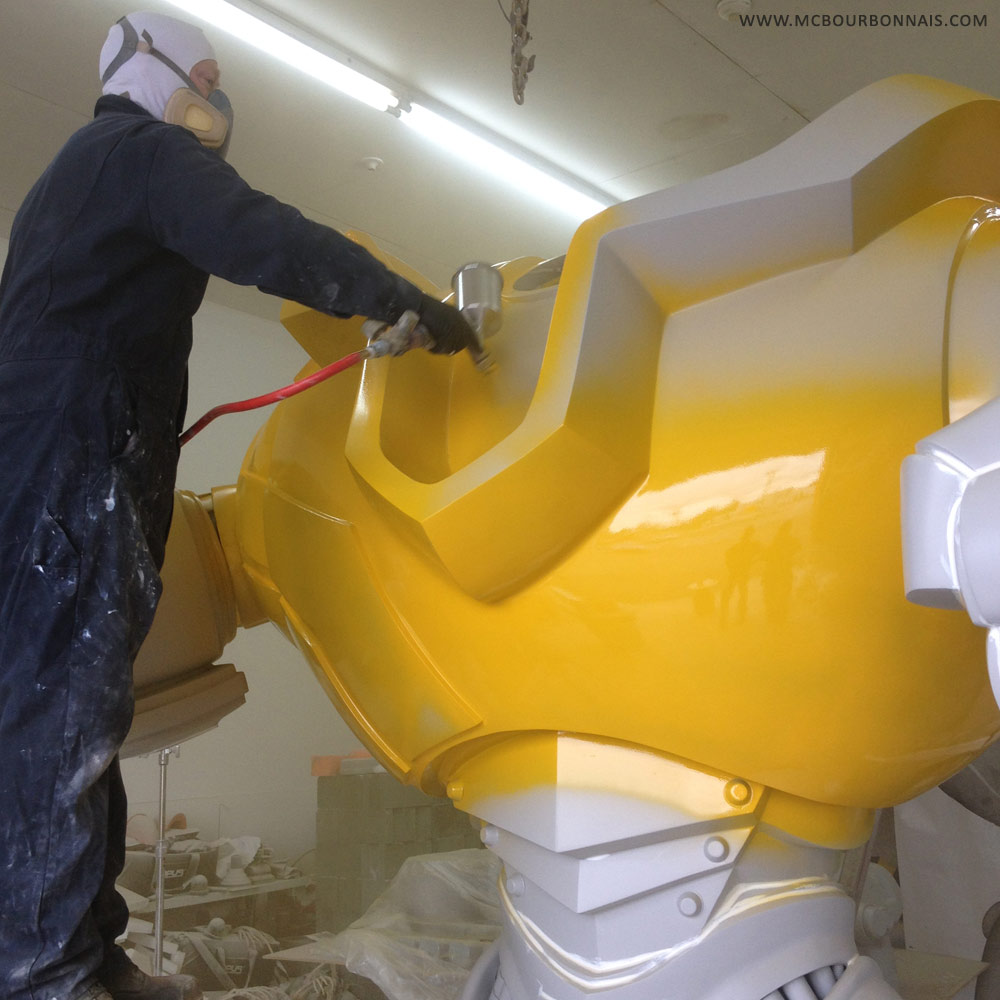
We made the primer first, then a coat of yellow that was applied everywhere. That was the ‘easy’ part.
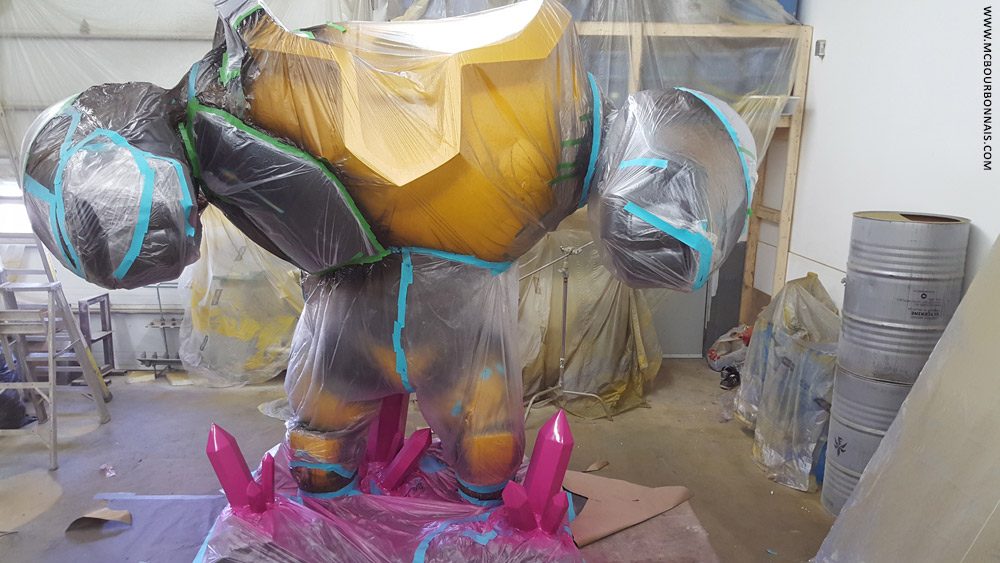
Then I did all the masking steps by myself. My friend said he wasn’t patient enough to do this. The first time, before Gen Con, my family and friends made most of the masking steps while I was sleeping (for the first time in a few days…) But this time, I made it alone. I learned that when they do touch up on a car, they entirely cover the car with this super wide plastic sheet, then pierce a hole in the plastic to access the piece of the car that has to be painted while the rest will be protected by the plastic.
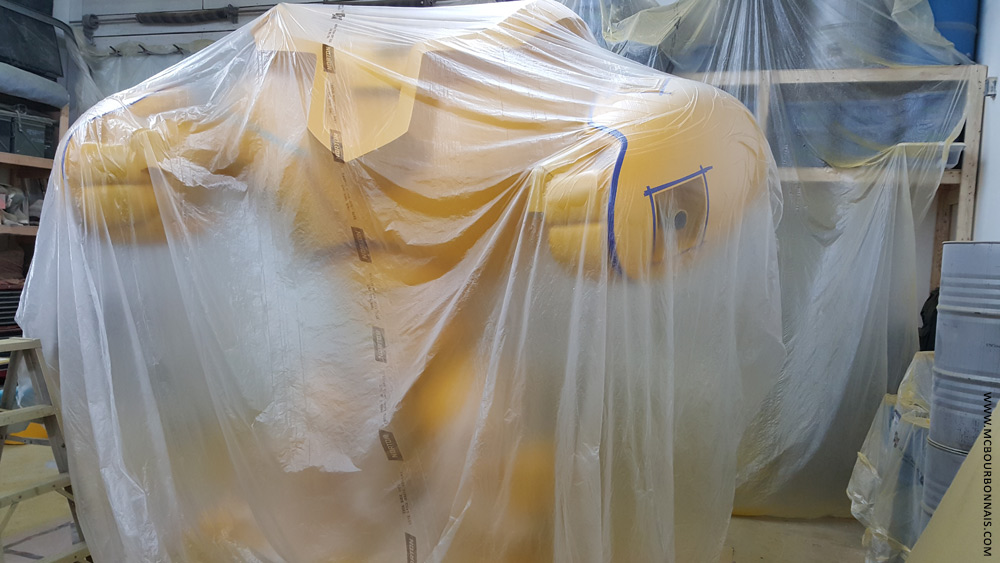
Then you use special rubber masking tape to hold the plastic sheet in place around the piece that will be painted. Don’t try to use the cheaper paper masking tape that we use to make the edges of a ceiling or to protect the edges of the floor when we paint a room. I know (because I tried it) that paper masking tape doesn’t make clean contours when you use it with automotive paint, while that special rubber masking tape gives perfect, super clean lines.
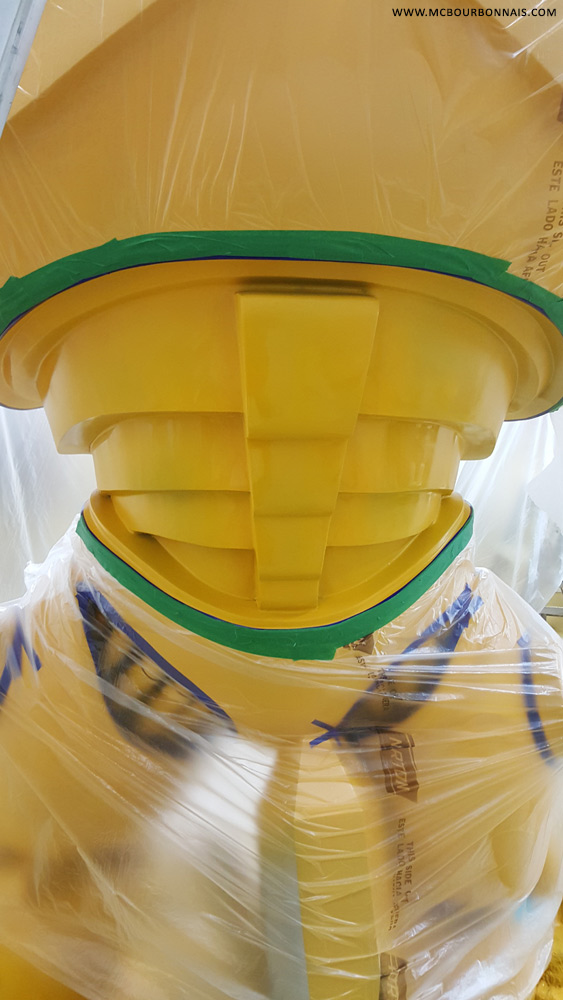
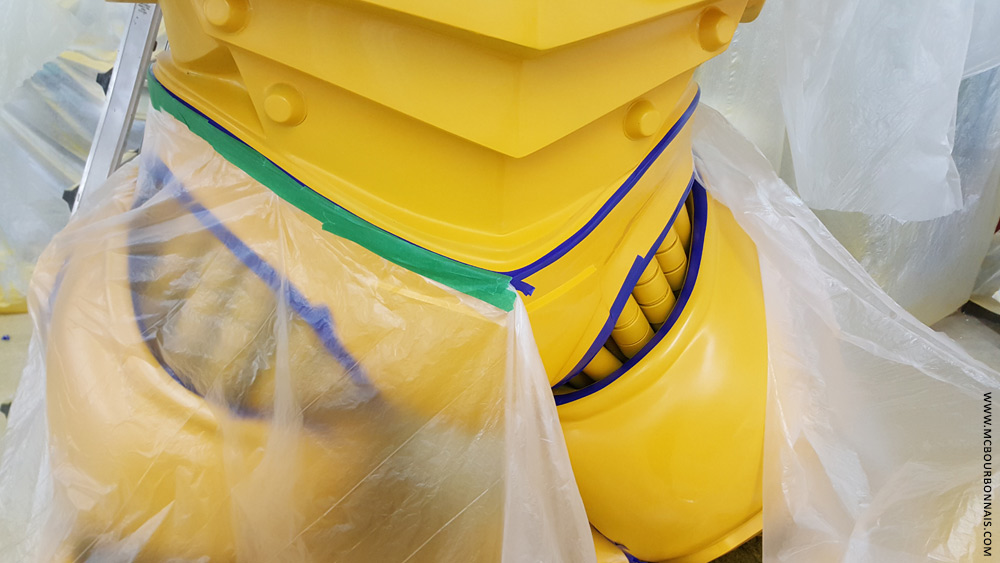
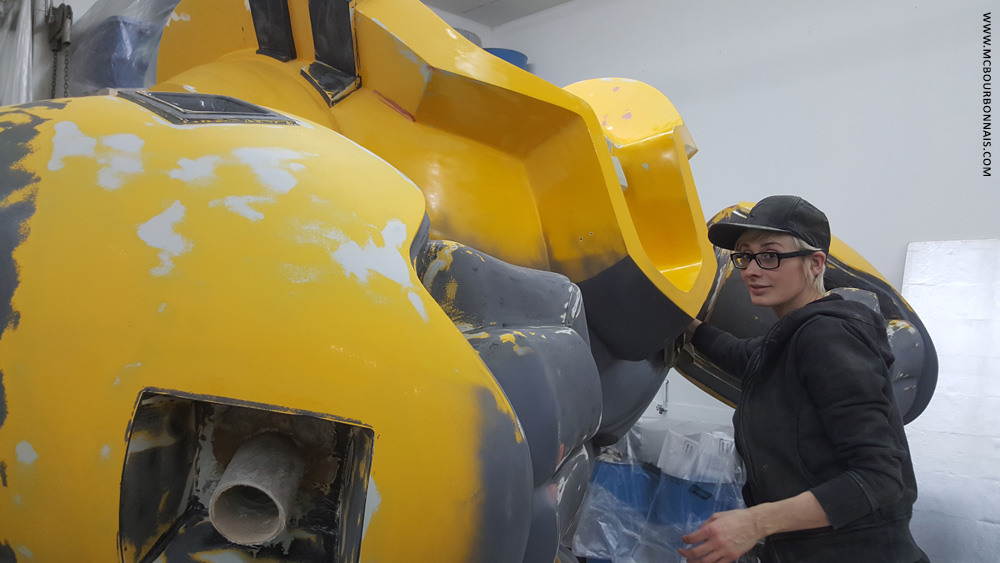
So to draw the patterns on the robot’s arms and all the countours of the parts that would be painted in dark gray, I used directly on the yellow paint that blue rubber masking tape. Since it’s more expensive, I used the cheaper green paper masking tape to glue the plastic sheet on the rubber masking tape. It’s not the plastic sheet itself that touches the paint, it has to be the rubber masking tape. Notice on the pics how the blue rubber masking tape marks out all the contours of the shapes or pieces that will be painted in dark gray, while the green paper masking tape only holds the plastic sheets on the blue tape. There’s always a fine blue line coming out from the green tape. It’s the blue tape that draws the contours. It took me about 4 or 5 hours to do that masking job. I had never done anything like that in my life. My only ‘masking experience’ was the small fiberglass Candy costume I had made for Soda Pop Miniatures years ago. And I thought it was complicated! lol I was very proud when the robot was finally ready to be painted in dark gray. :D


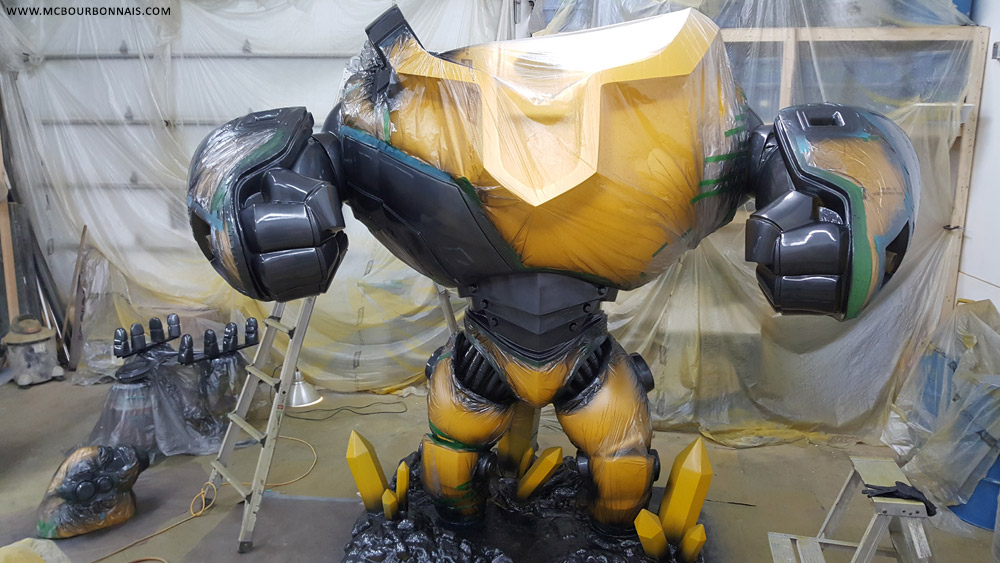
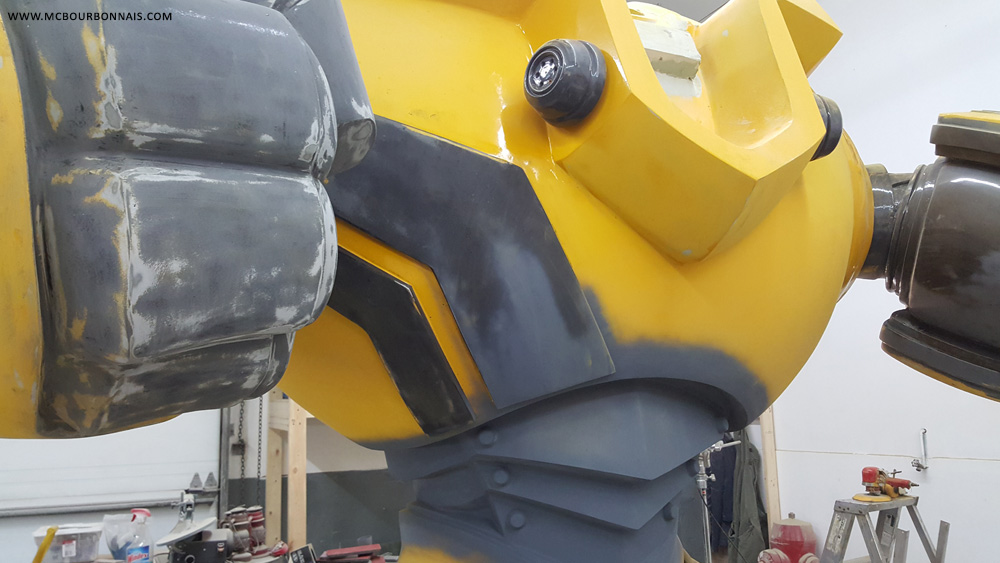
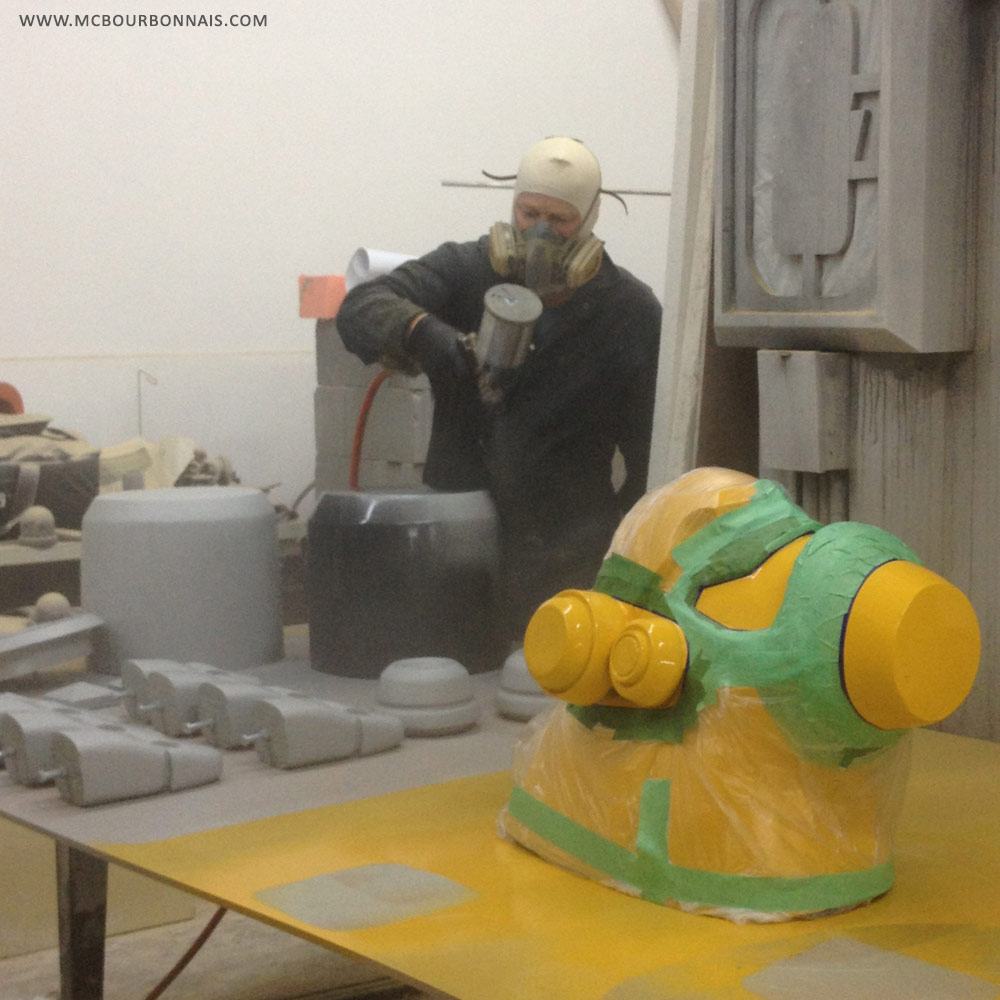
Then I covered all the dark gray parts and let only the large stripe on the robot’s torso and the crystals showing. The crystals were painted in hot pink because we thought it would be a nice contrast with the yellow and the stripe on the robot’s torso was painted in black according to the original design.
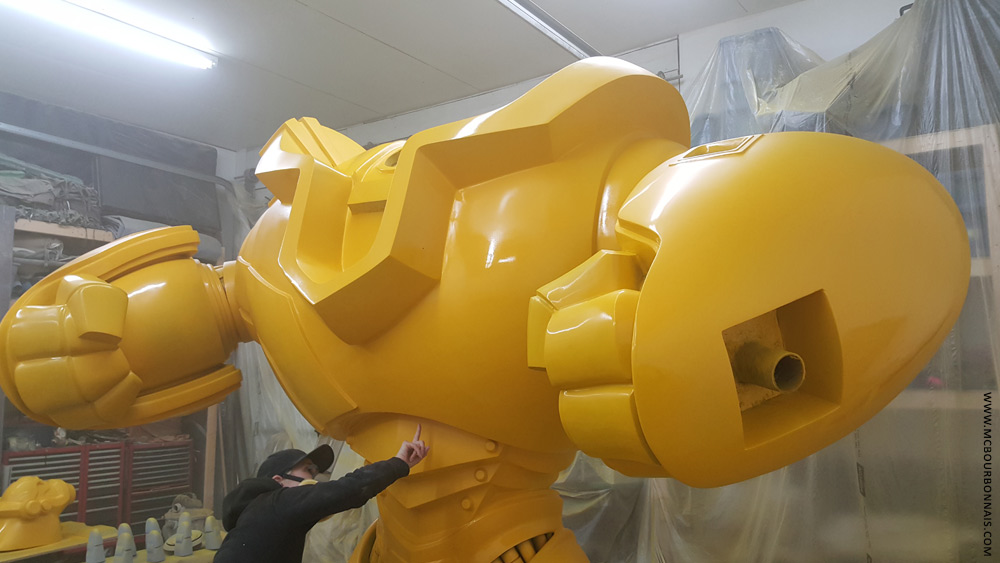
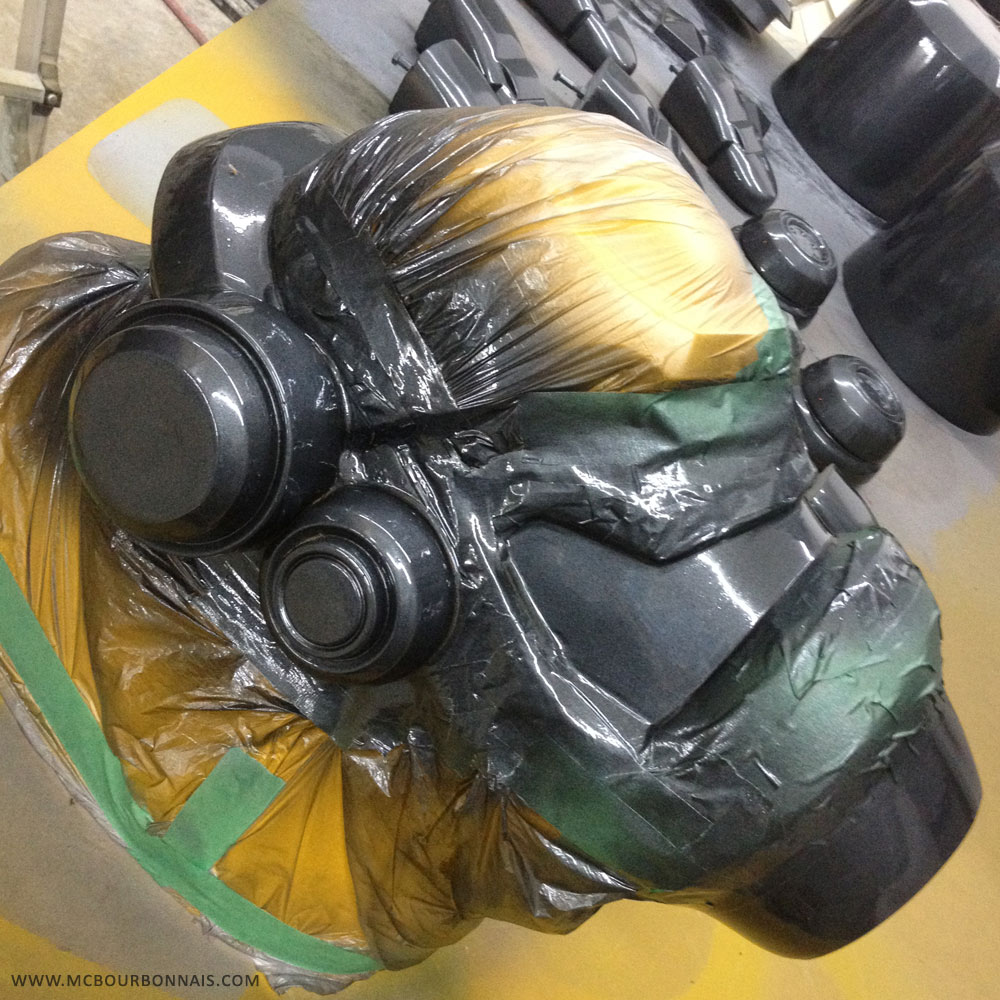
Finally I removed all the masking tape and all the plastic sheets. It’s kind of a stressful step because I was afraid that there could be a little hole somewhere in the plastic that would have allowed the paint to go through and to make a stain. But there was no hole. :)
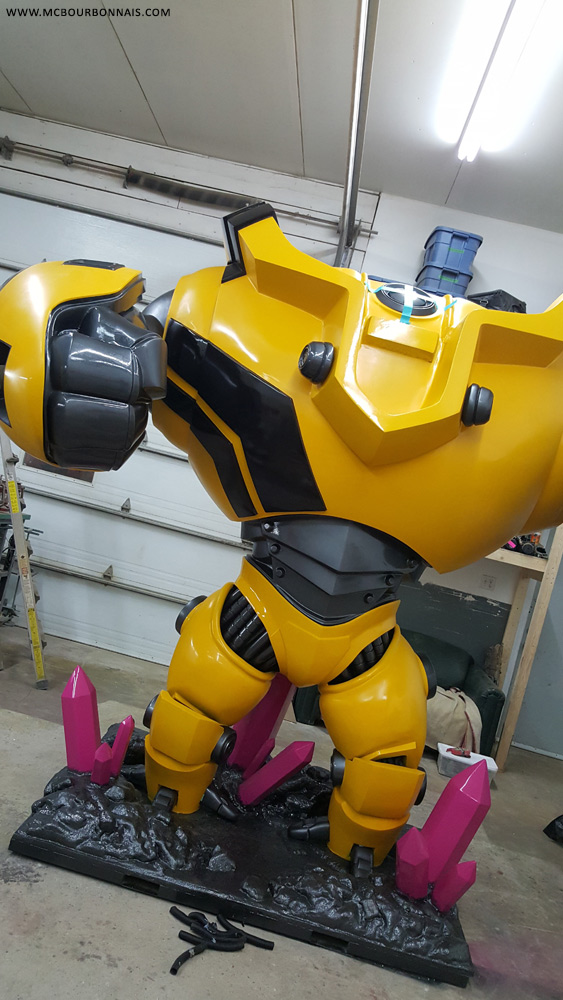
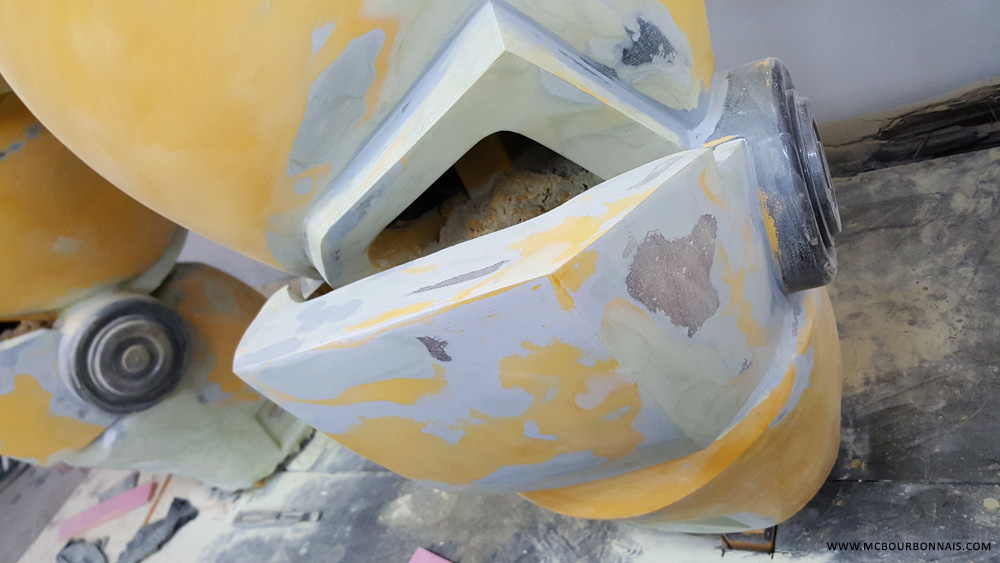
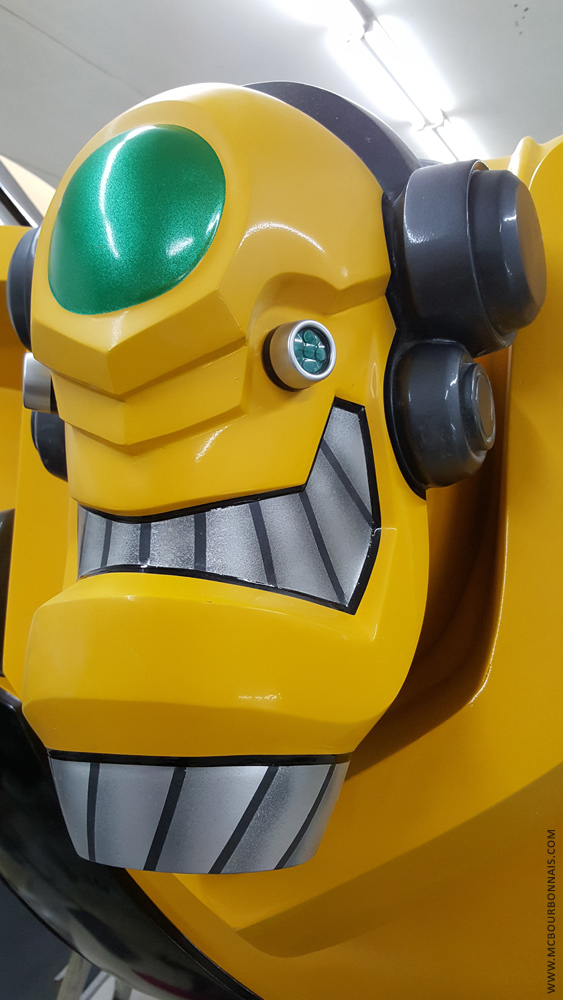
I finished the latest details on the head, masking the pattern on the mouth and chin and painted it in sliver. We made nice looking little turquoise eyes, way more beautiful than the body filler buttons I had made in the hotel room before Gen Con! lol

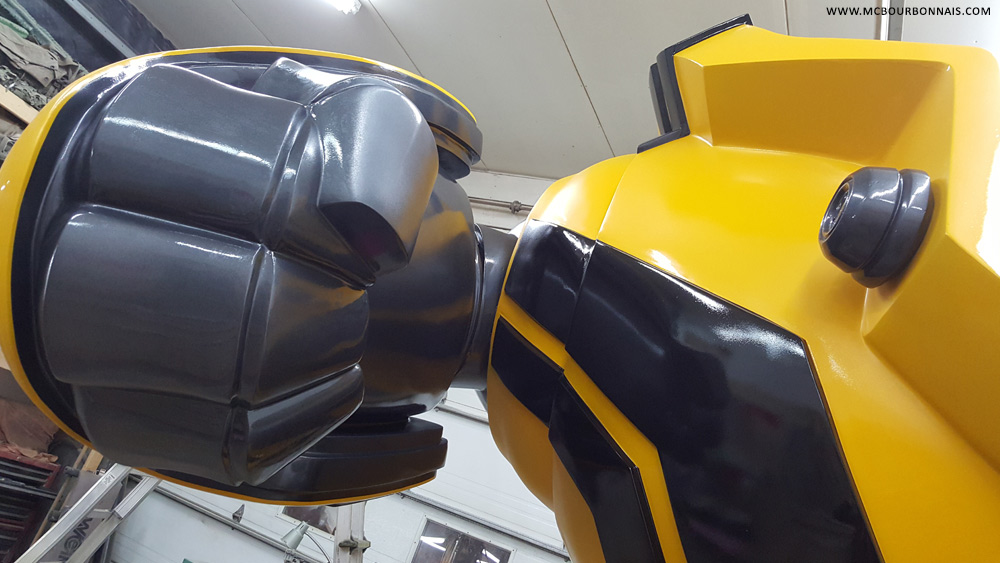
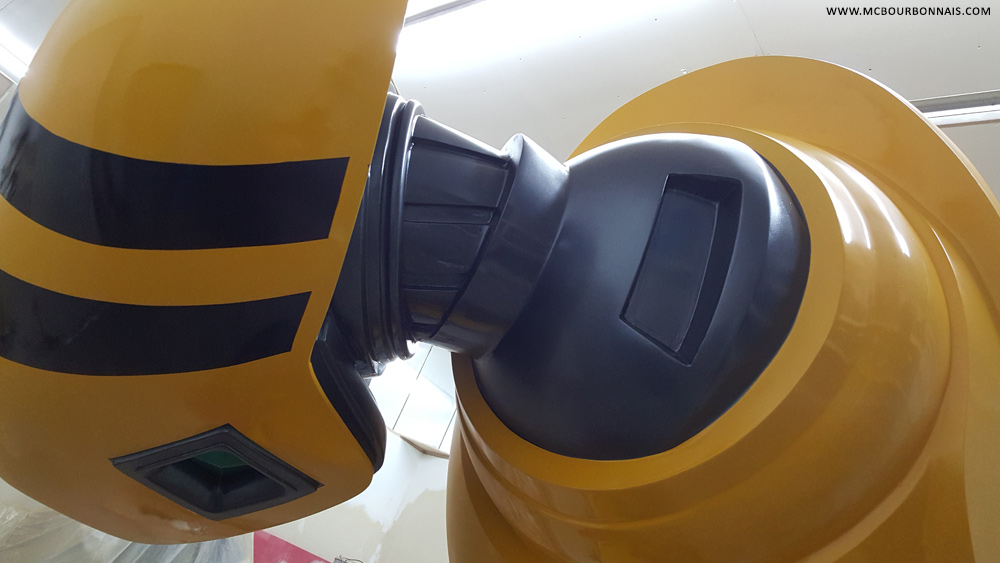
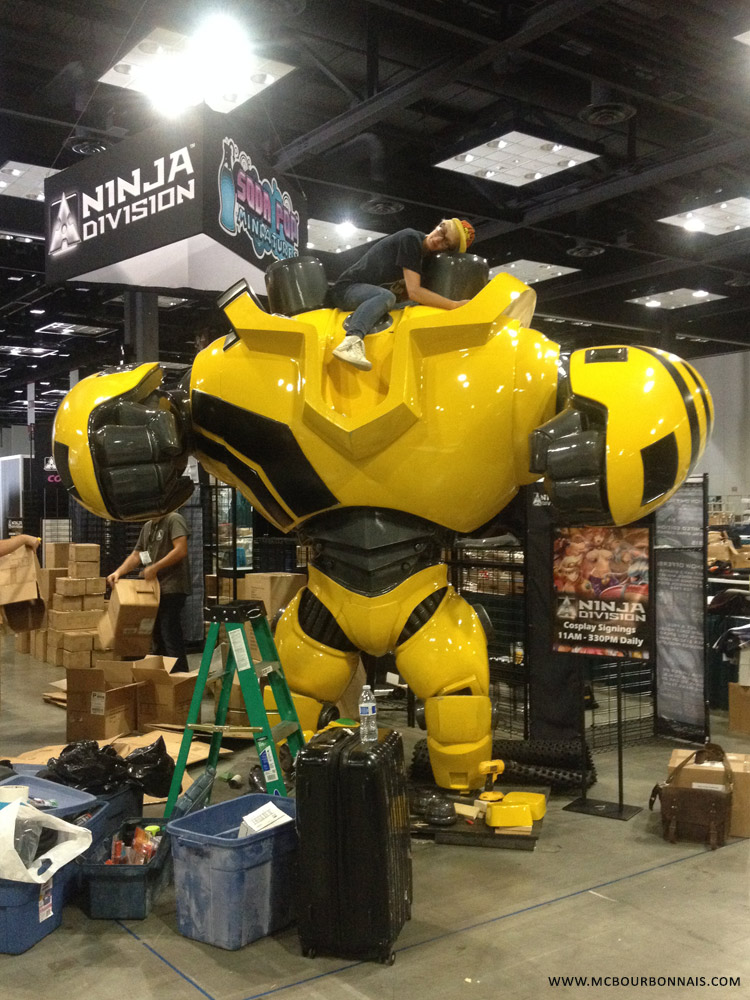
And finally! Here are some closeups of the finished robot!!!


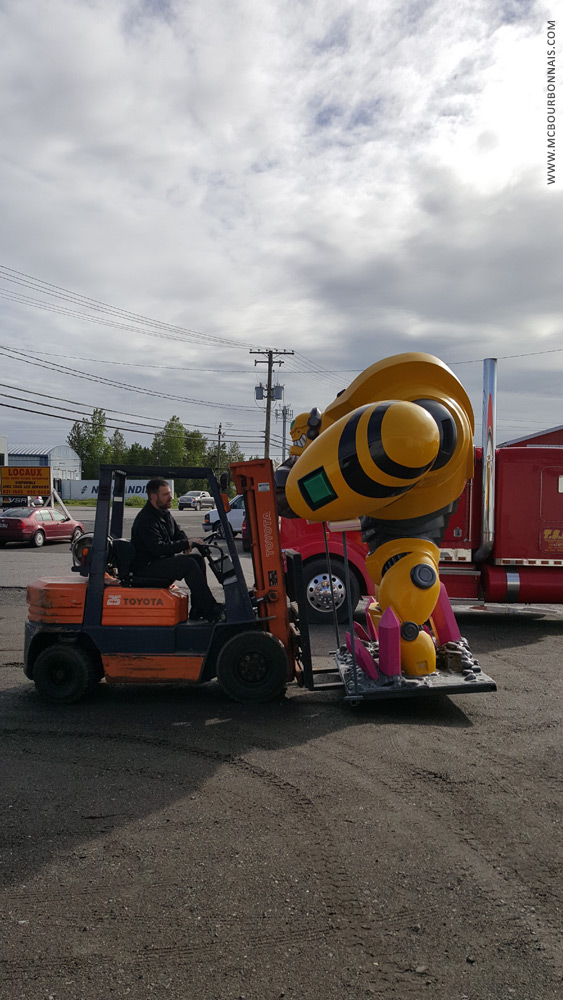
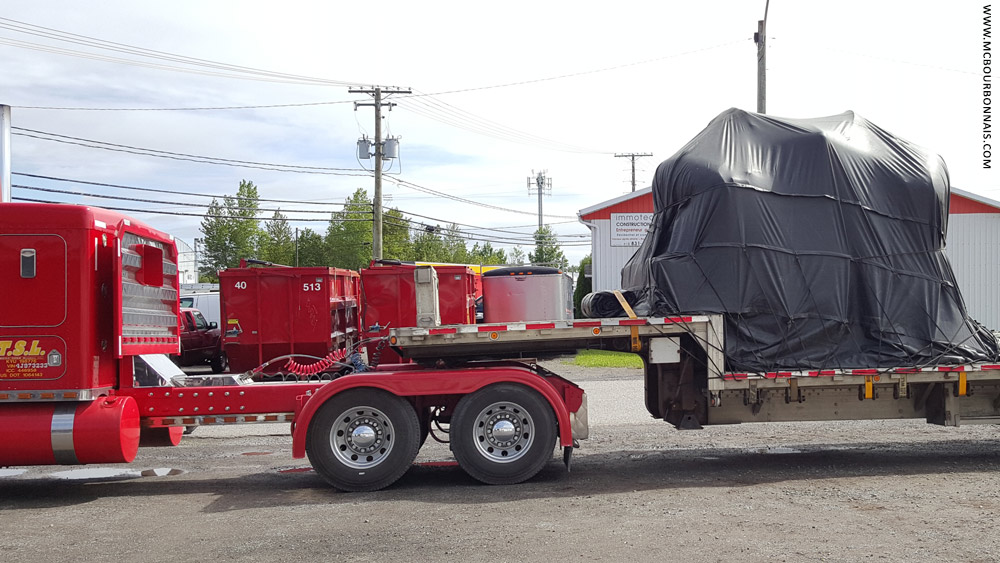
Lug was ready to leave the workshop. Its 8 toes and the big cylinders that go on its shoulders were in a box. The toes had to be painted separately anyway, so we made them with a magnet in each of them. Lug was brought with its luggage on a truck that would bring it to the USA. I took one last picture before we covered it with moving blankets to protect the paint during transportation. It’s the last time I saw it in real… Goodbye, robot!

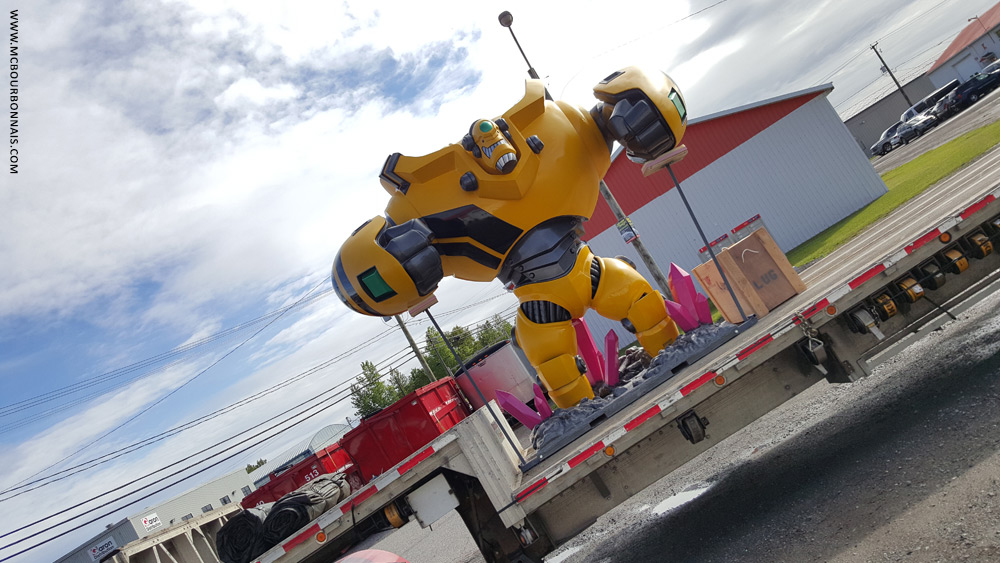

Then I found online that picture of Lug in a convention. :D

Lug is the property of Ninja Division. The company stores it somewhere… and hopefuly they will bring it to other conventions in the future. :)
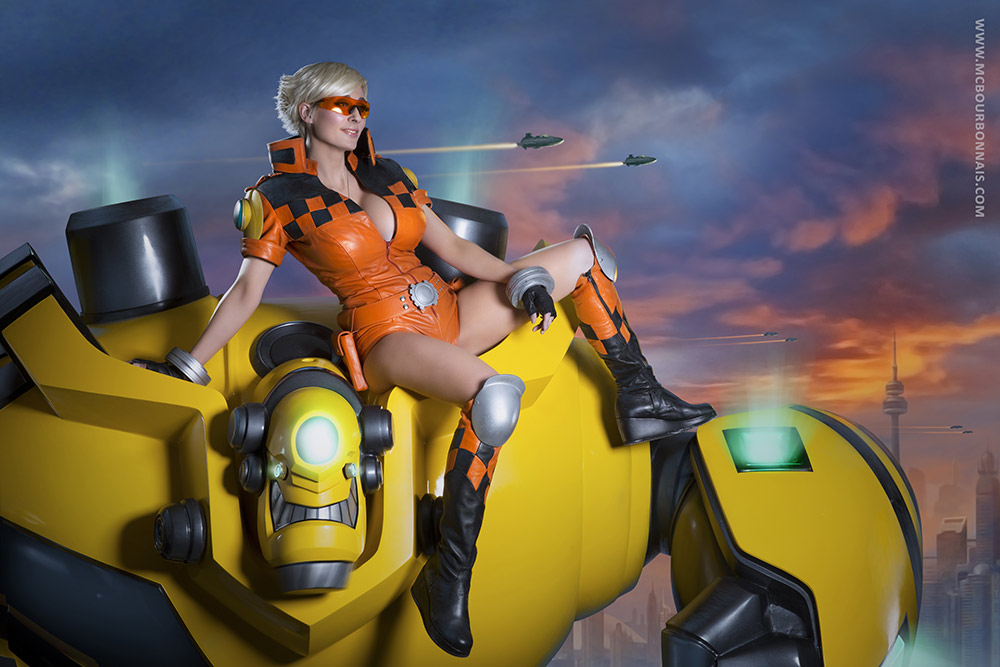
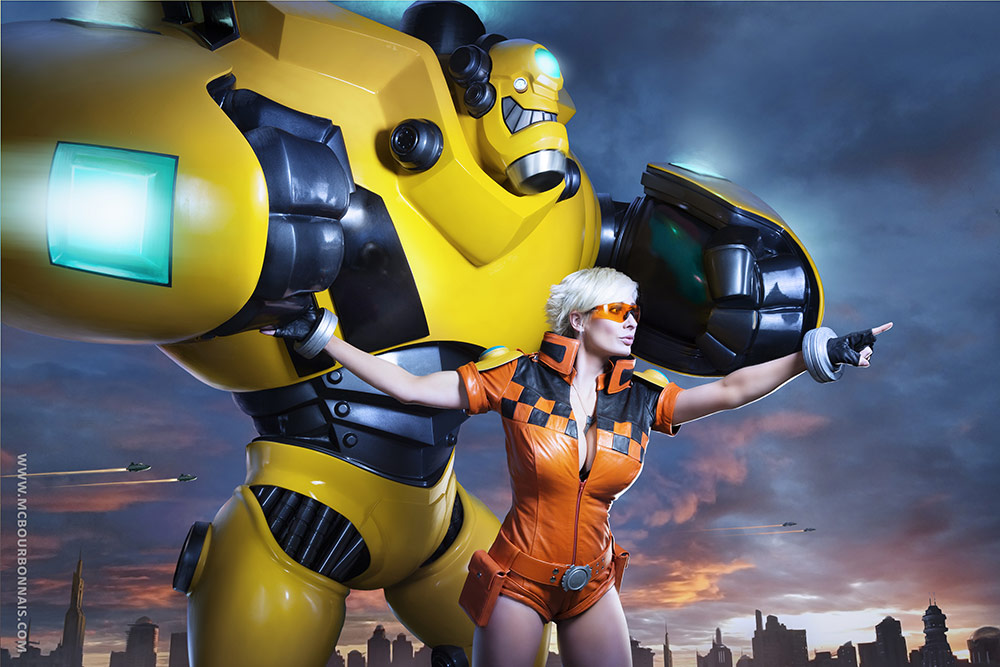
To add to the story, like if it wasn’t incredible already, I almost missed my chance to have a photoshoot organized with the robot. In 2016, I was a guest for a convention in Chile and I came back from Chile on the day before the departure of Lug for the USA. I was able to convince a photographer friend of mine to do a photoshoot in the middle of the night, right after my return from Chile. I put my Betty costume on and we did that photoshoot in the workshop. A French Canadian artist named Donald Caron retouched and integrated a background behind the robot and I to give me these 2 beautiful pictures. :) Souvenir from the robot I built…
Now you know all the story behind the making of Lug! If you want to support me, the 2 prints are available on my store:
Hope you enjoyed your reading!

I’ll visit Ontario again next week! :) I’m a cosplay guest for CAPE (Cornwall and Area Pop Event) in Cornwall, April 21-22. Come meet me at the Benson Center. I’m looking forward to seeing your costumes!

I’m received as a cosplay guest for a convention in Qubec City! :D Sorry, guys, this post is in French!
Je serai à Nadeshicon samedi le 7 avril! Je ne peux être là qu’un jour, mais je serai disponible à ma table toute la journée!
Ne manquez par ma conférence après la mascarade, à 20h00. Bienvenue à tous! Je présenterai plusieurs photos de ‘making of’ de projets que j’ai faits dans les dernières années pour expliquer différentes techniques de confection et de fabrication de costumes et accessoires cosplay pour débutants et plus avancés. Préparez vos questions, je répondrai à tout!
Pour plus d’info sur la convention, visitez le site web : www.nadeshicon.ca
It’s sugar shack time in Quebec! A sugar shack, or ‘cabane à sucre’ in French, is kind of a cabin in the middle of a maple tree forest where we harvest maple sap and boil it to make maple syrup. Sugar shacks sometimes have a restaurant section where they serve breakfast and brunch meals featuring a lot of maple syrup and some maple products.
I’m super excited to unveil my new Aimsee & Keira collectibles: the Maple Syrup Special Edition Standees! Here’s Aimsee dressed up as a little beaver who’s serving maple syrup pancakes and Keira dressed up as a cute polar bear with her maple leaf shaped maple syrup lollipop.
Order your standees now! www.store.mcbourbonnais.com
Acrylic Standee’s height: 2.5 inches – Base diameter: 1.5 inch
Artwork by Pop-Lee, Instagram: @popleeart
If you remember the custom Sugar Shack Themed Dakimakura I unveiled a few years ago… Now that you know what a sugar shack is, you’ll understand better all the delicious details from this artwork. ;) Art by Art of Jaguar. Dakimakura (5 feet long body pillow case) available on www.store.mcbourbonnais.com

I started 2018 working on a ‘secret non cosplay costume project.’ 2 months where I couldn’t talk about what I was doing because I signed a non disclosure agreement. I built 3 costumes and different props for a 4th character that didn’t need a costume, I did 4 photoshoots and I couldn’t share any picture, any tiny preview, I wasn’t allowed to give any little clue. I’ll be allowed to talk about this project and promote it only once it will be unveiled by the company that hired me.
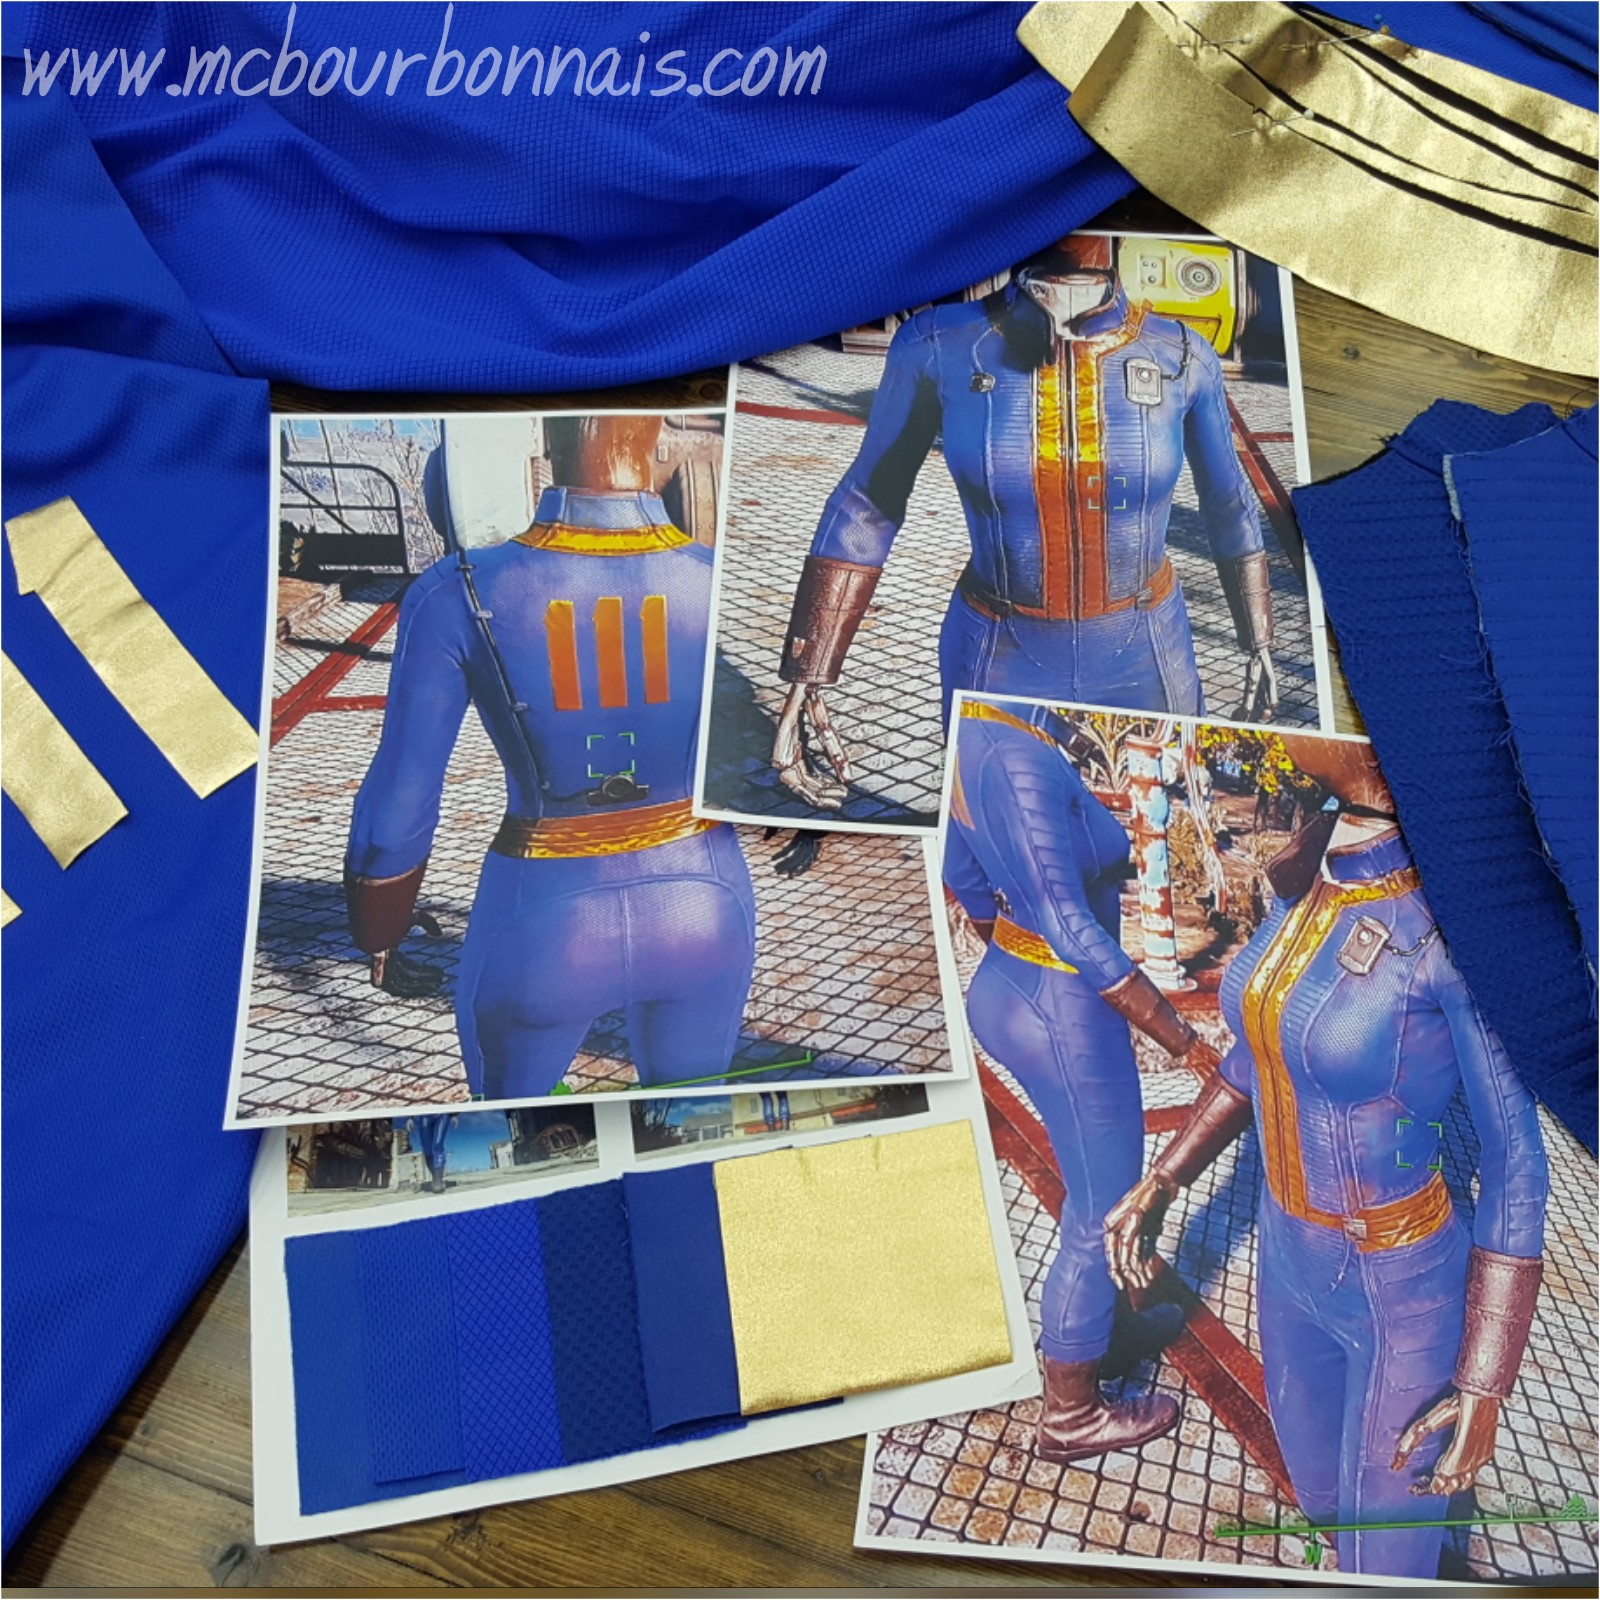
But finally, this project is over! And I can move on to a cosplay project I’ve started a long time ago. I’m very excited to announce that my next cosplay will be a Fallout 4 Vault suit with different props, including a Pip-Boy that was 3D modeled by Dutch Props, the same 3D modeler who made my Scorpion mask. Dutch Props on Instagram: @dutchprops
Even though I love video games’ designs, you know I’m not a good gamer… Sorry! lol I can never play for a long time because I get killed all the time! lol But I have a lot of gamer friends and one of my friends is a huge Fallout 4 fan. I spent an infinite amount of hours watching him play to have a good idea of the game’s environment, the backgrounds, objects, costumes and armors’ designs. I also got the collectible art book. I love Fallout 4. It’s an interesting mix of designs inspired from the 50s and the 60s, a perfectly well balanced retro futuristic look. The Vault suit is a beginning. I might do more cosplays from Fallout 4 eventually. ;)
Check out my Twitter (@mcbourbonnais1) and Instagram (@marieclaudebourbonnais) for regular updates about this costume. And yes, I’ll write a Making Of Blog for this cosplay, of course!

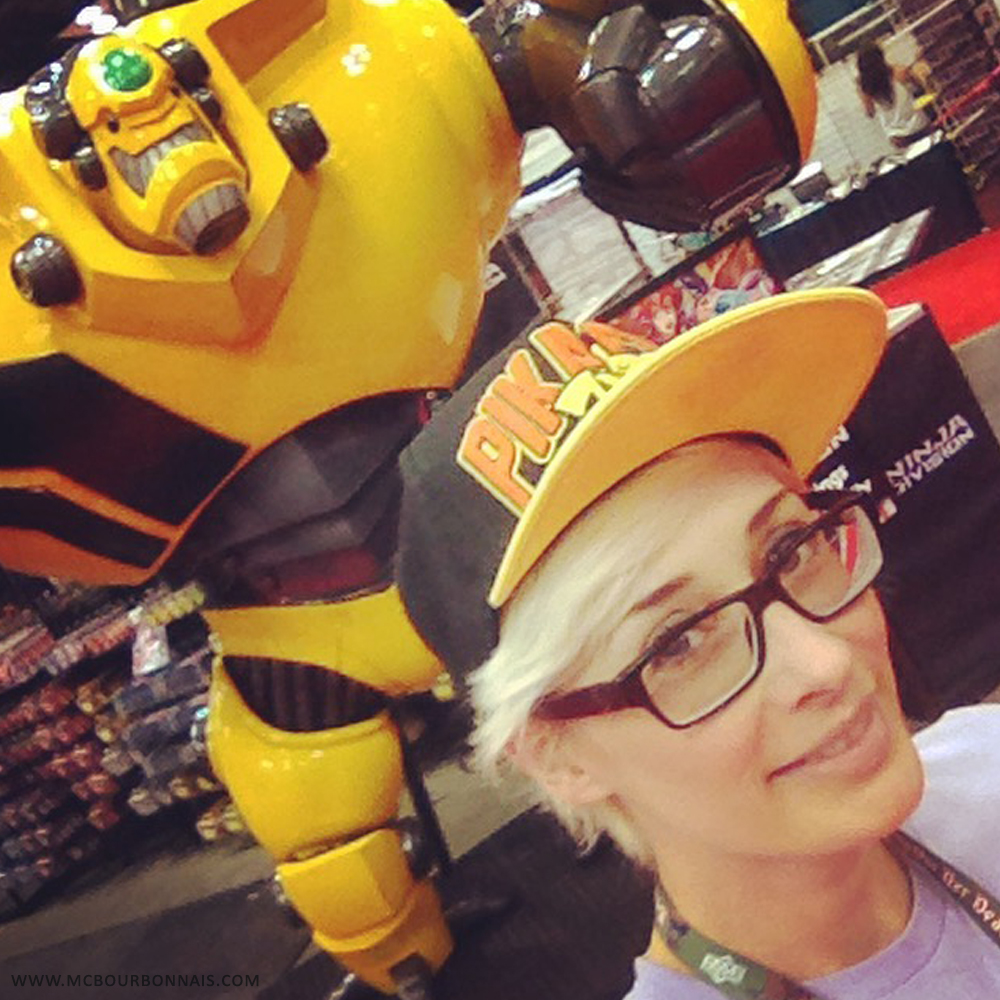
I’ve been so busy in the past weeks and months that I had no time to bleach my hair… and my hair grew until I got back to my natural hair color! :D How do you like me as a brunette? ;)
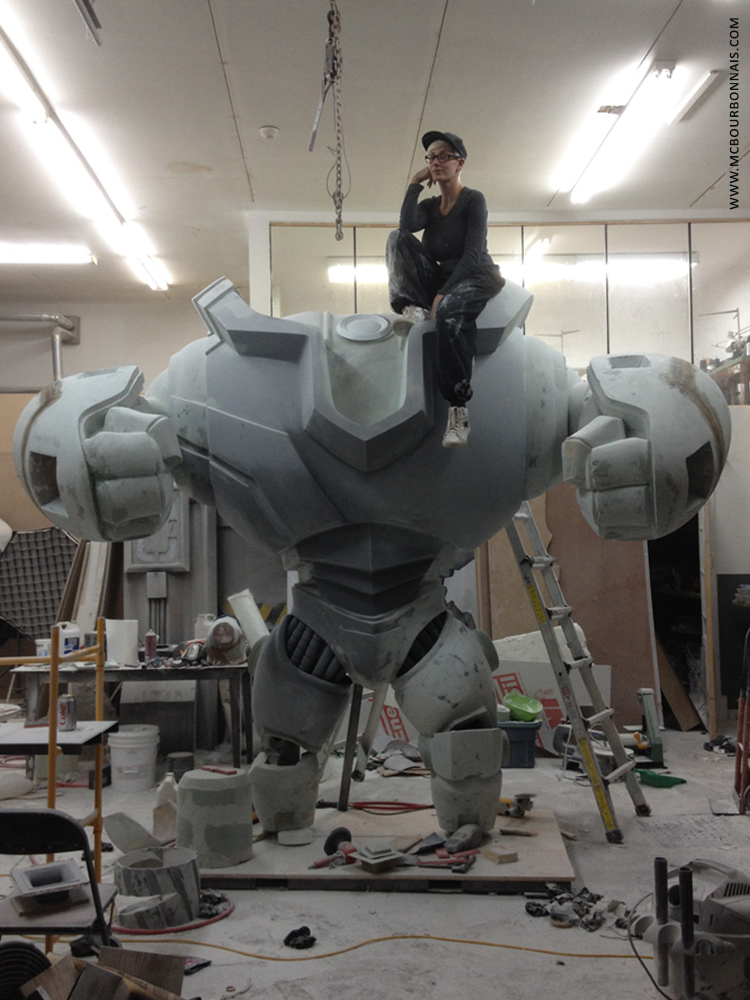
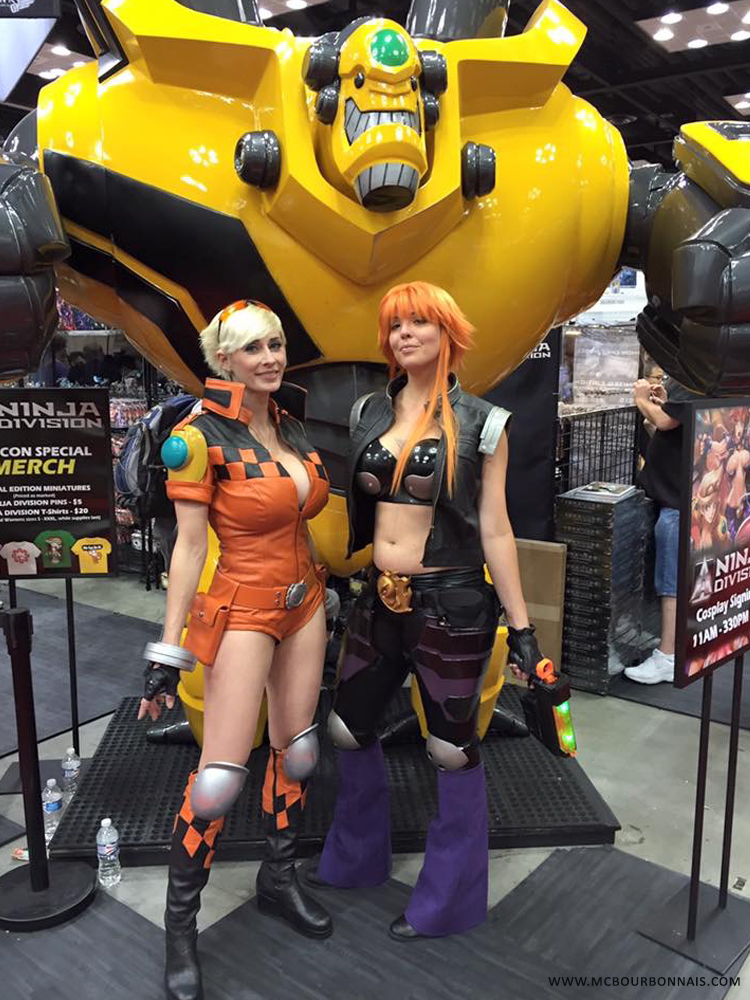
This picture was probably the first real robot’s making of pic I posted on my social medias in 2015. I had not really promoted the making of that project, I had just been focusing on staying calm, not panicking and trying to make it happen. Nobody really knew that I had spent the past months working on such a monster. I think that even the people of Ninja Division had not realized that what we had built was THAT big. But with me sitting on the robot’s shoulder, giving a clear idea of the robot’s proportions, our statue suddenly looked… impressive. I was finally revealing to the world a project at a very advanced step in the building process, without any preview or warning, asking at the last minute for volunteers to help us finish the robot on time for Gen Con.
I know many radio hosts in Quebec City and it was easy for me to talk about the robot and ask for help on the radio. Some friends came to do some sanding for a few hours a day or 2… but it was obviously not enough to truly help. The deadline was close. And we had to deliver Lug for Gen Con, no matter what.
Out of nowhere came an email from a gentleman called Carol. He worked during 16 years in a shop where they were making fiberglass kayaks. He knew how to do finishing sanding. He was already working full time, building his new house all by himself on the side AND he offered his help for the robot. He came to the workshop many times to help us as much as he could. And when we asked him why he had decided to help us since he was already so busy, he said that when he was finishing his house’s roof on December at -20C, a guy he didn’t know offered his help. ‘I felt like it was my turn to help someone now’ he said. Carol was our savior! Each time he would come to the workshop, my friend and I would feel less alone. We still had so much work to do, but at least, we had some help.
Ninja Division really needed to have Lug for Gen Con, even if it would have to be partially completed or not as beautiful as we would have liked it to be. They needed it NO MATTER WHAT. They wanted to have it so much that they offered us the opportunity to present a ‘temporary’ Lug at Gen Con and to bring it back home to finish it to our taste. ‘You realize it means you’ll have to pay for transportation twice. A round trip Quebec – Indianapolis, then another final shipping from Quebec to the USA. And you’ll pay for paint twice’ I said. They wanted to unveil Lug at Gen Con so much that they were willing to pay. My friend is such a demanding artist, he could only accept this opportunity to finish Lug later, even if it was a real sacrifice for him to present the robot at Gen Con while it wouldn’t be ‘perfect.’
The first thing we had to abandon in order to finish Lug on time was the base. Lug wouldn’t have a beautiful decorated base and we would just sand everything that still needed to be sanded as much as we could before painting. 4 days before leaving for Indianapolis, I remember I was falling asleeep while casting 8 fiberglass toes.

My friend’s uncle works in a garage as a professional painter. We had never painted such a big object before. I had used automotive paint for my fiberglass Candy costume, also for Ninja Division, many years ago. But it definitely didn’t compare to the huge task of painting a giant robot. Having a professional doing the paint for us was a release. I was just very sad to think that we would then bring back Lug in our workshop and scrap the beautiful paint that my friend’s uncle would do. But we had no other choice now.
We were sanding and sanding, day and night, but we knew that at some point we would have to stop sanding and just start painting. It was Monday morning, we hadn’t slept in 4 days. At 9am, my friend’s uncle arrived at the workshop. Lug wasn’t properly sanded. There was still bumps of bodyfiller, especially on the robot’s legs. But Gen Con was the following weekend and we had to drive down the robot to Indianapolis. We had to stop. And paint. Now. We stayed at the workshop while my friend’s uncle was applying the base coat, experiencing a strange mix of feelings. I was exhausted and disapointed. I was happy to see though that automotive high coverage primer would fill up some of the latest little holes, hiding some little flaws. Notice the paint fumes everywhere in my poor little workshop that was never meant to become a paint room… At least, it was summer time, so we could work with the garage door open, taking the chance, however, that there might be some dust in the paint.
We should have waited a little longer before applying the coat of yellow paint. But we had no time. We started looking at my friend’s uncle painting the robot in yellow… and we went to get the pick up truck and trailer I had rented to transport Lug to Indianapolis. I wasn’t driving. I was way too tired. I just went to sign the papers. I remember falling asleep in the car while we would bring back the pick up and trailer… and I finally went to bed.
We had choosen urethane car paint that didn’t need a clear coat. This paint is already very shinny and it dries pretty fast. It’s harder to do any retouch though if there’s any paint excess somewhere. I was happy that a professional would be doing the paint step for me… while I would be sleeping.
Painting the robot was like a huge event. Our friends and family were there. Everybody wanted to see the robot leave the workshop for its trip to the USA! When I came back to the workshop after a few hours of sleep, they had already started the masking process to hide the parts of the robot that we would leave yellow and prepare the parts that would be painted in dark gray. Again, it would have been better to wait a little longer before applying the coat of gray paint. But we had no time. As soon as I arrived, I started helping masking the robot so my friend’s uncle could start painting as soon as posisble.
When we left, the robot’s head wasn’t finished either. The yellow and gray were there, but the head had no eyes and no teeth.
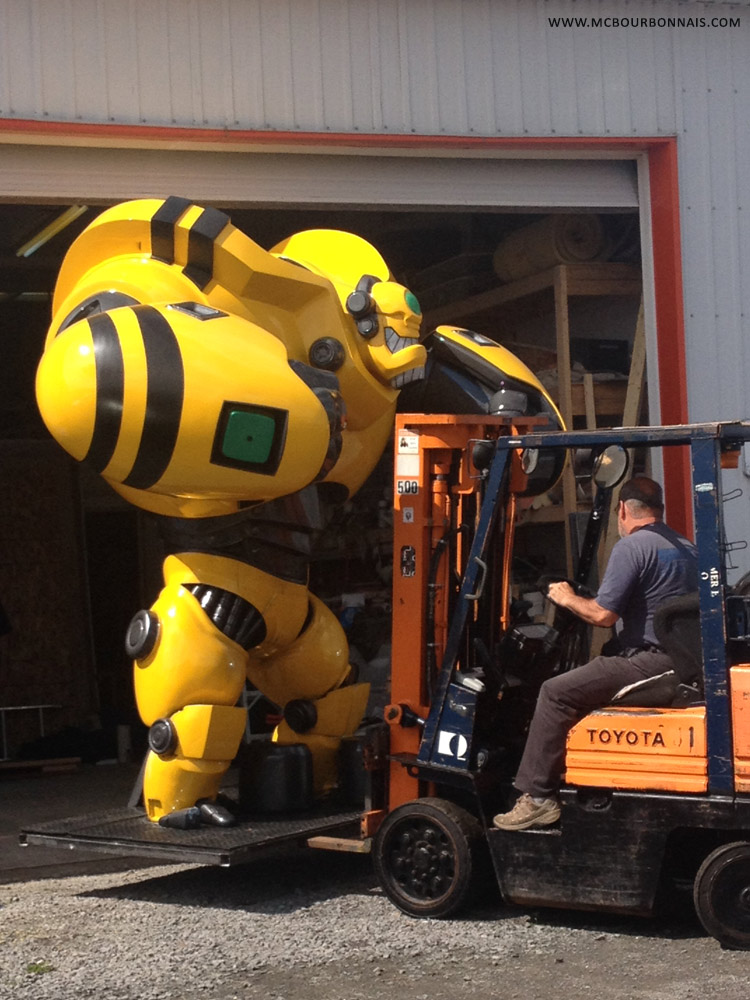
But it was time to go… As soon as we could, we removed all the masking tape and plastic sheets and I called my neighboor. That next step was actually the only simple part of the whole project. My neighboor at the workshop is a garage specialized in forklifts. So I had a forklift next door. :D
So the pick up and trailer were waiting in front of the workshop. Over the trailer was a big box built by my father to protect the robot during transportation. I called my neighboor, he came with his forklift and we installed Lug on the trailer, in its transportation box. The paint on the robot was made in about one day. That night, my friend and I left the workshop with our robot, heading to Indianapolis. We had our passports, our luggages, I had my Betty costume and a lot of tools we would need to finish and install the robot’s head before Gen Con. I started driving hoping that we wouldn’t have any trouble at the border.

Notice how simply the robot could be moved with a forklift. We welded large steel rectangular tubings in the robot’s base to allow a forklift to easily transport it.

We arrived at the border and I had huge doubts. I had asked to Ninja Division to provide me all the paperwork I would need to bring Lug to the USA and bring it back to Canada legally. After all, they’re a big company, they import products from China on a regular basis, they would know what to do and how it works better than I do. I was surprised when I saw what Ninja Division provided me. It was basically a printed mail saying that I was attending a convention in the USA. ‘It can’t be enough’ I said to my friend. ‘I can’t believe that we don’t need anything more. This isn’t even an official paper…’ But I was so tired while I was building the robot that I didn’t care and didn’t make any searches to see what I would really need, which was what they call a broker.
So here we are, at the American border. We drove through a big scanner. ‘You have kind of a huge robot inside, right?’ they asked. ‘Yes. It’s an exhibition piece. We bring it to a convention in the USA, then we’ll bring it back to Canada.’ And just as I thought, I didn’t have any of the official papers I needed to export that thing to the USA. But we were lucky. We met what I wouldn’t have expected to exist: a nice American customs officer. Maybe it’s because we looked very miserable, even if I have doubts that it would influence any customs officer, but he was very friendly. He explained us that if it would have been a sale, if we had planned to leave the robot in the USA, someone would have needed to pay duty taxes on it. But we were actually bringning it to an event with the intention to bring it back to Canada. In both cases, we needed papers that we didn’t have. We were not allowed to enter the USA. It was Tuesday morning, maybe between 5am and 6am.
The customs officer told us he would write a letter stating that we stayed in the US secured zone, that we didn’t cross the border and that we were allowed to go back to Canada with our inspected cargo. He sent us back to the Canadian border with our letter… and we were back to Canada. Gen Con was next Thursday.
In Canada, we were told that we needed a broker to export something to the USA. We contacted the people from Ninja Division to inform them that we got stuck at the border because the papers they had provided us were not what was required. They really looked surprised. I realized at that moment that our friends at Ninja Division, and with all due respect, American Citizens in general, have no idea of how complicated it is for non US Citizens to cross the US border, with or without a cargo, even as a simple tourist. My friend and I were told that there were brokers offices at the border. They would open at 8am or 9am, in a few hours. We would wait, go see one of these brokers, put them in contact with Ninja Division and see what would happen.
We waited there for a few hours and we had to fill up many papers to list and describe everything we were transporting with us to the USA that we would bring back to Canada at our return. The goal is to prove that we didn’t buy any of these things while we were visiting the USA, because we’d have to pay duty taxes on those things while entering Canada. We had to prove that these objects were purchased (or built, in the case of our robot) in Canada, that we had these things with us when we left Canada and that we would bring them back with us to Canada.
In the meanwhile, I guess that someone at Ninja Division did something somewhere, maybe they contacted a broker, because at some point, we were apparently allowed to cross the border and we didn’t have to meet a broker. So we left with a letter stating that we were brigning our cargo from Canada to the USA and that we would bring it back to Canada. We would have to show that letter at the Canadian border at our return. We finally crossed the US border. Welcome to USA, robot.
The trip from Lévis to Indianapolis is a 16 hours drive. It was an extremely hot summer and it would become warmer and warmer as we would go South. My friend and I drove while the other was sleeping and we had to stop regulary because soon enough, none of us would be able to drive anymore. We had had so little sleep in the previous days… It’s honestly a miracle that we could make it safe to Indianapolis. It took us 36 hours to do a 16 hours drive because we had to stop to sleep so often. With our pick up and huge trailer, the vehicle was too long to use regular parkings, so we would park between the big trucks in truck stops. We lived a trucker’s life for a few days. We finally arrived in Indianapolis on Wednesday early in the morning. I remember we waited until 6am or 7am before calling someone at Ninja Division to inform them that we had made it. Now, what should we do? I used to attend convention as a guest or simple attendee. My luggages, my banner and my little person. Easy to handle. But as an exhibitor with a huge display piece to deliver, what should I do? Where should I go? How does it work? May I remember that my friend and I had been on the road for 36 hours, after some very intense days of physical work and very little sleep? We were happy to finally be in Indianapolis, but it was the beginning of another challenge.
We asked questions to the little people we met around the convention center so early in the morning. We were told to go to a certain place where all the exhibitors could park their trucks. Once there, we could ask to other exhibitors what to do. We had to go to a little trailer that was like a ‘front desk’. I mentioned I was with Ninja Division, they gave me the booth number and which loading dock was the closest to our booth. This is where we would have to go when it would be our turn and they would send over a forklift. We would have 30 minutes to unload the robot and bring it to our booth in the convention center. I gave my cellphone number and we went back to the pick up, waiting to be called.
2 hours later, I got a phone call and we went to the loading dock. We unloaded the robot and brought all the tools and our luggages with us. We brought back the pick up to the exhibitors’ parking and walked back to the convention center. It was so warm outside, the sun was so strong, I felt like sun had never been that strong in Quebec even during summer time. Or maybe it’s just because I was so tired. We walked into the convention center, installed the rubber rugs that would cover the unfinished base and installed the robot’s toes. The head was still unfinished, though. ‘If you don’t need me anymore, I’d go to my hotel room now’ I said to Ninja Division’s crew. I took the robot’s head and went to the hotel, finally. I had never been so happy to take a shower. It was Wednesday afternoon.
I wanted to ask my friend some help to finish the robot’s head, but he was apparently already sleeping and impossible to wake up. We had stolen a cardboard box in the convention center to use it as a paint booth in the hotel room. I had masking tape (the real fancy one for automotive paint) spray paint, a small silicone mold that my friend had made before leaving to cast small eyes for the robot, body filler… I really felt like if I had brought all my workshop with me. I taped a pattern on the robot’s teeth and chin and sprayed silver paint in front of my improvised paint booth, hoping that the maid wouldn’t see some silver fume on the walls and carpet the following day. I catalysed a small quantity of bodyfiller that I put in the silicone mold, casting 2 small button shaped eyes for the robot, that I painted in black and put on the head using simple double sided tape. That’s the best I could do with the energy I had left. I called my friends from Ninja Division to tell them I wouldn’t go have dinner with them. I was too tired. I just went to bed. It was Wednesday night.
Thursday morning. I woke up early because we still had to go install the robot’s head before Gen Con’s beginning. My friend was panicking because he wasn’t sure if what he had planned as an attachement would work. We simply screwed a piece of 2X4 on the robot’s torso, where the head would be. The 2X4 would be completely hidden by the robot’s neck. The top of the neck would actually hold on top of the 2X4. I climbed on the robot and put 2 long screws through the robot’s neck and through the 2X4. It should be strong enough. And here’s the selfie I proudly made in front of my robot, with its head! :D
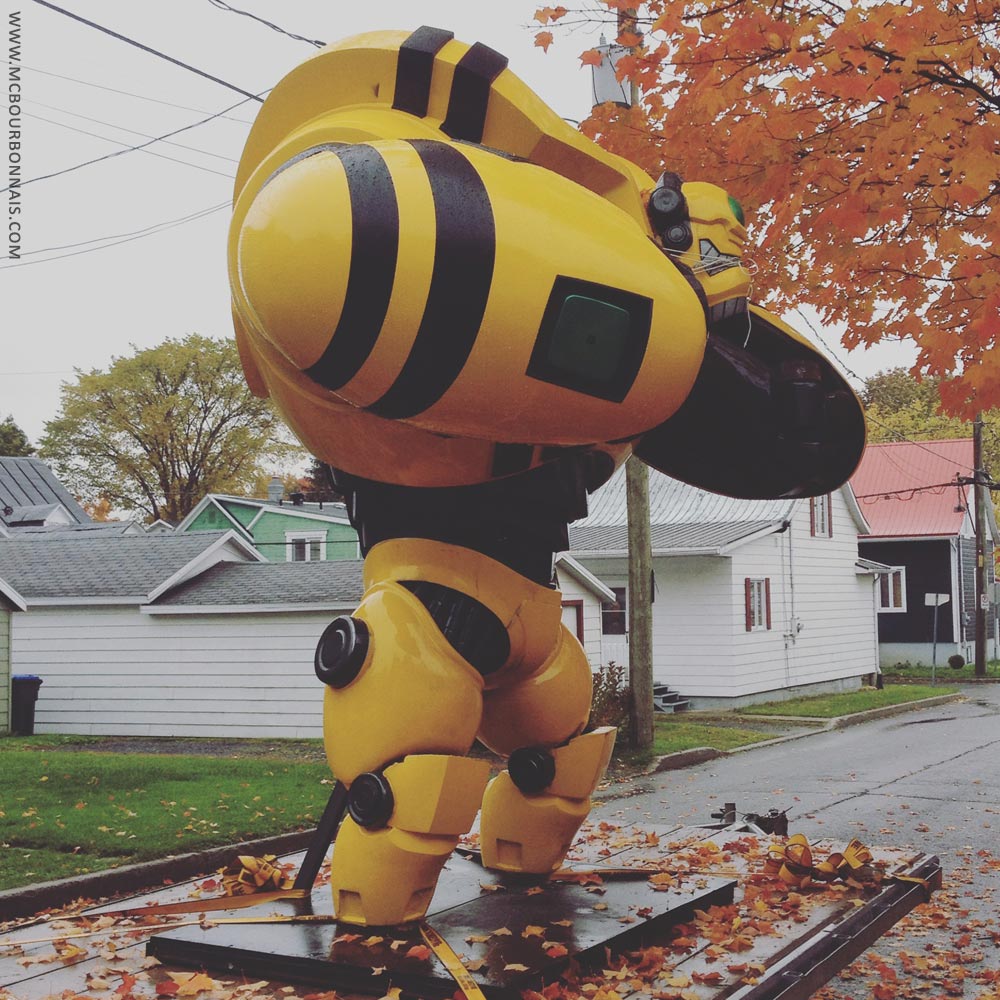
Here’s the version of Lug we were able to deliver for Gen Con 2015, with the unfinished base. But I was still very proud. :) I took this picture before going back to my hotel room Thursday morning.
My friend went back to sleep. But my day had just started. I had to put makeup on and put my Betty costume on. Because Gen Con was about to begin!
I don’t know how I did to survive to 4 convention days after all this… Months of hard work, an adventure at the US border, a first experience as an exhibitor in a major convention… Finally, when I think of it, standing in front of my robot in costume, even for many hours and days in a row, even with tons of makeup and fake lashes on, explaining to everybody how I built my robot, was the easiest and more pleasant part. :)
I wish I could say ‘THE END.’ But we actually had to bring back the robot to Canada, finish to sand it properly, build a base and do the paint again… Remember? Coming up next, Part 4: a paint story!