
Monster Musume Rachnera Cosplay Making Of Blog – Part 3
Body filler and patience: how to make fiberglass feel and look as slick as glass
After the legs, we covered the spider’s body with fiberglass. Since the body was so big, we could use big squares of fiberglass mat instead of small pieces. However, the bigger the fiberglass mat pieces are, the more chances you have that there might be air bubbles trapped between the layers. To avoid air bubbles, you can use that metallic roller that has the shape of a paint roller without the sleeve. You roll it over the soaked fiberglass mat or cloth and then you make sure that all the air bubbles will go away. Covering the back of the spider’s body was pretty fast. Covering it’s belly was way longer. Rachnera has kind of a large textured stripped pattern on her belly that was very long to cover with fiberglass, but mostly, it was long to finish with body filler and to sand. On the next picture, you’ll see the spider’s body on its back. The part on the top is its belly.

The amber colored thing is fiberglass. It has the color of the polyester resin I use. This is how fiberglass looks like before the finishing process. The blue product is the auto body filler. Body filler exists in many colors. It takes the color of the hardener you mix with it. There are different types of auto body filler. Some very rough body filler can be used to correct the shape of a fiberglass object and to fill up the fiberglass cloth texture. Very fine body filler with a super slick texture is used at the end for the finishing sanding to fill up small holes. The last, tiny holes will be filled up with the primer coat.
As I said, before you apply body filler, you can see all the texture of the fiberglass mat or cloth. If you want fiberglass to be as slick as glass and to have its famous shiny look that we love so much, you have to cover it with body filler and to sand it a lot. You don’t want to sand fiberglass. You want to sand body filler. Fiberglass dust is what is so itchy. Whenever you need to cut or buff a part of fiberglass, that dust is THE worst part of working with fiberglass. Fiberglass dust goes everywhere: on your clothes, on your skin and it itches so much that you wish you could rip off your own skin to stop it from itching. Water won’t completely remove the dust from your skin. Hot showers make it worst. It’s recommended to take a cold shower and to use a washcloth to wash your skin when you have fiberglass dust on you. That’s why you have to wear long clothes to protect your skin when you work with fiberglass. I’ve seen guys using tape around their wrists to fix their sleeves to their gloves in order to keep fiberglass dust from entering inside their shirt. Yes, it’s that bad. As much as you can, avoid to sand or buff fiberglass. Add an even coat of body filler everywhere and sand the body filler. Since I’m not a fan of cold showers, I always wear long sleeves when I work with fiberglass. Loose clothes are also more comfortable, because they don’t touch your skin and then you feel less the fiberglass dust that went on your skin. I just bought a product called ‘liquid gloves’ that is kind of a cream that you put on your hands and arms and that is supposed to create a layer that will protect your skin from paint and fiberglass. I’ll certainly try this product during my next fiberglass projet. Also, no need to repeat that wherener you’re using polyester resin and fiberglass, you have to wear a respirator mask.
Like a glass snowball
Speaking of fiberglass dust… We were concerned about the total weight of the spider. Weight influences the transportation fees and we wanted to make sure that it would be as cheap as possible for our clients, Ninja Division and Seven Seas Entertainment. What could we possibly do to take off some weight? We could empty the spider’s body and take off the styrene. Plus, we knew that we would have to assemble the spider by ourselves before Anime Expo. So we had to figure out a way to lift that big body and install the legs. The body would better be as light as possible. We definitely had to take off the styrene inside. Yes, styrene is light, but in such a big quantity, it becomes surprisingly heavy.
I remember when we were building Lug the robot. It took 4 bundles of 12 4’ X 8’ sheets of styrene to sculpt the whole robot. Some of you may remember that picture of me where I was making snow angels in sterene. There was styrene everywhere in the workshop. 48 sheets of styrene granules that I had to clean up even months after the robot was finished. That’s why I wasn’t so enthusiastic about taking off the styrene from the spider’s body, but I knew it wouldn’t be worst than the robot.

So we cut a hole in the spider’s body with a buffer (which is a good example of a step that produces fiberglass dust… itchy, so itchy.) You can see on the next picture the stacked sheets of sterene inside the fiberglass body.
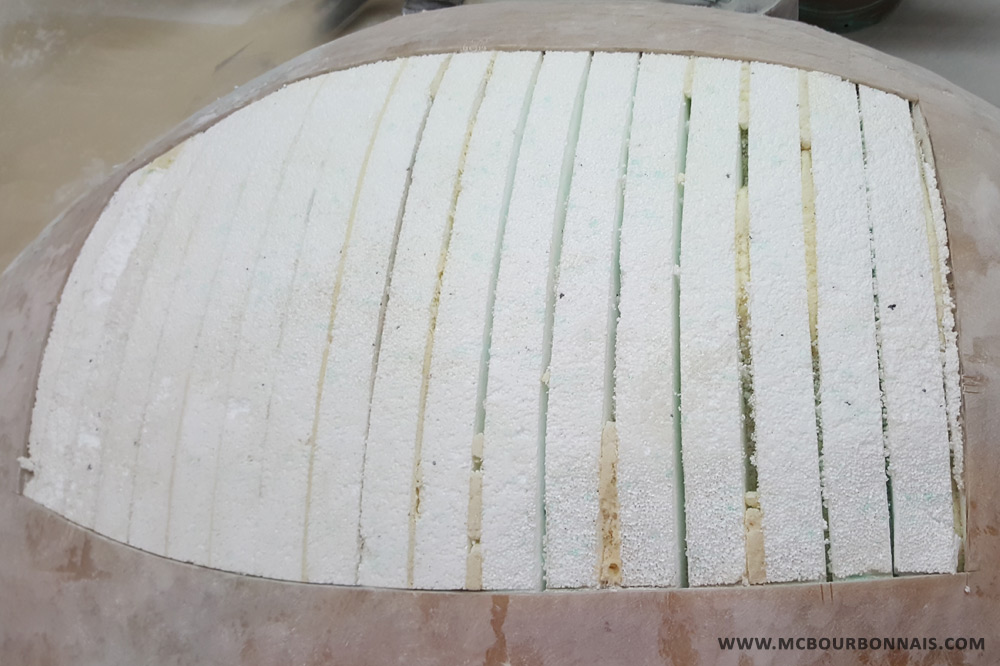
Then we took off all the styrene. It came out in bits and small pieces. It really took a while. And once again, there was styrene everywhere in the workshop, making it look like a glass snowball. Can’t remember how many garbage bags I filled up with all that styrene. Sorry, environment.

Now you can admire the empty fiberglass body. Notice how aluminium foil, that we had glued on styrene to protect it from polyester resin, stayed in the bottom of the fiberglass shell. It’s not important and doesn’t change anything since it’s hidden inside. It can stay there, it has no consequence. You have certainly also noticed a square tubing that crosses the spider’s body. It was welded on the other side to the metallic plate where the spider’s legs would be boalted. You can see it on the first picture of this part of the blog. Since that plate, located in the front part of the spider’s body, would support the whole weight of the body, we wanted to make sure that the plate wouldn’t come out from the body because of all that pressure. So we fixed the square tubing inside the body with more fiberglass. I’ll explain later how the legs were installed under the body.
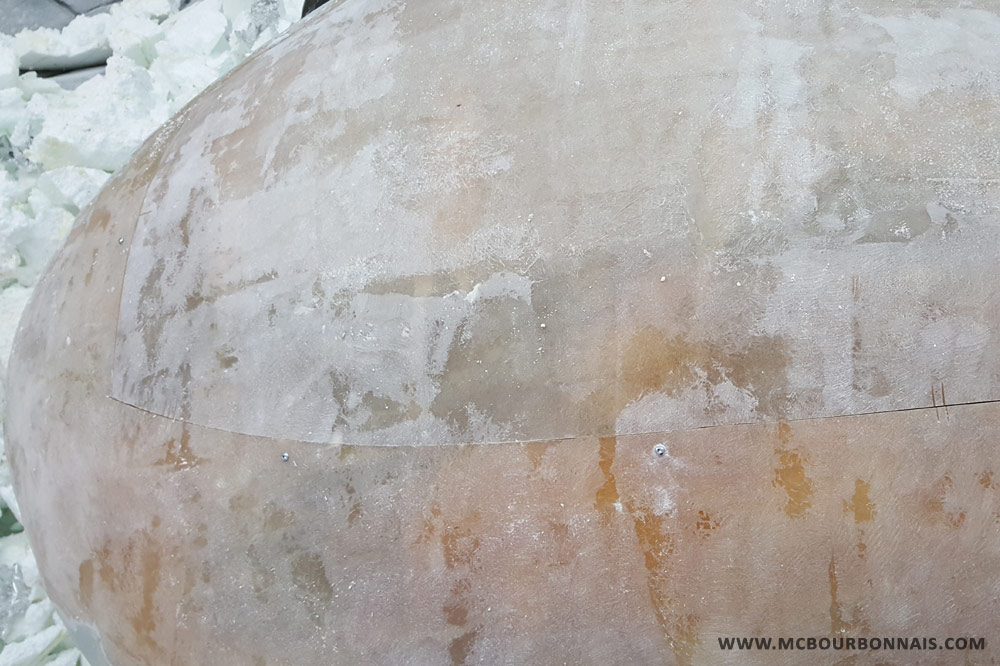
Now that the body was empty, the last step was to put back the fiberglass piece that we had temporary removed. One of the only good sides of fibergalss is that it can be cut and patched as many times as you want and at the end, if you do a good job, it will not show. See how we put back the piece at its place, following the little notches we had made. We had to buff around the hole to make the surface lower in order to allow us to apply more fiberglass mat to hide the opening. If we would have only added more fiberglass mat on top of everything, we would have created a bump all around our piece that we are actually trying to hide. At the end, body filler will cover everything and you won’t be able to tell that there was once a hole there.
More body filler fun in Part 4 of my blog! And you’ll also discover how the spider’s legs were fixed to its body.
Great work! Another tip to remove fiberglass: duct tape. Or any other strong tape, really. Just dab it on your skin to remove small shards. Works for splinters and other hard to remove fragments. Again, congo rats on such a tremendous build.
looks like a lot of work.
Woof, that’s a lot of work! Interesting info on the fiberglass dust. How thick did you have to have the body filler be to sand it down properly without hitting the fiberglass underneath?
Thanks for another great blog post, Marie-Claude!
It’s a pretty thin layer, actually. That’s why we do see the fiberglass in some places. It’s just important that the transition between the fiberglass and body filler is impeccable, perfectly smooth when you touch it.