
Fallout 4 Vault suit cosplay Making of – Part 2
When I work on a cosplay costume, I always use many reference pics. Instead of looking at the pics on my computer or phone, I like to print the pics on cardboards that I can manipulate and put next to each other to have a global view of the costume. For video game costumes, it’s easy. I put a Vault suit on one of those mannequins in the game and I took pictures of my TV screen. Turning around the mannequin in the game, I could see the costume from every angle and from head to toe, so I had plenty of reference pics that I printed and put on my wall in my sewing room.
I mentioned many times how making a mockup is an essential step in the development of a pattern. When I work on a costume that has many yokes and seams, instead of guessing where the seams go on my flat paper pattern pieces, I simply make the mockup of a plain garment. I sewed a suit with long sleeves without any detail and standing in front of my mirror, looking at my reference pics, I started drawing the yokes and seams of the Vault suit directly on the suit I was wearing. It allows me to immediately see the proportions of each yoke compared to the reference pics. As you can guess, my breast implants are always the challenging part in the adaptation of a costume’s proportions. It’s not the design that is changing. It’s truly its proportions. Some yokes will be smaller or bigger than the original drawings in order to match my breasts measurements. Then I cut my mockup following the lines I traced and I make the paper pattern pieces with all the yokes. Once I have all my paper pattern pieces, I cut and sew a new mockup to test my pattern. There are always adjustments to make. I use pins, I take notes by drawing again on that new mockup and one more time, I transfer these adjustments to my paper pattern pieces. And I will make as many mockups as required until my pattern will be perfect. Don’t get me wrong. This isn’t a question of being perfectionist. This is simply how every piece of clothing is developed in the garment industry, from the simple jeans that will be mass produced to the Haute Couture dress custom made for a specific client. Mockups can NOT be avoided. For mass produced clothes, companies will even produce a mockup for each size that will be offered in their store. Each pattern, in each size, will be tested before it will be sent to mass production, most of the time in another country.
After many mockups, I evaluated that all the design details were there and that I could finally cut the pieces in the real fabrics. We often underestimate the time needed to cut. Also, many little pieces needed fusible interfacing. It took me many hours to cut all the pieces of my 5 Vault suits and to add interfacing to all the pieces that needed it. I used fusible interfacing because I’m using stretch fabrics, 4 knits and 1 woven fabric with a stretch fiber, and fusible interfacing would keep some pieces from stretching and would add some strength to the different fabrics. Usually, the pieces that will need interfacing are the collar, the wrists, any opening where there will be buttons and buttonholes, some hems (for fancy skirts, jackets, etc. but obviously not for jeans and tshirts), some pockets and their openings, etc. Putting fusing interfacing takes some time too. Some subcontractors in the garment industry specialize in cutting pattern pieces in the fabric and adding fusible interfacing to the pieces that need it.
So all the pieces were cut and I was ready to start sewing. From where would I start? There are so many yokes and steps in this Vault suit! Sewing mockups allowed me to determine the order in which some pieces would need to be sewed. Because of some specific design details, that devilish yoke that goes under the arm instead of the usual side seam, I already knew that the Vault suit would have an unusual assembling order. This detail probably deserves an explanation.
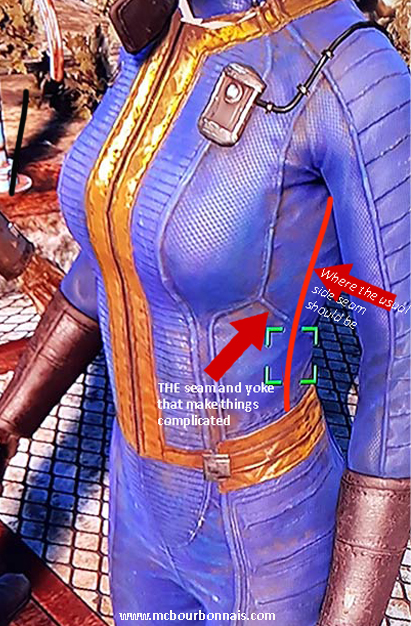 If you don’t sew, you have to know that all the ‘ordinary’ tshirts/shirts/jackets in the world are usually assembled in one specific, efficient and profitable order. We’ll start by sewing the shoulders together, so the front and back of a shirt, for example, will hold together by the shoulders. After, we’ll sew the sleeves. Then, we’ll sew that seam that closes the sleeve and we’ll continue to close the side of the garment. One long seam that goes from the wrist to the hem of the garment. Then we can move on to the collar, wrists and/or hems. For a one piece jumpsuit with sleeves, that seam will go from the wrist to the hem of the leg. One long seam that closes all the suit. If the garment design allows it, that’s always how it will be sewed because it’s the most efficient way and companies usually want to keep the production costs low. If you draw on purpose a design that doesn’t allow you to close the side of the garment in one long seam, like for a racing suit with a lot of pieces and yokes, for example, you know in advance that the garment will be more expensive to produce because it will require more sewing steps.
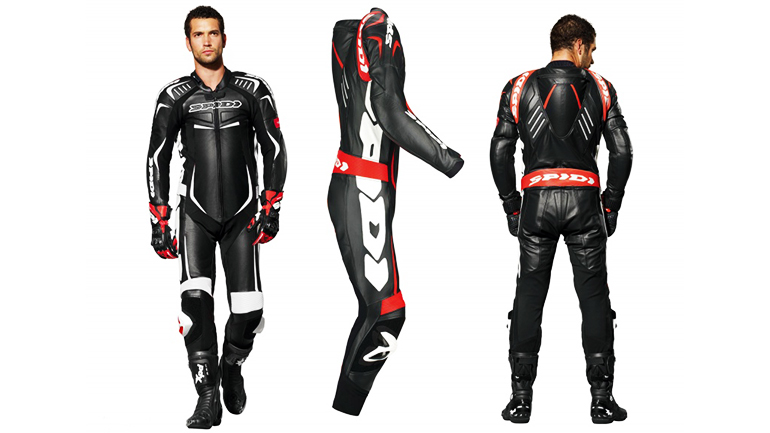
The following is a good example of a motorcycle racing suit with a lot of yokes, including some yokes on the side of the body, so there’s no side seam. It would be totally normal that such a suit would be more expensive, because it has many pieces to cut and many sewing steps.
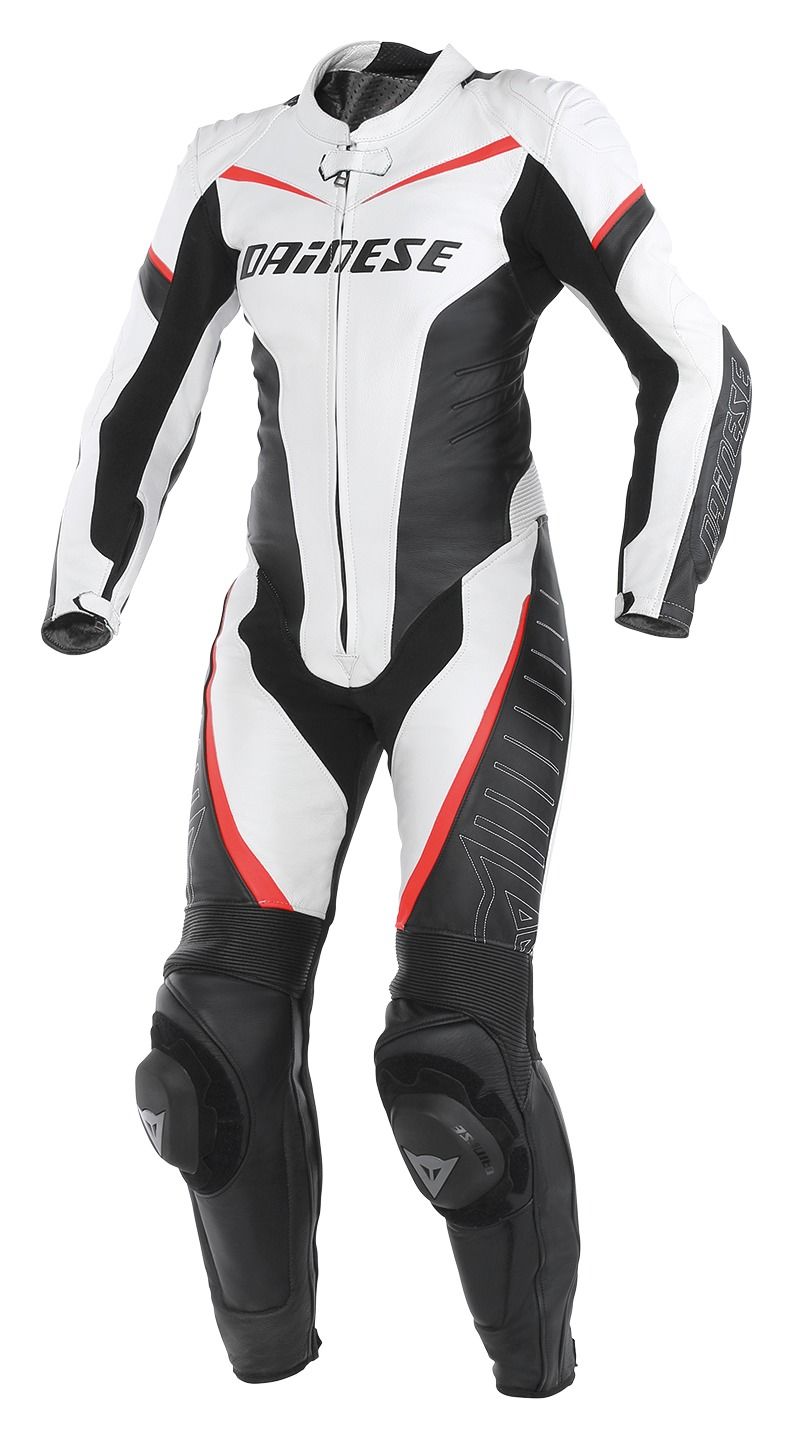
Here’s another good example of a pretty complicated one piece suit that has a lot of sewing steps.
Note that tshirts made using circular knits are one notable exception. If you look at your tshirt and it doesn’t have a seam on the side, it means that the knit was knitted on a circular machine, like a sock or a beanie. Each ‘tube’ corresponds to a size. They will cut the tshirt pattern pieces in that tube using the side of the tube as it is. No seam on the sides. The sewing steps will be to sew the shoulders together, forming a circle, the armholes. Each sleeve will be ‘closed’ with one seam separately, then sewed in the armhole in a circular seam. Last steps are the collar, sometimes a biais that covers the shoulder seams inside and finally, the hems.
Men’s tailor suits are also an exception. These fancy jackets will often be sewed by ‘closing’ the sleeves, ‘closing’ the body of the jacket and sewing the sleeves in a circular seam in the armholes. It makes a more beautiful looking, ‘rounder’ sleeve with a better visual structure. But it takes a little longer to sew.
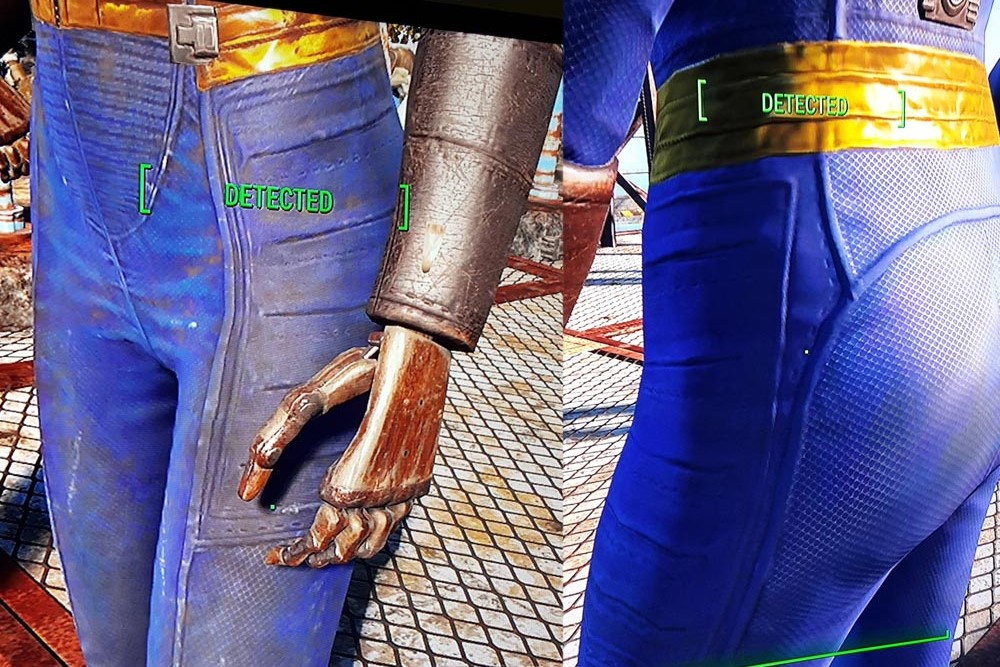
So the Vault suit is one of these one piece suits that couldn’t be ‘closed’ with one long side seam because of that yoke under the arm and the rectangular yoke on the side of the thighs. I decided to start by that rectangle. There are horizontal lines in the rectangle with suddle dotted lines around that remind me of top stitches.
I think that concept artists always draw costumes and garments trying to imitate things that they’ve seen around them. They are not fashion designers. They probably don’t know how to do pattern drafting or how to sew. They don’t necessary draw things that are logically functional or doable. They draw things that ‘look’ like a garment and most importantly, that look cool. My question was: ‘What the hell did this guy see to draw these lines surrounded by a top stitch? Which part of a real garment inspired this artist?’ Of course I’ll never know. I’ll never get to meet this artist to ask him what inspired this particular detail. I can only analyse and try to guess. After all, that’s my job as a costumer.
And after a little while, I came to the conclusion that these approximative, mysterious lines could be an artist’s interpretation of a welt pocket. There are different types of welt pockets.

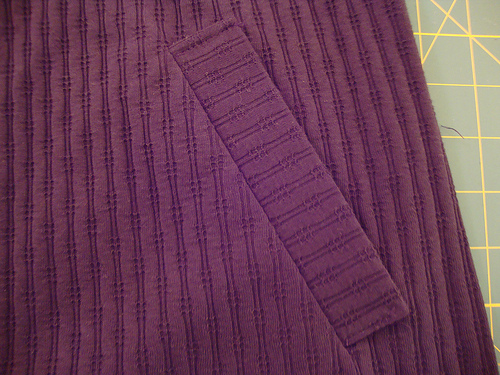
I think that the concept artist could have seen welt pocket with a topstitch around and that it could have been the inspiration for these 5 horizontal lines. I decided to make 5 decorative double welt pockets in each rectangular yoke on the sides of the Vault suits. Every cosplayer knows that cosplay costumes rarely have pockets. I rarely get to sew pockets in my cosplay projects. As a matter of fact, I hadn’t sewed a welt pocket in years. I didn’t even remember how to do it. I had to look at my school books again.
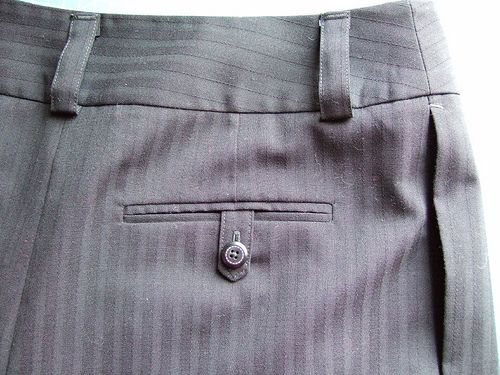
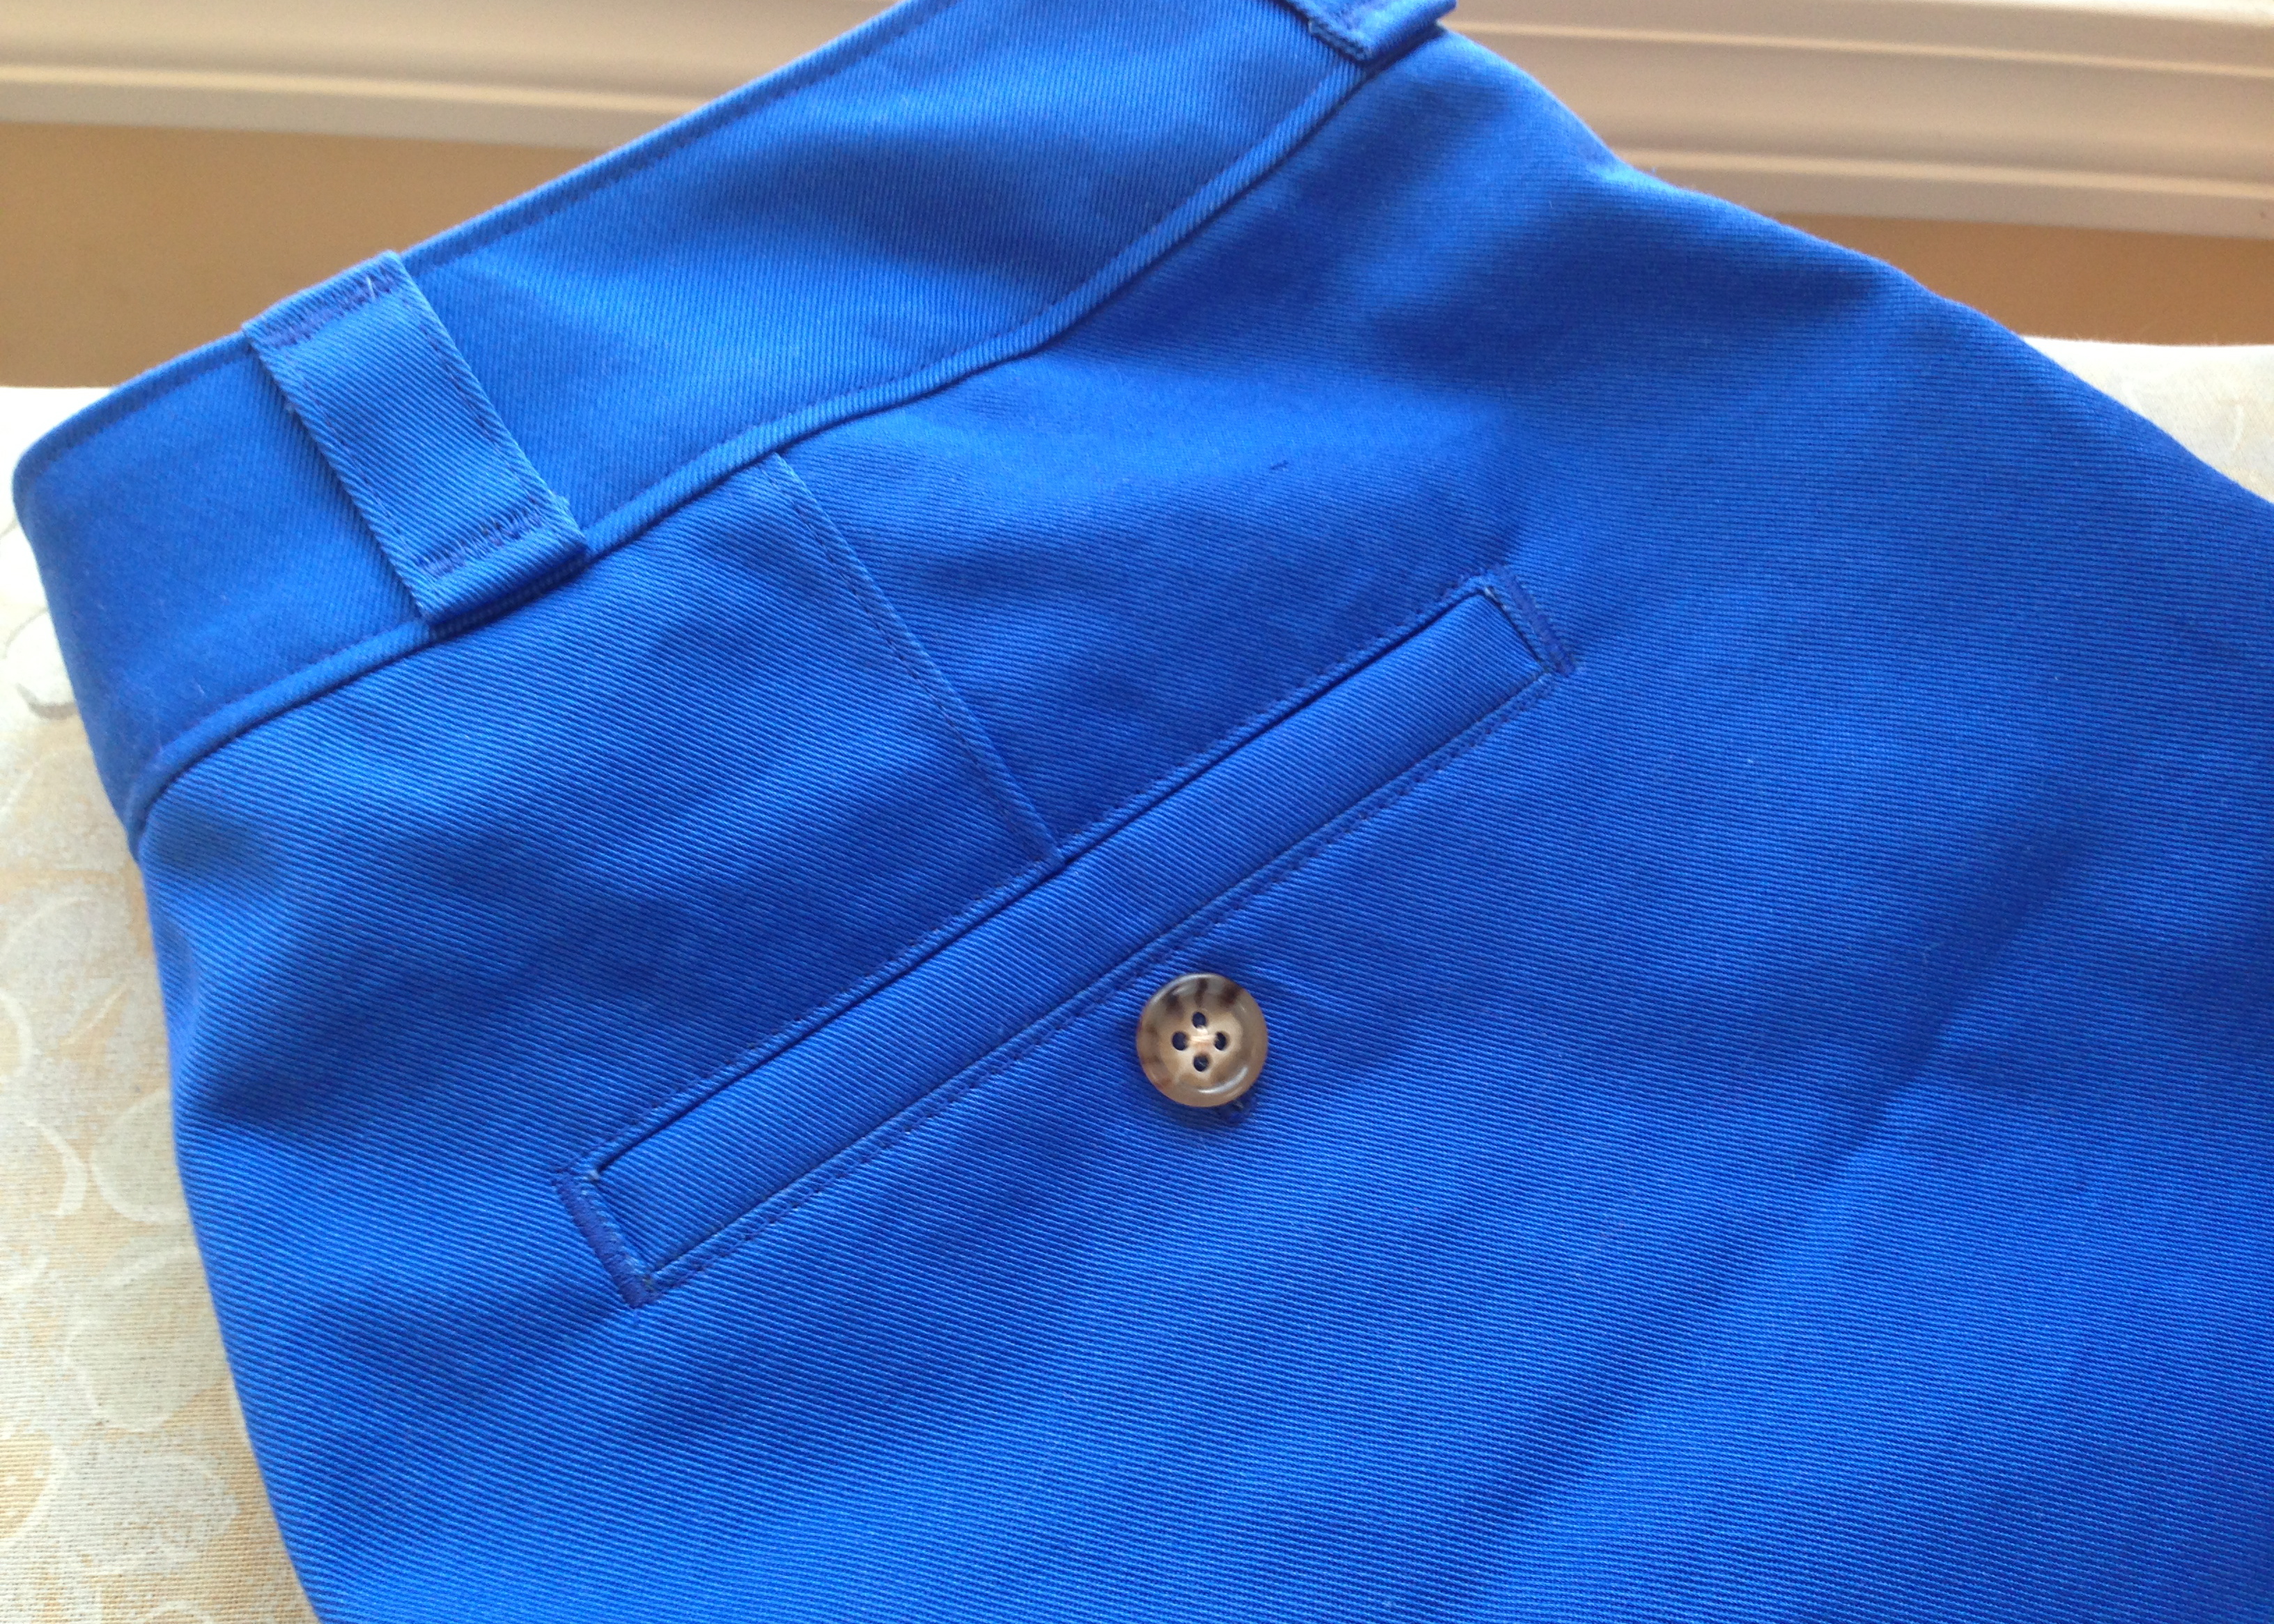
You’ll usually see welt pockets on tailor suits and toxedos, on light or heavy jackets like leather jackets, etc. There are many techniques to sew a welt pocket. Different techniques will give slightly different results, some techniques are more complicated than others. But generally speaking, sewing a welt pocket isn’t a project for a beginner. I’ll try to explain the technique I used.
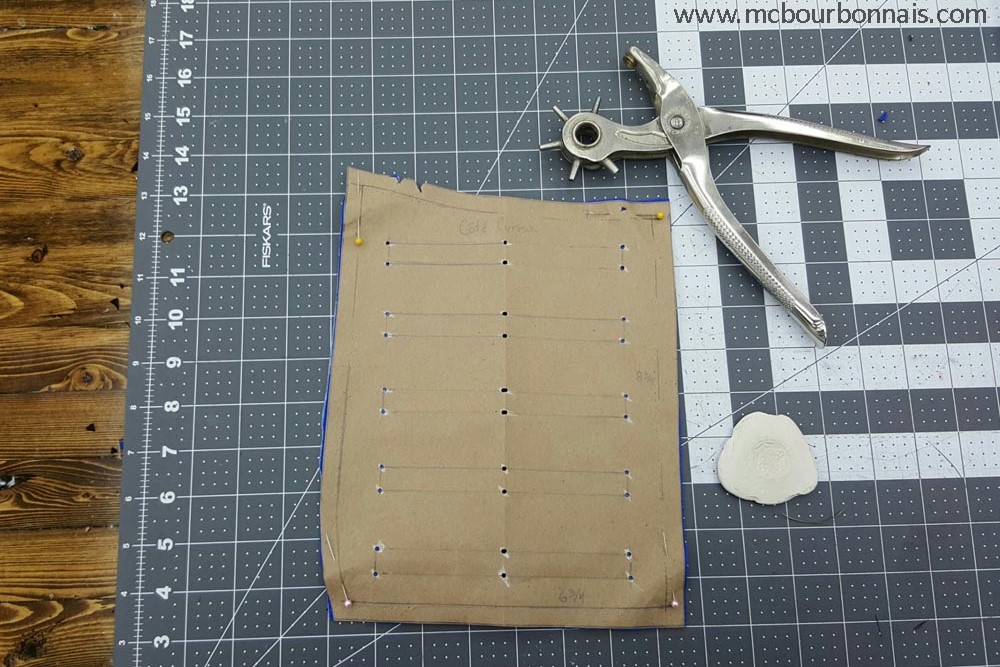
I started by tracing on my pattern piece the shape and place of each pocket. I used my revolving punching pliers to make holes in my paper pattern to mark the pockets’ corners and I traced dots on the fabric with a chalk.

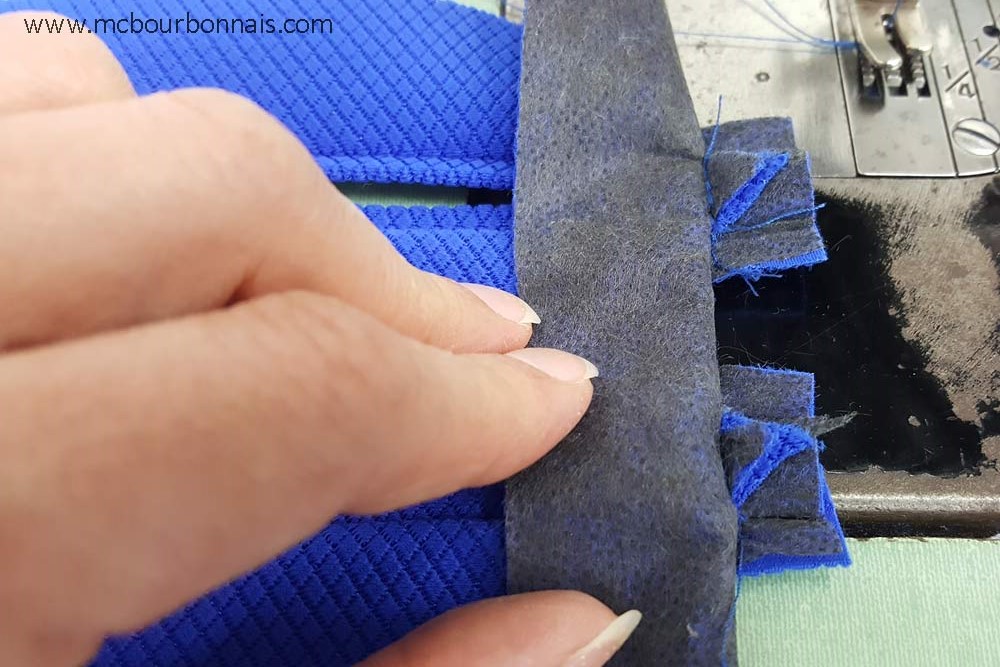
Welt pockets require a lot of calculation and precision. I chose a technique that I thought would be easier, since I hadn’t sewed a welt pocket for so long. I used fusable interfacing on all the fabric pieces. I folded in 3 many fabric stripes of a precise width and placed each of them on the rectangular yoke, following the chalk marks, with the opening facing me. Yes, I’m working on the good side of the fabric. There’s a point, in the making of a welt pocket, where you make an opening in the fabric and flip the pockets inside, on the wrong side of the fabric. But for now, I’m working on the good side of the fabric.
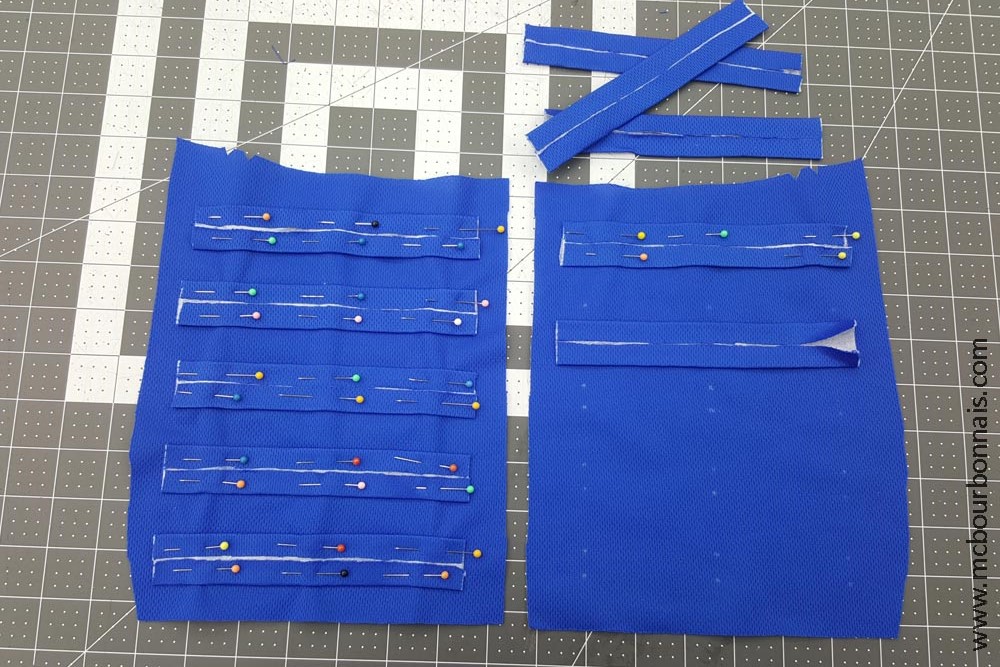
Next step is to make 2 stitches and this is where you have to be precise. The distance between the 2 stitches corresponds to the opening of the pocket. The distance between the stitch and the edge of the folded fabric stripe corresponds to half of the pocket’s opening width. When we’ll flip these fabric stipes inside, they will fill up the opening to form the welt pocket. If they’re too large, they will overlap. If they’re too narrow, there will be an opening in the middle. If they’re uneven, it will show and it won’t be beautiful.

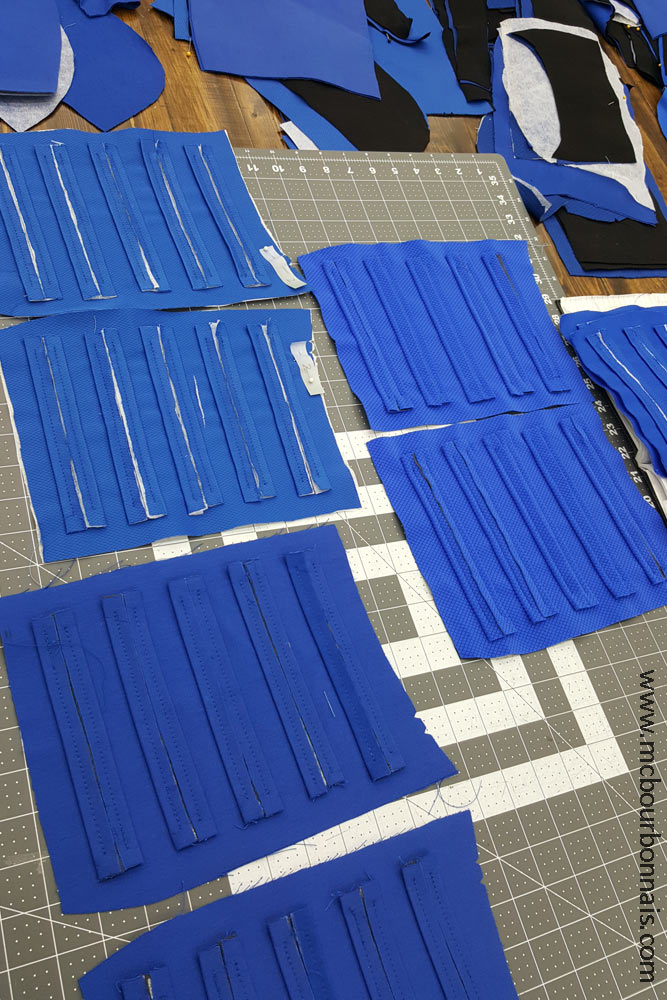
And remember that I had to repeat the steps for the 5 Vault suits…
Next step is to cut an opening with an X-acto blade (my favorite tool…) right in the middle of the 2 stitches. Notice the shape of the opening cut in the corners. This shape is called ‘queue d’hirondelle’ in French, which means ‘swallow tail’. This cut shape will become the rectangular opening of the welt pocket. By the way, the white thing that you see on the wrong side of the fabric is the fusible interfacing.

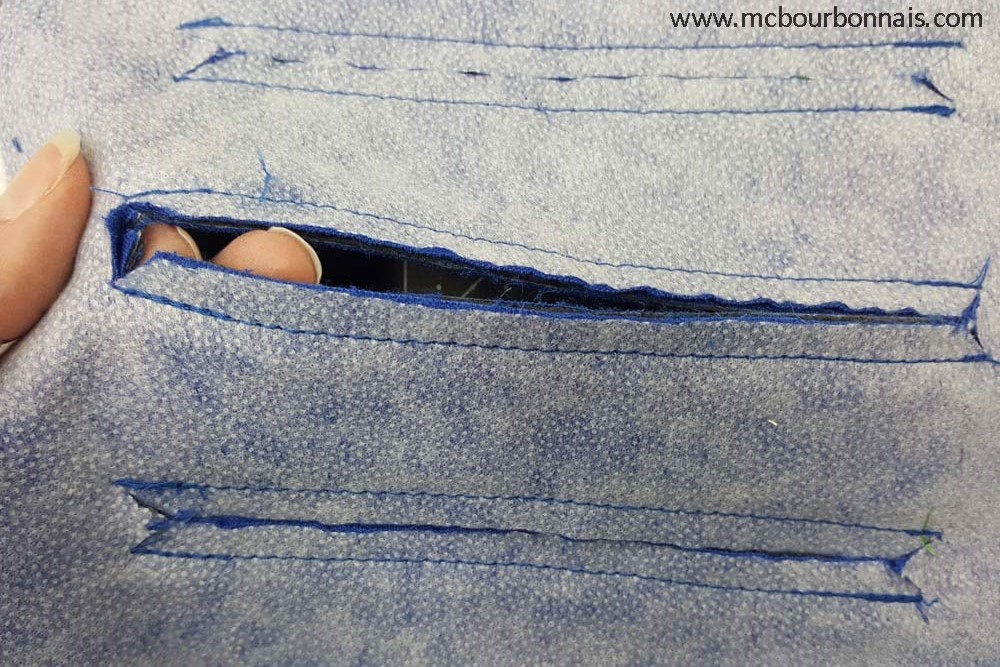
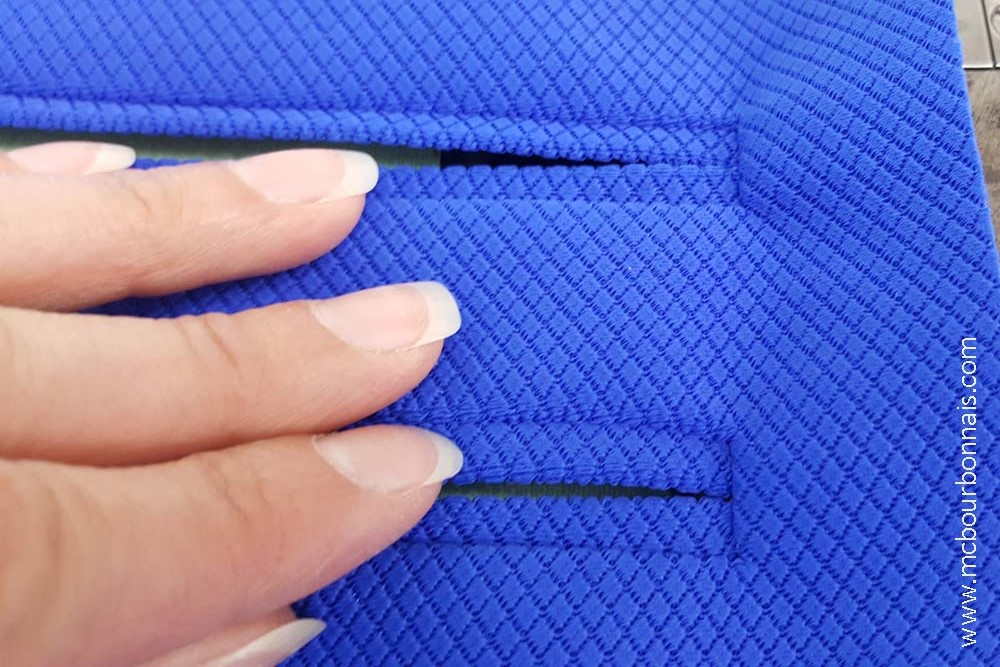
This is where the magic happens. Now that there’s an opening in the middle of the rectangle, you can flip the fabric stripes inside, on the wrong side of the fabric. And all of a sudden, it looks like a welt pocket. :D
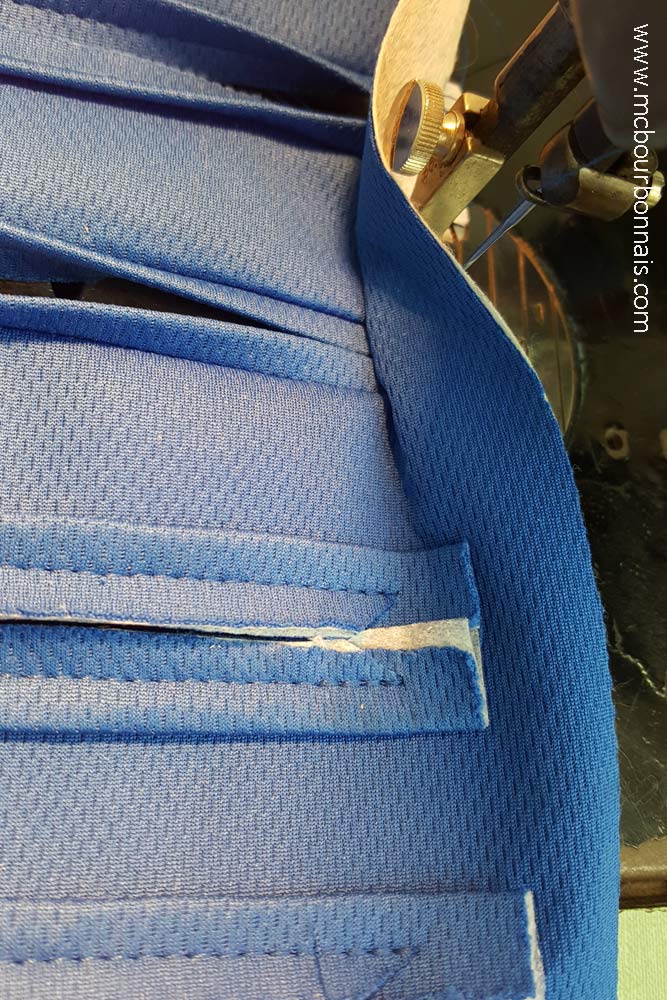
Notice the ‘queue d’hirondelle’ shape that is now a little triangle of fabric coming out from the corner.

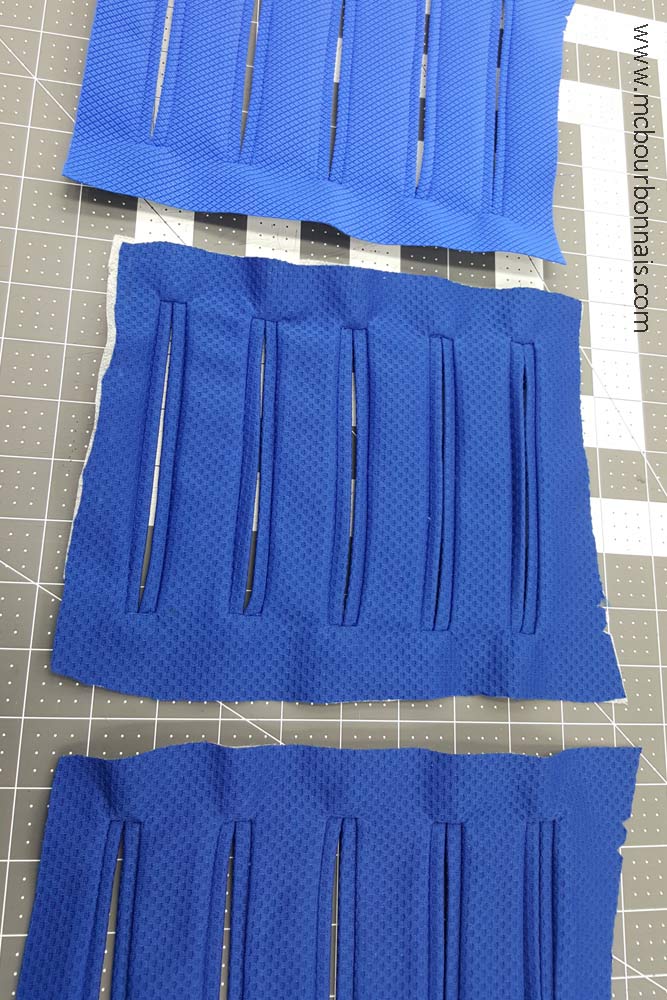
This little triangle has to be stitched. It will hold in place the sides of the rectangular opening.

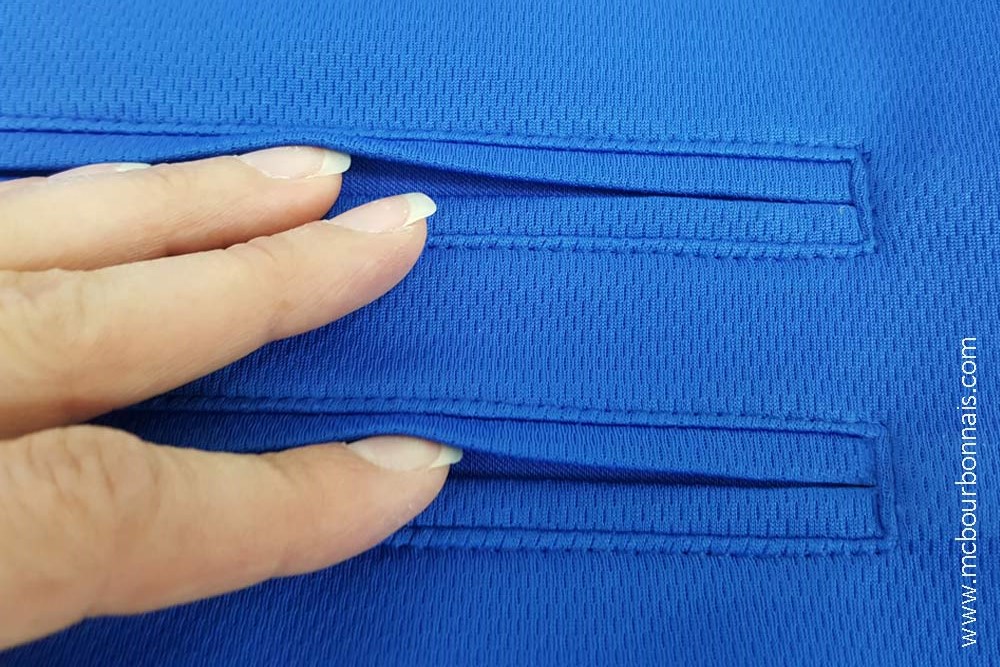
And here they are, the welt pockets!
Many welt pockets that need a little love and ironing.
Of course I skipped some steps because they are only decorative pockets. There’s no pocket bags. I only lined each rectangular yoke with a piece of blue fabric. The topstitch around each welt pocket will hold the blue fabric under it. They are fake, ‘closed’ welt pockets.

5 welt pockets on each side of the Vault suit = 10 welt pockets per Vault suit X 5 Vault suits = 50 welt pockets. Done. I hadn’t made any welt pocket for years and I won’t make 1 more welt pocket anytime soon. To be honest, when I look at them closely, I know they’re not all perfect. But it was a good practice of a sewing technique I had forgotten.
Now let’s look at the original design again.
Each rectangular yoke with the welt pockets is ‘framed’ in another rectangular yoke. Sewing a rectangle in a rectangular opening is another type of challenge. Here we go.
Rectangle = 4 sides, so 4 seams. The first one is easy.

Then, how do we turn the corner? :S There’s a technique. :) You have to lift the foot of the sewing machine, but keep the needle in the fabric to make sure nothing will move. Then, you cut a diagonal notch in the corner. It has to be a precise cut. You want to stop just before the stitches.
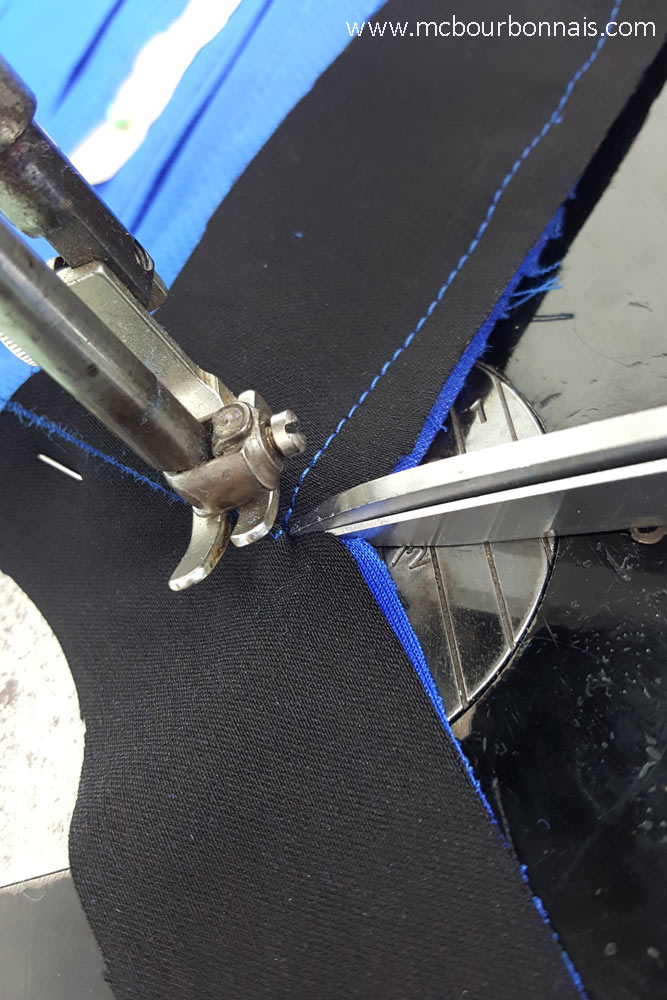
Once the corner is cut, you can ‘open’ the notch, turn the fabric and continue sewing the other side of the rectangle. You repeat these steps for each corner until the whole rectangular yoke is sewn in the rectangular hole.

Assembling a garment is usually made using a 5 thread serger (for non stretch or very lightly stretch fabrics, look inside your jeans, for example) or a 4 thread serger (for stretch fabrics, look inside your tshirt.) But some complicated steps like the previous one I just explained have to be done with a plain sewing machine. It means that to prevent the fabric from fraying, I have to use the serger anyway, in a 2nd step, sewing over my 1st plain stitch. It’s just longer and for a mass produced garment, it would mean that it would be a little more expensive to produce. Each extra step adds to the production costs.
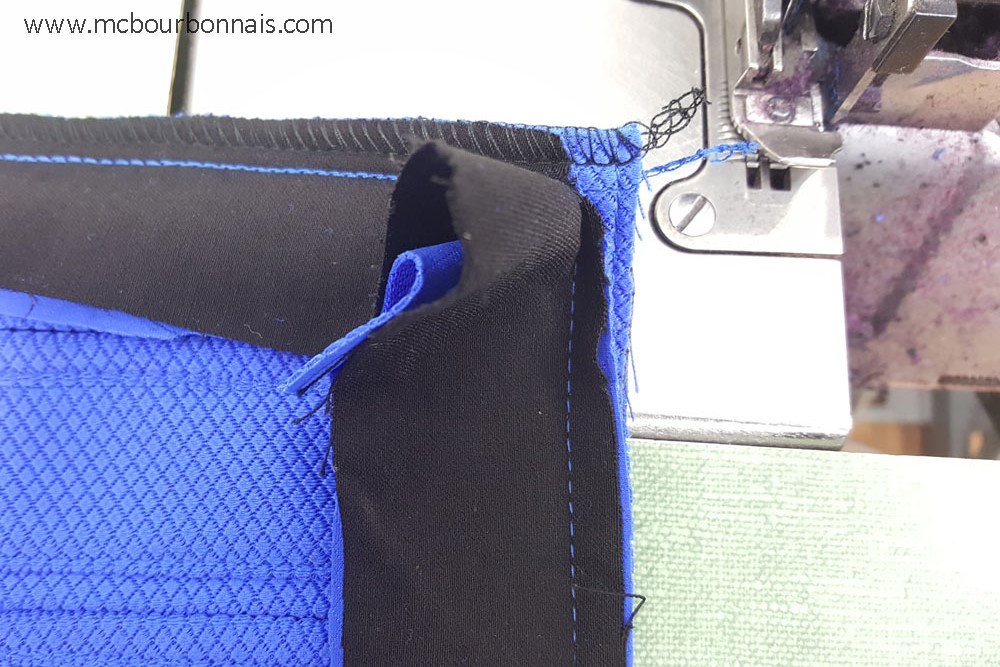
A topstitch, some ironing and that first little part of the Vault suit was done!

You can look at the original design again. A lot of work for only one yoke, right? That was a blog with a lot of information about sewing techniques and how garments are made in general. If you’re part of the readers who don’t know how to sew, I hope you’ve learned something! lol More information coming up in Part 3! :)
Reading this again as I get ready to make a fallout suit in celebration of the new TV series. I am in awe of your attention to detail and artisanship
Hi Ted,
I’m glad that my blog can help you making your own Vault jumpsuit. :) Thanks for your kind words about my work. Good luck with your project!
Wow, a lot of technical info in this one! I didn’t quite get all of it, but I imagine that this would be quite a treat for people with tailoring knowledge. Still, I learned a thing or two like what’s a welt pocket and ‘queue d’hirondelle’ lol. It’s great to see your passion for your craft and sharing it with everyone!