
The making of my Bunny Bulma photoset
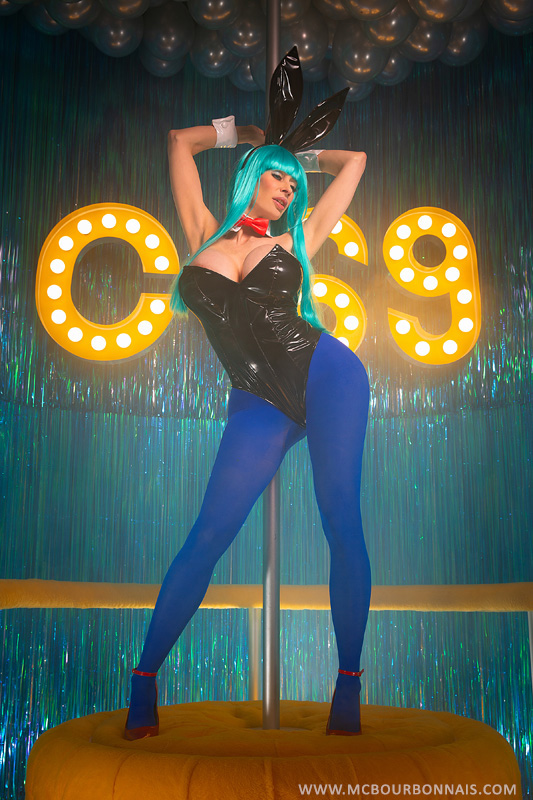
There’s so much to say about that photoset! I worked on that project for more than a year, almost 2 years before the pics were finally released. Building that set was like going on a journey!
Once again, I’ll be using a lot of technical words. I know these words in French, but I had to translate tons of specific words to write this blog in English. I did my best, I hope my explanations will make sense. :)
Many years ago, I did a Bulma cosplay for which I never organized an official photoshoot. It was Bulma’s yellow jacket which was very comfortable to wear in a convention, but which isn’t the most exciting costume to take in pictures. I’m a huge Dragon Ball fan, I watched all the series and I really wanted to make a great Bulma cosplay photoshoot. I eventually decided to sew Bulma’s iconic bunny bodysuit. :) But I didn’t know at the time which photoset I would build and which photo concept I would choose for this costume.
It all started with a special request from my photographer. He wished he could do a photoshoot in front of a round-shaped background instead of a usual flat wall for a change. I thought ‘Why not?’ and I started thinking about how I could build a round-shaped structure for a background and most importantly, which material I could use to cover that round-shaped background. I quickly had the idea to use a lot of fabric to sew very large curtains. Curtains could easily create a circular shape. They would follow the shape of any structure they would be hanging from. But what could that round-shaped structure be made of? It sounded like a challenge for my Grumpy Friend who was way too enthusiastic about this complicated request for which he was very happy to suggest a complicated solution.
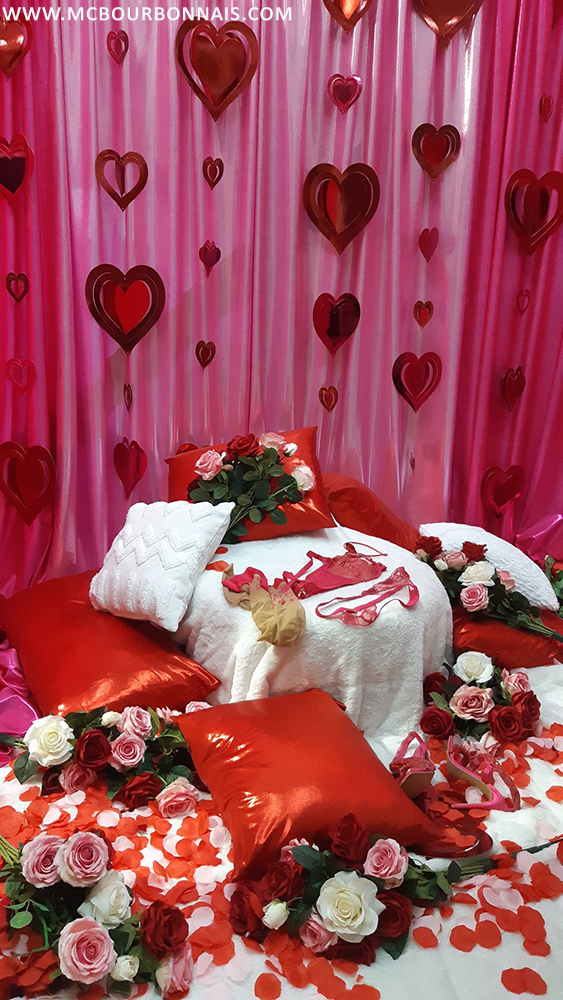
I went ahead and bought a huge quantity of pink fabric. Yes, at first, the pink fabric I used for my Limited Edition Valentine’s Day ‘Heartwarming’ photoset was supposed to be used for this round-shaped background. The ‘Heartwarming’ photoset was finally done in a huge wooden square structure made of 3 walls of fabric and a top on which my photographer could climb to take pictures from the air. The round-shaped photoset would be used for another concept. These are the pink curtains I had first planned to use for my round-shaped photoset. Now I know I didn’t have enough pink fabric anyway to cover my giant round-shaped structure. If you missed it, here’s how my ‘Heartwarming’ photoset looked like.
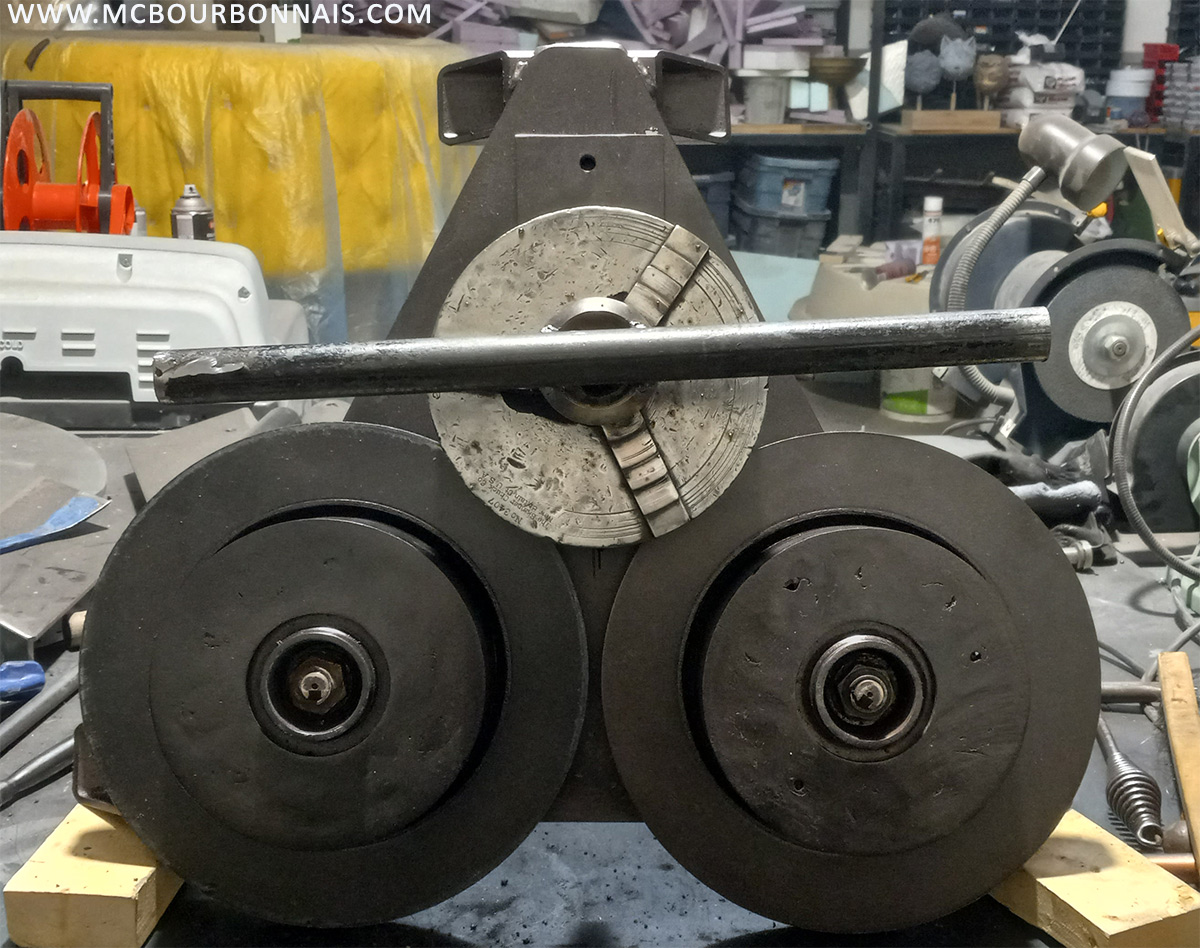
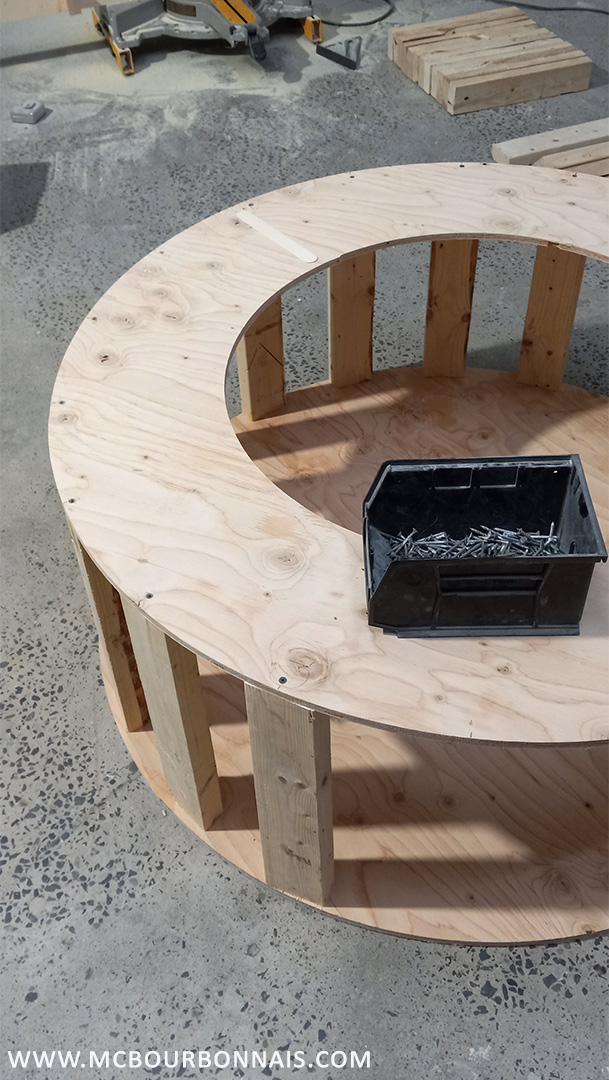
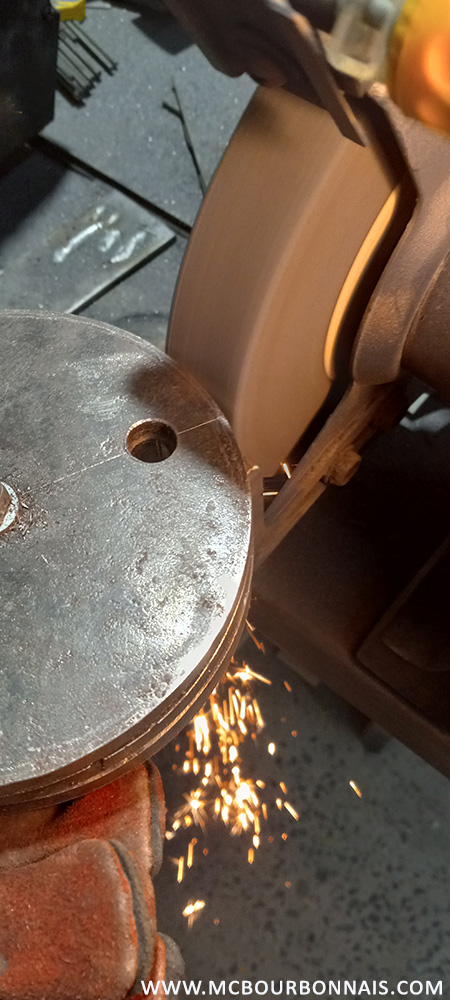
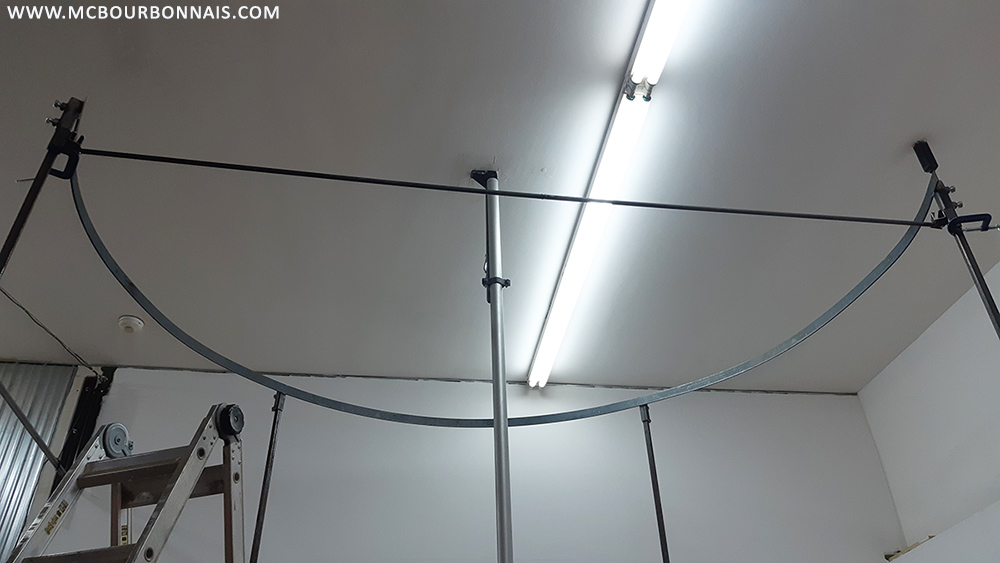
My Grumpy Friend suggested to use metal to build the round-shaped structure. The plan was to buy HSS square tubes and flat bars and bend those flat bars to create 2 half round shapes. One half round shape would be fixed to the floor and the second half round shape would be attached to the top of the vertical HSS square tubes. But a steel flat bar isn’t that easy to bend or roll and we first needed to build our own metal rolling machine. There is that expression in English : ‘Go big or go home.’ Well, for my Grumpy Friend, big is not enough. It has to be big AND complicated. Why make things simple when you can make complicated? That’s definitely my friend’s motto. I couldn’t come up with a better or simpler idea, unfortunately, so we started analysing how metal rolling machines work and how we could build our own.
This homemade metal rolling machine was built using various used pieces, including broken disc brakes. Let’s see if you can recognize those pieces in the picture. :D The flat bar would go through those metallic discs and ‘roll.’ They would acquire the curved shape we needed in order to make the round-shaped photoset structure. Building that metal rolling machine took quite a while and as you can see in the background of that picture, by the time the rolling machine was finished, other parts of the photoset had been built and the yellow pouf was already finished. I’ll come back to that amazing giant pouf later. :D Actually, assembling the metallic round-shaped structure was done in the middle of the project, but I think it makes more sense to explain this step first.
We fixed to the floor the first curved flat bar. Easy. But you have no idea how complicated it was to lift up the 2nd flat bar to install it at the top of the HSS square tubes. If only I had helpers… But there was only my friend and I, so it took many hours to lift up that flat bar a tiny bit at the time, fixing it to each square tube at a certain height, moving the ladder every time, fixing the flat bar to the square tube a little bit higher each time, until the flat bar was finally at the top. I was exhausted. Yes, a steel flat bar is heavier than some of you might think. It was so complicated to manipulate. And once this step was done, it looked like this.
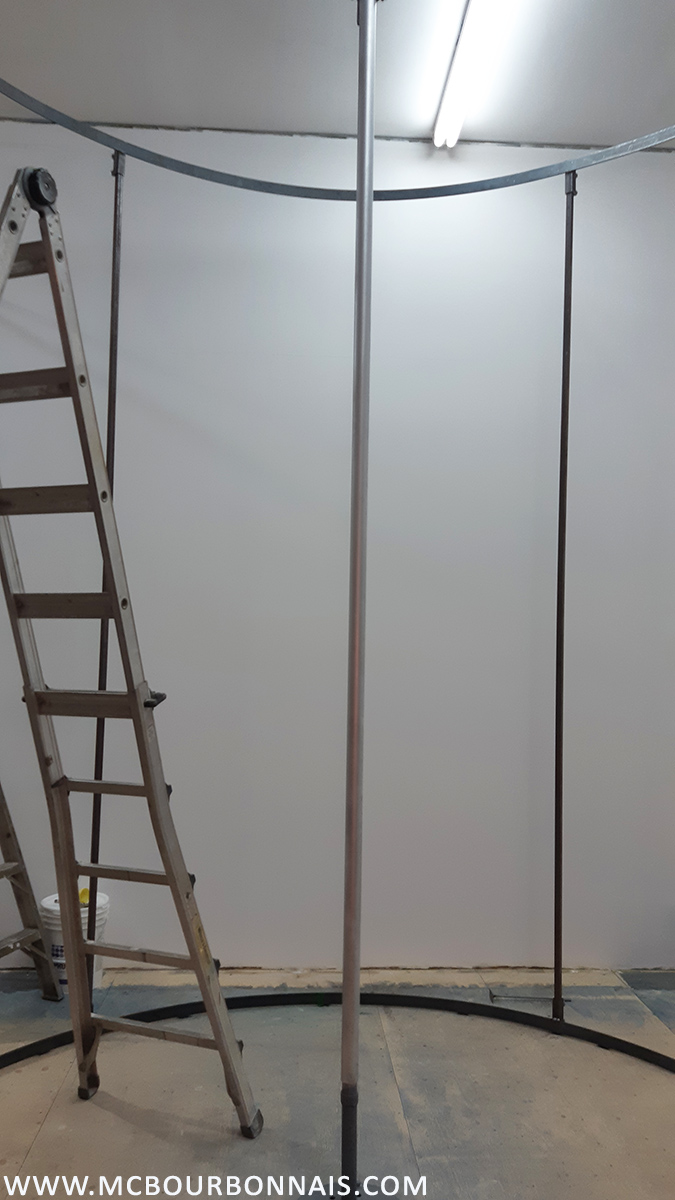
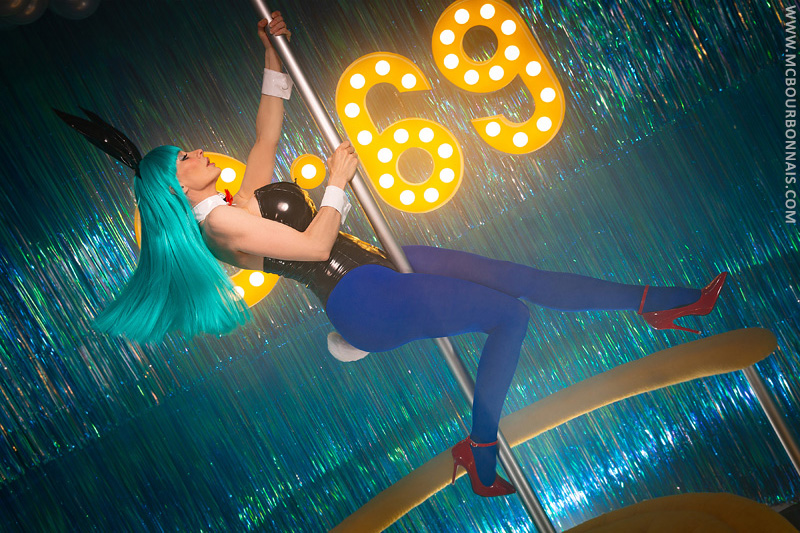
We also temporarily installed the stripper pole to make sure that all the measurements of the photoset were right, following the established plans.

Where does the concept of the pouf and stripper pole come from? I thought that a round-shaped background needed a round-shaped furniture to enhance it. Of course no local furniture store offers something as custom and fancy as a giant round pouf, so I’d have to build it by myself. Making searches about upholstery techniques online, I found an image of a round pouf with a stripper pole in the center and I thought it was brilliant! My round-shaped photoset would be a strip club! And while my friend and I were still searching for the parts to build the metal rolling machine, we started building a giant pouf with a hole in its center to put a stripper pole. We actually elaborated the whole photo concept before the metallic structure was installed. All the separate pieces of that strip club photoset were in my workshop before the first flat bar was rolled to make the round-shaped metallic structure.
To build the giant pouf, we cut simple plywood shapes. This shape would become the top of the pouf with a hole in the middle and a metallic part to hold the stripper pole in place. To be as strong as possible, the stripper pole would cross the pouf and go down to the floor. It would actually hold in another metallic part fixed to the photoset’s floor.
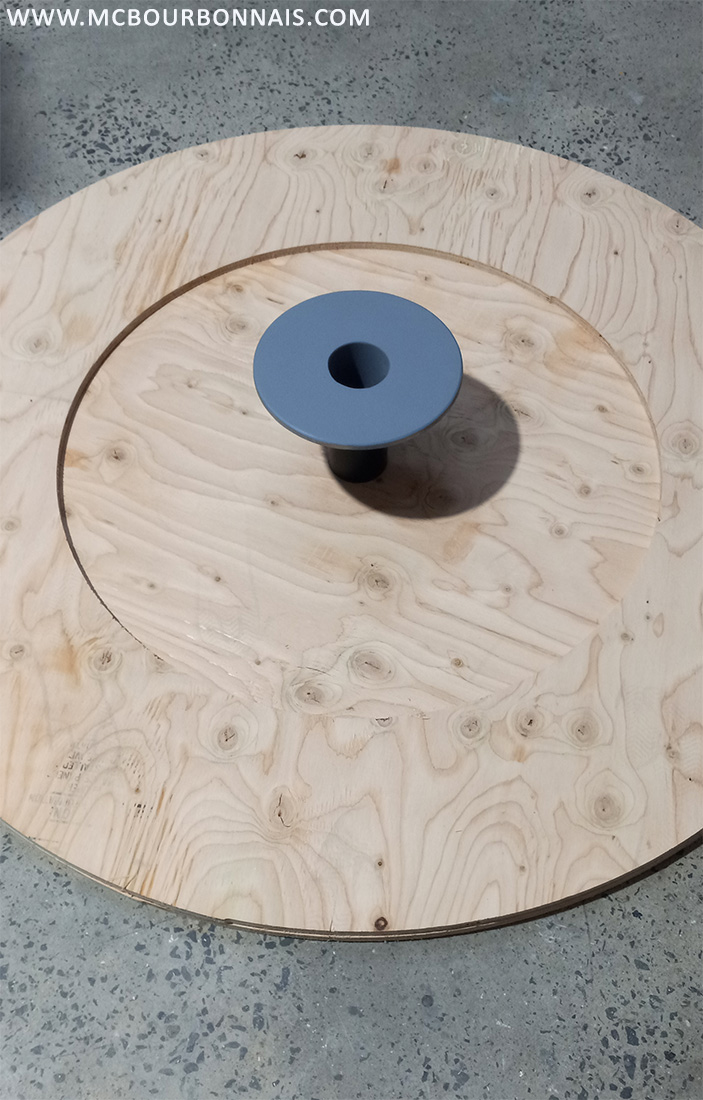
This shape you see on the top is actually the bottom of the pouf. It has a big opening in the middle because we need to access the inside of the pouf to build it. You’ll understand why later. The top and the bottom of the pouf were simply fixed together with pieces of 2-inch x 4-inch planks.
Then we covered that face with a flexible material, masonite board. By the way, those pieces of 2-inch x 4-inch planks painted in green are the same I used to build my ‘Ice Queen’ Christmas wreath. :D I always try to reuse construction material whenever I can. You can read my ‘Ice Queen’ giant Christmas wreath Making of blog here : https://mcbourbonnais.com/en/frozen-inspired-ice-queen-cosplay-photoset-finally-available/

The masonite board would then be covered with specialized upholstery foam. The foam was glued to the masonite board with a special spray adhesive made especially for foam. I bought both the foam and the spray adhesive from the same upholstery material store, www.jtsoutdoorfabrics.com I’m not sponsored by this store, I paid for everything, but I think it’s a specialized store that some of you might be happy to discover.
On the following picture, you can see many things :
1- The pouf was already covered with a few layers of foam.
2- The pouf isn’t on the floor anymore, we raised it using long temporary legs. (You’ll understand why later.)
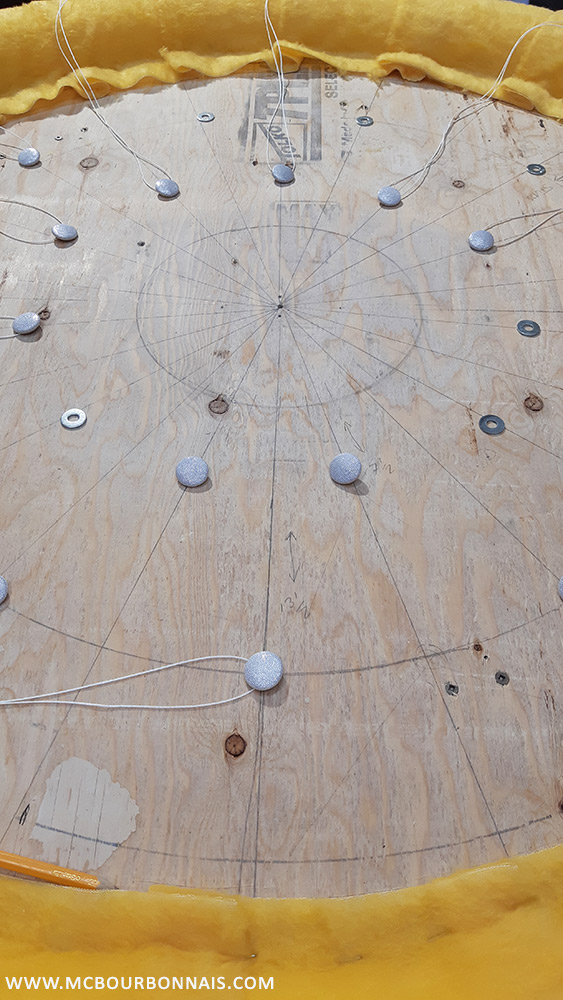
3- I wanted to use that diamond button tufted technique and I made a paper pattern to determine the place of each tufing button around the pouf.
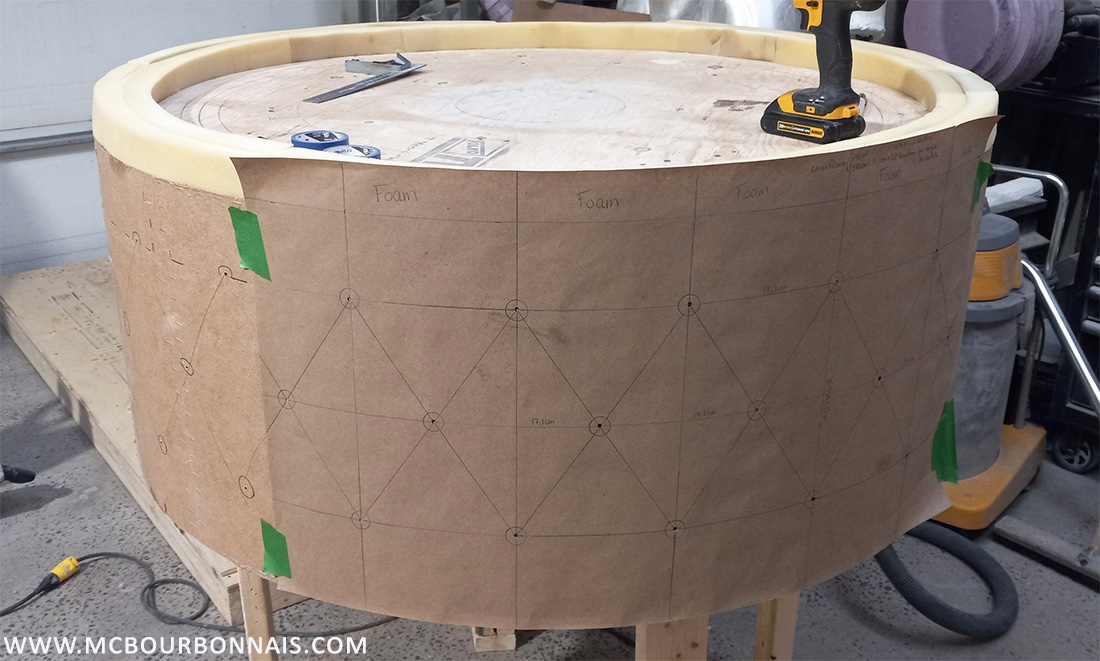
First, I drilled holes in the masonite board following my paper pattern. Where there’s a hole, there would be a button.
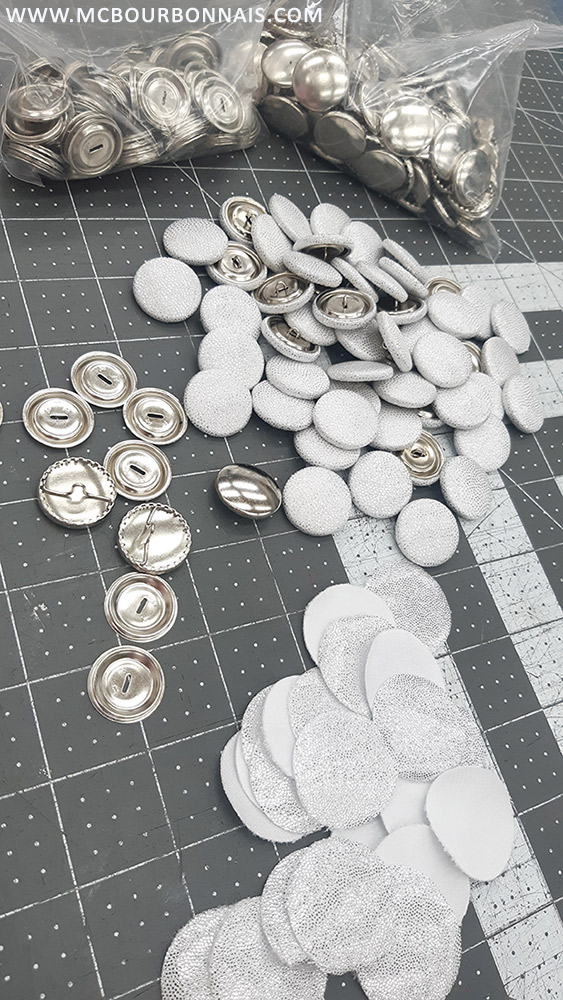
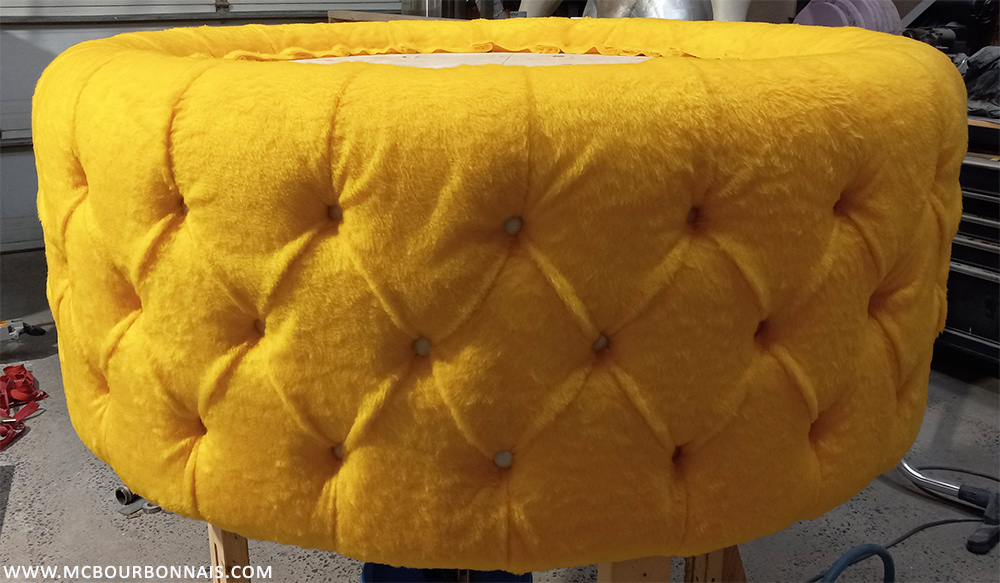
You’ve certainly seen diamond button tufted furnitures before, but maybe you don’t know how it’s made. Well, it’s made with foam, tufting buttons and a lot of strong upholstery twine. Tufting buttons can be made of platic or metal and they are ‘plain’ buttons sold in 2 separate parts. The top part will be covered with the fabric of your choice and the bottom part of the button will be tightly inserted into the top part to squeeze the fabric between the 2 parts and hold it in place. Tufting buttons are used for clothing and upholstery. There’s a machine that quickly allows to push the bottom part of the button into the top part while folding the edges of the fabric inside. but I do not own that machine, so I made all the buttons by hand. Yes, it’s doable, you can assemble tufting buttons manually, but it takes a while and it requires great dexterity. I needed more than 80 tufting buttons for my giant pouf and it took a few hours to assemble them all by hand. Notice the 2 separate parts of the buttons in each bag and the finished buttons covered with a silver white fabric. The fabric has to be pre-cut in circles.
Once you’ve chosen the button size you will use, you have to cut holes in the foam according to the chosen pattern. Each hole in the foam has to face the correspondig hole in the masonite board. That beautiful diamond-shaped pattern is so impressive because we can see the foam’s tickness under the fabric. The tufting buttons are not simply stitched to the fabric, they are actually pulled with a twine through that hole made in the foam. That’s how we obtain that ‘padded’ effect. I don’t know what kind of tool upholstery professionals use to do this step, but here’s the homemade tool I used. Yes, that’s a sanding file in the middle. :D
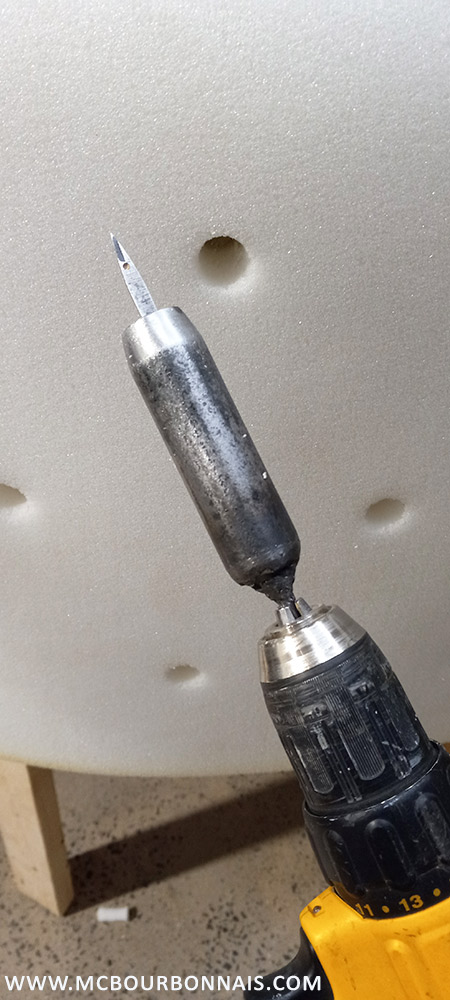
With this tool, I was able to cut perfect holes in the upholstery foam following the marks I had made using my paper pattern and according to the holes in the masonite board. Just like paint, fabric or paper, foam is sensitive to sunlight. The yellow parts of the foam you can see on the next picture were obviously exposed to the light while the white parts were protected by the wrapping. The foam was delivered to me like this, but it’s unimportant since upholstery foam will be covered with a thick fabric anyway.
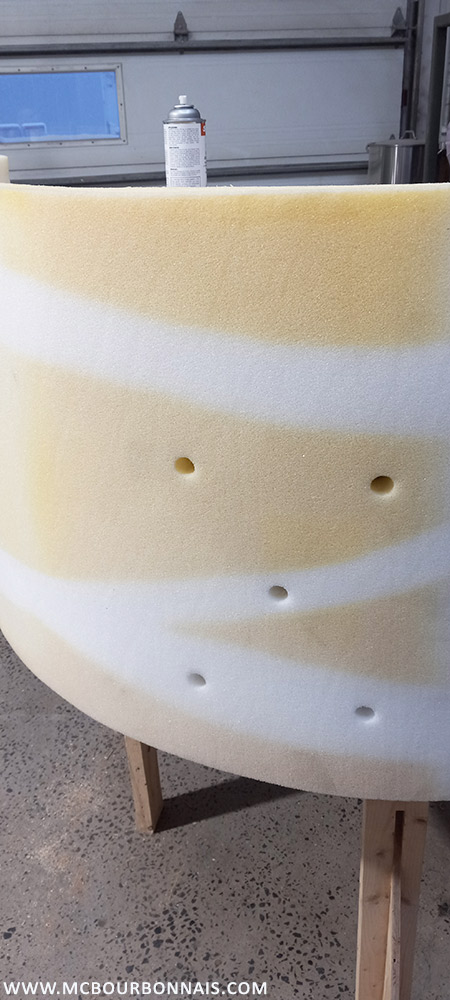
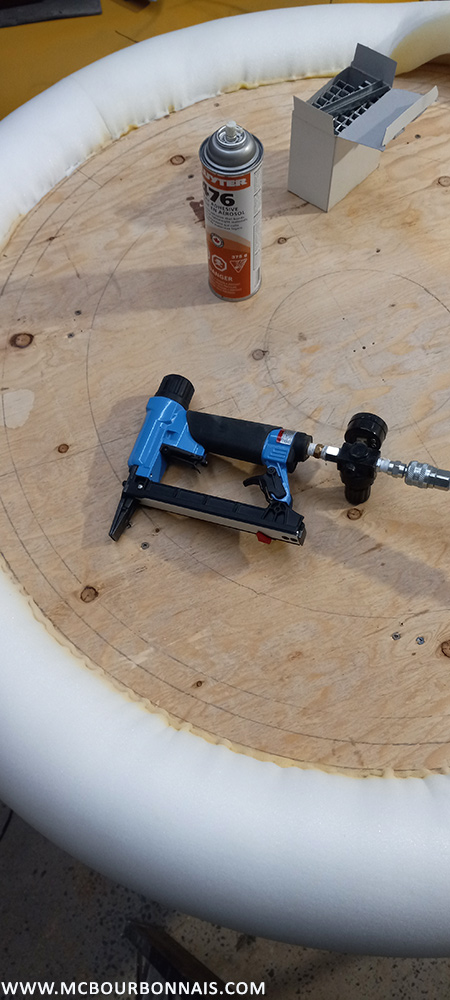
Finally, the top edge of the foam was folded over the top of the pouf to create a gorgeous padded edge. To fix the foam to the plywood, I used stapples and a pneumatic staple gun made especially for upholstery. The tension and strength required to fold over the foam and create an even edge all around was surprising.
I had never made any upholstery project before. I discovered a fascinating world. When it comes to know how much fabric you’ll need for a project, upholstery is all about calculations. Very unique calculations. Each tufting button has an influence on the quantity of fabric you will need because the fabric, just like the button, is pulled through the hole in the foam. The thicker the foam, the more fabric you will need. Those few extra centimeters of fabric that will go inside each hole in the foam make a big difference in the total quantity of fabric you need. It’s not just the circumference and height of the pouf. It’s the circumference and height PLUS the extra fabric needed for each button. I’m certainly not the best person to explain this, especially not in English, but you’ll find tons of upholstery tutorials online if you’re interested in learning more. :)
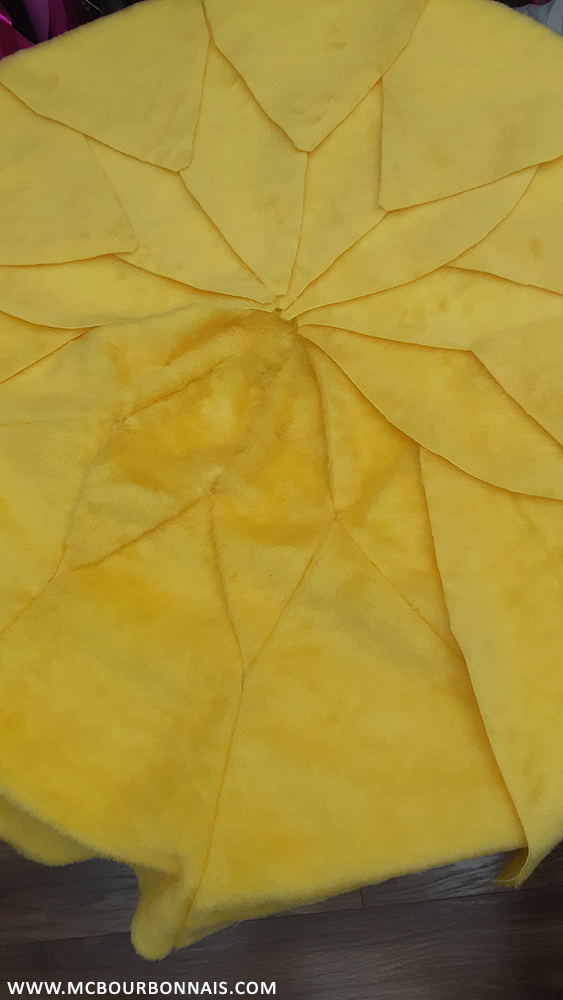
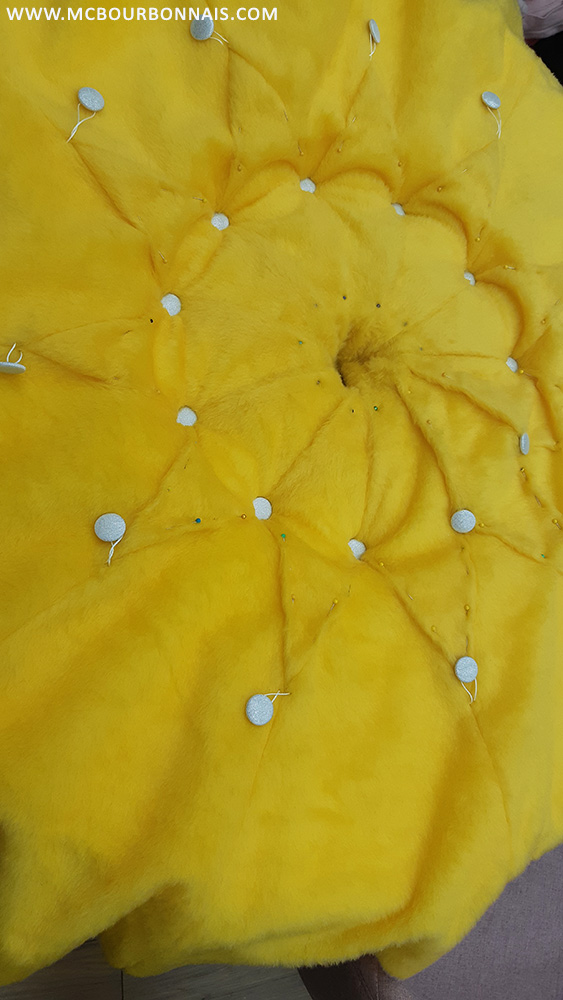
For my project, I used a fabric that I already had. I had many, many meters of that yellow fake fur, I knew I had more than enough. I had previously cut long pieces of upholstery twine and threaded the twine through each tufting button. Each tufting button was ready to be used. Then I started applying the fabric over the foam. This is where the fun begins. :D This step can’t be done by only one person. Now you will understand why the pouf had to have an opening under it and why it had to be lifted in the air to be accessible from the inside. Look at the next picture.

I was standing next to the pouf while my friend was sitting on the bucket you can see under the pouf. His upper body was literally hidden inside the pouf. He would insert a long needle through a first hole from the inside of the pouf, going through the foam and the fabric. As soon as I would see the needle appear outside the pouf, I would thread the twine with a button through the needle so my friend could pull that twine until the button AND the fabric would go down the hole in the foam. Meanwhile, outside the pouf, I was carefully creating with my fingers the folds around each button. If you look closely at the picture, the diamond button tufted effect is not just created with the tufting buttons placed following a diamond pattern. There’s also a fold between each button, diagonal folds that also create a diamond-shape pattern. Once the 3 or 4 folds around a button were properly made, I would tell my friend to pull the twine inside the pouf (remember that my friend can’t see anything, he’s hidden inside the structure of the pouf) so the button would find its final place inside the hole in the foam. Finally, my friend would use the pneumatic staple gun to attach the twine inside the structure of the pouf. Again, the strength required to pull the twine and keep the tension was surprising. Apparently, you have to be strong to do upholstery! lol I didn’t think of taking a picture of the inside of the pouf, but at the end, once all the tufting buttons were attached, the inside of the pouf looked like a musical instrument full of tensed strings! :D That’s why upholstery twine has to be so strong. The tension applied to hold each tufting button in place is truly incredible. Now look at that same picture again.
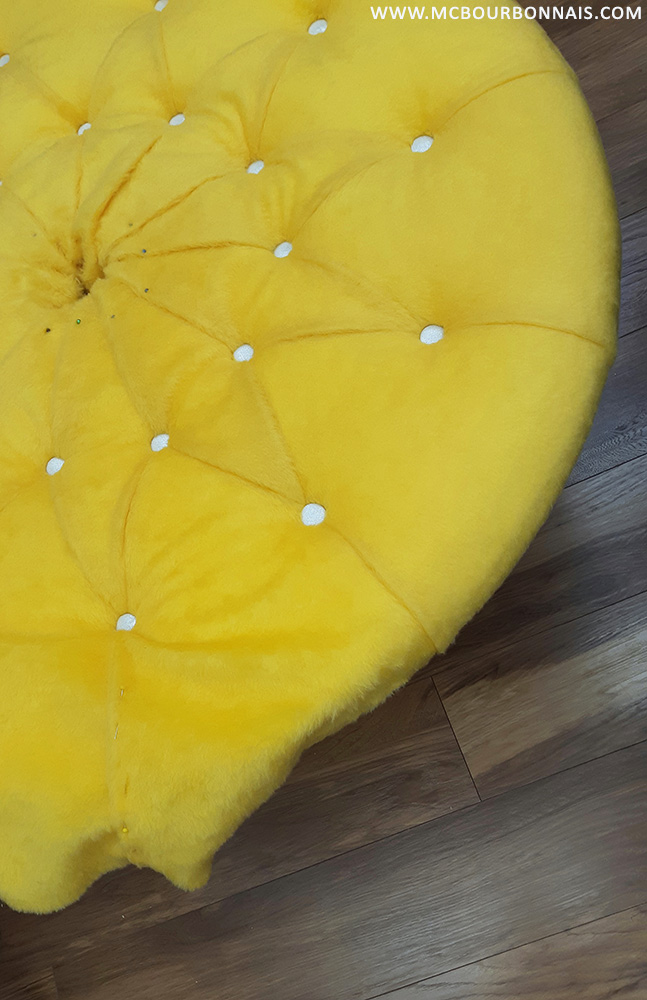
My yellow fabric was about 60’’ wide. but the circumference of the pouf was way more than 60 inches, which means that there would be joints in the fabric. But there’s no stitches, only folds between the tufting buttons. This is one of upholstery magical techniques. The joints in the fabric are simply hidden among the folds. Once I would reach the edge of my fabric, the limit of its width, I would cut the fabric between the buttons, following the folds creating the diamond pattern. Then I would start with another piece of fabric, hiding the joints by creating a fold with my fingers, following the same diamond pattern. It means that most of the folds are real folds, but some folds are actually joints and you can find those joints if you carefully inspect each fold of a diamond button tufted furniture. It’s not easy to explain all this with just words, but again, you’ll find plenty of upholstery videos online if you’re curious about this. At some point, the pouf was entirely covered! And seeing that gorgeous diamond button tufted pouf was extremely satisfying!
I have to mention that the fabric was also attached to the plywood structure at the top and bottom of the pouf with the same pneumatic staple gun as you can see on the next picture. This is actually the top of the pouf.
The next step was to cover the top of the pouf, which was another piece of plywood covered with foam. I first created a concentric pattern, choosing where each button would be, as you can see on the picture. The top of a round diamond button tufted furniture is usually not made this way. I used regular sewing techniques to draft, cut and sew a round shape with a specific concentric pattern that would become the top of my pouf.
The layers of foam on the top were not as thick as they were around the pouf so the padding effect wasn’t as dramatic. I had to be able to walk on the top of my pouf and easily stand on it with high heels during the photoshoot. I wanted a minimal padding. So I cut and sewed the pieces and I applied the final fabric shape on the foam following the same steps than the pouf itself. The difference is that this time, I was able to insert the twine and buttons and attach the twine on the other side of the plywood with the pneumatic staple gun all by myself. The tension on the twine wasn’t as big because the padding wasn’t as thick.
The extra fabric was folded around the foam and plywood shape at the end and attached with the pneumatic staple gun. Of course, there was a hole in the middle of that top part for the stripper pole.
Once my amazing pouf was finished, as he always does, my Grumpy Friend thought of one more thing we could add to the set. He got the idea to add a round-shaped seat around the round pouf. One more big prop I could eventually use to take poses during the photoshoot. It wasn’t a bad idea and it was pretty easy to make compared to that very complicated pouf we had just made. The upholstery part, at least, was simpler. So I said yes and we built that seat. Another plywood shaped was cut, covered with ordinary polystyrene insulating board and fabric. No upholstery foam (because it’s really expensive) and I didn’t need the seat to be comfortable. No tufting buttons either, so the seat itself was quickly done.
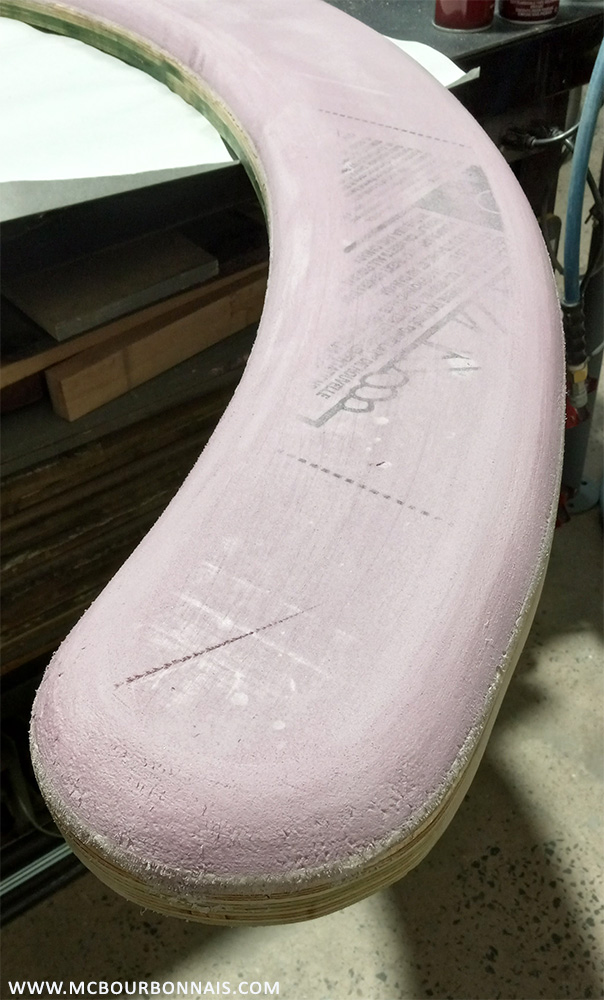
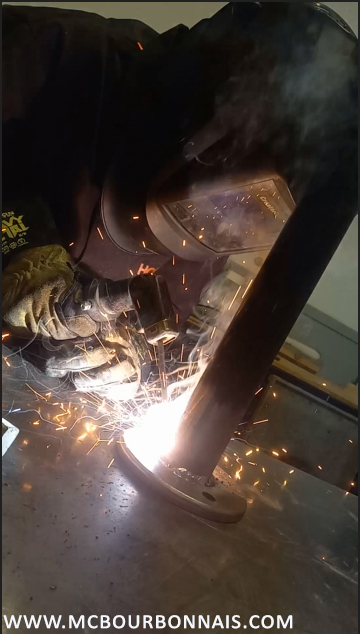
That seat, however, needed legs and we decided to use HSS rounds to make the legs. Amazing fact, I was taking the welding classes at that time, so I was able to practice and weld the metallic seat’s structure by myself. :D First, you can see the 3 round plates that became the base of each leg. These would be fixed to the photoset’s floor for more stability.

And that’s me welding the round tube to one of the bases. :D This would become one of the seat’s legs.
I have often mentioned that I’m always working on many projects at the same time. There are pieces of various photosets all over my workshop. Things move around, I need space to work, I build something new, something has to be moved to allow something else to be built, it’s an endless merry-go-round. To give you an idea, I took that pictture where you can see the finished yellow pouf and seat from my ‘Bunny Bulma’ photoset in front of my ‘Sticky Bunny’ photoset, which was my 2024 Easter photoset. The ‘Bunny Bulma’ photoset was already in the works more than 1 year before it was officially released, in April 2025.

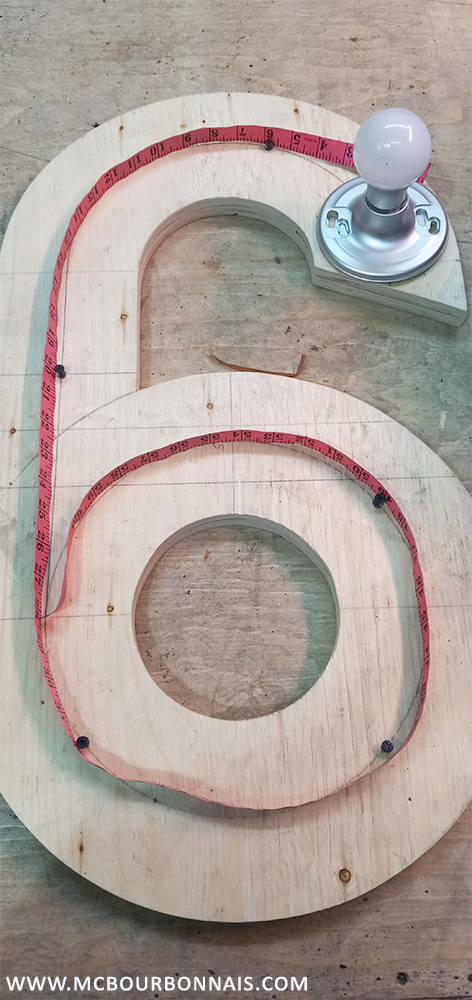
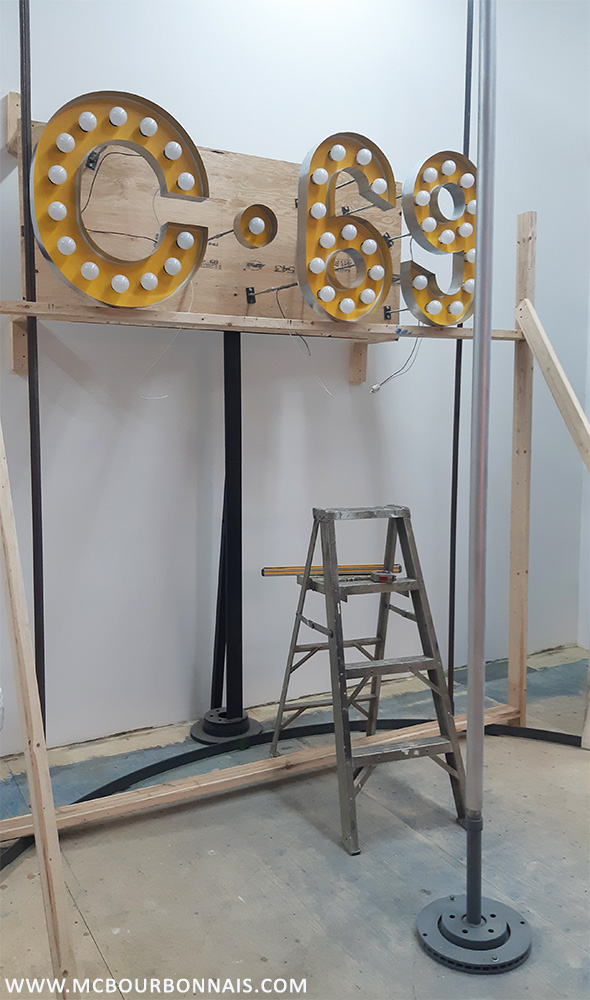
The challenge with any photoset is to visually ‘fill the space.’ You don’t want to have a large empty space in a photoset. Things have to be visually balanced. Looking at my photoset, I had a bright yellow pouf and a seat in the lower part. I knew I’d have some kind of curtains to create the background of the set. But I needed more elements, more ornaments. So I decided to create light bulb letters, the kind of bright letters you’d expect to see in a Moulin Rouge inspired set or a Las Vegas show. I chose to write ‘C-69’ which would stand for ‘Capsule 69.’ This is an obvious reference to Capsule Corporation, Bulma’s company in Dragon Ball. And the choice of the number 69 was… for the concept, you know. lol I started by gluing MDF board on top of a plywood for more thickness, but also because the MDF has a smooth texture that can easily be painted. Then I drew and cut the giant letter and numbers with a jig saw and I sanded the edges.
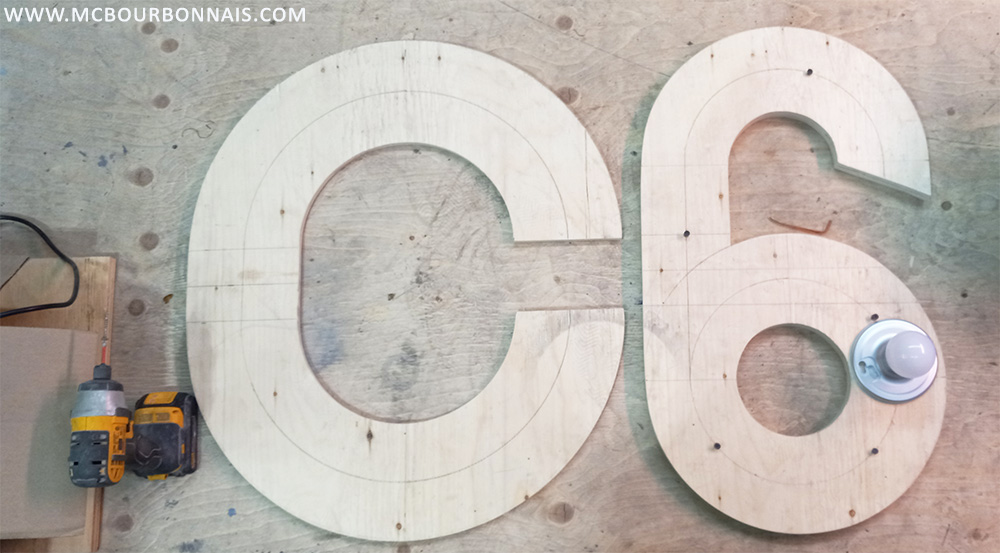
I calculated where I would place each light bulb. I’ve always hated construction mesuring tapes and this is a perfect example of a situation where a seamstress measuring tape can be more appropriate and useful than a construction mesuring tape even for a construction task. ;)
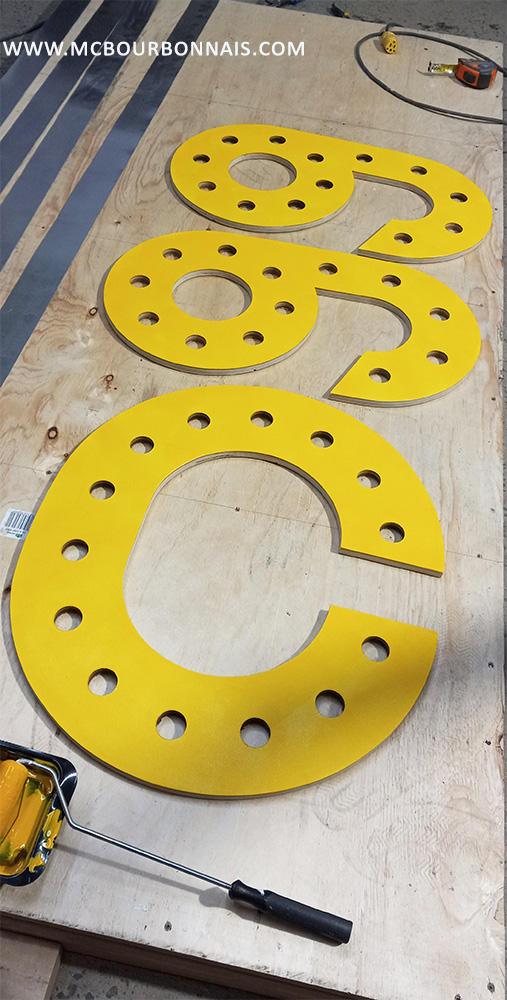
The next steps were pretty easy. Cutting a hole for each light bulb and painting the letters to match the yellow pouf. On the next picture, you can see under the cut shapes the steel sheet that was used to create the edges of each light bulb letter and number.
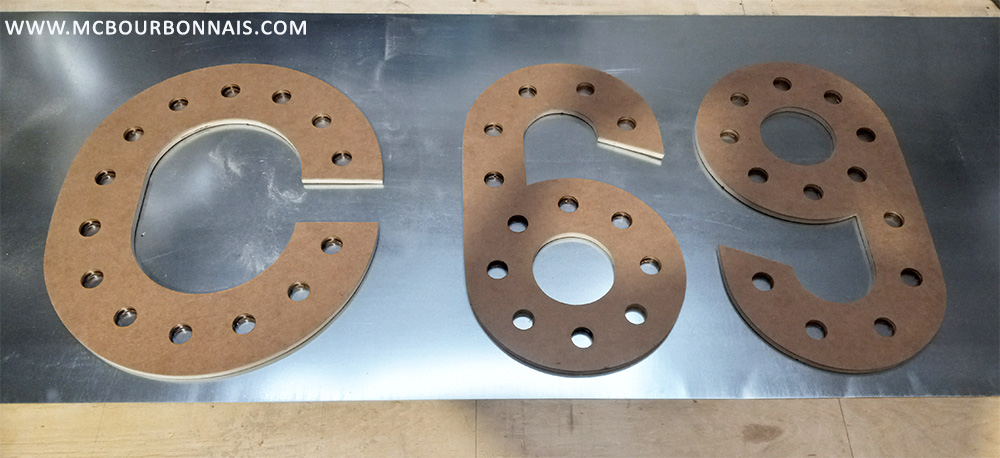
These are the final painted plywood/MDF shapes. On the left, you can see the steel strips that would become the edges of the light bulb letter and numbers.
Unfortunately, I realized that I didn’t take any picture during the process of bending and curving the steel strips around the shapes. It was a complicated step, one of those situations where you’d need many hands to hold everything in place! lol The steel strips were curved to follow the outer shape of each letter and number and were nailed in place. The MDF board on top of the plywood provided the extra thickness required to be able to nail the steel strips. You can see the tiny nails on the next picture.
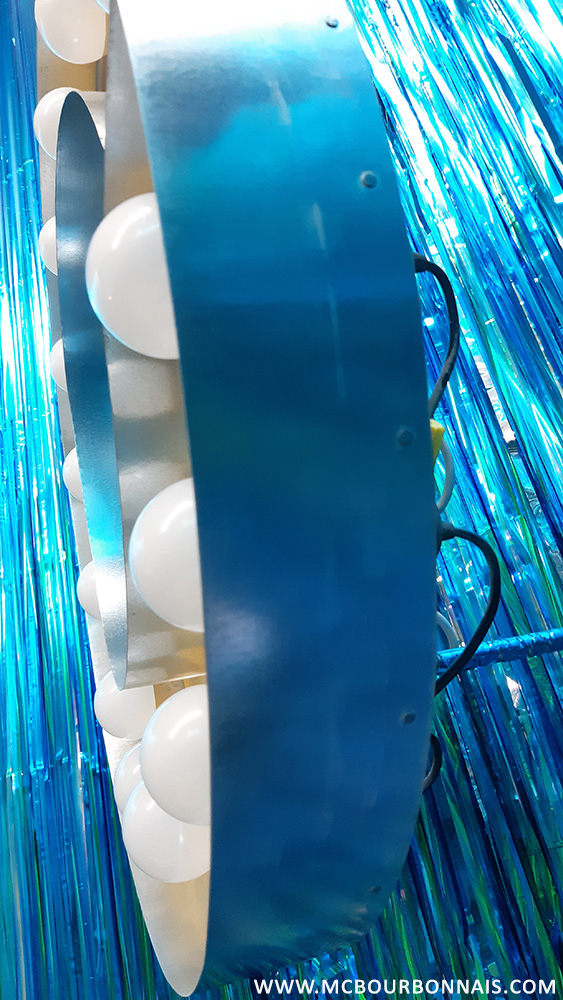
The goal was that those light bulbs would work for real. They could have been a decoration only, but they actually worked. :D Once the ‘C-69’ light bulb sign was done with all the electric system working, it was time to figure out how this sign would hold in the air, in the middle of the phototset. Each letter and number was attached to one or many metallic rods, which were attached to a piece of plywood standing on a heavy and stable metallic structure.
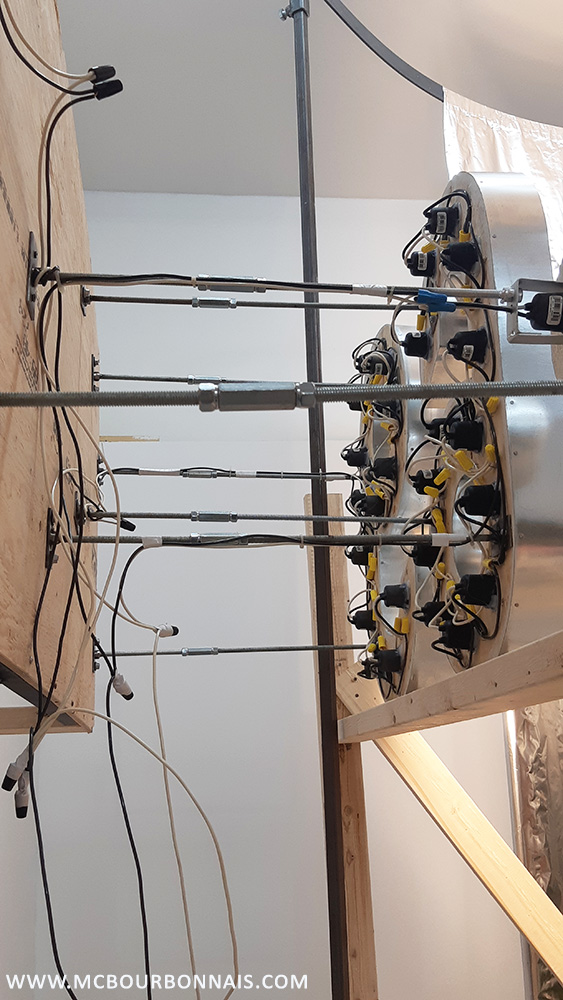
The installation was made possible thanks to a wooden structure that would temporarily support the light bulb sign. This wooden structure would then be removed.
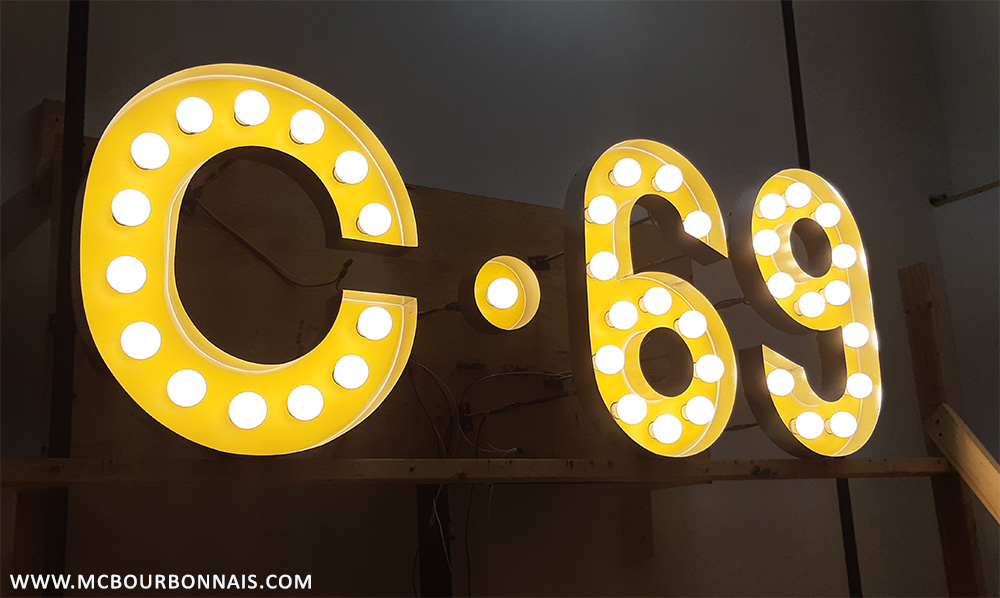
Moment of truth, we tested the light bulbs. :D
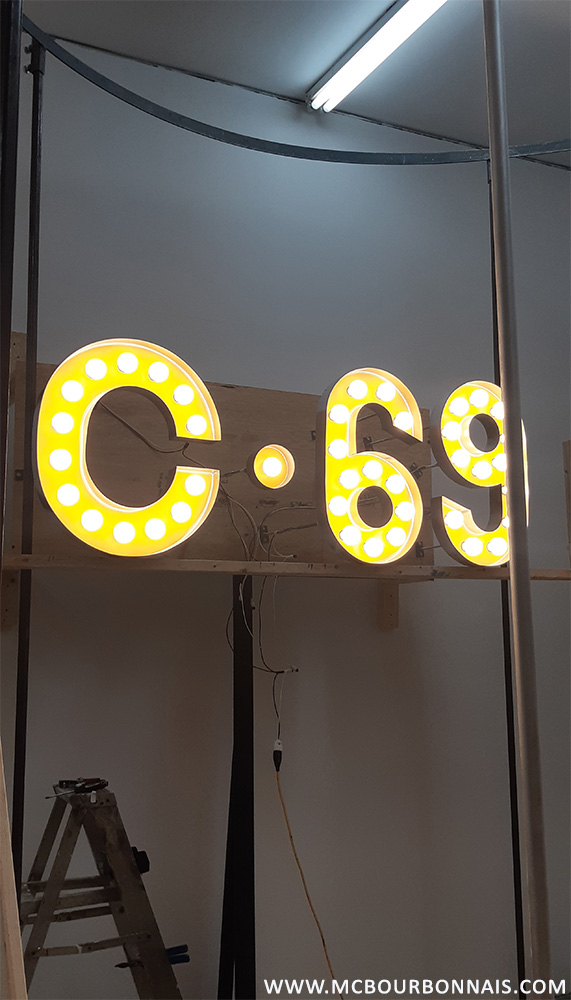
That was very satisfying. :)
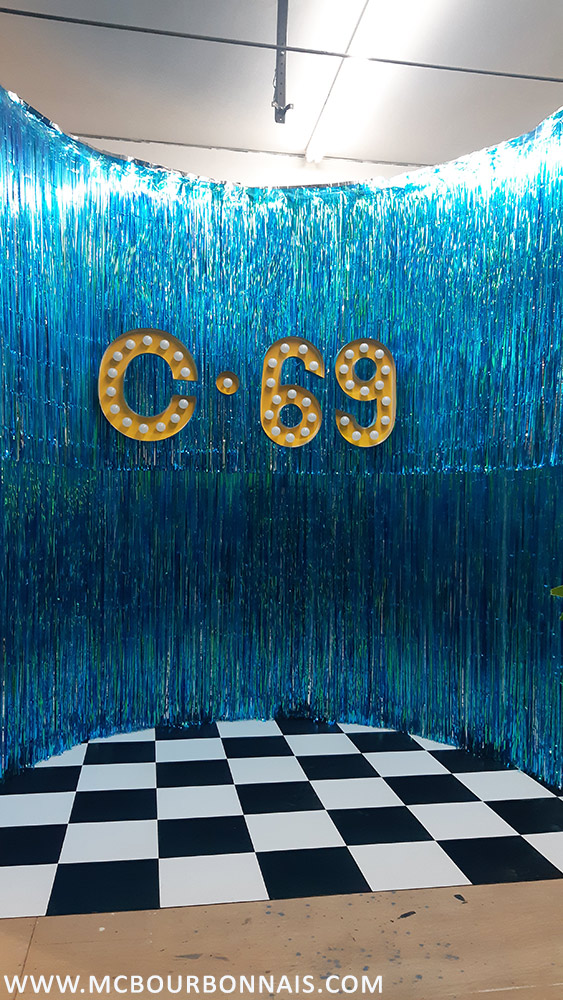
Maybe some of you noticed this already, but the metallic rods holding the ‘C-69’ sign in front of the future curtains are actually going THROUGH these curtains. Which means I’d have to cut holes, no, long slits in the fabric to allow the metallic rods to go through. That’s when I thought of using fringe curtains. Dazzling and shiny, they would be perfect for a night club concept and perfect to be placed on each side of each rod, as you can see on the next picture. This was later in the process, though. More steps needed to be done before I installed the first fringe curtains.

I had previously purchased a lot of fringe curtains at my local dollar store. Actually, I buy a lot of seasonal ornaments at the dollar store all year round. In my workshop, I’m storing fake flowers and fake plants, Valentine’s Day, Easter and Halloween decorations and tons of Christmas ornaments. So I already had those fringe curtains bought around Easter time, pink, yellow and teal fringe curtains. I considered all 3 colors for the photoset. But considering that my giant pouf was already yellow, I thought that pink or teal could be a great contrasting color for the photoset. I finally decided to go with teal to match Bulma’s hair.
However, things were not that easy. When I placed the first fringe curtains, I quickly realized that I could totally see the rest of my workshop behind the fringe curtains. They were too thin, too see-through. I’d have to put many layers of fringe curtains on top of each others. And as a first layer, I’d need an opaque material anyway because the fringe curtains were only 2 meters long. My photoset is way higher than that. I needed 2 fringe curtains to cover the height of my photoset. One fringe curtain could be attached to the top of my photoset, to the curved steel flat bar forming the top of the structure. But how would I attach the 2nd fringe curtain? It wouldn’t obviously hold in the air by itself. It would have to be attached to that first opaque layer of material that still had to be determined.
At that point, I already knew that I didn’t have enough teal fringe curtains, so I decided to put silver fringe curtains under the teal ones. Using silver as a base color for my background, I had the idea to buy a construction material, that aluminum paper that is sold in hardware stores for a completely different use. So the first step was to attach a layer of aluminum paper to my photoset’s structure to create an opaque background that would also be used to attach the multiple layers of fringe curtains. On the next picture, you can see that the temporary wooden structure holding the ‘C-69’ sign during its installation was removed. You can also see how the aluminum paper was attached to the top and the bottom flat bars. I had to cut slits in the paper to place it on each side of the metallic rods holding the ‘C-69’ sign. Then I used aluminum tape to patch those slits. Not very fancy, but all this would be covered with many layers of fringe curtains anyway. To give you an idea, this is a 14 feet ceiling. My photoset metallic structure was very high. I spent a lot of time in that ladder.
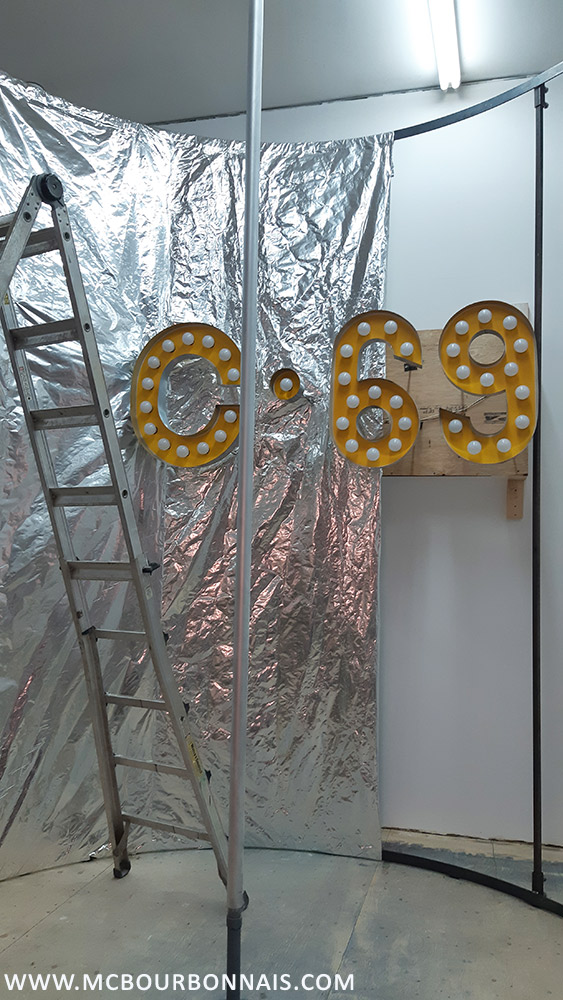
Once the full background was covered with this aluminum paper, I started adding the silver fringe curtains. Each fringe curtain does have a piece of adhesive tape to glue it on a wall. But after a few days, the fringe curtains were coming off… :( So I climbed the ladder again and attached the fringe curtains to the aluminum paper with my sewing pins. I needed a lot of sewing pins. I even had to buy a new box of sewing pins because I had used all the ones I had for the photoset!

Doesn’t it look good already? And it’s not even the final look!
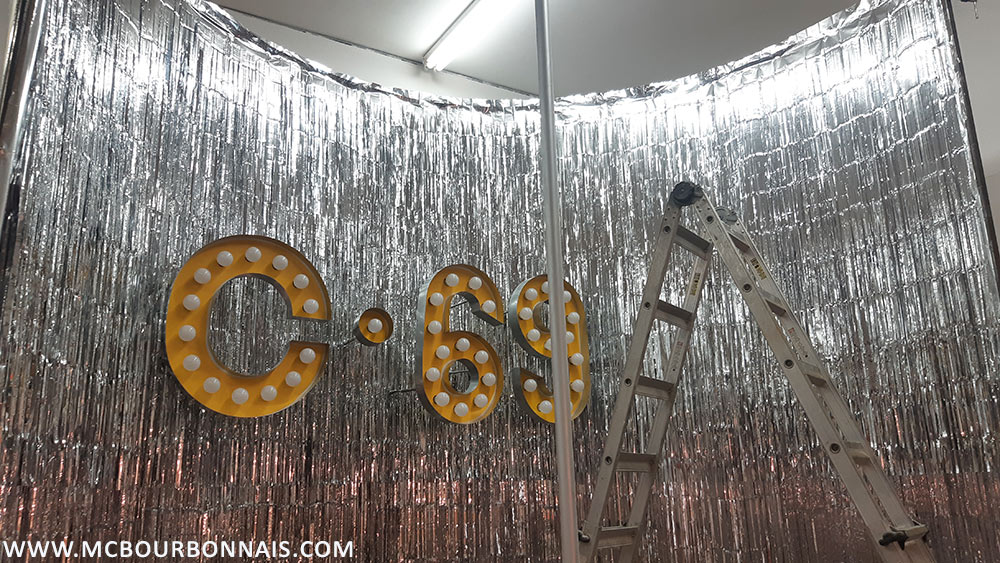
Then I added the teal fringe curtains I had. I had enough to put 1 layer of teal fringe curtains all over the background. And I realized that 1 layer wasn’t enough… It wasn’t teal enough. The silver was a great base, but I needed more teal. I couldn’t go back to the dollar store to buy more because these fringe curtains were a seasonal item bought during Easter time and that product wasn’t available anymore. So I ordered more teal fringe curtains online and it added extra delays in the making of process. People don’t think about this, but there are so many items to source to build a set, items that are not always easy to find locally, that the searching time and delivery time have a huge impact on the making of process. While you’re waiting to receive what you need for the next step of a project, you work on another project. So I’m always working on something and I’m always working on many projects at the same time.
Eventually, I received the extra teal curtains and I climbed my ladder again! lol It looked so good once it was all installed! :D Look at that contrast between the yellow ‘C-69’ sign and the teal background!

One important but always forgotten part of any photoset is the floor. I had to choose a floor for my photoset. Linoleum, rug, floating floor or tiles are all expensive options. I did buy a lot of linoleums, rugs and floating floors in the past years that I all used for many photoshoots. But I had nothing in stock that would match this set. I already had yellow, teal and silver in the set. Bulma’s costume is black and white with blue pantyhose, red heels and bow tie and teal hair. Should I add more colors? I finally decided to go for a black and white checkerboard floor. Believe me or not, I searched the whole Internet to find black and white tiles locally or to find a store selling black and white tiles that wouldn’t be on another continent. I couldn’t find anything. At that point, that photoset was already pretty expensive, I had used a lot of material and I needed to limit the costs as much as possible. I finally used white masonite boards on which I simply painted black squares.
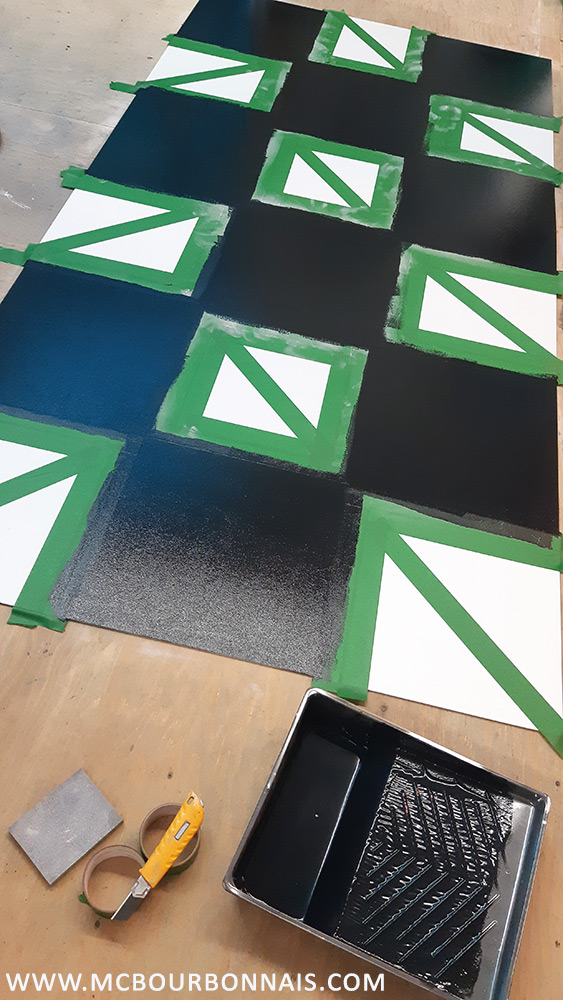
It’s not the greatest paint job ever, but I knew that the floor wouldn’t be the main focus of this photoset, unlike my ‘Heartwarming’ photoset where the photographer took many pictures of me from the air while I was laying on the ground. In my ‘Heartwarming’ photoset, the floor was my background. I had that blanket, all those cushions, flowers and decorations around me. That’s a good example of a photoset where the floor is the focus because it’s the only background. Even then, the decorations and elements have to be visually balanced.
By the way, if you missed my Limited Edition ‘Heartwarming’ photoset, it will be available again for a few days only in October 2025, around my birthday. ;)
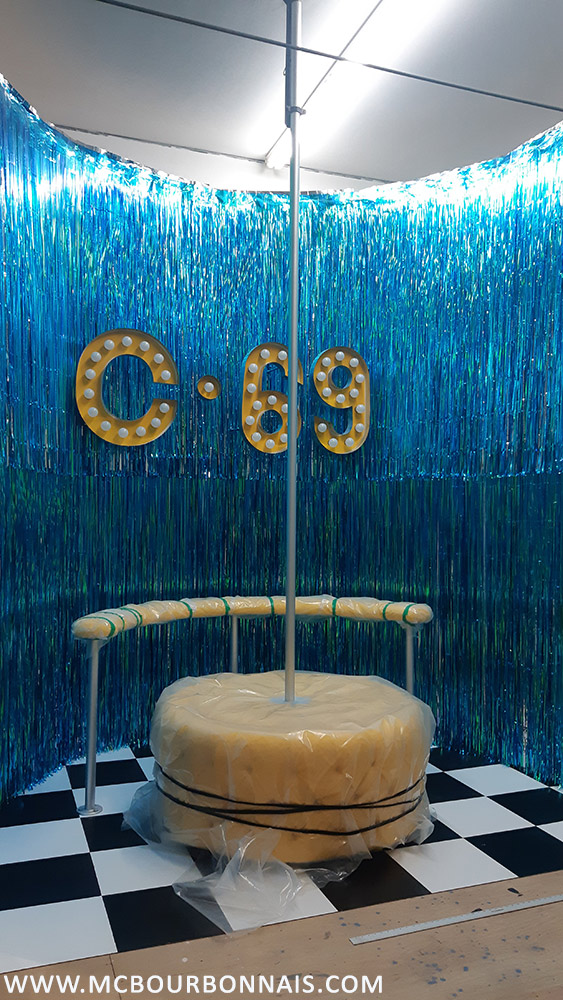
But in my ‘Bunny Bulma’ photoset, the floor wouldn’t be seen that much. Here’s the result. The black and white floor with the other colors of the set looks amazing! :D Notice that the stripper pole had been removed to allow the installation of the pouf. Remember that the stripper pole goes through the middle of the pouf.
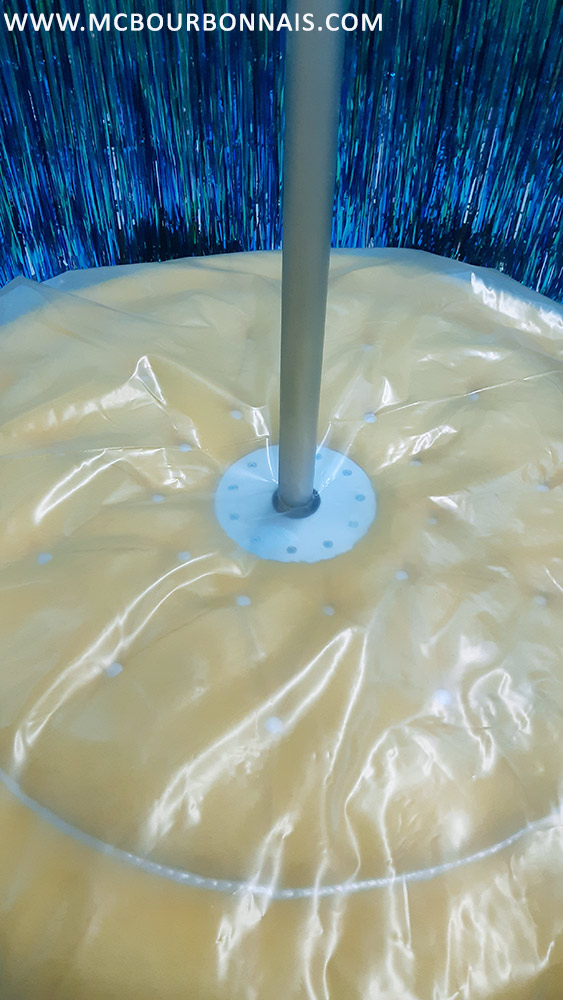
Now it was time to install the pouf with the stripper pole! :) The pouf was heavy, the pole too… I thought it would be very complicated to put everything in place but it wasn’t too bad, surprisingly. It’s true that we had already tested the installation of the pole before. We knew what to expect and I knew it was super strong. The small metallic base holding the stripper pole was first screwed to the floor. The pouf was put over it, then the stripper pole was inserted in the middle of the pouf and it went through the pouf down to the base screwed to the floor. The top of the stripper pole was attached to another metallic part coming out from the ceiling. Super well installed, very stable, nothing could move. :)
Notice that the pouf was wrapped to protect it form dust. At this point, the pouf had been ready and waiting in my workshop for many months. It was important to protect it because a workshop is a workshop and everything always gets dusty.

You can see the metallic part built to insert the stripper pole in the middle of the pouf.
Last but not least, the round-shaped seat was installed, each of its 3 metallic legs were screwed to the floor.
I thought that was it, I thought my photoset was finished and ready! But those of you who saw the final pics know that 2 things are missing : the yellow structure with more light bulbs on the floor and the balloon ceiling.
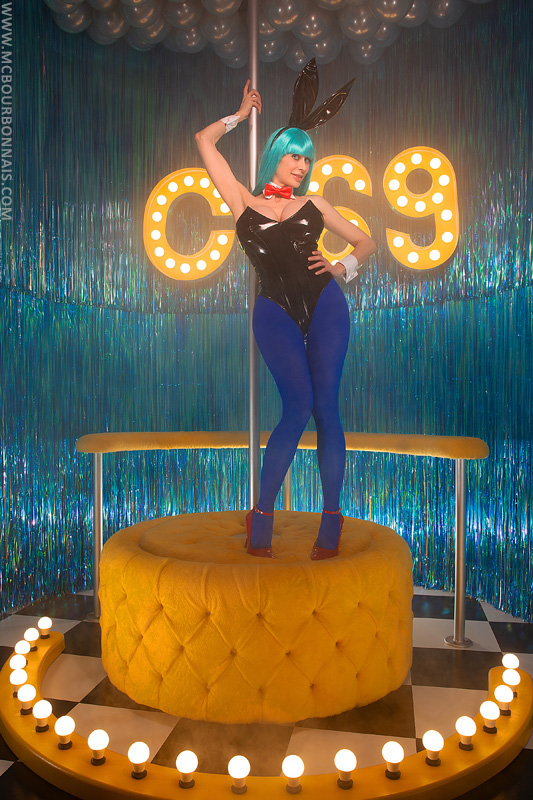
This is another very technical part and I’ll do my best to explain this in English. :) When my photographer saw the ‘C-69’ light bulb sign and when I told him the light bulbs were actually working, he was very enthusiastic about it. He wished he could use that sign as part of the photography lighting. For those who don’t know, studio photography uses powerful flash units. It’s not the same continuous light used for video making for example. Flash units work with transceivers. A transceiver is an electronic device that serves as a transmitter and receiver, enabling wireless communication over short distances using radio waves. A transceiver (the transmitter) is attached to the camera and other transceivers (the receivers) are attached to each flash unit and they all ‘flash’ together each time the photographer takes a picture with the camera. With the appropriate light modifiers (umbrellas, softboxes, etc.) that spread and diffuse the light, flash units can create a very flattering lighting that makes everybody look better. :D During a photoshoot, the photo studio is almost completely dark. The only source of light is coming from the modeling lamps, small light bulbs (continuous light) placed in the middle of each flash unit. This small source of continuous light stays on throughout the shoot. It allows the photographer to make his focus and it allows the model not to stumble on everything. lol Combining both continuous light (like the light bulbs of my ‘C-69’ sign) and photography flash units is doable, but it’s technical. There are many kinds of flash units that are more or less powerful. The more powerful ones will easily wash out on a picture any weaker source of light like the light bulbs. Which means that on the final picture, you’d see the light bulbs, but you’d have to add a ‘glowing effect’ on each light bulb in Photoshop. Or you can use less powerful flash units and succeed in keeping the real glow of the light bulbs on the final pictures. The photographer and I did many lighting tests before the real photoshoot to figure out how we could keep the precious glow of my ‘C-69’ light bulb sign. He asked me to integrate more light bulbs in my photoset, so I ended up building 3 more big ornaments with light bulbs. From those 3 extra ormaments that were built, only 1 was finally added to the set, which is the yellow structure you can see on the floor, in front of the giant pouf. I couldn’t tell if those light bulbs really did contribute to the global lighting of the photoset, but my photographer was pretty happy and the final pics look good, so I guess it was worth it.
I didn’t think of taking any making of pics when I built those extra structures with the light bulbs because I was focusing on finishing those structures as soon as possible to do the photoshoot as soon as possible. That round-shaped lighting structure on the floor was simply cut in MDF board, then covered with ordinary polystyrene insulating board that was sculpted. The final polystyrene shape was covered with aluminum tape and fiberglass (with polyester resin.) A big hole was pierced under the structure and it was partly emptied out to allow the installation of the light bulbs and electric wires. Holes were obviously pierced in the remaining fiberglass shell to put each light bulb. The fiberglass had of course been previously painted. It was not complicated, it just added more development time to this project that had already required so much time.
At that point, I really thought my photoset was finished. For real. Finally. But no… Apparently, something else was still missing. Since I’d be standing on the pouf or holding the stripper pole during the photoshoot, I’d visually be higher than I would normally be if I was standing on the floor. Which means that on most of the pics, and we quickly realized it during the photo tests, we would see a bit of the workshop’s ceiling. Which isn’t the most beautiful ceiling, as you could see on the previous making of pics. So my photographer asked me to come up with a ceiling for the photoset. One last challenge.
First, it wouldn’t be easy to install anything now that the pouf, seat and everything was installed on the floor. If I had thought about that before, I’d have installed a ceiling while the floor was still empty. Actually, I should have thought that we would need a ceiling. But now, it would be hard to put the ladder in the photoset. I had to be very careful not to break or scratch anything. Then, what could my ceiling be made of? How would it hold? The only thing I could think of was balloons. At first, I thought of using orange balloons, orange like the Dragon Balls. :D But I didn’t want to add one more color to this already very colorful set, so I went for silver balloons to match the rest of the set. I attached many balloons to a twine, many balloons in a row. I made many twines like this, many rows of balloons. With the ladder, I could easily reach the front of the photoset and I was able to attach one end of the twines to that top bar that you can clearly see on that pic I previously showed.
However, now that the pouf, seat and stripper pole were installed, I didn’t have access anymore to the back of the photoset. The ladder was too far, I couldn’t come close enough to attach the other end of the twines to the other part of my photoset and that was a real pain in the ass. :( I couldn’t reach the back of the photoset from behind the structure either, because I built the round-shaped structure too close from the wall behind it. But I found a solution. :D I attached a giant nut (not the nuts you can eat! lol The nut that goes with a bolt) at the end of each twine and I threw the nut over my photoset! The weight of the nut would pull down the twine and put some tension on it so the balloons would hold in a straight line. You can see on the next pic the rows of balloons attached to many twines during the process. A balloon ceiling is nothing that had never been done before, but the final result always looks good. :)
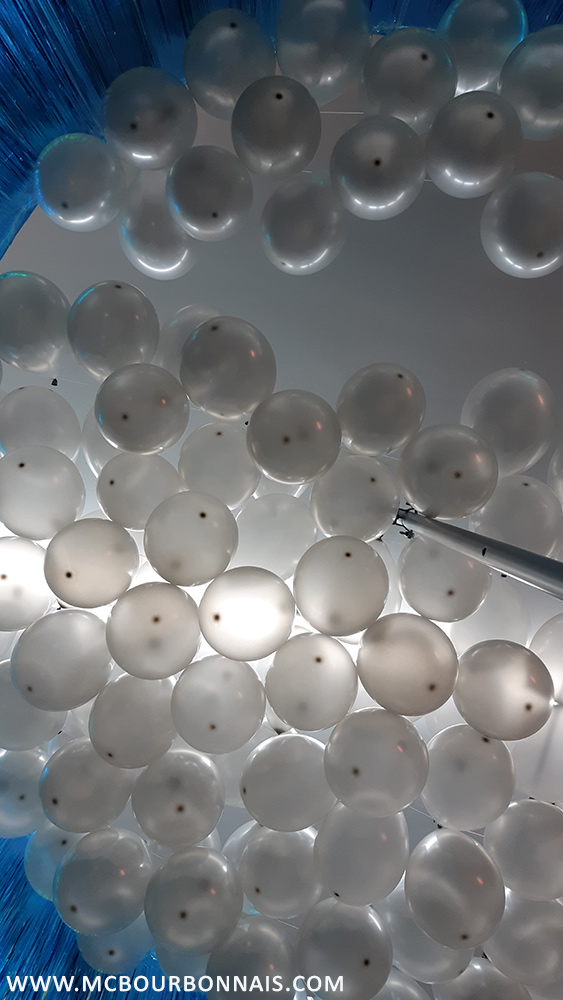
And I think it was essential because we ended up seeing the balloon ceiling on most of the pics, except the pics where I’m sitting or laying on the pouf, standing visually lower in the photoset. Notice the balloon ceiling on the next pic. :)
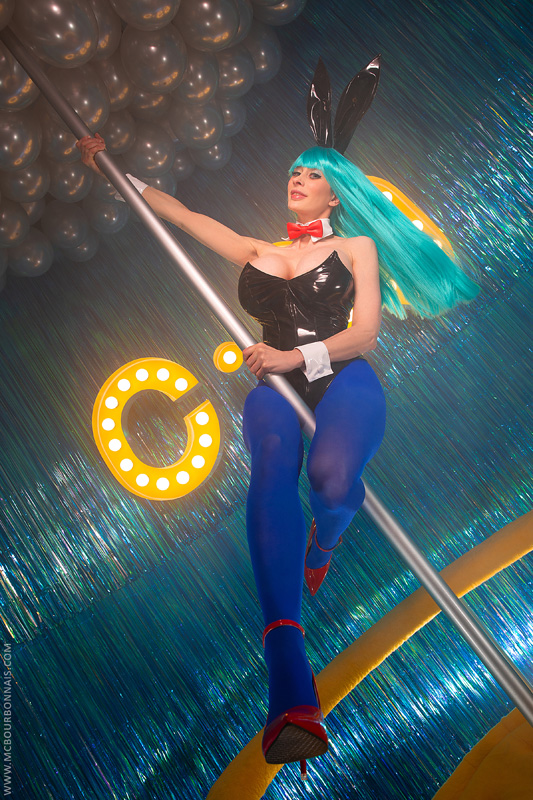
Yes, I sewed Bulma’s black bodysuit even though it’s a cosplay costume that is super easy to find online nowadays. I sewed it for a simple reason : no store-bought bodysuit would have suited me as it is. I would have had to buy a larger one to fit my breast implants and alter it to make it smaller at the waist. Why not just sew it since it was a pretty easy sewing project for me and while we’re at it, I could sew the white collar and wrists in a matching white fabric and make the bunny ears to my taste, in the same black fabric. I didn’t take any picture while I was sewing this because there was no real technical challenge other than the fabric itself, that stupid sticky faux leather that turns any topstitch into a nightmare (seamstresses and tailors out there will exactly know what I mean.) I ended up using masking tape, yes, that paper tape you use when you’re painting. I put masking tape on the good side of the fabric, all along each seam to allow the sewing machine’s foot to slide on the tape and make the topstitches possible.
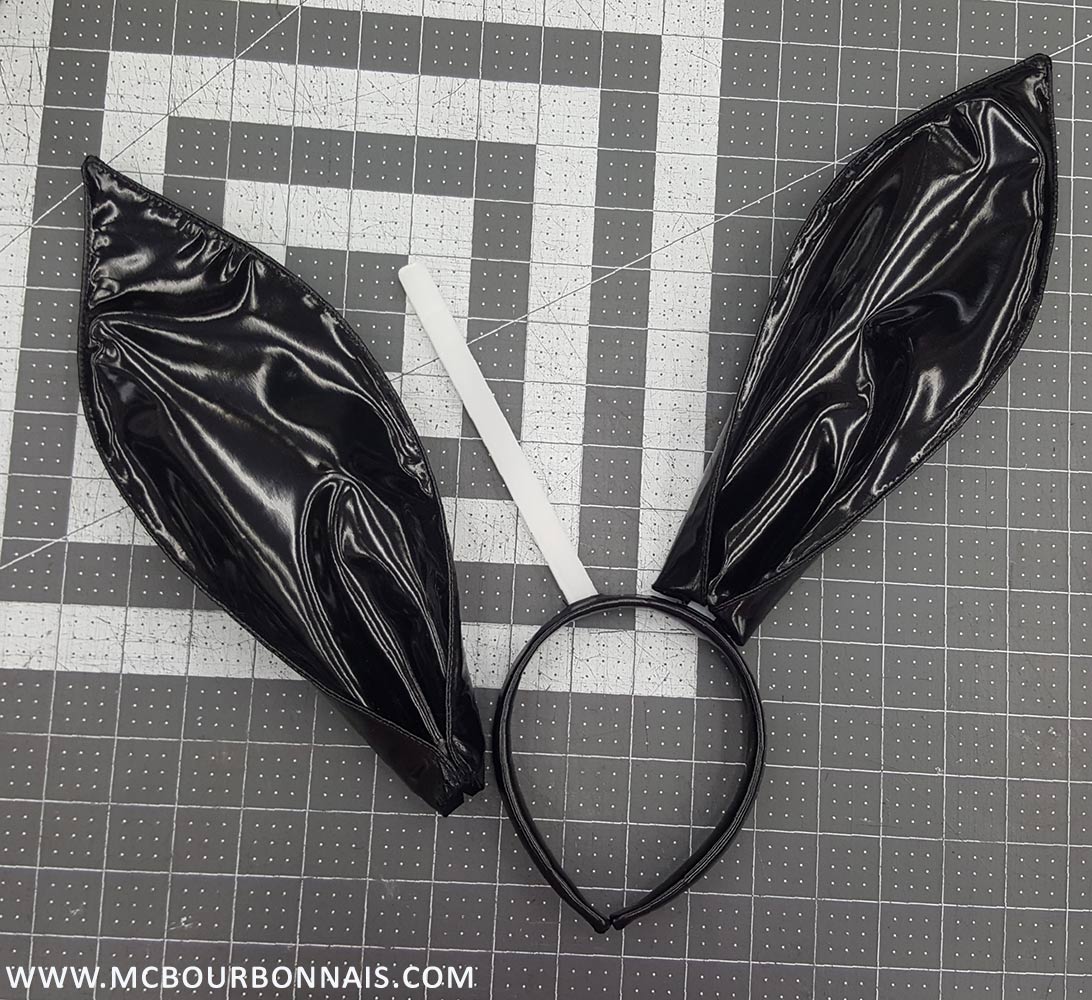
I took a picture of the bunny ears, though, because I love headbands and I even own a small headband collection. :D Here’s the trick with all those headbands that have cat ears, bunny ears, etc. Usually, the material covers the top of the headband and the finishing is made inside the headband with a stitch, a glued ribbon or a glueded piece of faux or genuine suede/leather. Ear headbands usually have a stitch on the top, making the insertion of the ears super easy. :D Here’s the secret inside the bunny ear headband.
Finally, I also sewed a smaller, way smaller bikini in the same black fabric because the bodysuit ‘covers too much’ skin, at least for some of you, I guess. ;) Itsy bitsy tiny black bikini, for you, guys, that I paired with blue stockings so we can remember it’s supposed to be Bunny Bulma.

There you have it, the whole story behind the making of my amazing Bunny Bulma strip club photoset! :D I know it’s a long blog, thanks for taking the time to read it. Actually, it took me many days to write this blog in English which is obviously not very profitable because I’m not paid to write and my website is totally ad free (which I’m very proud of.) As an artisan, I think educational content and techniques should be easily accessible to everybody, especially the ones who have limited financial ressources and I’m glad to share my techniques and knowledge here. :) That being said, if you enjoyed reading my blog and can afford it, feel free to send me an itsy bitsy tiny little tip to support my artisan work while you’re looking at my itsy bitsy tiny bikini pics. ;)
Thanks for your support throughout the past years. :)
Merci encore de prendre le temps de nous expliquer et nous montrer tous les “behind the scenes.” J’adore voir ta créativité dans les décors et le travail que tu fais avant tes “photos shots”
SVP
Continue de nous faire part de tes efforts derrière tes projets.
Merci
Merci d’avoir pris le temps de lire mon blog, Sylvain! :) Ce projet a été une longue aventure, j’avais très hâte de le partager avec le monde! :D
MC
This is amazing and fascinating details, thanks so much for taking the time to share. So you used woodworking, welding, upholstery, electrical, dressmaking, and set design skills to make this amazing set. I really don’t know how you do it, it makes sense that it took a year.
I have always really appreciated the detail and the craftsmanship that have gone into your sets but this one by far is the most intricate and difficult one to date.
Obviously, you in a bunny suit being Bulma is the icing on the cake and you and your body were made to be in a bunny outfit.
I love this set and hope you get to use pieces of it again in the future, too good to waste.
Thanks MC
Patrick
Hi Patrick,
Thanks for taking the time to read my blog. :) I agree, this might be the most intricate photoset I’ve built so far and one of the most challenging photoshoot too! ;) I’m really proud of this set. It’s so visually appealing with its bright colors and cozy ambience. It was very motivating using that many different techniques for one single project. Upholstery was my favorite part. :D But I also really enjoyed sewing Bulma’s costume. :) I’m glad you enjoyed the pics! Thanks for your comment!
C’est une description très intéressante de toutes les étapes de la réalisation d’un très beau décor. On peut voir que toutes les techniques apprises et maîtrisées au long des années de travail ont été utiles. Bravo à toi et à grumpy Bear ……
Merci à vous deux! :) Oui, il en a fallu des techniques différentes pour construire ce projet-là! lol Je suis assez fière du résultat. :)
Loved reading about the making of this set, you really did a lot for this amazing set, and you can really tell your hard work really paid off.
Love how you explained how you’re concept started to where it turned out, definitely added a lot of context to some of those tweets about it. :)
Truly awesome how it all turned out!
Hi Robert,
Thanks for your kind words! :) I know that some of my tweets are mysterious sometimes! lol It definitely makes more sense now that people can see what I was working on. :D Building such a big set is truly an adventure. Even though I have a concept, a lot of things can change during the process and even I never know what my final photoset will look like. It’s always a surprise!