
Monster Musume Rachnera Cosplay Making Of – Part 4
Rachnera’s legs: the magical assembling process
I’m showing you that picture of the spider’s body again because there are other details I want to point out.

You can see that we had started applying batches of auto body filler all over the spider’s body. Experts will apply it more evenly. I do my best, but some intricate shapes are harder for me to cover evenly. The more little bumps, the more sanding I’m gonna have to do. At least, auto body filler is easy to sand. Easier than fiberglass. To apply body filler, I use a large variety of spatulas: rubber ones, plastic ones, metallic ones.
You can also notice a large metallic plate that comes out from the spider’s body and continues on the half sphere shape which is the front part of the body. The holes in that plate are where the legs will be boalted. Another half sphere fiberglass shape will be assembled there to cover and hide the top part of the legs. This second half sphere is removable because we need to have access to the legs to assemble and disassemble them. Now you can see that the 8 legs will come from the front part of the spider’s body. The biggest part of the body has no leg under it to support it. Just like a real spider. Which means that we needed the metallic support in the 4 big legs to be very strong.
For the 4 bigger legs, we used a gigantic round tubing, 3’’ of diameter, 1/8’’ of thickness. It was probably way more than necessary, but since I would spend hours sitting on that structure, and since the 4 legs had to support all the weight of the spider’s body, we wanted to make sure that it would be super strong. The round tubings were bended and welded to follow the shape of the bigger legs. You can see on the next picture how the tubing follows the shape of the original template and of the final fiberglass leg.
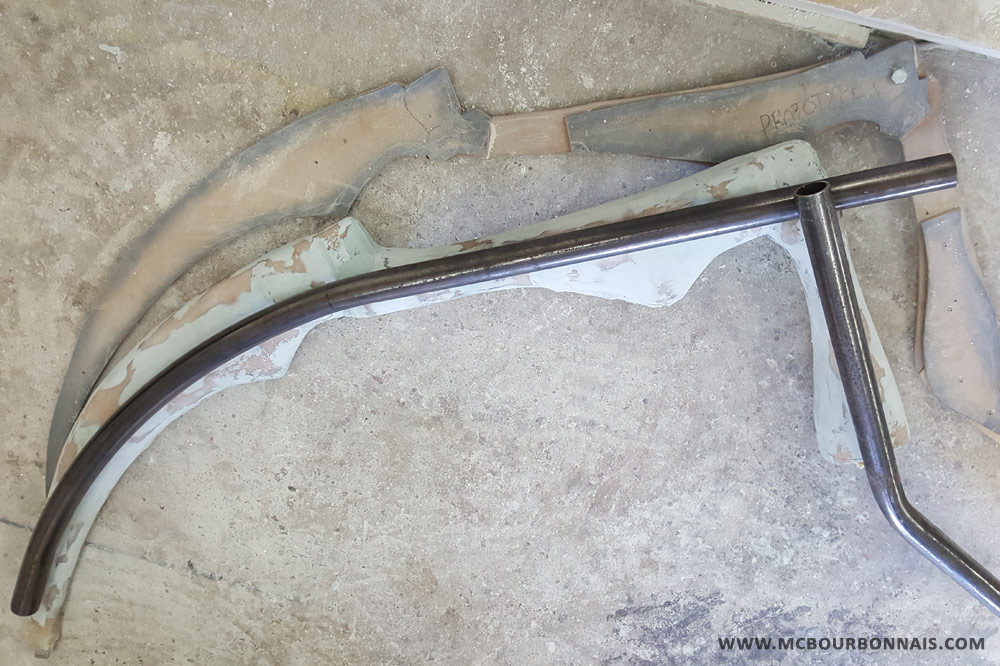
Wait. Yes, the leg is covered with fiberglass and the metallic structure is outside. Right. To insert the metallic structure inside the big legs, we had to cut them in halves with a buffer (which means fiberglass dust, awful step) and to take off the styrene and MDF template from the legs to keep only the empty fiberglass shell. Then we could put the round tubing inside and we patched the legs together again using the same method explained in my previous blog (see Part 3.)
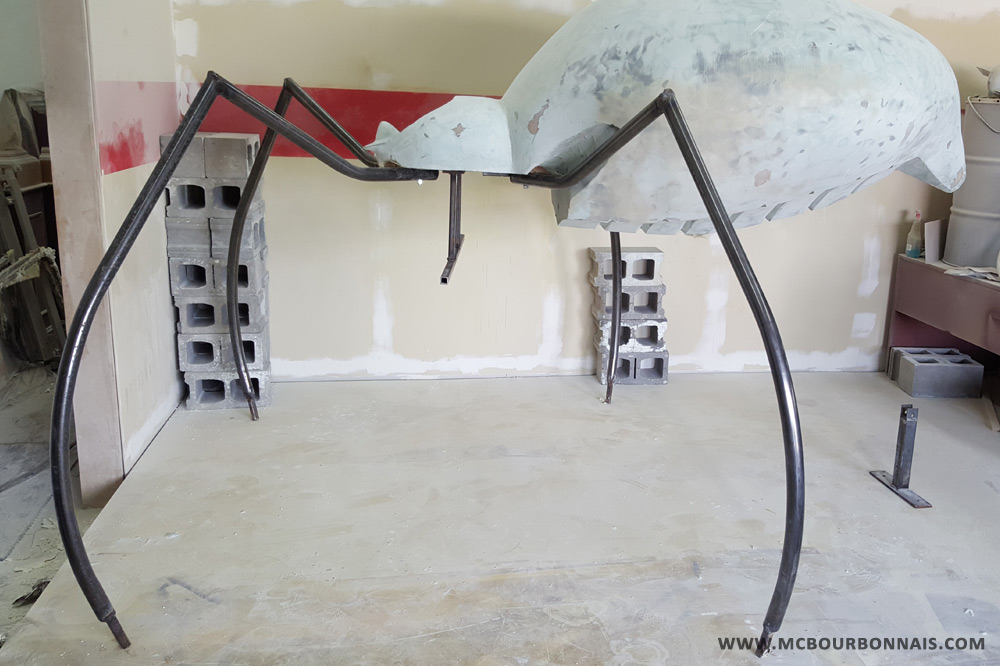
Let’s take a look at the spider’s body holding on the 4 metallic tubings. Before going through the whole process of inserting the metallic tubings inside the legs, we wanted to make sure that they would really support the body. It worked well. Notice how the legs come out from the front part of the body. And notice how the spider’s belly was well sanded at that point. :) From sanders to single sanding paper sheets, anything you can think of that was created to sand, we used it. And we sanded a lot.
We were in the process of developing a concept that would allow us to lift up the spider’s body and install the legs. That body, even empty, was way too heavy to be held in the air by a few people while someone else would install the legs. Plus, its round shape was making it very hard to manipulate. And we knew that we couldn’t count on a 15 people team to help us installing the spider at the booth before Anime Expo. My friend and I really had to create a concept that would make the assembling and disassembling process doable by 2-3 people.
The most obvious way was to use the already existing metallic plate hidden in the spider’s belly, where the legs are boalted, as a part of our assembling/disassembling structure. There are 8 holes in the plate, one for each leg, and we used these holes to temporary fix the removable sturcture that would allow us to fix the spider’s body in its transportation box and to lift it up to assemble the legs. I’m skipping a couple of steps there, because it was later in the finishing sanding process, but I want you to notice, on the next picture, the metallic structures on the floor.
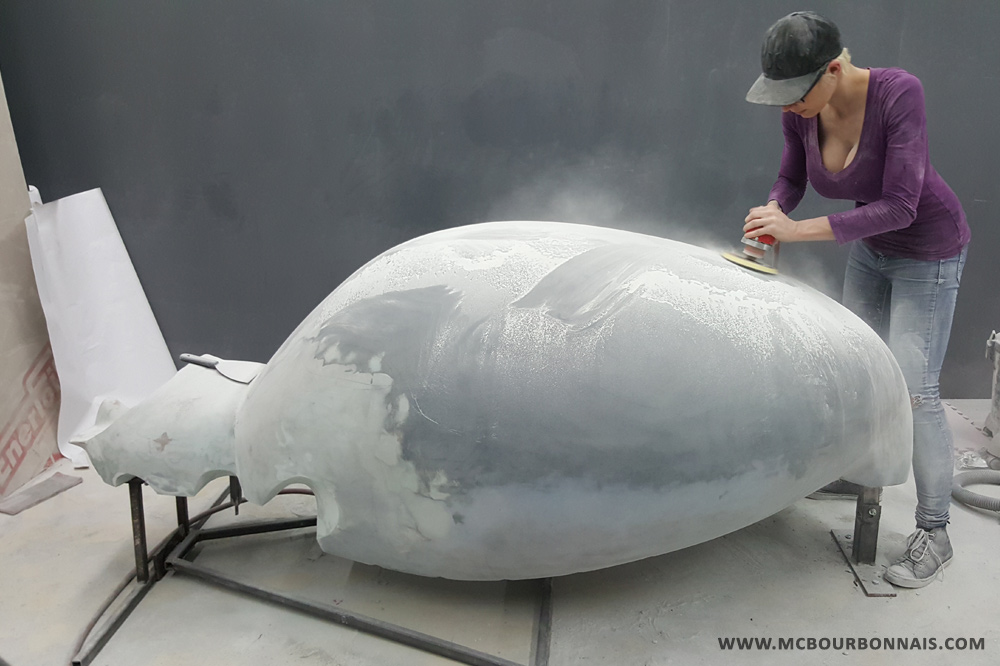
Before any of you make any comment about the fact that I’m not wearing a dust paper mask while sanding, please read Part 1 of this blog.
As it is on the picture, the metallic folded triangle and the metallic piece coming out from the spider’s tail allowed us to boalt the spider’s body to the bottom of its transportation box. See how we boalted it to the floor while we were sanding it. It was fixed the same way in the transportation box. To assemble the legs to the body, we had planned to take off the walls of the box and to let the tail of the spider boalted to the bottom of the box. We would then unfold the front part of the metallic structure, the triangle part, which would lift up the front part of the spider’s body, allowing us to fix the 2 first big legs. (I’ll share a picture of that step later, while I was actually installing the spider before Anime Expo.) Then, we could unboalt the tail from the bottom of the box, take off the metallic triangle from the front of the spider and fix it to the little part coming out from the tail, which would allow us to lift ut the back part of the spider’s body. At that point, the front of the body would hold on the front legs and the back, on the triangle metallic structure. We would then be able to boalt the 2 back legs, take off definitely the assembling structure pieces and fix the 4 remaining legs. It was a real engineering challenge to develope that process and when I think about it, I can’t believe that without any official engineering knowledge, we came up with that idea. And most importantly, I’m impressed that it actually worked. It was so much improvisation, but we had no choice, it had to work.
We’re getting closer and closer to see Rachnera alive! Watch for Part 5 of my blog to learn more!
Very impressive that you managed to figure out that set up just by the two of you without any professional engineering experience! Great work to you and your friend :)
Already, that picture of the unfinished body and metal legs already makes it look super spidery.
Looking forward to reading the next one!
Marie-Claude,
the assembly steps for legs is actually very clever, you can’t do it any better without using some machinery. :) You could spare some weight (and fiberglass dust) by using 2,5″ pipes for legs, wirh 1/8″ thickness they are strong enough to hold that spider body and you, I can assure you, I’m working in industry for 30 years.
And don’t worry, there will be always at least one who will point why you not wearing mask! lol
Arnie