Making of MKX Scorpion cosplay – PART 4
Making of MKX Scorpion costume – PART 4
The man behind the mask
I’ve been wanting to integrate new technologies into my costumes for a while and since 3D printing is everywhere these days, I was really looking forward to finding the appropriate project to use this technology.
Back in 2009, when I made my Frost cosplay, a friend of mine helped me sculpting the mask on a plaster bust of myself. (I had my head molded and casted a couple times in my life.) Then I made a simple plaster mold and a fiberglass cast. That was probably the very first fiberglass prop I made. (Now, when I look at Soda Pop Miniatures’ robot, I can’t believe it… That little fiberglass mask seems like it was made a century ago.) That was old school stuff! Today, 3D printing offers infinite opportunites and since it’s still a very slow and pretty expensive technology, it’s perfect for small pieces like a mask. And if you have an unlimited budget, well, lucky you, go ahead and print an entire armor! That’s what I would do if I could. :D
So 3D printing it would be. However, 3D printing means 3D modeling first, which is something I don’t know at all. (Hey, we can’t be good at everything.) I found someone to help me with that matter.
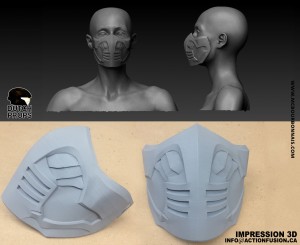
But first, I have to tell you something that may fall into the fantasy category for some of you. A couple years ago, I had my body 3D scanned. So I do have an actual 3D model of my own body. Perfect 3D replica of myself! Before some of you think about it, no, I won’t make that 3D model available online. I know too well what you guys do with those Daz models. ;) Just kidding. I found online a 3D modeler whose work I liked and contacted Dutch Props who became my collaborator for this project. I provided him my body’s scan so he could 3D model Scorpion’s mask directly over my own face.
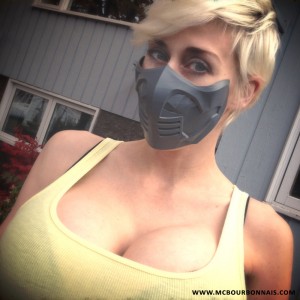
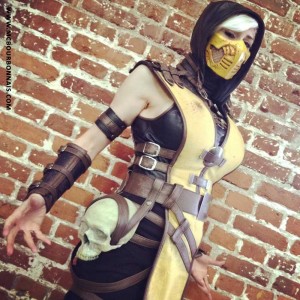
Dutch Props was very open to follow my directions and understood exactly what I wanted. He did an excellent job reproducing the original design and adapting it to my proportions. Once again, the challenge was to have a mask designed for a man’s face fitting a smaller, female face and Dutch Props nailed it.
You can see more of Dutch Props’ work here:
Instagram: @dutchprops
3D printing: let’s get excited!
I don’t have a 3D printer, but I wish I would. One day, I went to Division XP, my local airsoft store, to buy props for an upcoming cosplay and I learned that the owner also had a 3D printing company. A high hand 3D printing machine in a store half an hour from home! Things are rarely that easy to find in Quebec City! I was blessed by the Gods of Cosplay! Division XP was already my official airsoft provider, the second company, Action Fusion, would from now on be my partner for 3D printing. All owned by the same guy, thanks, Daniel. :) I was excited like a kid when I went to get my 3D printed mask. When I said that 3D printing is a slow technology, for those who’d be wondering, it took 20 hours to print my Scorpion mask. Cleaning the support material required to print the mask’s shape, a little sanding and I could try the mask on. The fit was perfect and Dutch Props’ design adaptation was spot on.
See the biggest airsoft shop in the province of Québec:
For info about 3D printing services: info@actionfusion.ca
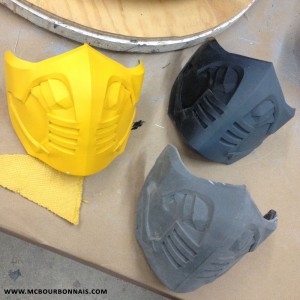
Many cosplayers use the 3D printed piece as their final piece. I prefered not to do so, for different reasons. First, the 3D printed mask remains fragile. Since it’s a thin piece, it could be broken. Each printed layer is a weakness if you force the piece. So I decided to mold the printed mask. Plus, as I would have a mold, I could easily make another cast if my mask was broken or lost. I made a silicone mold using Smooth-On Rebound 25, with a fiberglass shell for the mold. Then I made a couple fiberglass casts. I use a mix of polyester resin and auto body filler to make the print coat, the brush-on first coat that you put in the mold. That’s the coat that you will sand and finish to be painted. It’s easier to sand that mix of resin and body filler than sanding fiberglass alone. When you mix the polyester resin and the body filler, add both resin catalyst and body filler hardener. Working on various fiberglass projects, each time I had excess polyester resin mixed, I would use it to make a fiberglass cast of my mask. After a while, I already had a few copies.
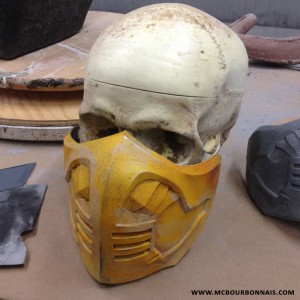
Buffing the excess fiberglass cloth around the mask, sanding the little imperfections and my mask was ready to be painted! Many types of paint will hold on fiberglass, from cheap acrylic paint to expensive automotive paint. I mixed different shades to match the yellow fabric’s color and used an airbrush to apply it. Since the back of my head is hidden by the costume’s hood, I could make the mask hold with a simple elastic. That’s what I had the time to do before leaving for Romania last October. The costume was brand new, made of clean fabric and shiny silver pieces. And that’s one of the 2 negative critics I got for this costume: it was too clean and Scorpion’s emblematic spears were missing. When I came back home after my trip to Romania, I distressed the costume, made it look used and dirty, put the silver pieces in acid and added ‘blood’ to the costume and mask. I also added the skull to the costume’s belt. And… the spears are still missing. I may have them 3D molded/printed. I think I’m getting lazy. ;) But overall, I have to say that I’m very satisfied with this costume, my tribute to Mortal Kombat X, that I even got to show to Ed Boon in person in a MKX competition in Burbank, in January 2016.
2 cow hides and one costume later…
Through the making of my Scorpion costume, I definitely learned a lot about leather techniques. It’s all in the details, and details really make the difference. It’s funny because the first thing you see, when you look at Scorpion’s costume, is a yellow garment and black pants. But I really needed a whole brown cow hide to make all the leather straps, belt and bias and almost a whole black cow hide to make the sleeveless top, hood, bracelets and other details. For me, Scorpion’s costume is a leather costume, even if it doesn’t look like one. There’s so much more to be said about this cosplay. I will certainly blog about other details eventually. It’s a pleasure for me to share the knowledge and techniques I have developed with ones who are interested. To the cosplayers and costumers among you, I hope you have learned something that you’ll be able to use for upcoming costumes. :)

Very interesting to read about the whole process. Thanks for sharing these!
Awesome! Very cool about getting 3D printing done! Looks amazing!
It was a pleasure reading how you got your whole costume done, Marie-Claude :)
Looks like 3D printing is going to be a big help for future props!
How was it wearing the mask? Looks like a great fit, but was it comfortable?
C’est tout simplement génial!
J’avais du respect pour ton travail de modeling, mais pour la création de costume c’est juste fou!
Je trouve ça vraiment génial que tu nous expliques les techniques utilisées et que tu transmettes ainsi ta passion pour la création.
Chaque nouvelle technique amène des défis et permet de découvrir autre chose.
En plus d’être belle, t’es bonne!
It’s awesome!