
Ninja Division Way of the Fighter Severina Cosplay Making Of – Part 3
I’m happy to finally talk about one of Severina’s costume pieces I think you’ll be very excited about: the magical staff!

I hired Texelion, a 3D modeler from France, to do this 3D model. (Bonjour à mes amis Français!) As you can see, the original chibi art doesn’t show that much details, so I had to find other reference images of dragons, scales and textures that I sent to Texelion to give him an idea of the interpretation I wanted for my life size scepter. I’m very satisfied with how it turned out! Texelion pays great attention to details and understood exactly what I had in mind! You can see more of his work on his DA: www.texelion.deviantart.com

What an incredible design! I was excited just to look at that picture of the 3D model! Next step was to have the piece printed. A little while ago, I bought my own 3D printer. (Ultimaker 2 Extended +) 3D printing is new to me, I’m just starting to integrate that technology to my cosplays. I choose to do this costume especially to practice 3D printing, molding, casting, sanding and painting techniques. A lot of things I’m not specialized in. I’ll do my best to explain what I’ve learned. In any case, it couldn’t be worst than building a 10 feet tall fiberglass robot!
Before you put your file in the printer, you have to see how you’ll cut your 3D model to make it fit the printer. Because the staff is as tall as I am and my printer isn’t obviously that tall! lol The Ultimaker 2 Extended + has a build volume of 223 x 223 x 305 mm. To give you an idea, the dragon head needed to be cut in 6 pieces and the staff itself, in 3 pieces. The file was cut using a 3D slicing software called Cura. Choosing where and how to cut your 3D model and in which position each piece will be printed is important because it will have an impact on the support material needed to print and the 3D printing texture in the different curves of the object. (We call ‘support’ some material that the printer will print around the 3D model just to allow the piece to hold, but this support will be removed after. Some 3D printer will print the support in the same material than the rest of the 3D piece while other printers are designed to use a different material to print the support. Some types of support disolve in water. Other have to be removed with pliers.) A word about the 3D printed texture, the distinctive lines or ridges that are the undeniable proof that your piece was 3D printed and not made in any other way. For example, if you print half a sphere, the flat surface facing the floor, the final layers or ridges on top of the sphere won’t look as good as the ridges around the sphere. It’s hard to explain in words. If you’re curious about 3D printing, but not familiar with it, I’d recommend you to watch videos online. Videos are easier to understand. :)
Speaking of the 3D printing texture, the main challenge, when you 3D print a prop, is to get rid of it. The type of 3D printer, the resolution of the original 3D model, the size of the nozzle, etc. will all influence the quality of the final printed piece. With my 3D printer, I can use 4 nozzle sizes: 0.25mm, 0.4mm, 0.6mm or 0.8mm. The 0.25mm nozzle will obviously give a better results, but it will take way longer to print. Since the staff is a pretty big piece, I decided to use the 0.8mm nozzle. To give you an idea, even with the bigger nozzle, it took more than a week, day and night, to print all the pieces of the staff.
I’m using PLA to print and I saw online a popular technique where people expose their PLA 3D printed piece to an acetone vapor bath to give it a smoother texture. However, I think that this technique also smooths some of the more suddle details of the piece, so I realized that, just like it’s the case for fiberglass, the secret for a smooth 3D printed piece would be sanding and patience. I’ll talk more about the sanding process later. For now, I want to show you the dragon scepter at a stage where it was already sanded a lot and painted with a coat of automotive high coverage primer, the same Omni products I used to paint the fiberglass robot and spider for Ninja Division. (You can see my Rachnera Making Of blog for references.)
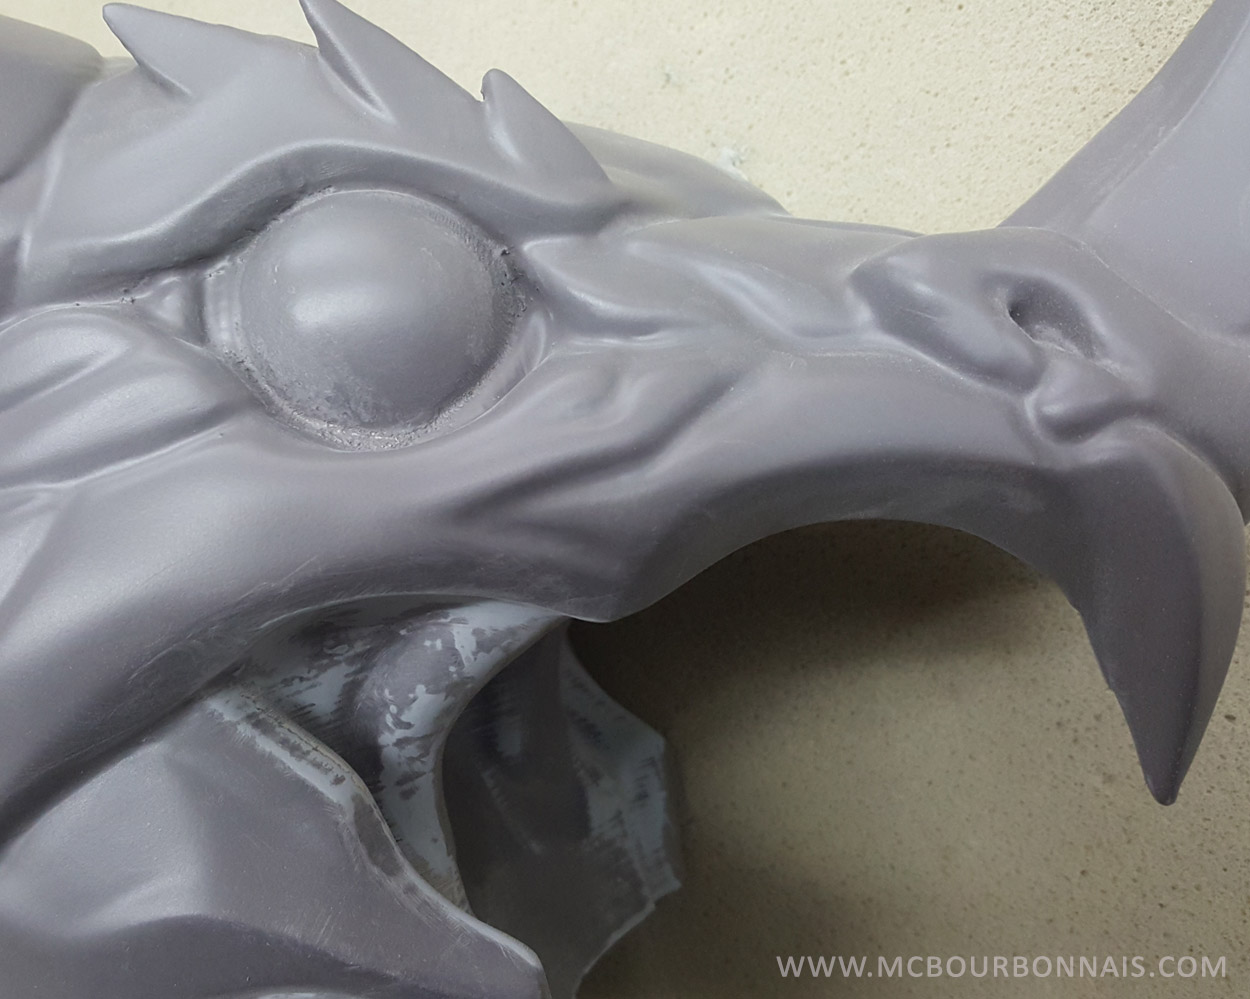
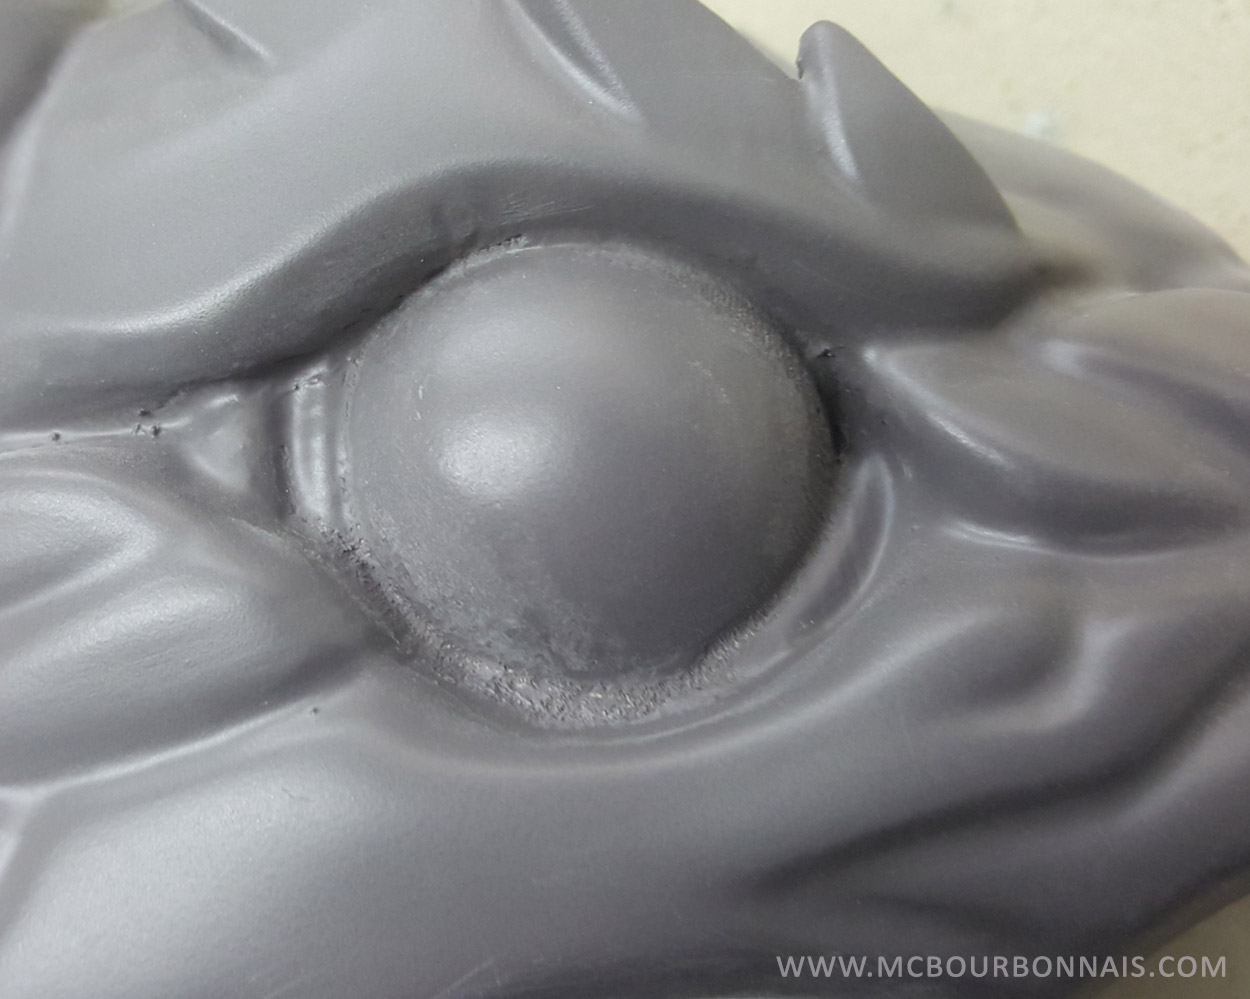
You can already see that most of the 3D printing texture doesn’t show anymore, but there’s still work to do on the details and smaller areas. Many hours of sanding were required to reach this level of smoothness. A vapor bath would have been faster, but I keep thinking it would have flatten down too much of the nice details Texelion had carefully 3D modeled. Here’s a closeup so you can see better what was done and what still has to be sanded.
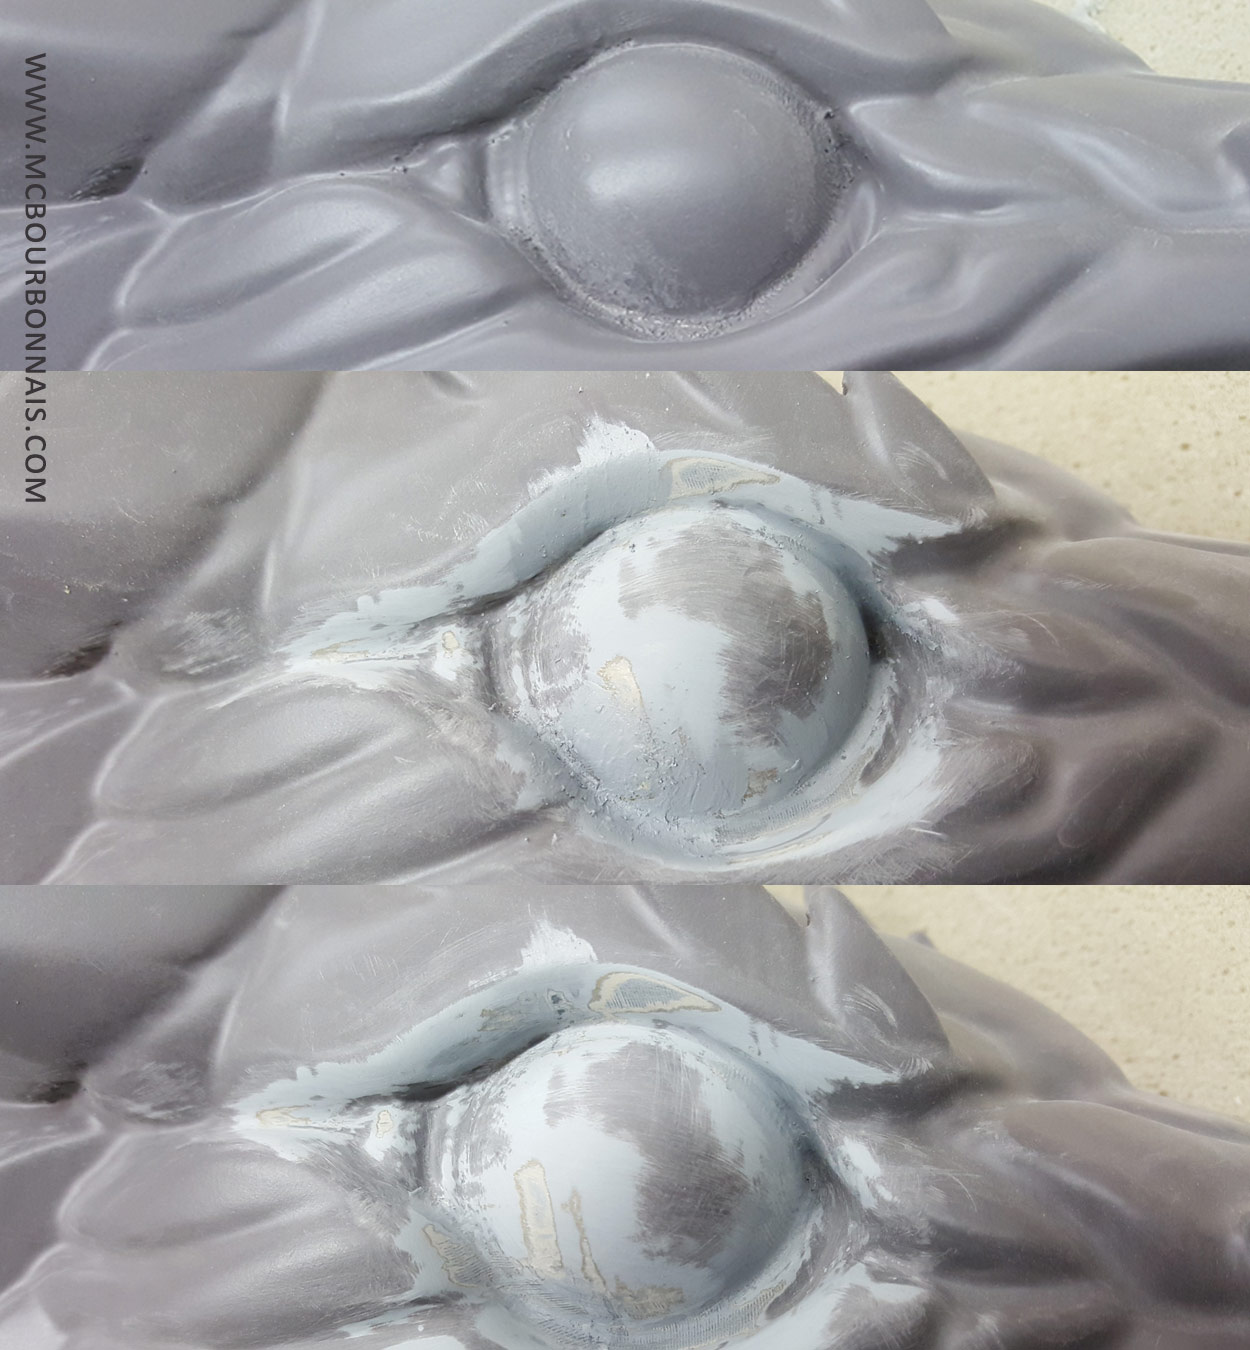
I found out that the Tamiya putty they use for miniatures works well on PLA. It’s fine enough to fill up the very small imperfections and 3D printing texture. To apply this putty, I’m using a rubber brush, I don’t know how else I could describe this tool. It’s literally a sharp piece of rubber on a paint brush tip. It’s sold as a sculpting tool, but it’s very efficient to apply putty.

I might not be the best at applying putty in these little corners. If you don’t evenly apply it, you just have more stuff to sand. But using very fine sanding paper grade and very fine files (and have I mentioned a lot of patience?) you can make miracles. Here’s a before/after pic so you can compare the details once they were corrected with the putty and sanded. Don’t hesitate to download the image in its full size to see better.
Yes, every little part of the huge magical dragon staff was sanded like this. Under each scale, eveywhere. I don’t calculate the hours I spent sending this prop. But I really wanted to get rid of all the typical 3D printed texture. When I was working on my Jesse Quick costume, which had a 3D printed helmet, I tried to sand 3D printed PLA with my small orbital sander. I realized that high speed sanding was heating the PLA, making it sticky and the sanding paper would then be useless. I had to find a way to sand PLA without heating it up. This is when I started water sanding the PLA pieces and it worked super well! They sell in my local hardware store this very fine sanding paper I had never used before. It’s made to be wet and to sand under the water. Yes, the sanding paper and the surface you’re sanding are wet… and it works! If water sanding is common for you, there’s nothing there that will surprise you, but I was personally surprised to learn that some wet sanding paper would still sand! lol And it turned out that it worked very well on PLA. With a lot of sanding, tiny files, Tamiya putty and lots of patience, I could make my dragon look the way I wanted it to look.
Here a larger view of the dragon staff so you can see how it looks from various angles.
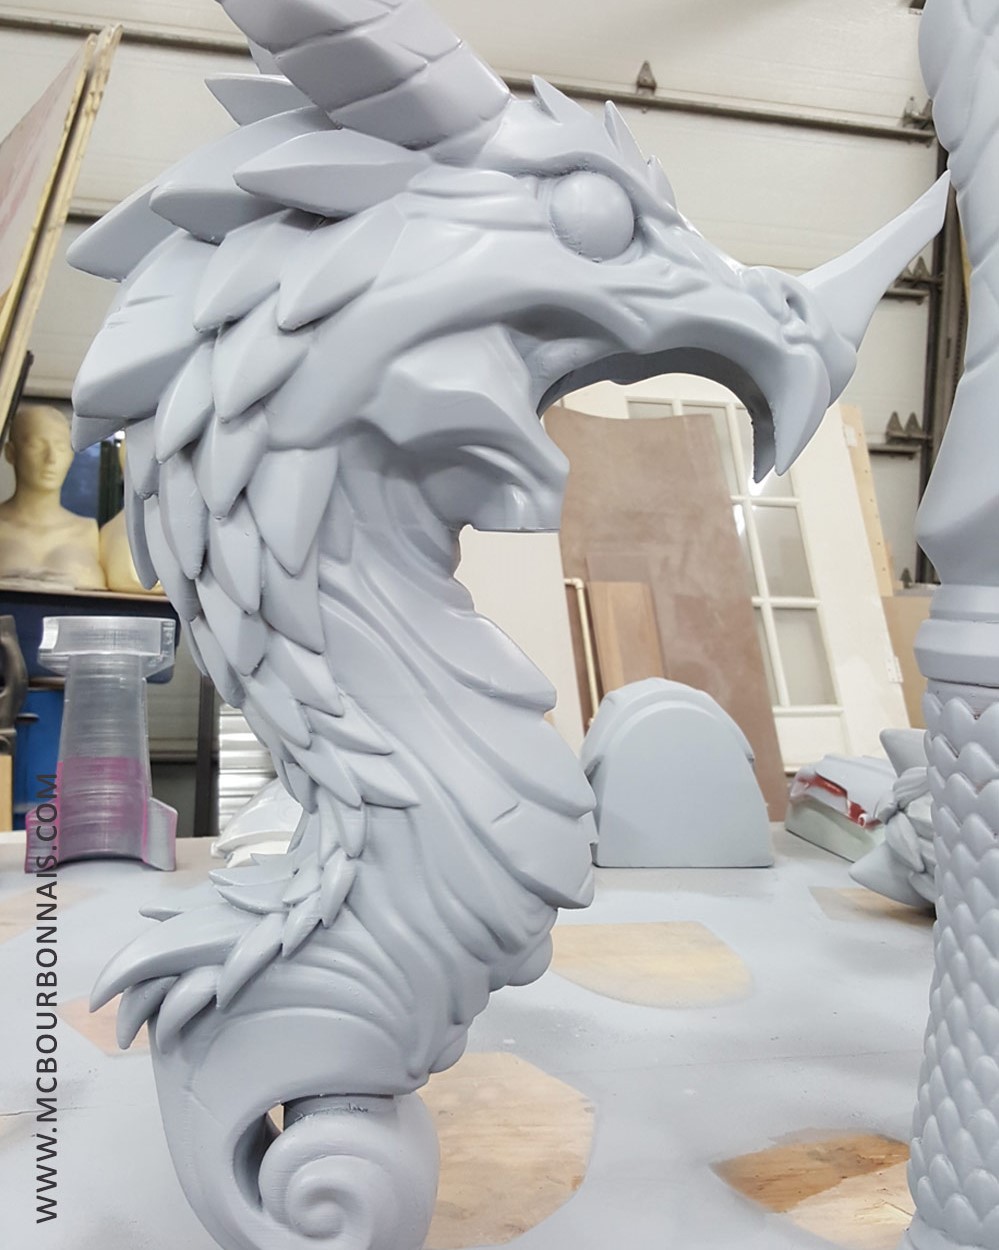
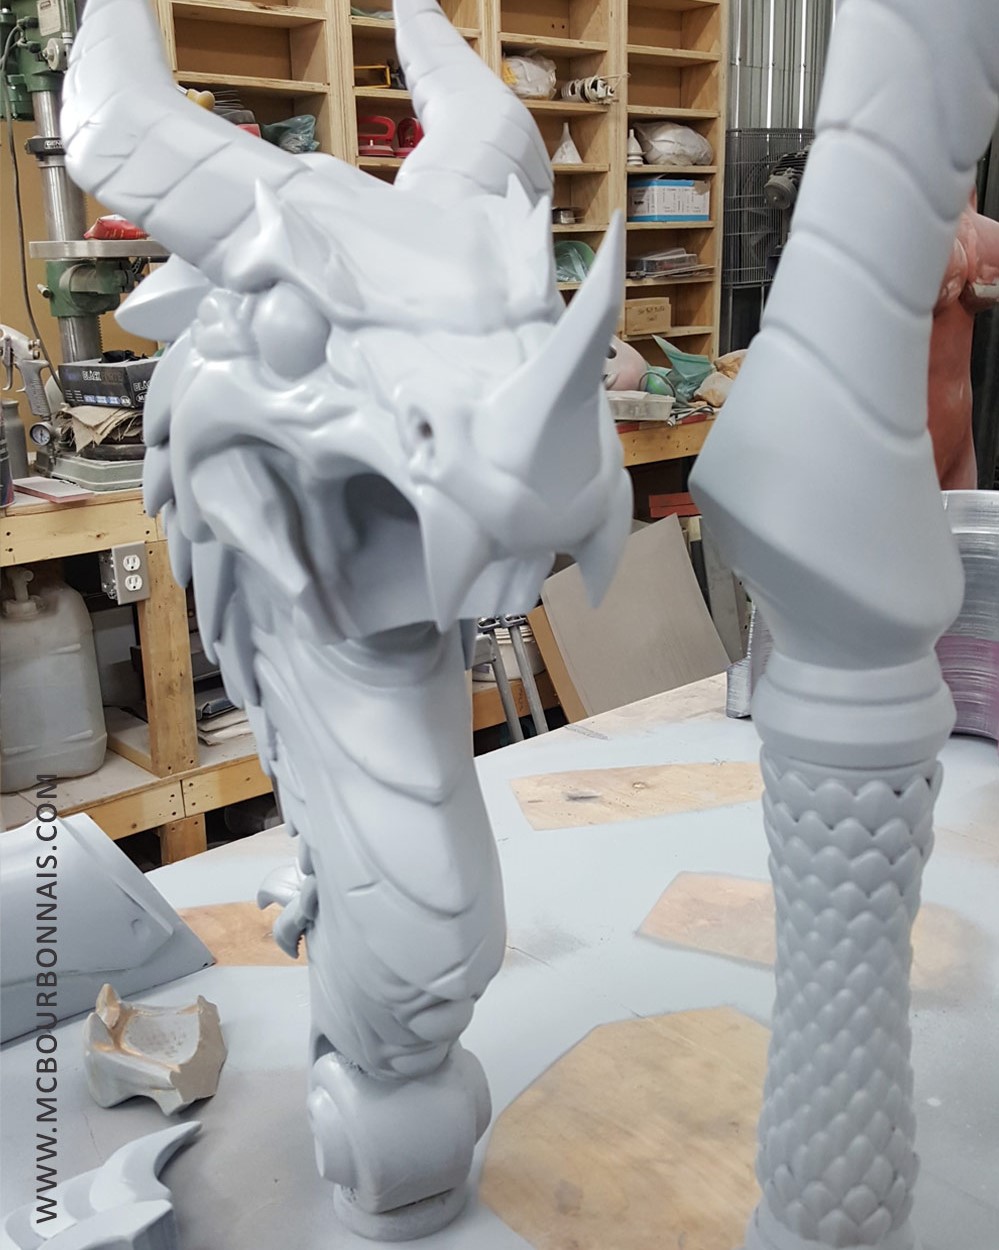
On this last picture, you can clearly see that some of the details, in the dragon’s scales and eyes, still needed some sanding. But there was already a lot of work done.

I’ll post pics of the finished magical staff later! More work in progress pics to come! Hope you enjoyed my 3D printing/sanding adventures! lol
Comments are closed.